Motion Paths in WPF 4 using Expression Blend 4
原文 Motion Paths in WPF 4 using Expression Blend 4
The PathListBox control is a new addition to the Expression Blend 4 SDK, and allows the elements inside a ListBox to lay out along any Path control shape. In this article, we will see how to align some objects to a given path using the ‘PathListBox’ control in WPF 4.0 and Expression Blend 4. We will also see how to animate these objects using Visual states in WPF. To use Visual States, you will need some basic knowledge of Behaviors. Read my previous article Silverlight 4: Introduction to Behaviors to learn more.
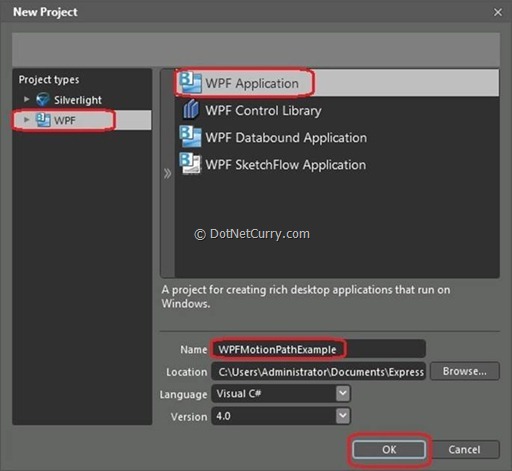
So let’s start by creating a WPF application using Microsoft Expression Blend 4.0 and call this application as ‘WPFMotionPathExample’:
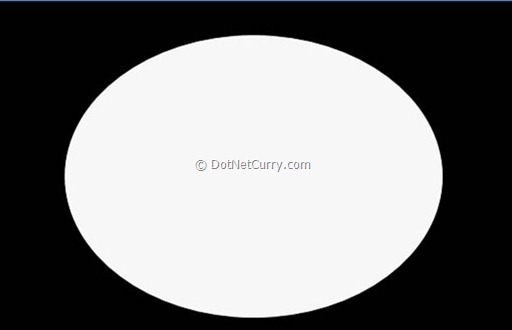
Once the WPF application is created, change its ‘Height’ and ‘Width’ to ‘500’ and ‘600’ respectively. Change the background color of the ‘Grid’ layout to ‘Black’.
Now draw an ‘Ellipse’ on the art board as shown below – (I am using a height of 300 and width of 400 for the ellipse control).
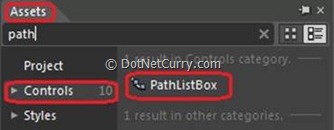
After drawing the ellipse on the art board, go to the ‘Assets’ window in the controls section and add a control ‘PathListBox’ on the ‘MainWindow’ as shown below:
After selecting the ‘PathListBox’ control, go to the Properties window and find a section ‘Layout Paths’ as shown below :

Now drag the ‘Circle’ (Select an object to use as a LayoutPath) highlighted by a yellow color square (as shown in the above diagram) over the ‘Ellipse’ and click on the ‘Ellipse’. Now if you check your ‘Layout Paths’ section in the properties window, you will see your ellipse got added as a layout path, as shown below:

Now to align the objects around the layout path which is an ‘Ellipse’, we need to add objects on our WPF form. This can be done in multiple ways. You can draw an object from ‘Asset’ window and align it to our path or you can add sample data and align it to our path and you can also align a ‘Text’ to our path.
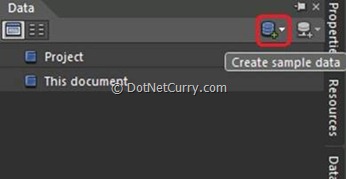
For the first demonstration, we will use sample data which will hold collection of images to be aligned to our layout path. To add the sample data, let’s open the ‘Data’ window from the Windows menu.
Now click on ‘Create Sample Data’ as shown below:
This will ask you to create –
1) New sample data.
2) Import Sample Data from XML.
3) Create sample data from class.
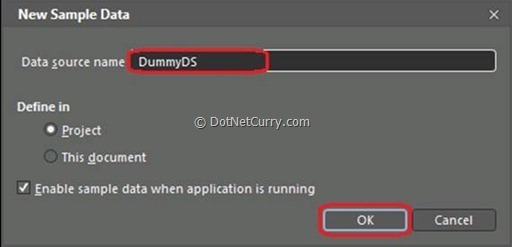
Let’s click the option ‘New Sample Data’. This will create a collection with two properties. We can either change the data type or can add/remove the properties. You will see a dialog which will ask you the scope of the ‘New Sample Data’. Keep the default settings ‘as-is’ and give a name to our new sample data as ‘DummyDS’ as shown below:
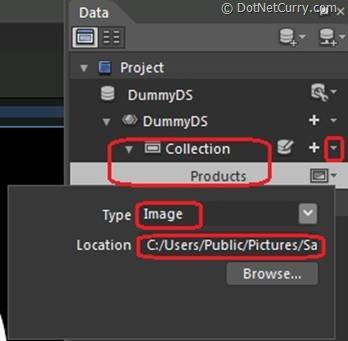
Click the ‘OK’ button. Now from the ‘Collection,’ right click ‘Property2’ and click ‘Remove Property2’. Rename ‘Property1’ as ‘Products’ and change its data type to ‘Image’. You will be asked to browse the folder where all the images are located. Browse the folder as shown below:
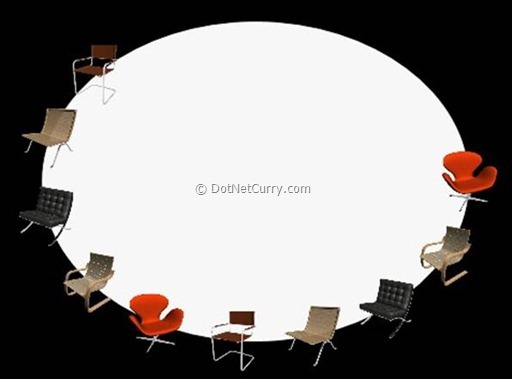
Now select ‘PathListBox’ and drag and drop ‘Collection’ on the ‘PathListBox’ from the ‘Data’ window. Now if you observe your Ellipse, you will see all the ‘Product’ images aligned to our ‘Ellipse Path’ as shown below:
Now let’s create some ‘Visual States’ for our demonstration and handle those states using the behaviors in WPF 4.0.
To add the states into our WPF application, we need to open a ‘States’ window from ‘Windows’ menu. Once you open a State window, let’s click on ‘Add State Group’ as shown below:
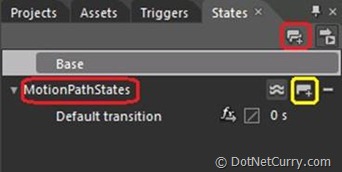
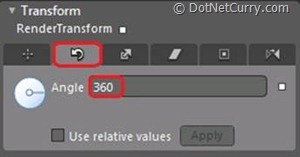
Rename your state group as ‘MotionPathStates’ as shown above. Now click an icon highlighted in yellow called ‘Add State’. Rename this state as ‘MouseOverState’. For this ‘MouseOverState’ visual state, we will rotate our products by 360 degree.
To do so, select ‘PathListBox’ > Go to properties window > Select ‘Transform’ section > In the ‘Render Transform’ group, select ‘Rotate’ group and make its ‘Angle’ property value 360 as shown below:
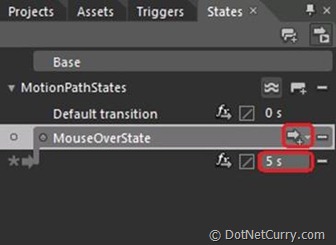
Now let’s get back to our ‘State’ window and add a transition to our ‘MouseOverState’ and change its duration to 5 seconds as shown below:
Now we are done with the Visual State. Let’s handle this visual state using a mouse event. For handling visual states in WPF 4.0 or Silverlight 4.0, we have a very nice feature called ‘Behaviors’. Read my previous article Silverlight 4: Introduction to Behaviors to learn more.
Now let’s handle our states using WPF 4.0 ‘Behavior’.
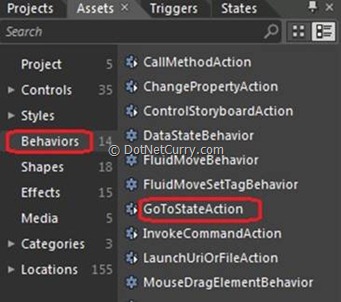
For this demonstration, we will add a behavior ‘GoToStateAction’ to our ‘Ellipse’ and handle the state on ‘Mouse Enter’ event of the ‘Ellipse’. To add the behavior, let’s go to the ‘Asset’ window. From the ‘Behaviors’ group, drag and drop the behavior ‘GoToStateAction’ on the Ellipse as shown below:
Once you are done with this step, now go to your properties window and change the properties of the behavior as shown below :
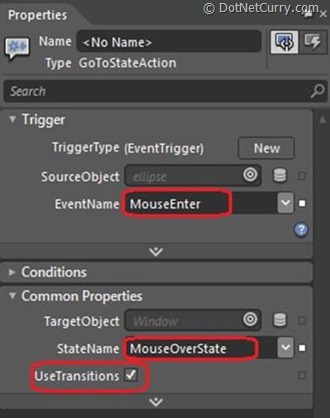
As shown above, change the ‘Event Name’ property to ‘MouseEnter’ and ‘State name’ property to ‘MouseOverState’. Now save your application and press ‘F5’. You will see that when you move your mouse into the Ellipse, the animation starts.
I have shown you a simple demo of Visual state. You can create multiple Visual States and handle them on different events of Ellipse by simply using ‘GoToStateAction’ behavior.
Conclusion - In this article, we saw how to use ‘PathListBox’ control to align objects on a given path in WPF 4.0, by using Microsoft Expression Blend 4.0. Similarly, we can also have multiple layout paths on which we can align our objects as per our requirements. In the next article, I will demonstrate how to align text on a given path using Silverlight 4 and Expression Blend 4.
The entire source code of this article can be downloaded over here
Motion Paths in WPF 4 using Expression Blend 4的更多相关文章
- WPF和Expression Blend开发实例:一个样式实现的数字输入框
原文:WPF和Expression Blend开发实例:一个样式实现的数字输入框 今天来一个比较奇淫技巧的手法,很少人用,同时也不推荐太过频繁的使用. 先上样式: <Style x:Key=&q ...
- WPF和Expression Blend开发实例:模拟QQ登陆界面打开和关闭特效
不管在消费者的心中腾讯是一个怎么样的模仿者抄袭者的形象,但是腾讯在软件交互上的设计一直是一流的.正如某位已故的知名产品经理所说的:设计并非外观怎样,感觉如何.设计的是产品的工作原理.我觉得腾讯掌握了其 ...
- Expression Blend创建自定义按钮
在 Expression Blend 中,我们可以在美工板上绘制形状.路径和控件,然后修改其外观和行为,从而直观地设计应用程序.Button按钮也是Expression Blend最常用的控件之一,在 ...
- Expression Blend制作自定义按钮(转)
来源:http://www.cnblogs.com/iChina/archive/2011/11/25/2262854.html Expression Blend制作自定义按钮 1.从Blend工具箱 ...
- 【翻译】用 Expression Blend 创建酷炫的 Button
原文:Creating “Cool” Buttons with Expression Blend Author: Alex 在本文中,我们将考虑在Expression Blend用几种方法来创建酷炫的 ...
- Expression Blend实例中文教程(9) - 行为快速入门Behaviors
在Blend强大的设计功能支持下,设计人员和开发人员可以无代码实现Silverlight/WPF动画效果,例如上文介绍的StoryBoard,就是一个典型例子,设计人员和开发人员仅需提供必要元素,即可 ...
- Expression Blend实例中文教程(1) - 开篇
随着计算机软件开发分工细节化,微软对已有的产品线进行了调整,在保持原有经典开发工具Visual Studio基础上,又推出了一套新的设计开发工具系列,Expression Studio. Expres ...
- Expression Blend实例中文教程系列
Expression Blend实例中文教程系列 本系列文章均转载:银光中国 时间:2010-04-09 09:20责任编辑:银光中国网 点击:次 Expression Blend实例中文教程系列由C ...
- 用 Expression Blend 创建酷炫的 Button
原文:用 Expression Blend 创建酷炫的 Button 原文:Creating "Cool" Buttons with Expression Blend Author ...
随机推荐
- 【u006】海战
Time Limit: 1 second Memory Limit: 128 MB [问题描述] 在峰会期间,武装部队得处于高度戒备.警察将监视每一条大街,军队将保卫建筑物,领空将布满了F-2003飞 ...
- 【codeforces 757A】Gotta Catch Em' All!
time limit per test1 second memory limit per test256 megabytes inputstandard input outputstandard ou ...
- .net core 微服务之Api网关(Api Gateway)
原文:.net core 微服务之Api网关(Api Gateway) 微服务网关目录 1. 微服务引子 2.使用Nginx作为api网关 3.自创api网关(重复轮子) 3.1.构建初始化 3.2. ...
- [Flow] The Fundamentals of Flow
Install: yarn global add flow-typed /*get type defination*/ yarn add flow-bin -D For example you hav ...
- Sublime Text3的react代码校验插件
之前写前端一直用的是jshint做语法检查,但jshint不支持JSX语法,为了在React使用,需要用eslint代替它.六月份的时候为了写React Native,编辑器换过Webstorm和VS ...
- 【21.28%】【codeforces 707D】Persistent Bookcase
time limit per test2 seconds memory limit per test512 megabytes inputstandard input outputstandard o ...
- VS版本 与 .NET版本以及C#版本之间的关系
版本 .NET Framework版本 Visual Studio版本 发布日期 特性 C# 1.0 .NET Framework 1.0 Visual Studio .NET 2002 2002.1 ...
- Delphi Base64编码/解码及ZLib压缩/解压
最近在写的程序与SOAP相关,所以用到了一些Base64编码/解码及数据压缩/解压方面的知识. 在这里来作一些总结: 一.Base64编码/解码 一般用到的是Delphi自带的单元EncdDe ...
- QList介绍(QList比QVector更快,这是由它们在内存中的存储方式决定的。QStringList是在QList的基础上针对字符串提供额外的函数。at()操作比操作符[]更快,因为它不需要深度复制)非常实用
FROM:http://apps.hi.baidu.com/share/detail/33517814 今天做项目时,需要用到QList来存储一组点.为此,我对QList类的说明进行了如下翻译. QL ...
- 在IIS上部署.net core的webapi项目 以及502.5错误的两种解决方法
首先要在服务器上面安装.net core https://github.com/dotnet/core/tree/master/release-notes/download-archives 这里面有 ...