机器学习: DeepDreaming with TensorFlow (一)
在TensorFlow 的官网上,有一个很有趣的教程,就是用 TensorFlow 以及训练好的深度卷积神经(GoogleNet)网络去生成一些有趣的pattern,通过这些pattern,可以更加深入的去了解神经网络到底学到了什么, 这个教程有四个主要部分:
1:简单的单通道纹理pattern的生成;
2:利用tiled computation 生成高分辨率图像;
3:利用 Laplacian Pyramid Gradient Normalization 生成各种有趣的视觉效果;
4:生成类似 Deepdream的图像;
这个教程还提供了一个生成pattern的图像库,
http://storage.googleapis.com/deepdream/visualz/tensorflow_inception/index.html
在这个库里,可以看到神经网络每一层上生成的pattern。
在学习这个教程之前,请确保你已经安装好了Tensorflow 以及 Jupyter.
这个教程里的所有pattern都是基于训练好的Googlenet 生成的,Googlenet 网络先在 ImageNet 上进行了足够的训练。
先看第一部分:
简单的单通道纹理pattern的生成
# boilerplate code

from __future__ import print_function

import os

from io import BytesIO

import numpy as np

from functools import partial

import PIL.Image

from IPython.display import clear_output, Image, display, HTML

import tensorflow as tf

# 运行以下这句代码将训练好的网络模型下载解压到本地:

!wget https://storage.googleapis.com/download.tensorflow.org/models/inception5h.zip && unzip inception5h.zip

model_fn = 'tensorflow_inception_graph.pb'

# creating TensorFlow session and loading the model

# 加载模型

graph = tf.Graph()

sess = tf.InteractiveSession(graph=graph)

with tf.gfile.FastGFile(model_fn, 'rb') as f:

    graph_def = tf.GraphDef()

    graph_def.ParseFromString(f.read())

t_input = tf.placeholder(np.float32, name='input') # define the input tensor

imagenet_mean = 117.0

t_preprocessed = tf.expand_dims(t_input-imagenet_mean, 0)

tf.import_graph_def(graph_def, {'input':t_preprocessed})

# 获取网络的层数以及总的通道数

layers = [op.name for op in graph.get_operations() if op.type=='Conv2D' and 'import/' in op.name]

feature_nums = [int(graph.get_tensor_by_name(name+':0').get_shape()[-1]) for name in layers]

print('Number of layers', len(layers))

print('Total number of feature channels:', sum(feature_nums))

# Picking some internal layer. Note that we use outputs before applying the ReLU nonlinearity

# to have non-zero gradients for features with negative initial activations.

# 选择某些中间层,以及某个通道

layer = 'mixed4d_3x3_bottleneck_pre_relu'

channel = 139 # picking some feature channel to visualize

# start with a gray image with a little noise

# 先生成一个噪声图像

img_noise = np.random.uniform(size=(224,224,3)) + 100.0

def showarray(a, fmt='jpeg'):

    a = np.uint8(np.clip(a, 0, 1)*255)

    f = BytesIO()

    PIL.Image.fromarray(a).save(f, fmt)

    display(Image(data=f.getvalue()))

def visstd(a, s=0.1):

    # Normalize the image range for visualization

    return (a-a.mean())/max(a.std(), 1e-4)*s + 0.5

def T(layer):

    # Helper for getting layer output tensor

    return graph.get_tensor_by_name("import/%s:0"%layer)

def render_naive(t_obj, img0=img_noise, iter_n=20, step=1.0):

    t_score = tf.reduce_mean(t_obj) # defining the optimization objective

    t_grad = tf.gradients(t_score, t_input)[0] # behold the power of automatic differentiation!

    img = img0.copy()

    for i in range(iter_n):

        g, score = sess.run([t_grad, t_score], {t_input:img})

        # normalizing the gradient, so the same step size should work

        g /= g.std()+1e-8         # for different layers and networks

        img += g*step

        print(score, end = ' ')

    clear_output()

    showarray(visstd(img))

render_naive(T(layer)[:,:,:,channel])
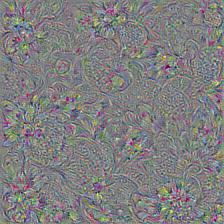
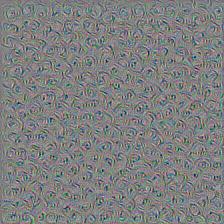
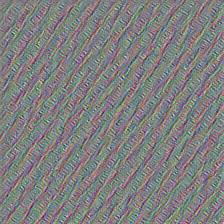
我们看看生成的效果图:
layer = ‘mixed4d_3x3_bottleneck_pre_relu’ channel = 139
layer = ‘mixed3b_3x3_bottleneck_pre_relu’ channel =10
layer = ‘mixed3a_3x3_bottleneck_pre_relu’ channel =20
机器学习: DeepDreaming with TensorFlow (一)的更多相关文章
- Google机器学习课程基于TensorFlow : https://developers.google.cn/machine-learning/crash-course
Google机器学习课程基于TensorFlow : https://developers.google.cn/machine-learning/crash-course https ...
- 机器学习:DeepDreaming with TensorFlow (三)
我们看到,利用TensorFlow 和训练好的Googlenet 可以生成多尺度的pattern,那些pattern看起来比起单一通道的pattern你要更好,但是有一个问题就是多尺度的pattern ...
- 机器学习:DeepDreaming with TensorFlow (二)
在前面一篇博客里,我们介绍了利用TensorFlow 和训练好的 Googlenet 来生成简单的单一通道的pattern,接下来,我们要进一步生成更为有趣的一些pattern,之前的简单的patte ...
- ML.NET 发布0.11版本:.NET中的机器学习,为TensorFlow和ONNX添加了新功能
微软发布了其最新版本的机器学习框架:ML.NET 0.11带来了新功能和突破性变化. 新版本的机器学习开源框架为TensorFlow和ONNX添加了新功能,但也包括一些重大变化, 这也是发布RC版本之 ...
- 初入机器学习,安装tensorflow包等问题总结
学习python,机器学习(maching-lerning).深度学习(deep-learning)等概念也是耳熟能详.我最近从新手开始学习maching-learning知识,不过课程偏向基本的理论 ...
- 人工智能新手入门学习路线和学习资源合集(含AI综述/python/机器学习/深度学习/tensorflow)
[说在前面]本人博客新手一枚,象牙塔的老白,职业场的小白.以下内容仅为个人见解,欢迎批评指正,不喜勿喷![握手][握手] 1. 分享个人对于人工智能领域的算法综述:如果你想开始学习算法,不妨先了解人工 ...
- TensorFlow机器学习实战指南之第一章
TensorFlow基础 一.TensorFlow算法的一般流程 1.导入/生成样本数据集 2.转换和归一化数据:一般来讲,输入样本数据集并不符合TensorFlow期望的形状,所以需要转换数据格式以 ...
- 学习tensorflow之mac上安装tensorflow
背景 听说谷歌的第二代机器学习的框架tensorflow开源了,我也心血来潮去探探大牛的产品.怎奈安装就折腾了一天,现在整理出来备忘. tensorflow官方网站给出的安装步骤很简单: # Only ...
- Tensorflow学习笔记1:Get Started
关于Tensorflow的基本介绍 Tensorflow是一个基于图的计算系统,其主要应用于机器学习. 从Tensorflow名字的字面意思可以拆分成两部分来理解:Tensor+flow. Tenso ...
随机推荐
- 在云平台上基于Go语言+Google图表API提供二维码生成应用
二维码能够说已经深深的融入了我们的生活其中.到处可见它的身影:但通常我们都是去扫二维码, 曾经我们分享给朋友一个网址直接把Url发过去,如今我们能够把自己的信息生成二维码再分享给他人. 这里就分享一下 ...
- ios开发之坐标系转换
1:坐标系转换最核心的问题就是:比较两个坐标是否包含,或者是重叠等,最主要的问题是先将两个坐标转换到同一个坐标系下再去比较.第一步先确定矩形框在某个view坐标系下的frame(该矩形框是以该view ...
- 微信开发学习日记(七):开源微商城wemall
最近嘛,不是在调研PHP和微信的行情么. 发现,微商城是非常火爆的一个领域,既然业务有搞头,那么技术这一块也有很多选择. 网上发现了wemall这个开源的PHP实现的微商城. 下载了开源版本,PHP后 ...
- js如何使用正则表达式验证电话号码(可选区号)和邮箱?(分步骤)
js如何使用正则表达式验证电话号码(可选区号)和邮箱?(分步骤) 一.总结 js进阶正则表达式16电话号码和邮箱正则(分类解决邮箱验证)(分组加?解决电话号码区号选择问题)([\w\.-]中括号解决邮 ...
- 使用JSONP解决跨域问题-代码示例
前段时间用JSONP解决了跨域问题,现在不用了,把代码思路记下来,今后说不定还用得上. JS代码 //查询公告数据 function recentpost(){ $.getJSON(cmsUrl+&q ...
- Android与IOS的UUID的区别
UUID含义是通用唯一识别码 (Universally Unique Identifier),这 是一个软件建构的标准,也是被开源软件基金会 (Open Software Foundation, OS ...
- php实现 明明的随机数
php实现 明明的随机数 一.总结 一句话总结: 1.asort是干嘛的? asort — 对数组进行排序并保持索引关系 2.从控制台取数据怎么取? trim(fgets(STDIN)) 3.多组测试 ...
- asp.net core2.1 部署centos7/linux系统 -- 安装部署(一)
原文:asp.net core2.1 部署centos7/linux系统 -- 安装部署(一) 1.安装dotnet sdk(添加产品秘钥与yum源) 添加yum源:sudo rpm -Uvh htt ...
- Oracle中的sid与servicename
在平时自己创建库的时候,习惯的将sid与servicename取同名,但是在实际生产中这两个名字很有可能不一致,再使用jdbc连接数据库的url时就需要注意区分了,否则创建不了数据库连接 //serv ...
- BZOJ1415 聪聪与可可 - 期望dp
传送门 题目大意: 一张无向图上有一只猫和一只老鼠,猫先走,鼠后走.猫每次会向与其相邻的并且距离老鼠最近的点移动(若距离相等去编号较小的),如果移动一步后还没吃到老鼠,还可以再移动一步(算在一个时间内 ...