C#笔记(1)窗体
1. 隐藏TabPage
在使用TabControl控件时,希望隐藏其中某个选项卡(即TabPage)。设置该TabPage的父容器为null 即可,如TabPage.Parent = null 。如需显示该TabPage,设置其父容器为对应的TabControl即可;
using System;
using System.Collections.Generic;
using System.ComponentModel;
using System.Data;
using System.Drawing;
using System.Linq;
using System.Text;
using System.Threading.Tasks;
using System.Windows.Forms; namespace WinFormsApp1
{
public partial class Form1 : Form
{
public Form1()
{
InitializeComponent();
}
private void Form1_Load(object sender, EventArgs e)
{
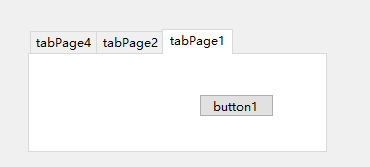
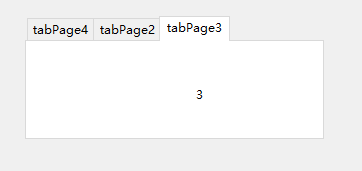
tabPage3.Parent = null;//使tabPage3不可见 }
private void button1_Click(object sender, EventArgs e)
{
tabPage3.Parent = tabControl2;//使tabPage3可见
tabPage1.Parent = null;//使tabPage1不可见
tabControl2.SelectedTab = tabPage3;//停留在tabPage3
} }
}
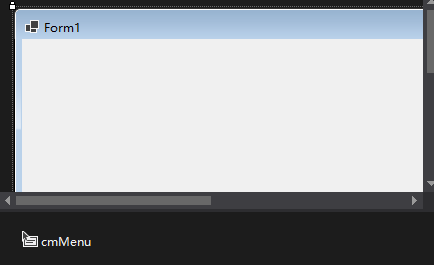
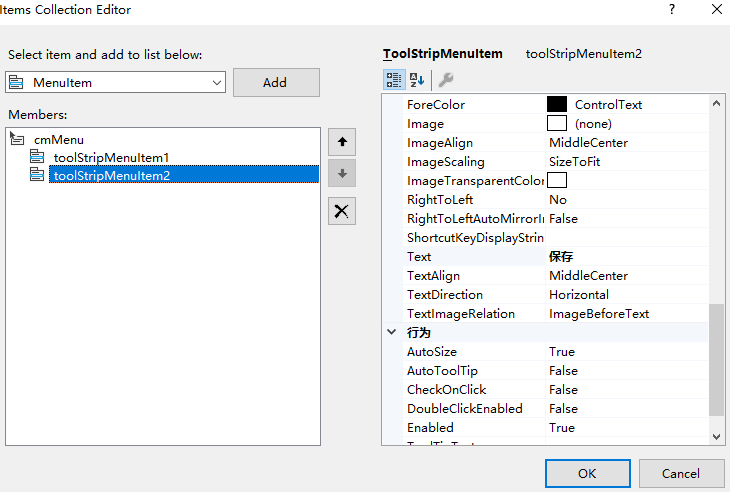
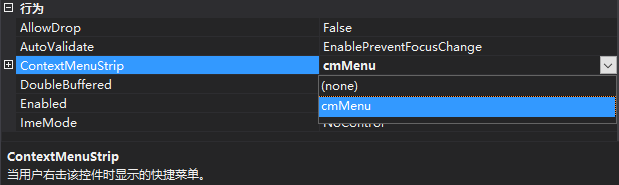
2. 鼠标右键菜单
1) 把ContextMenuStrip控件拖放到设计界面上(此处命名为cmMenu)。
2)右键cmMenu,点击Edit Items,添加菜单项,比如添加“打开”,“保存”等
3) 将想绑定控件(此处为Form)的ContextMenuStrip属性设置为设计的ContextMenuStrip(即cmMenu)。
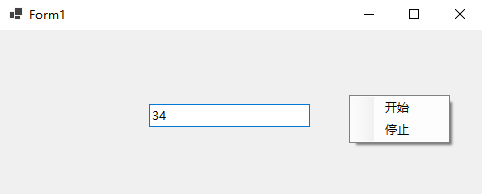
运行:

3. 定时器
示例:用定时器每隔1s刷新数组,数字每次+1
代码:
using System;

using System.Collections.Generic;

using System.ComponentModel;

using System.Data;

using System.Drawing;

using System.Linq;

using System.Text;

using System.Threading.Tasks;

using System.Windows.Forms;

namespace WinFormsApp1

{

    public partial class Form1 : Form

    {

        public Form1()

        {

            InitializeComponent();

        }

        public int number = 0;

        System.Timers.Timer timer;

        private void Form1_Load(object sender, EventArgs e)

        {

            timer = new System.Timers.Timer(1000);

            timer.Elapsed += new System.Timers.ElapsedEventHandler(changeNumber);

            timer.AutoReset = true;//AutoReset属性设置是否重复计时(设置为false只执行一次,设置为true可以多次执行)

            timer.Enabled = false;

        }

        private void changeNumber(object obj, EventArgs e)

        {

            number++;

            this.Invoke(new Action(delegate { this.textBox1.Text = number.ToString(); }));

        }

        private void toolStripMenuItem1_click(object sender, EventArgs e)

        {

            timer.Start();

        }

        private void toolStripMenuItem2_click(object sender, EventArgs e)

        {

            timer.Stop();

        }

    }

}
namespace WinFormsApp1

{

    partial class Form1

    {

        /// <summary>

        ///  Required designer variable.

        /// </summary>

        private System.ComponentModel.IContainer components = null;

        /// <summary>

        ///  Clean up any resources being used.

        /// </summary>

        /// <param name="disposing">true if managed resources should be disposed; otherwise, false.</param>

        protected override void Dispose(bool disposing)

        {

            if (disposing && (components != null))

            {

                components.Dispose();

            }

            base.Dispose(disposing);

        }

        #region Windows Form Designer generated code

        /// <summary>

        ///  Required method for Designer support - do not modify

        ///  the contents of this method with the code editor.

        /// </summary>

        private void InitializeComponent()

        {

            this.components = new System.ComponentModel.Container();

            this.cmMenu = new System.Windows.Forms.ContextMenuStrip(this.components);

            this.toolStripMenuItem1 = new System.Windows.Forms.ToolStripMenuItem();

            this.toolStripMenuItem2 = new System.Windows.Forms.ToolStripMenuItem();

            this.textBox1 = new System.Windows.Forms.TextBox();

            this.cmMenu.SuspendLayout();

            this.SuspendLayout();

            //

            // cmMenu

            //

            this.cmMenu.Items.AddRange(new System.Windows.Forms.ToolStripItem[] {

            this.toolStripMenuItem1,

            this.toolStripMenuItem2});

            this.cmMenu.Name = "contextMenuStrip1";

            this.cmMenu.Size = new System.Drawing.Size(101, 48);

            //

            // toolStripMenuItem1

            //

            this.toolStripMenuItem1.Name = "toolStripMenuItem1";

            this.toolStripMenuItem1.Size = new System.Drawing.Size(100, 22);

            this.toolStripMenuItem1.Text = "开始";

            this.toolStripMenuItem1.Click += new System.EventHandler(this.toolStripMenuItem1_click);

            //

            // toolStripMenuItem2

            //

            this.toolStripMenuItem2.Name = "toolStripMenuItem2";

            this.toolStripMenuItem2.Size = new System.Drawing.Size(100, 22);

            this.toolStripMenuItem2.Text = "停止";

            this.toolStripMenuItem2.Click += new System.EventHandler(this.toolStripMenuItem2_click);

            //

            // textBox1

            //

            this.textBox1.Location = new System.Drawing.Point(149, 74);

            this.textBox1.Name = "textBox1";

            this.textBox1.Size = new System.Drawing.Size(161, 23);

            this.textBox1.TabIndex = 1;

            //

            // Form1

            //

            this.AutoScaleDimensions = new System.Drawing.SizeF(7F, 17F);

            this.AutoScaleMode = System.Windows.Forms.AutoScaleMode.Font;

            this.ClientSize = new System.Drawing.Size(800, 450);

            this.ContextMenuStrip = this.cmMenu;

            this.Controls.Add(this.textBox1);

            this.Name = "Form1";

            this.Text = "Form1";

            this.Load += new System.EventHandler(this.Form1_Load);

            this.cmMenu.ResumeLayout(false);

            this.ResumeLayout(false);

            this.PerformLayout();

        }

        #endregion

        private System.Windows.Forms.ContextMenuStrip cmMenu;

        private System.Windows.Forms.ToolStripMenuItem toolStripMenuItem1;

        private System.Windows.Forms.ToolStripMenuItem toolStripMenuItem2;

        private System.Windows.Forms.TextBox textBox1;

    }

}
C#笔记(1)窗体的更多相关文章
- C#学习笔记-Windows窗体自定义初始位置
根据屏幕大小定义初始位置: (这个不是难,但是最近常常忘记,记着方便查看.) //获取当前屏幕的长和宽 int ScreenX = Screen.PrimaryScreen.Bounds.Width; ...
- C#学习笔记-Windows窗体基本功能(Login登录界面)
本菜鸟由于实习工作的原因,不得不快速接触C#语言,刚刚好又要做毕业设计,所以就通过自学的方式一举两得地完成这两件事情. 故此文字记录或代码中的各种文件名之类均是以毕业设计为模版记录的,看着不方便之处请 ...
- C#学习笔记——MDI窗体(多文档界面)
1.设置父窗体: 如果要将某个窗体设置为父窗体,只需将该窗体的IsMdiContainer属性设置为True即可. 2.设置子窗体: 通过设为某个窗体的MdiParent属性来确定该窗体是那个窗体的子 ...
- JAVA笔记__窗体类/Panel类/Toolkit类
/** * 窗体类 */ public class Main { public static void main(String[] args) { MyFrame m1 = new MyFrame() ...
- c#窗体开发
奇: 常用控件的使用(期间参杂着VS快捷键/常用设置) 快捷键:引用命名空间:shift+alt+F10 断点:F9 调试:F5 逐句调试(每行代码一次跳转):F11 逐过程调试:F10 重构提取方法 ...
- Duilib学习笔记《06》— 窗体基类WindowImpBase
在前面的例子中我们发现,窗口都是继承CWindowWnd.INotifyUI,然后重载相关函数去实现.显然,我们发现窗口的创建流程实际上都是差不多的,主要只是在OnCreate加载的配置文件不同等等… ...
- Duilib学习笔记《04》— 窗体显示
在前面已经了解了duilib控件以及界面布局相关内容,接下来就要考虑该如何将xml中描述的布局通过界面展现出来.实际上在 Duilib学习笔记<01> 中我们已经简单提到过基本的流程及元素 ...
- OpenTK学习笔记(3)-你好!窗体!
参考:http://dreamstatecoding.blogspot.com/2017/01/opengl-4-with-opentk-in-c-part-1.html http://www.cnb ...
- PyQt5学习笔记-从主窗体打开一个子窗体
PyQt5学习笔记-从主窗体打开一个子窗体 软件环境: Eric6+Python3.5+PyQt5 试验目标: 1.点击菜单项Open,打开一个子窗体 2.点击按钮Open,打开一个子窗体 主窗体设计 ...
- SQL Server Window Function 窗体函数读书笔记二 - A Detailed Look at Window Functions
这一章主要是介绍 窗体中的 Aggregate 函数, Rank 函数, Distribution 函数以及 Offset 函数. Window Aggregate 函数 Window Aggrega ...
随机推荐
- Java进行excel的导入导出操作
excel表格的导出导入在业务中经常会遇到,下面介绍hutool和easyExcel两种操作excel的工具 测试的实体类 通过mybatis-plus生成的,用于导出数据的实体类 @Getter @ ...
- 分布式文件存储-FastDFS
1.1 FastDFS简介 1.1.1 FastDFS体系结构 FastDFS是一个开源的轻量级分布式文件系统,它对文件进行管理,功能包括:文件存储.文件同步.文件访问(文件上传.文件下载)等,解决了 ...
- TaskPool 和 Worker 的对比
作用: TaskPool(任务池)和 Worker 都为应用程序提供多线程运行环境,用于处理耗时的计算任务或其他密集型任务,避免阻塞主线程,提高系统性能. 实现特点对比: 内存模型:TaskPoo ...
- js 连接数据库 提示:ActiveXObject is not defined
ActiveXObject is not defined 最近比较闲,上班瞎捣鼓一下,没想到报错了,提示ActiveXObject is not defined 大概是在js连接数据库时new对象使用 ...
- 第四課-Channel Study File Reader & File Writer
示例描述:从数据库中读取数据并过滤转换为HL7并存放到指定目录;然后读取目录中的HL7文件转换为txt文本并存放到指定目录. 首先在F:\MirthConnect\Test目录下创建Out目录存放输出 ...
- 牛客网-SQL专项训练7
①SQL语言可以分为多个类别,那么不属于数据操纵语言DML的是(B) 解析: SQL语言共分为四大类:数据查询语言DQL,数据操纵语言DML,数据定义语言DDL,数据控制语言DCL. 1. 数据查询语 ...
- dubbogo 3.0:牵手 gRPC 走向云原生时代
作者 | 李志信 于雨来源|阿里巴巴云原生公众号 自从 2011 年 Dubbo 开源之后,被大量中小公司采用,一直是国内最受欢迎的 RPC 框架.2014 年,由于阿里内部组织架构调整,Dubbo ...
- 阿里云数据库开源重磅发布:PolarDB三节点高可用的功能特性和关键技术
简介:在3月2日的阿里云开源 PolarDB 企业级架构发布会上,阿里云数据库技术专家孟勃荣 带来了主题为<PolarDB 三节点高可用>的精彩演讲.三节点高可用功能主要为 PolarD ...
- Databricks 企业版 Spark&Delta Lake 引擎助力 Lakehouse 高效访问
简介:本文介绍了Databricks企业版Delta Lake的性能优势,借助这些特性能够大幅提升Spark SQL的查询性能,加快Delta表的查询速度. 作者: 李锦桂(锦犀) 阿里云开源大数据 ...
- 基于MaxCompute SQL 的半结构化数据处理实践
简介: MaxCompute作为企业级数据仓库服务,集中存储和管理企业数据资产.面向数据应用处理和分析数据,将数据转换为业务洞察.通过与阿里云内.外部服务灵活组合,可构建丰富的数据应用.全托管的数据 ...