基于AidLux的自动驾驶智能预警应用方案
### 1. 自动驾驶感知算法及AidLux相关方案介绍
#### 1.1自动驾驶
自动驾驶汽车,又称无人驾驶车、电脑驾驶车、无人车、自驾车,是一种需要驾驶员辅助驾驶或者完全不需要操控的车辆。作为自动化载具,自动驾驶汽车可以不需要人类操作即能感知环境及导航。
#### 1.2 自动驾驶系统的组成部分
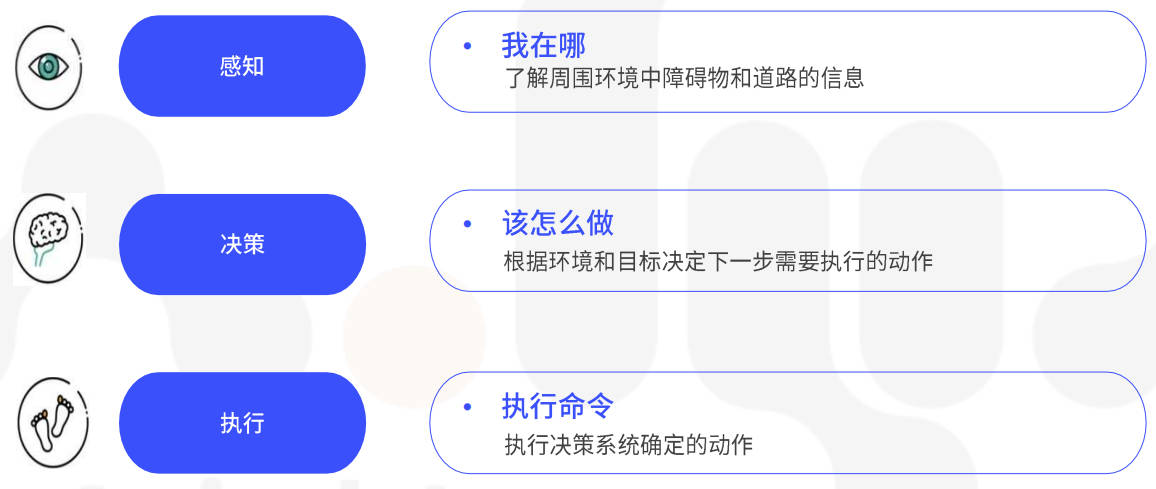
#### 1.2.1 环境感知系统

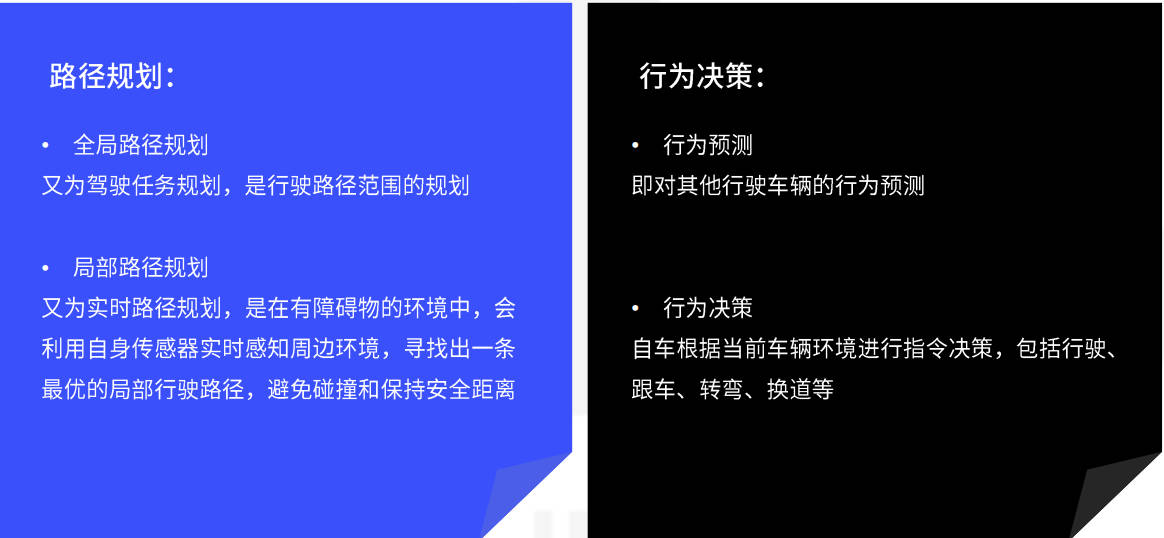
#### 1.2.2 决策系统
#### 1.3 安卓端部署平台AidLux
AidLux平台可快速部署在ARM64位智能设备上,手机也能变成边缘计算设备,当服务器使用、做测试、做练习。后续换设备落实实际项目,直接迁移,不需要重复开发。

### 2. 基于YOLOP的全景感知系统讲解与实战应用
#### 2.1 YOLOP算法介绍
YOLOP能同时处理目标检测、可行驶区域分割、车道线检测三个感知任务,并速度优异,保持较好精度进行工作,代码开源。它是华中科技大学--王兴刚团队在全景感知方面提出的模型。

模型结构包括1个encoder+3个分离的decoder,其中encoder包括backbone和neck,3个decoder分别完成车辆检测、车道线检测、可行驶区域分割任务
encoder:主干网络(CSPDarknet),和neck结构(SPP+FPN)
decoder:1个检测头和2个分割,两个分割头都是使用FPN的最底层特征图(w/8,h/8,256)作为输入,进行3次最近邻上采样,最终输出(W, H, 2)的特征图。
#### 2.2 AutoDL云端YOLOP模型训练
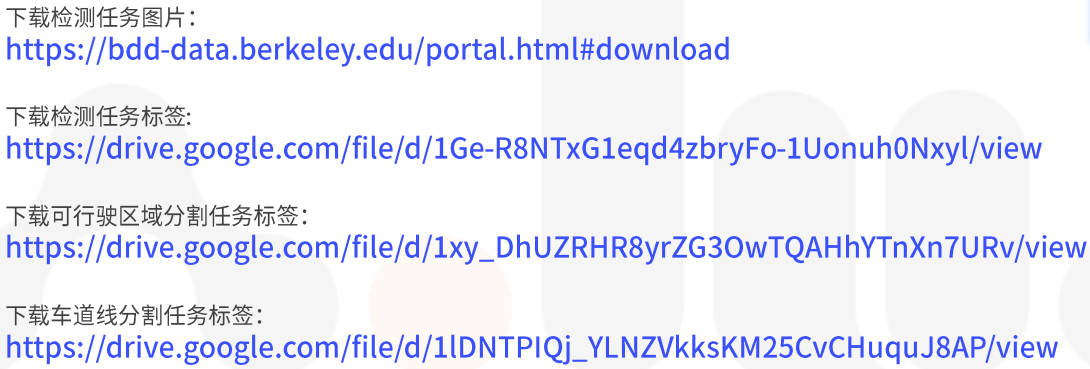
#### 2.2.1 下载BDD100K数据集
#### 2.2.2 将项目和数据集上传到AutoDL平台

#### 2.2.3 训练YOLOP
执行命令:pip install -r requirements.txt安装依赖包
单GPU训练:
```python
python tools/train.py
```
多GPU训练:
```python
python -m torch.distributed.launch --nproc_per_node=N tools/train.py #N:GPU数量
```
推理
```python
python tools/demo.py --weights weights/End-to-end.pth --source inference/videos
```

### 3. 智能预警在AidLux平台上的部署与应用
#### 3.1 YOLOP模型onnx转换部署
**1.使用课程代码转换为onnx**
执行命令:
```python
python export_onnx.py --height 640 --width 640
```
执行完成后,会在weights文件夹下生成转换成功的onnx模型
onnx转换核心api:
```python
x = torch.onnx.export(model, # 网络模型
torch.randn(1, 3, 224, 224), # 用于确定输入大小和类型,其中的值可以是随机的。
export_onnx_file, # 输出onnx的名称
verbose=False, # 是否以字符串的形式显示计算图
input_names=["input"], # 输入节点的名称,可以是一个list
output_names=["output"], # 输出节点的名称
opset_version=10, # onnx支持使用的operator set
do_constant_folding=True, # 是否压缩变量
# 设置动态维度, 此处指明Input节点的第0维度可变,命名为batch_size
dynamic_axes={"input":{0: "batch_size", 2:"h", 3: "w"}, "output": {0: "batch_size"}}
)
```
**2. AidLux模型转换工具-AIMO**
AI Model Optimizer--AIMO, 是一个简单、快速、精度损失小的模型转换平台。
AIMO旨在帮助用户能够在边缘端芯片上无精度损失的快速迁移、部署和运行各种机器学习模型。
平台地址:http://117.176.129.180:21115/
体验账号:AIMOTC001
账号密码:AIMOTC001

3.2 YOLOP模型在AidLux上部署和应用
**3.2.1 AidLux简介**
AidLux是一个构建在ARM硬件上,基于创新性跨Android/鸿蒙+Linux融合系统环境的智能物联网(AIOT应用开发和部署平台)。
AidLux软件使用非常方便,可以安装在手机、PAD、ARM开发板等边缘设备上,而且使用AidLux开发的过程中,既能支持在边缘设备的本机开发,也支持通过web浏览器访问边缘端桌面进行开发。
各大应用商城都能下载AidLux,在手机商城搜索、下载安装AidLux。
**3.2.2 连接AidLux**
> 将手机的wifi网络和电脑的网络连接到一起,打开安装好的手机上的AidLux软件,点击第一排第二个Cloud_ip。手机界面上会跳出可以在电脑上登录的IP地址,在电脑的浏览器上,随便出入一个IP,
>
> 即可将手机的系统投影到电脑上,连接上后就可以利用手机的算力进行模型推理了。

**3.2.3 上传项目代码到AidLux**
1.点击文件浏览器,打开文件管理页面
2.找到home文件夹,并双击进入此文件夹
3.点击右上角往上的箭头“upload”,再选择Folder,将前面YOLOP的文件夹上传到home文件夹内。(也可以直接将文件夹拖进目录下。)
#### 3.2.4 安装环境
1.打开终端,切换到项目目录
2.执行命令:pip install -r requirements.txt安装依赖环境
3.安装pytorch、torchvision、onnxruntime
```python
pip install torch == 1.8.1==0.9.0 -i https://pypi.mirrors.ustc.edu.cn/simple/
pip install onnxruntime -i https://pypi.mirrors.ustc.edu.cn.simple/
```
4 运行demo.py
验证推理效果,执行命令:
```python
python tools/demo.py --source inference/images
```
#### 3.3 智能预警系统代码实战
智能预警系统包含3个任务:
目标检测,可行驶区域检测,车道线检测
传感器:前视相机
目标检测任务:检测车辆
可行驶区域检测:主要是hi检测可以行驶的区域,为自动驾驶提供路径规划辅助
车道线检测:一种环境感知应用,目的是通过车载相机或激光雷达来检测车道线。
**智能预警流程**
**1.输入**
读取视频图像作为输入,图像尺寸1920*1080
**2.预处理**
2.1 将输入尺寸1920*1080 resize + padding到640*640
2.2 归一化
2.3 640*640*3 --> 1*3*640*640
**3. 使用onnx模型进行推理**
读取模型-->准备数据-->推理
得到det_out,da_seg_out, ll_seg_out,shape分别为:(1,n,6) (1,2,640,640) (1,2,640,640)
**4.后处理**
4.1 将检测结果,可行驶区域检测结果,车道线检测结果,合并到一张图像上,分别用不同的颜色标记出来
4.2 将检测的帧数,帧率,车辆数等信息显示在图像上
**5.输出**
获取最终融合的图像,并保存成视频,图像尺寸、帧率、编码是原视频尺寸、帧率和编码。
**完整的预警代码**
```python
import cv2
import time
import torch
import numpy as np
import onnxruntime as ort
from PIL import Image, ImageDraw, ImageFont
from lib.core.general import non_max_suppression
onnx_path = "weights/yolop-640-640.onnx"
def resize_unscale(img, new_shape=(640, 640), color=114):
shape = img.shape[:2] # current shape [height, width]
if isinstance(new_shape, int):
new_shape = (new_shape, new_shape)
canvas = np.zeros((new_shape[0], new_shape[1], 3))
canvas.fill(color)
# Scale ratio (new / old) new_shape(h,w)
r = min(new_shape[0] / shape[0], new_shape[1] / shape[1])
# Compute padding
new_unpad = int(round(shape[1] * r)), int(round(shape[0] * r)) # w,h
new_unpad_w = new_unpad[0]
new_unpad_h = new_unpad[1]
pad_w, pad_h = new_shape[1] - new_unpad_w, new_shape[0] - new_unpad_h # wh padding
dw = pad_w // 2 # divide padding into 2 sides
dh = pad_h // 2
if shape[::-1] != new_unpad: # resize
img = cv2.resize(img, new_unpad, interpolation=cv2.INTER_AREA)
canvas[dh:dh + new_unpad_h, dw:dw + new_unpad_w, :] = img
return canvas, r, dw, dh, new_unpad_w, new_unpad_h # (dw,dh)
def cv2AddChineseText(img, text, position, textColor=(0, 0, 255), textSize=10):
if (isinstance(img, np.ndarray)): # 判断是否OpenCV图片类型
img = Image.fromarray(cv2.cvtColor(img, cv2.COLOR_BGR2RGB))
# 创建一个可以在给定图像上绘图的对象
draw = ImageDraw.Draw(img)
# 字体的格式
fontStyle = ImageFont.truetype(
"simsun.ttc", textSize, encoding="utf-8")
# 绘制文本
draw.text(position, text, textColor, font=fontStyle)
# 转换回OpenCV格式
return cv2.cvtColor(np.asarray(img), cv2.COLOR_RGB2BGR)
def infer(ori_img, img, r, dw, dh, new_unpad_w, new_unpad_h):
ort_session = ort.InferenceSession(onnx_path)
t0 = time.time()
# inference: (1,n,6) (1,2,640,640) (1,2,640,640)
det_out, da_seg_out, ll_seg_out = ort_session.run(
['det_out', 'drive_area_seg', 'lane_line_seg'],
input_feed={"images": img}
)
seconds = time.time() - t0
fps = "%.2f fps" %(1 / seconds) # 帧率
det_out = torch.from_numpy(det_out).float()
boxes = non_max_suppression(det_out)[0] # [n,6] [x1,y1,x2,y2,conf,cls]
boxes = boxes.cpu().numpy().astype(np.float32)
if boxes.shape[0] == 0:
print("no bounding boxes detected.")
return None
# scale coords to original size.
boxes[:, 0] -= dw
boxes[:, 1] -= dh
boxes[:, 2] -= dw
boxes[:, 3] -= dh
boxes[:, :4] /= r
print(f"detect {boxes.shape[0]} bounding boxes.")
img_det = ori_img[:, :, ::-1].copy()
for i in range(boxes.shape[0]):
x1, y1, x2, y2, conf, label = boxes[i]
x1, y1, x2, y2, label = int(x1), int(y1), int(x2), int(y2), int(label)
img_det = cv2.rectangle(img_det, (x1, y1), (x2, y2), (0, 255, 0), 2, 2)
# select da & ll segment area.
da_seg_out = da_seg_out[:, :, dh:dh + new_unpad_h, dw:dw + new_unpad_w]
ll_seg_out = ll_seg_out[:, :, dh:dh + new_unpad_h, dw:dw + new_unpad_w]
da_seg_mask = np.argmax(da_seg_out, axis=1)[0]
ll_seg_mask = np.argmax(ll_seg_out, axis=1)[0]
color_area = np.zeros((new_unpad_h, new_unpad_w, 3), dtype=np.uint8)
color_area[da_seg_mask == 1] = [0, 255, 0]
color_area[ll_seg_mask == 1] = [0, 0, 255]
color_seg = color_area
return img_det, boxes, color_seg, fps
def main(source, save_path):
cap = cv2.VideoCapture(source)
width = int(cap.get(cv2.CAP_PROP_FRAME_WIDTH)) # 获取视频的宽度
height = int(cap.get(cv2.CAP_PROP_FRAME_HEIGHT)) # 获取视频的高度
fps = cap.get(cv2.CAP_PROP_FPS) #
fourcc = cv2.VideoWriter_fourcc(*"mp4v")
#fourcc = int(cap.get(cv2.CAP_PROP_FOURCC)) # 视频的编码
#定义视频对象输出
writer = cv2.VideoWriter(save_path, fourcc, fps, (width, height))
# 检查是否导入视频成功
if not cap.isOpened():
print("视频无法打开")
exit()
frame_id = 0
while True:
ret, frame = cap.read()
if not ret:
print("视频推理完毕...")
break
frame_id += 1
# if frame_id % 3 != 0:
# continue
canvas, r, dw, dh, new_unpad_w, new_unpad_h = resize_unscale(frame, (640, 640))
img = canvas.copy().astype(np.float32) # (3,640,640) RGB
img /= 255.0
img[:, :, 0] -= 0.485
img[:, :, 1] -= 0.456
img[:, :, 2] -= 0.406
img[:, :, 0] /= 0.229
img[:, :, 1] /= 0.224
img[:, :, 2] /= 0.225
img = img.transpose(2, 0, 1)
img = np.expand_dims(img, 0) # (1, 3,640,640)
# 推理
img_det, boxes, color_seg, fps = infer(frame, img, r, dw, dh, new_unpad_w, new_unpad_h)
if img_det is None:
continue
color_mask = np.mean(color_seg, 2)
img_merge = canvas[dh:dh + new_unpad_h, dw:dw + new_unpad_w, :]
# merge: resize to original size
img_merge[color_mask != 0] = \
img_merge[color_mask != 0] * 0.5 + color_seg[color_mask != 0] * 0.5
img_merge = img_merge.astype(np.uint8)
img_merge = cv2.resize(img_merge, (width, height),
interpolation=cv2.INTER_LINEAR)
img_merge = cv2AddChineseText(img_merge, f'帧数:{frame_id} 帧率:{fps} 前方共有 {boxes.shape[0]} 辆车...',
(100, 50), textColor=(0, 0, 255), textSize=30)
img_merge = cv2AddChineseText(img_merge, '前方绿色区域为可行驶区域,红色为检出的车道线...',
(100, 100), textColor=(0, 0, 255), textSize=30)
for i in range(boxes.shape[0]):
x1, y1, x2, y2, conf, label = boxes[i]
x1, y1, x2, y2, label = int(x1), int(y1), int(x2), int(y2), int(label)
img_merge = cv2.rectangle(img_merge, (x1, y1), (x2, y2), (0, 255, 0), 2, 2)
# cv2.imshow('img_merge', img_merge)
# cv2.waitKey(0)
writer.write(img_merge)
cap.release() # 释放摄像头
writer.release() # 可以实现预览
cv2.destroyAllWindows()
if __name__=="__main__":
source = 'inference/videos/1.mp4'
save_path = '/home/AidLux_Course/YOLOP/inference/output/test.mp4'
main(source, save_path)
```
代码运行结果:
<iframe src="https://player.bilibili.com/player.html?aid=273245099&bvid=BV1yF411X7Qs&cid=1191271593&page=1" scrolling="no" border="0" frameborder="no" framespacing="0" allowfullscreen="true"></iframe>
### 4.总结
感谢成都阿加犀公司举办的训练营课程,让笔者能够学习自动驾驶的基础知识,以及自动驾驶算法在移动端的部署。
基于AidLux的自动驾驶智能预警应用方案的更多相关文章
- 带你了解基于Ploto构建自动驾驶平台
摘要:华为云Solution as Code推出基于Ploto构建自动驾驶平台解决方案. 本文分享自华为云社区<基于Ploto构建自动驾驶平台>,作者:阿米托福 . 2022年6月15日, ...
- 华为MDC自动驾驶
华为MDC自动驾驶 智能驾驶汽车中,包含四个核心子系统:传感器.计算平台.执行器与应用算法,华为MDC( Mobile Data Center: 移动数据中心)定位为智能驾驶的计算平台.此平台集成了华 ...
- 自动驾驶汽车数据不再封闭,Uber 开源新的数据可视化系统
日前,Uber 开源了基于 web 的自动驾驶可视化系统(AVS),称该系统为自动驾驶行业带来理解和共享数据的新方式.AVS 由Uber旗下负责自动驾驶汽车研发的技术事业群(ATG)开发,目前该系统已 ...
- 百亿级小文件存储,JuiceFS 在自动驾驶行业的最佳实践
自动驾驶是最近几年的热门领域,专注于自动驾驶技术的创业公司.新造车企业.传统车厂都在这个领域投入了大量的资源,推动着 L4.L5 级别自动驾驶体验能尽早进入我们的日常生活. 自动驾驶技术实现的核心环节 ...
- 基于DRL和TORCS的自动驾驶仿真系统——之环境配置
基于DRL和TORCS的自动驾驶仿真系统 --之环境配置 玩TORCS和DRL差不多有一整年了,开始的摸爬滚打都是不断碰壁过来的,近来在参与CMU的DRL10703课程学习和翻译志愿者工作,也将自己以 ...
- 2020云栖大会智慧出行专场:聚焦高精地图/算法、智能模型、自动驾驶、AR导航
2020云栖大会将于9月17日-18日在线举行,届时将通过官网为全球科技人带来前沿科技.技术产品.产业应用等领域的系列重要分享. 阿里巴巴高德地图携手合作伙伴精心筹备了“智慧出行”专场.我们将为大 ...
- 基于自动驾驶车辆的NVIDIA-TensorRT推理实时优化
基于自动驾驶车辆的NVIDIA-TensorRT推理实时优化 Optimizing NVIDIA TensorRT Conversion for Real-time Inference on Auto ...
- 基于TORCS和Torch7实现端到端连续动作自动驾驶深度强化学习模型(A3C)的训练
基于TORCS(C++)和Torch7(lua)实现自动驾驶端到端深度强化学习模型(A3C-连续动作)的训练 先占坑,后续内容有空慢慢往里填 训练系统框架 先占坑,后续内容有空慢慢往里填 训练系统核心 ...
- 基于TensorRT 3的自动驾驶快速INT8推理
基于TensorRT 3的自动驾驶快速INT8推理 Fast INT8 Inference for Autonomous Vehicles with TensorRT 3 自主驾驶需要安全性,需要一种 ...
- <转载> 从算法上解读自动驾驶是如何实现的?
科技新闻小鹏汽车2016-03-28 10:42 [摘要]车辆路径规划问题中路网模型.路径规划算法和交通信息的智能预测为关键点. 由于驾驶员的驾驶工作繁重,同时随着汽车拥有量的增加,非职业驾驶员的数 ...
随机推荐
- LeeCode 二叉树问题(四)
二叉搜索树的应用问题 二叉搜索树的定义 若左子树不空,则左子树上所有节点的值均小于根节点的值 若右子树不空,则右子树上所有节点的值均大于根节点的值 它的左右子树也均为二叉搜索树 中序遍历结果为一个升序 ...
- RateLimiter使用
1.maven依赖 <dependency> <groupId>com.google.guava</groupId> <artifactId>guava ...
- day09-达人探店
功能04-达人探店 5.功能04-达人探店 5.1发布&查看探店笔记 5.1.1发布探店笔记 探店笔记类似点评网站的评价,往往是图文结合.对应的表有两个: tb_blog:探店笔记表,包含笔记 ...
- 关于java中的equal
正常情况下的equal方法是比较两者之间的id.如果需要它实现其他的问题,可以通过重写这个方法.idea自带了重写equal的快捷方式.右键生成中的equals() 和 hashCode()就可以帮助 ...
- GPT4free安装部署教程 - 白嫖GPT
前言 为啥之前一直没有更新GPT相关的内容,因为个人觉得如果每次都需要使用付费使用API的话,那这个工具还是很难在个人手上被运用起来,多测试几次关键字和清洗数据,API的费用对个人来说都太高昂了 直到 ...
- Flutter 如何将代码显示到界面上
前言 如何优雅的将项目中的代码,亦或是你的demo代码展示到界面上?本文对使用简单.便于维护且通用的解决方案,进行相关的对比和探究 为了节省大家的时间,把最终解决方案的相关接入和用法写在前面 预览代码 ...
- 从浏览器输入域名开始分析DNS解析过程
摘要:DNS(Domain Name System)是域名系统的英文缩写,是一种组织成域层次结构的计算机和网络服务命名系统,用于 TCP/IP 网络. 本文分享自华为云社区<DNS那些事--从浏 ...
- 2022-09-20:以下go语言代码输出什么?A:8 8;B:8 16;C:16 16;D:16 8。 package main import ( “unsafe“ “fmt“ )
2022-09-20:以下go语言代码输出什么?A:8 8:B:8 16:C:16 16:D:16 8. package main import ( "unsafe" " ...
- 没想到还有这种骚操作~如何使用Golang实现无头浏览器截图?
前言 在Web开发中,有时需要对网页进行截图,以便进行页面预览.测试等操作. 而使用无头浏览器来实现截图功能,可以避免手动操作的繁琐和不稳定性. 这篇文章将介绍:使用Golang进行无头浏览器的截图, ...
- Midjourney|文心一格prompt教程[Text Prompt(上篇)]:品牌log、App、徽章、插画、头像场景生成,各种风格选择:科技风、运动风
Midjourney|文心一格prompt教程[Text Prompt(上篇)]:品牌log.App.徽章.插画.头像场景生成,各种风格选择:科技风.运动风 1.撰写 Text Prompt 注意事项 ...