APISIX的安装和简单使用
APISIX 是一个云原生、高性能、可扩展的微服务 API 网关。
它是基于 Nginx 和 etcd 来实现,和传统 API 网关相比,APISIX 具备动态路由和插件热加载,特别适合微服务体系下的 API 管理。
APISIX安装
首先安装依赖
https://github.com/apache/incubator-apisix/blob/master/doc/zh-cn/install-dependencies.md
# 安装 OpenResty, etcd 和 编译工具

sudo yum install -y etcd openresty curl git gcc luarocks lua-devel

# 开启 etcd server

sudo service etcd start
依赖openresty的新版本 OpenResty 1.15.8.3。检查下etcd是否已经正常启动。
ps aux | grep etcd

etcd      2769  2.2  4.2 10856200 21364 ?      Ssl  14:54   0:00 /usr/bin/etcd --name=default --data-dir=/var/lib/etcd/default.etcd --listen-client-urls=http://localhost:2379
可以看到,监听的端口号是2379.也可以看下etcd的配置,也可以看到端口号。
/etc/etcd/etcd.conf
接下来安装主角apisix
官方安装yum安装
sudo yum install -y https://github.com/apache/incubator-apisix/releases/download/1.3/apisix-1.3-0.el7.noarch.rpm
发现下载不下来,直接下载rpm包手动安装。
https://github.com/apache/incubator-apisix/releases/download/1.3/apisix-1.3-0.el7.noarch.rpm
手动安装,并且启动apisix
rpm -ivh apisix-1.3-0.el7.noarch.rpm

准备中...                          ################################# [100%]

正在升级/安装...

   1:apisix-1.3-0                     ################################# [100%]

apisix start
检查下apisix是否启动成功
ps aux | grep nginx

root      2978  0.0  0.5 178996  2616 ?        Ss   08:14   0:00 nginx: master process openresty -p /usr/local/apisix -c /usr/local/apisix/conf/nginx.conf

nobody    2979  0.6  2.4 191600 12368 ?        R    08:14   0:00 nginx: worker process

nobody    2980  0.1  0.4 173672  2120 ?        S    08:14   0:00 nginx: cache manager process

nobody    2981  0.0  0.4 173672  2120 ?        S    08:14   0:00 nginx: cache loader process
启动成功,也可以到apisix的Nginx conf的配置路径。
APISIX简单使用
这是官方的入门指南
https://github.com/apache/incubator-apisix/blob/master/doc/zh-cn/getting-started.md
我们先配置下upstream
curl "http://127.0.0.1:9080/apisix/admin/upstreams/50" -H 'X-API-KEY: edd1c9f034335f136f87ad84b625c8f1' -X PUT -d '

> {

>     "type": "roundrobin",

>     "nodes": {

>         "127.0.0.1:7080": 1

>     }

> }'

{"node":{"value":{"type":"roundrobin","nodes":{"127.0.0.1:7080":1},"hash_on":"vars","id":"50"},"createdIndex":22,"key":"\/apisix\/upstreams\/50","modifiedIndex":22},"prevNode":{"value":"{\"hash_on\":\"vars\",\"id\":\"50\",\"nodes\":{\"httpbin.org:80\":1},\"type\":\"roundrobin\"}","createdIndex":19,"key":"\/apisix\/upstreams\/50","modifiedIndex":19},"action":"set"}
再给刚刚配置的upstream配置router
curl "http://127.0.0.1:9080/apisix/admin/routes/5" -H 'X-API-KEY: edd1c9f034335f136f87ad84b625c8f1' -X PUT -d '

> {

>     "uri": "/get",

>     "host": "httpbin.org",

>     "upstream_id": 50

> }'

{"node":{"value":{"host":"httpbin.org","upstream_id":50,"uri":"\/get","priority":0},"createdIndex":25,"key":"\/apisix\/routes\/5","modifiedIndex":25},"prevNode":{"value":"{\"host\":\"httpbin.org\",\"plugins\":{\"proxy-rewrite\":{\"scheme\":\"https\"}},\"uri\":\"\\\/get\",\"upstream_id\":50,\"priority\":0}","createdIndex":24,"key":"\/apisix\/routes\/5","modifiedIndex":24},"action":"set"}
现在的流程就是这样的的。
终端请求httpbin.org/get->APISIX代理-> 127.0.0.1:7080
我们再启动一个Nginx服务,使得上游服务 127.0.0.1:7080/get 可以正常提供服务。
vim /usr/local/openresty/nginx/conf/nginx.conf

添加7080的端口服务

    server {

        listen       7080;

        location /get {

            echo "success";

        }

    }

启动Nginx WEB服务

sudo /usr/local/openresty/nginx/sbin/nginx -c /usr/local/openresty/nginx/conf/nginx.conf

curl 'http://127.0.0.1:7080/get'

success

说明7080能够正常提供服务了
我们在终端试下是否代理成功
curl -i -X GET "http://127.0.0.1:9080/get?foo1=bar1&foo2=bar2" -H "Host: httpbin.org"

HTTP/1.1 200 OK

Content-Type: application/octet-stream

Transfer-Encoding: chunked

Connection: keep-alive

Server: APISIX web server

Date: Sun, 28 Jun 2020 15:52:03 GMT

success
打印了success,说明整个网络流程是通畅的。
APISIX控制台安装
新版本的APISIX已经内置了dashboard可视化WEB控制台,可以很直观的看到各种router配置、upstream配置等等。
浏览器直接访问就可以打开dashboard
http://127.0.0.1:9080/apisix/dashboard
出现下面的报错,可能是etced服务忘记启动了
connection refused
启动下etcd服务就正常了
service etcd start
如果是虚拟机或者docker机器的话,可能需要打开admin的访问显示
vim /usr/local/apisix/conf/config.yaml

找到 allow_admin

- 127.0.0.0/24 该为 - all

就是允许所有IP访问,生产环境可不能这样,有非常大的安全风险
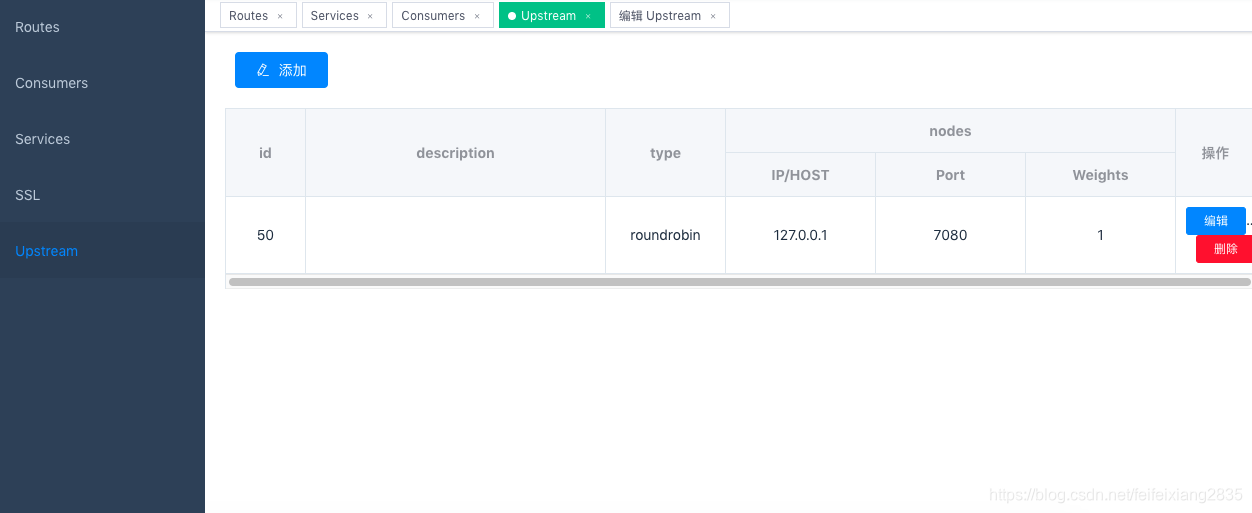
正常访问 http://127.0.0.1:9080/apisix/dashboard 就能在左侧的Routes 和 Upstream 看到上面用curl设置的routes和upstream。
etcd 命令行简单使用
etcd 是一个分布式、可靠的 key-value 存储的分布式系统,主要用于服务发现。最著名的k8s就是用etcd存储配置数据的。
命令行主要使用 etcdctl 执行 etcd 命令,先看下帮助菜单
etcdctl -h

NAME:

   etcdctl - A simple command line client for etcd.

WARNING:

   Environment variable ETCDCTL_API is not set; defaults to etcdctl v2.

   Set environment variable ETCDCTL_API=3 to use v3 API or ETCDCTL_API=2 to use v2 API.

USAGE:

   etcdctl [global options] command [command options] [arguments...]

VERSION:

   3.3.11

COMMANDS:

     backup          backup an etcd directory

     cluster-health  check the health of the etcd cluster

     mk              make a new key with a given value

     mkdir           make a new directory

     rm              remove a key or a directory

     rmdir           removes the key if it is an empty directory or a key-value pair

     get             retrieve the value of a key

     ls              retrieve a directory

     set             set the value of a key

     setdir          create a new directory or update an existing directory TTL

     update          update an existing key with a given value

     updatedir       update an existing directory

     watch           watch a key for changes

     exec-watch      watch a key for changes and exec an executable

     member          member add, remove and list subcommands

     user            user add, grant and revoke subcommands

     role            role add, grant and revoke subcommands

     auth            overall auth controls
最常用几个命令 ls get set rm rmdir mk mkdir等等,名字都比较通俗易懂。
etcdctl ls

/apisix

etcdctl ls /apisix

/apisix/upstreams

/apisix/node_status

/apisix/ssl

/apisix/routes

/apisix/services

etcdctl ls /apisix/upstreams

/apisix/upstreams/50

etcdctl get /apisix/upstreams/50

{"hash_on":"vars","id":"50","nodes":{"127.0.0.1:7080":1},"type":"roundrobin"}
APISIX的安装和简单使用的更多相关文章
- (转)python requests的安装与简单运用
requests是python的一个HTTP客户端库,跟urllib,urllib2类似,那为什么要用requests而不用urllib2呢?官方文档中是这样说明的: python的标准库urllib ...
- MongoDB在Windows下安装、Shell客户端的使用、Bson扩充的数据类型、MongoVUE可视化工具安装和简单使用、Robomongo可视化工具(2)
一.Windows 下载安装 1.去http://www.mongodb.org/downloads下载,mongodb默认安装在C:\Program Files\MongoDB目录下,到F:\Off ...
- python requests的安装与简单运用
requests是python的一个HTTP客户端库,跟urllib,urllib2类似,那为什么要用requests而不用urllib2呢?官方文档中是这样说明的: python的标准库urllib ...
- memcache的windows下的安装和简单使用
原文:memcache的windows下的安装和简单使用 memcache是为了解决网站访问量大,数据库压力倍增的解决方案之一,由于其简单实用,很多站点现在都在使用memcache,但是memcach ...
- 【RabbitMQ】RabbitMQ在Windows的安装和简单的使用
版本说明 使用当前版本:3.5.4 安装与启动 在官网上下载其Server二进制安装包,在Windows上的安装时简单的,与一般软件没什么区别. 安装前会提示你,还需要安装Erlang,并打开下载页面 ...
- Thrift的安装和简单演示样例
本文仅仅是简单的解说Thrift开源框架的安装和简单使用演示样例.对于具体的解说,后面在进行阐述. Thrift简述 ...
- libmemcached安装及简单例子
libmemcached安装及简单例子 1.下载安装libmemcached $ wget http://launchpad.net/libmemcached/1.0/0.44/+download/ ...
- [hadoop系列]Pig的安装和简单演示样例
inkfish原创,请勿商业性质转载,转载请注明来源(http://blog.csdn.net/inkfish ).(来源:http://blog.csdn.net/inkfish) Pig是Yaho ...
- Redis 安装与简单示例
Redis 安装与简单示例 一.Redis的安装 Redis下载地址如下:https://github.com/dmajkic/redis/downloads 解压后根据自己机器的实际情况选择32位或 ...
- Redis 安装与简单使用
安装 Redis 一般系统都会有软件管理工具,但是通常版本都不会太新,况且 Redis 的安装很简单,因此下面使用源码的安装方式. 下载源码 wget http://download.redis.io ...
随机推荐
- 【2】Pycharm插件推荐,超级实用!每个小trick都可以快速提升变成效率!
相关文章: [1]Pycharm 主题设置推荐Material Theme UI以及编辑环境配置(字体大小和颜色) [2]Pycharm插件推荐,超级实用!每个小trick都可以快速提升变成效率! [ ...
- 【6】opencv采用映射技术实现鱼眼镜头校正和鱼眼镜头还原全景图。
相关文章: [1]windows下安装OpenCV(4.3)+VS2017安装+opencv_contrib4.3.0配置 [2]Visual Studio 2017同时配置OpenCV2.4 以及O ...
- Flask Echarts 实现历史图形查询
Flask前后端数据动态交互涉及用户界面与服务器之间的灵活数据传递.用户界面使用ECharts图形库实时渲染数据.它提供了丰富多彩.交互性强的图表和地图,能够在网页上直观.生动地展示数据.EChart ...
- 14.6 Socket 应用结构体传输
当在套接字编程中传输结构体时,可以将结构体序列化为字符串(即把结构体的所有成员打包成一个字符串),然后将字符串通过套接字传输到对端,接收方可以将字符串解析为结构体,然后使用其中的成员数据.这种方法通常 ...
- 基于.NET+FreeSql实现的仿掘金专栏前后端分离的CMS
前言 今天分享一款基于.NET+FreeSql实现的仿掘金专栏前后端分离.支持Docker部署.集成了OAtuh2授权登录.QQ.Github.Gitee快速登录.简单实用的CMS:lin-cms-d ...
- WinForm之ComboBox实现模糊查询
ComboBox实现模糊查询 第一步:在Form_Load事件中绑定数据源 第二步:写一个方法,返回一个List<string>类型的集合来存储控件中的Items 第三步:在Form_Lo ...
- 【Docker内容大集合】Docker从认识到实践再到底层原理大汇总
前言 那么这里博主先安利一些干货满满的专栏了! 首先是博主的高质量博客的汇总,这个专栏里面的博客,都是博主最最用心写的一部分,干货满满,希望对大家有帮助. 高质量博客汇总https://blog.cs ...
- 关于DbgridEh滚动从表一起跟着滚动的分析
我的实现:
- NebulaGraph入门介绍
NebulaGraph入门介绍 什么是图数据库? 图数据库就会是存储图形网络并能从中检索信息的数据库. 图数据库在处理关联关系上有极大的优势,它以图论为理论基础,使用图模型,将关联数据的实体作为顶点( ...
- JS leetcode 删除排序数组中的重复项 题解分析
壹 ❀ 引 一日一题,今天的题目来自于leetcode26. 删除排序数组中的重复项,其实在之前我们已经做了一道类似的题目,可参考JS leetcode 移除元素 题解分析,关于本题描述如下: 给定一 ...