
jmeter接口自动化部署jenkins教程
首先,保证本地安装并部署了jenkins,jmeter,xslproc
我搭建的自动化测试框架是jmeter+jenkins+xslproc
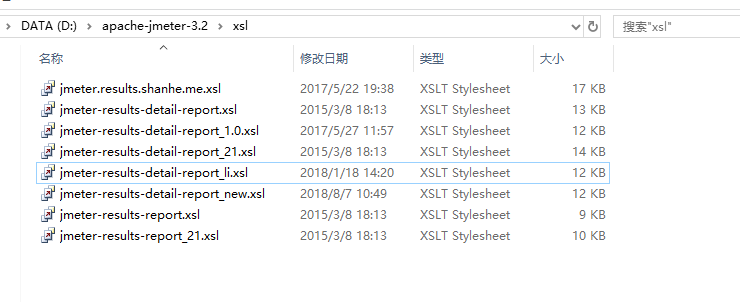
---注意:原理是,jmeter自生成的报告jtl文件,通过xslproc工具,再结合jmeter自带的模板修改,自带模板目录如下,最终将测试结果报告转化为html格式
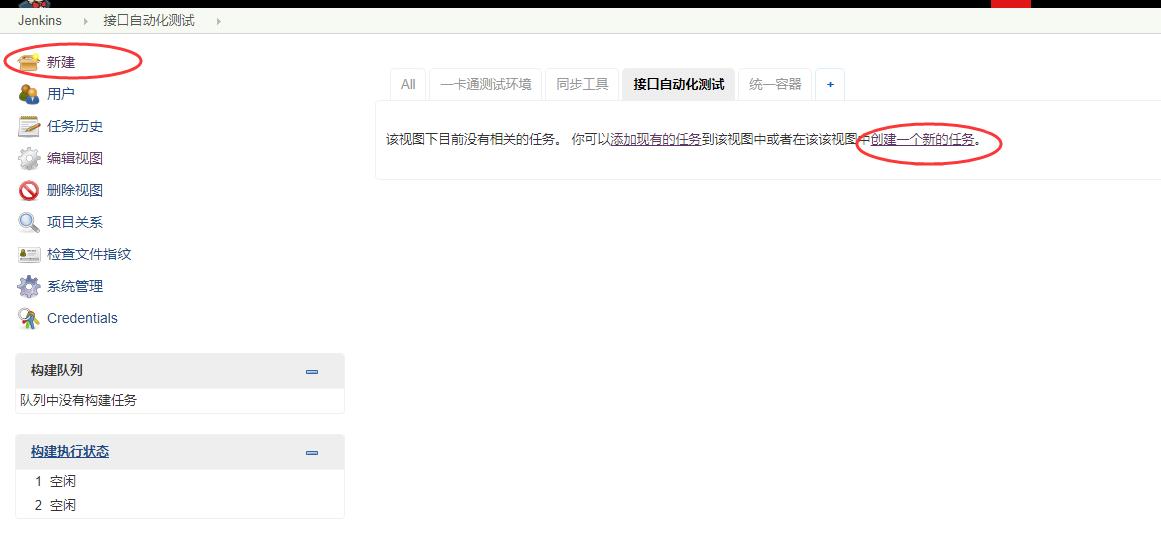
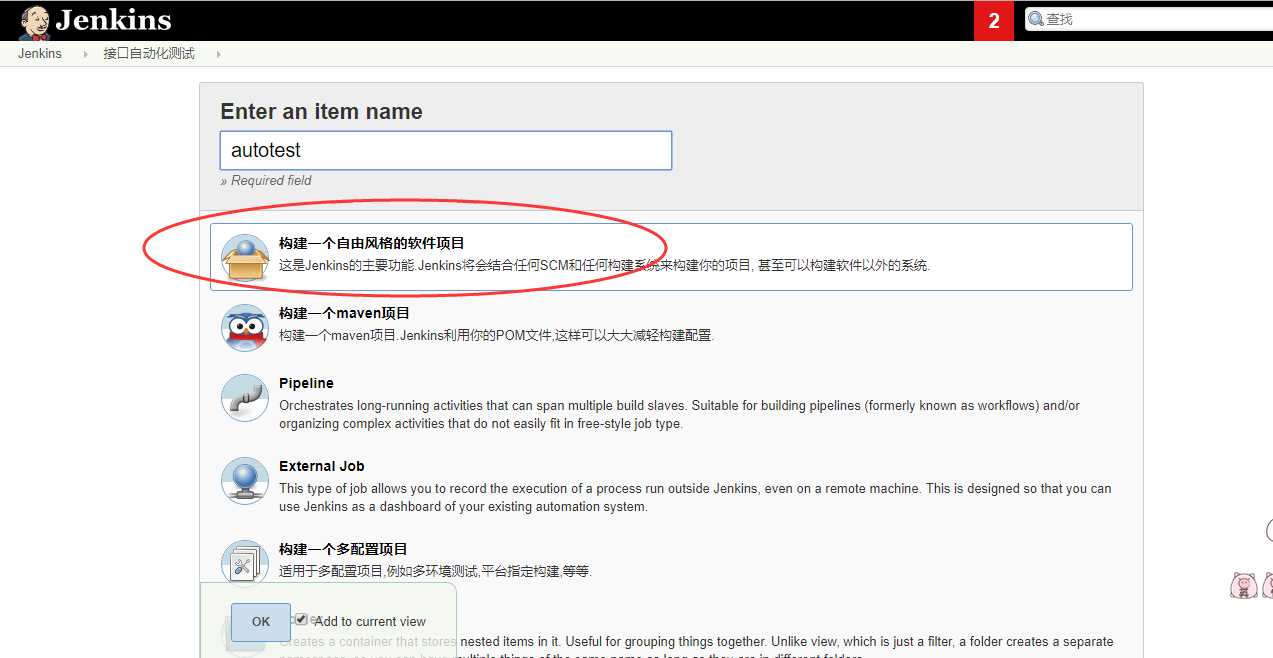
1.jenkins新建一个任务,选择“构建一个自由风格的软件项目”,点击OK
2.选择构建触发器,根据时间点,每天到点进行自动触发构建

3.输入构建命令
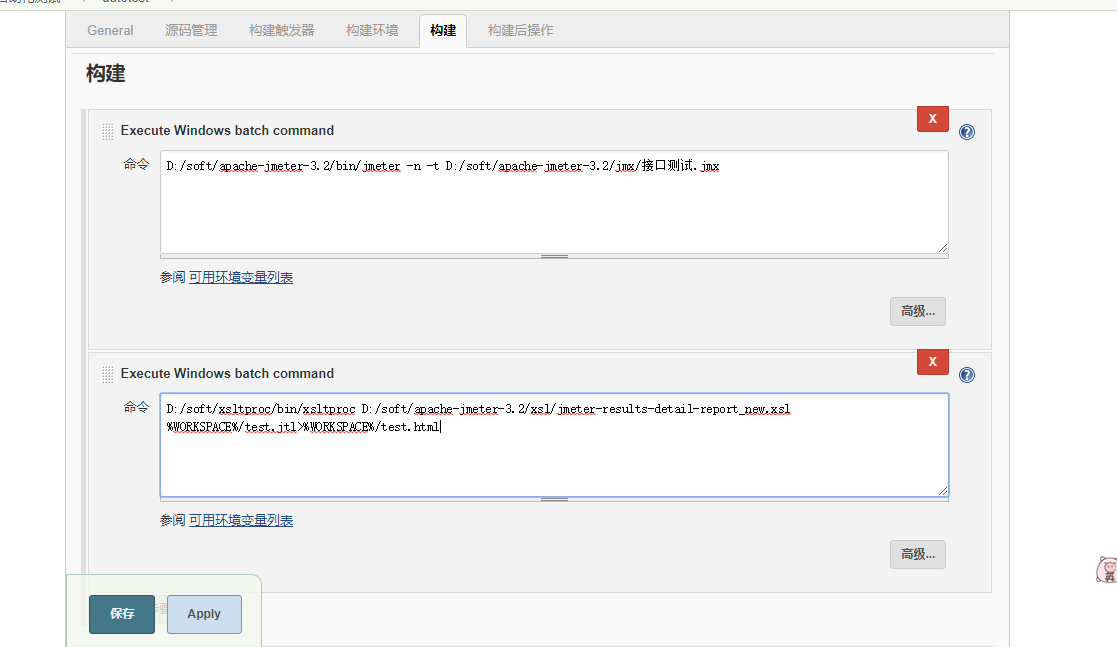
(1)D:/soft/apache-jmeter-3.2/bin/jmeter -n -t D:/soft/apache-jmeter-3.2/jmx/接口测试.jmx
这一句是通过cmd命令调用jmeter程序,执行jmeter的jmx自动化脚本;
(2)D:/soft/xsltproc/bin/xsltproc D:/soft/apache-jmeter-3.2/xsl/jmeter-results-detail-report_new.xsl %WORKSPACE%/test.jtl>%WORKSPACE%/test.html
这一句是调用xslproc程序,通过jmeter-results-detail-report_new.xsl模板,将jtl文件转换为html报告文件;
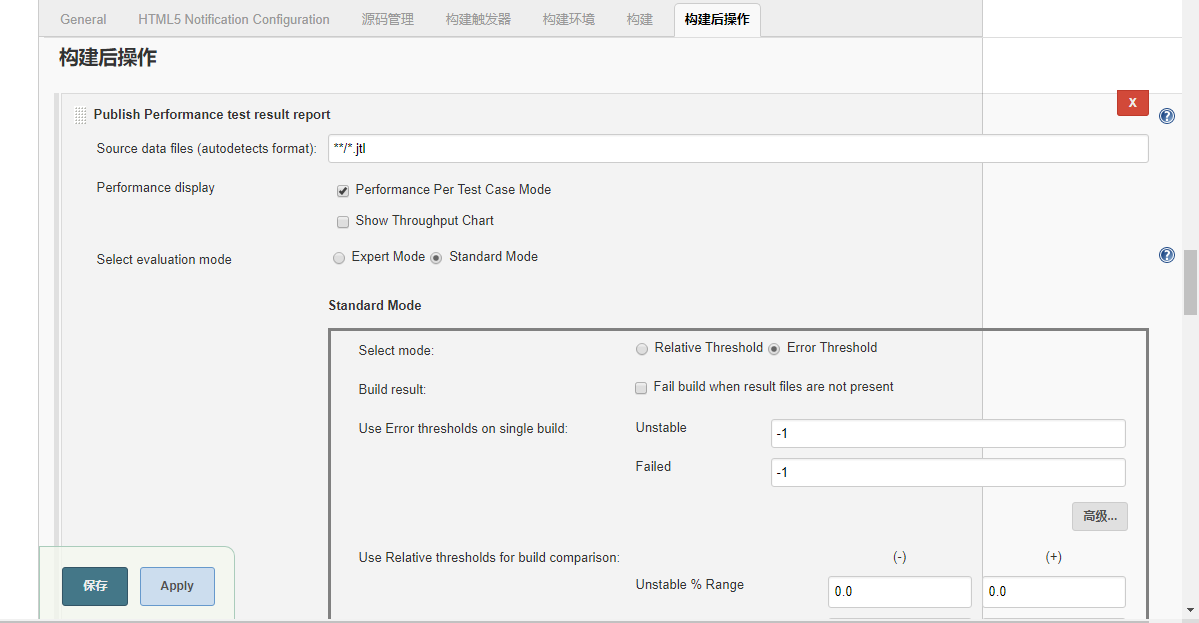
4.
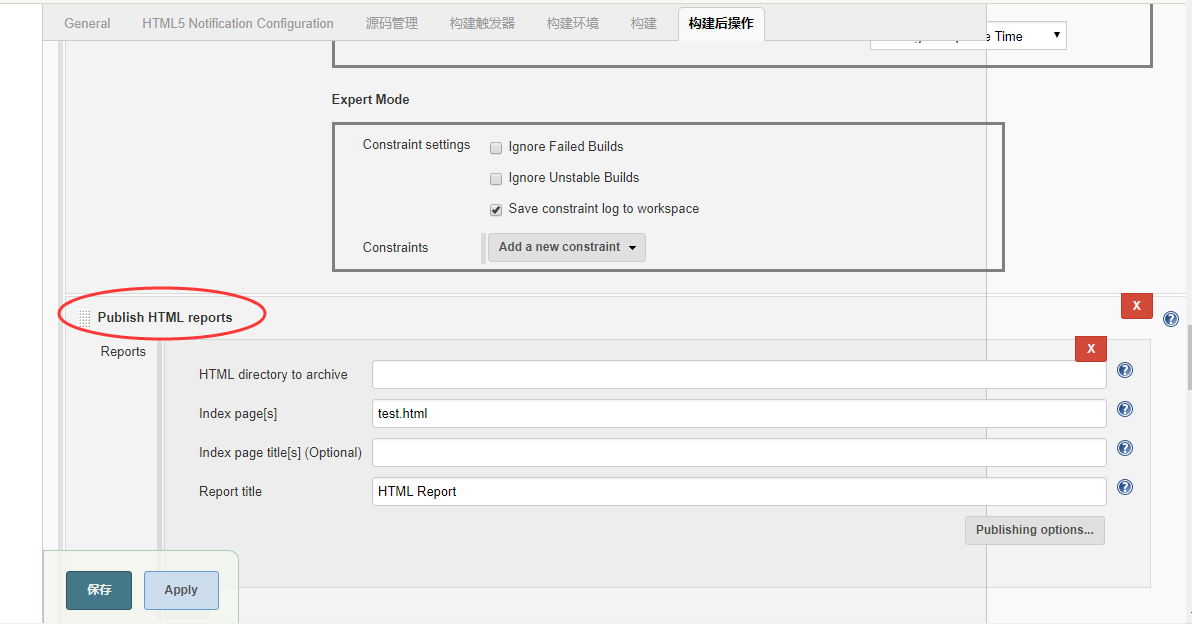
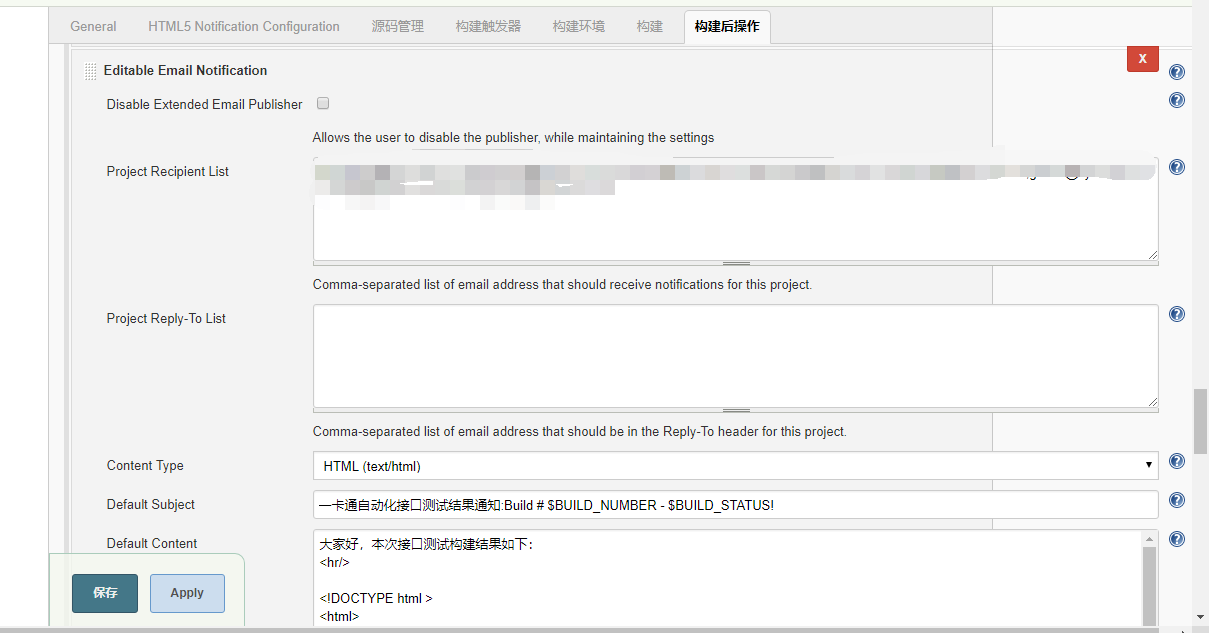
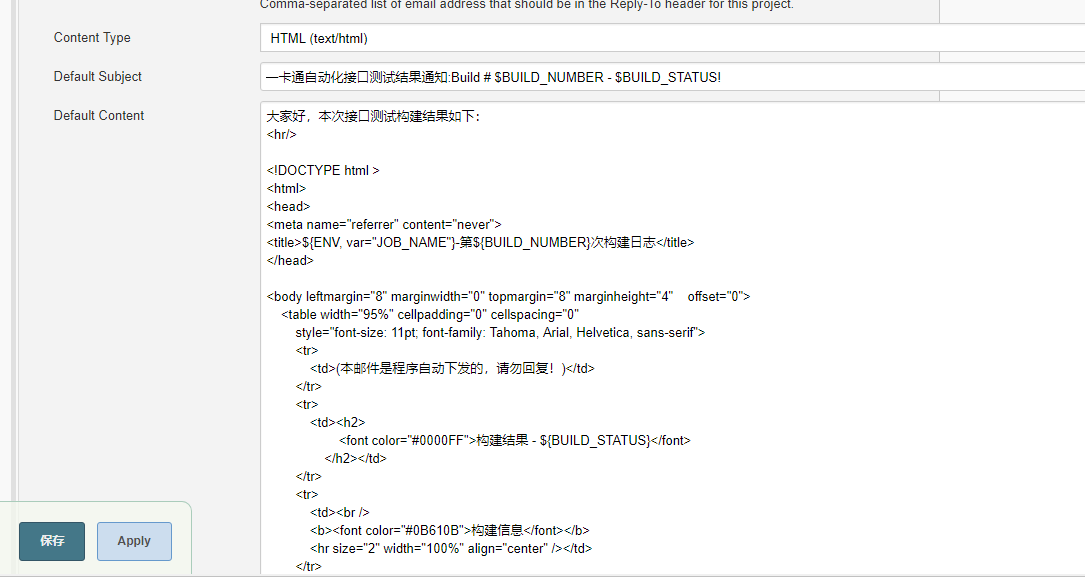
邮件的格式代码如下:
大家好,本次接口测试构建结果如下:
<hr/> <!DOCTYPE html >
<html>
<head>
<meta name="referrer" content="never">
<title>${ENV, var="JOB_NAME"}-第${BUILD_NUMBER}次构建日志</title>
</head> <body leftmargin="8" marginwidth="0" topmargin="8" marginheight="4" offset="0">
<table width="95%" cellpadding="0" cellspacing="0"
style="font-size: 11pt; font-family: Tahoma, Arial, Helvetica, sans-serif">
<tr>
<td>(本邮件是程序自动下发的,请勿回复!)</td>
</tr>
<tr>
<td><h2>
<font color="#0000FF">构建结果 - ${BUILD_STATUS}</font>
</h2></td>
</tr>
<tr>
<td><br />
<b><font color="#0B610B">构建信息</font></b>
<hr size="2" width="100%" align="center" /></td>
</tr>
<tr>
<td>
<ul>
<li>项目名称 : ${PROJECT_NAME}</li>
<li>构建编号 : 第${BUILD_NUMBER}次构建</li>
<li>触发原因: ${CAUSE}</li>
<li>构建日志: <a href="${BUILD_URL}console">${BUILD_URL}console</a></li>
<li>构建 Url : <a href="${BUILD_URL}">${BUILD_URL}</a></li>
<li>工作目录 : <a href="${PROJECT_URL}ws">${PROJECT_URL}ws</a></li>
<li>项目 Url : <a href="${PROJECT_URL}">${PROJECT_URL}</a></li>
</ul>
</td>
</tr>
<tr>
<td><b><font color="#0B610B">Changes Since Last
Successful Build:</font></b>
<hr size="2" width="100%" align="center" /></td>
</tr>
<tr>
<td>
<ul>
<li>历史变更记录 : <a href="${PROJECT_URL}changes">${PROJECT_URL}changes</a></li>
</ul> ${CHANGES_SINCE_LAST_SUCCESS,reverse=true, format="Changes for Build #%n:<br />%c<br />",showPaths=true,changesFormat="<pre>[%a]<br />%m</pre>",pathFormat=" %p"}
</td>
</tr>
<tr>
<td><b>Failed Test Results</b>
<hr size="2" width="100%" align="center" /></td>
</tr>
<tr>
<td><pre
style="font-size: 11pt; font-family: Tahoma, Arial, Helvetica, sans-serif">$FAILED_TESTS</pre>
<br /></td>
</tr>
</table> </body>
</html>
<b>${FILE,path="D:/jenkins/workspace/test/test.html"}</b>
以上是jenkins的所有设置
5.jenkins的版本太低的话,可能存在需要手动下载jenkins插件
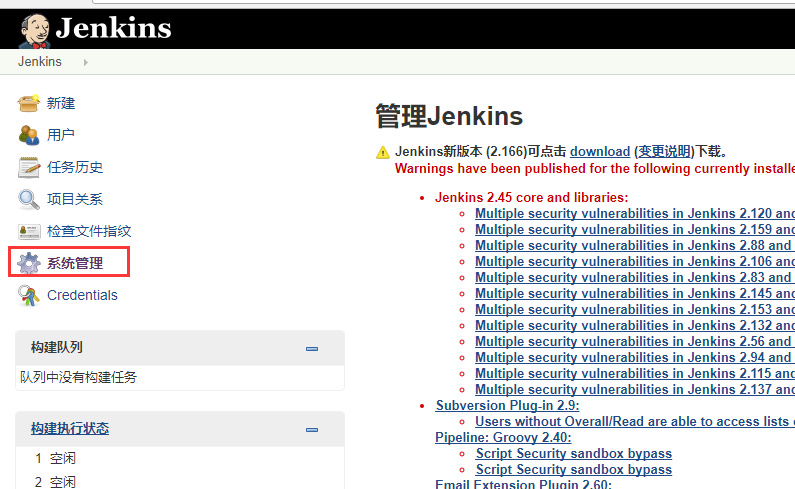
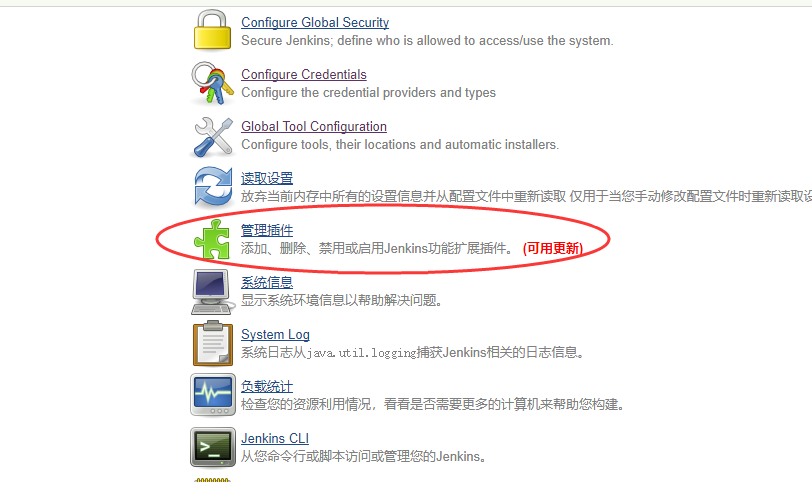

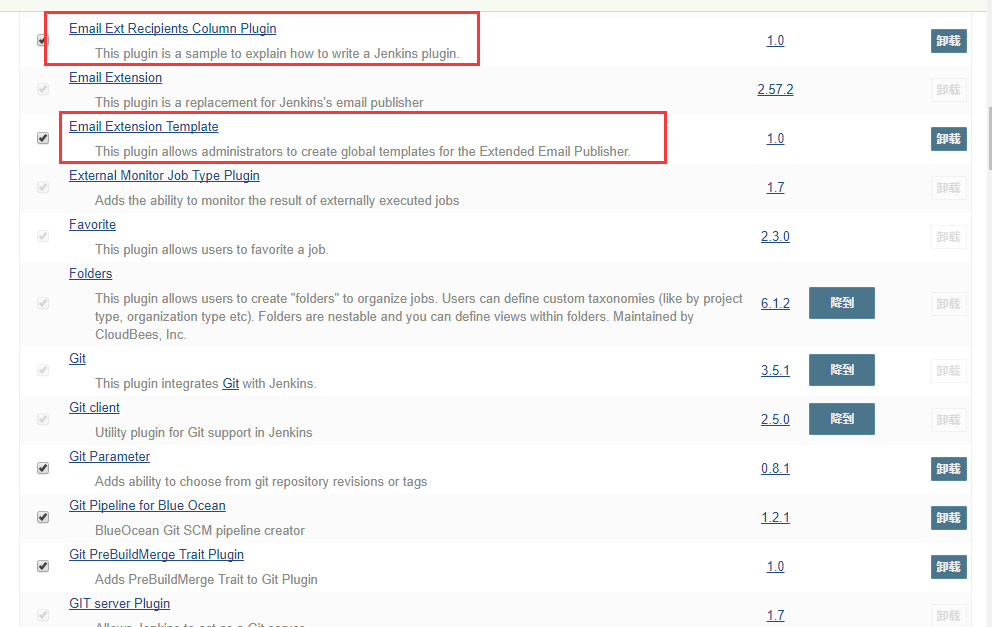

最后,附上模板代码给大家~
<xsl:stylesheet xmlns:xsl="http://www.w3.org/1999/XSL/Transform" version="1.0"> <!--
Licensed to the Apache Software Foundation (ASF) under one or more
contributor license agreements. See the NOTICE file distributed with
this work for additional information regarding copyright ownership.
The ASF licenses this file to You under the Apache License, Version 2.0
(the "License"); you may not use this file except in compliance with
the License. You may obtain a copy of the License at http://www.apache.org/licenses/LICENSE-2.0 Unless required by applicable law or agreed to in writing, software
distributed under the License is distributed on an "AS IS" BASIS,
WITHOUT WARRANTIES OR CONDITIONS OF ANY KIND, either express or implied.
See the License for the specific language governing permissions and
limitations under the License.
--> <!--
Stylesheet for processing 2.1 output format test result files
To uses this directly in a browser, add the following to the JTL file as line 2:
<?xml-stylesheet type="text/xsl" href="../extras/jmeter-results-detail-report_21.xsl"?>
and you can then view the JTL in a browser
--> <xsl:output method="html" indent="yes" encoding="GB18030" doctype-public="-//W3C//DTD HTML 4.01 Transitional//EN" /> <!-- Defined parameters (overrideable) <td bgcolor="#ff00ff"> -->
<xsl:param name="showData" select="'y'"/>
<xsl:param name="titleReport" select="'接口测试'"/> <xsl:template match="testResults">
<html > <head>
<title><xsl:value-of select="$titleReport" /></title>
<style type="text/css"> body {
font:normal 95% verdana,arial,helvetica;
color:#000000;
}
table tr td, table tr th {
font-size: 95%;
}
table.details tr th{
word-wrap:break-word;
color: #ffffff;
font-weight: bold;
text-align:center;
background:#2674a6; }
table.details tr td{
width: 400px;
word-wrap:break-word;
background:#eeeee0; }
table{
table-layout:fixed ;
}
h1 {
margin: 0px 0px 5px; font: 165% verdana,arial,helvetica
}
h2 {
margin-top: 1em; margin-bottom: 0.5em; font: bold 125% verdana,arial,helvetica
}
h3 {
margin-bottom: 0.5em; font: bold 115% verdana,arial,helvetica
}
.Failure {
font-weight:bold; color:red;
} img
{
border-width: 0px;
} .expand_link
{
position:absolute;
right: 0px;
width: 27px;
top: 1px;
height: 27px;
} .page_details
{
display: none;
} /* .page_details_expanded
{
display: block;
displayhide this definition from IE5/6: table-row;
} */ </style>
<script language="JavaScript"><![CDATA[
function expand(details_id)
{ document.getElementById(details_id).className = "page_details_expanded";
} function collapse(details_id)
{ document.getElementById(details_id).className = "page_details";
} function change(details_id)
{
if(document.getElementById(details_id+"_image").src.match("expand"))
{
document.getElementById(details_id+"_image").src = "collapse.png";
expand(details_id);
}
else
{
document.getElementById(details_id+"_image").src = "expand.png";
collapse(details_id);
}
}
]]></script>
</head>
<body > <xsl:call-template name="pageHeader" />
<xsl:call-template name="myresult" />
<xsl:call-template name="summary" />
<hr size="1" width="75%" align="center" /> <xsl:call-template name="pagelist" />
<hr size="1" width="75%" align="center" /> <xsl:call-template name="detail" /> </body> </html>
</xsl:template> <xsl:template name="pageHeader">
<h1><xsl:value-of select="$titleReport" /></h1>
<table width="100%">
<tr>
<td align="left">Date report:</td>
<td align="right">from 一卡通</td>
</tr>
</table>
<hr size="1" />
</xsl:template> <xsl:template name="myresult"> <xsl:variable name="allFailCount" select="count(/testResults/*[attribute::s='false'])" /> <xsl:if test="$allFailCount = '0'">
<h2>测试结果:成功</h2>
</xsl:if>
<xsl:if test="$allFailCount > '0'">
<h2 bgcolor="#ff00ff">测试结果:失败</h2>
<h2 bgcolor="#ff00ff">失败个数:<xsl:value-of select="count(/testResults/*[attribute::s='false'])"/></h2> </xsl:if> </xsl:template> <xsl:template name="summary">
<h2>报告概况</h2>
<table align="center" class="details" border="0" cellpadding="5" cellspacing="2" width="95%">
<tr valign="top">
<th>用例总数</th>
<th>失败数</th>
<th>成功率</th>
<th>平均响应时间</th>
</tr>
<tr valign="top">
<xsl:variable name="allCount" select="count(/testResults/*)" />
<xsl:variable name="allFailureCount" select="count(/testResults/*[attribute::s='false'])" />
<xsl:variable name="allSuccessCount" select="count(/testResults/*[attribute::s='true'])" />
<xsl:variable name="allSuccessPercent" select="$allSuccessCount div $allCount" />
<xsl:variable name="allTotalTime" select="sum(/testResults/*/@t)" />
<xsl:variable name="allAverageTime" select="$allTotalTime div $allCount" />
<xsl:variable name="allMinTime">
<xsl:call-template name="min">
<xsl:with-param name="nodes" select="/testResults/*/@t" />
</xsl:call-template>
</xsl:variable>
<xsl:variable name="allMaxTime">
<xsl:call-template name="max">
<xsl:with-param name="nodes" select="/testResults/*/@t" />
</xsl:call-template>
</xsl:variable>
<xsl:attribute name="class">
<xsl:choose>
<xsl:when test="$allFailureCount > 0">Failure</xsl:when>
</xsl:choose>
</xsl:attribute>
<td align="center">
<xsl:value-of select="$allCount" />
</td>
<td align="center">
<xsl:value-of select="$allFailureCount" />
</td>
<td align="center">
<xsl:call-template name="display-percent">
<xsl:with-param name="value" select="$allSuccessPercent" />
</xsl:call-template>
</td>
<td align="center">
<xsl:call-template name="display-time">
<xsl:with-param name="value" select="$allAverageTime" />
</xsl:call-template>
</td> </tr>
</table>
</xsl:template> <xsl:template name="pagelist">
<h2>详细情况</h2>
<table align="center" class="details" border="0" cellpadding="5" cellspacing="2" width="95%">
<tr valign="top">
<th width="50%">功能模块</th>
<th>检查次数</th>
<th>失败数</th>
<th>成功率</th>
<th>平均响应时间</th> </tr>
<xsl:for-each select="/testResults/*[not(@tn = preceding::*/@tn)]">
<xsl:variable name="label" select="@tn" />
<xsl:variable name="count" select="count(../*[@tn = current()/@tn])" />
<xsl:variable name="failureCount" select="count(../*[@tn = current()/@tn][attribute::s='false'])" />
<xsl:variable name="successCount" select="count(../*[@tn = current()/@tn][attribute::s='true'])" />
<xsl:variable name="successPercent" select="$successCount div $count" />
<xsl:variable name="totalTime" select="sum(../*[@tn = current()/@tn]/@t)" />
<xsl:variable name="averageTime" select="$totalTime div $count" />
<xsl:variable name="minTime">
<xsl:call-template name="min">
<xsl:with-param name="nodes" select="../*[@tn = current()/@tn]/@t" />
</xsl:call-template>
</xsl:variable>
<xsl:variable name="maxTime">
<xsl:call-template name="max">
<xsl:with-param name="nodes" select="../*[@tn = current()/@tn]/@t" />
</xsl:call-template>
</xsl:variable> <tr valign="top">
<xsl:attribute name="class">
<xsl:choose>
<xsl:when test="$failureCount > 0">Failure</xsl:when>
</xsl:choose>
</xsl:attribute>
<td>
<xsl:if test="$failureCount > 0">
<a><xsl:attribute name="href">#<xsl:value-of select="$label" /></xsl:attribute>
<xsl:value-of select="$label" />
</a>
</xsl:if>
<xsl:if test="0 >= $failureCount">
<xsl:value-of select="$label" />
</xsl:if>
</td>
<td align="center">
<xsl:value-of select="$count" />
</td>
<td align="center">
<xsl:value-of select="$failureCount" />
</td>
<td align="center">
<xsl:call-template name="display-percent">
<xsl:with-param name="value" select="$successPercent" />
</xsl:call-template>
</td>
<td align="center">
<xsl:call-template name="display-time">
<xsl:with-param name="value" select="$averageTime" />
</xsl:call-template>
</td> </tr> </xsl:for-each>
</table>
</xsl:template> <xsl:template name="detail">
<xsl:variable name="allFailureCount" select="count(/testResults/*[attribute::s='false'])" /> <xsl:if test="$allFailureCount > 0">
<h2>Failure Detail</h2> <xsl:for-each select="/testResults/*[not(@lb = preceding::*/@lb)]">
<xsl:variable name="failureCount" select="count(../*[@lb = current()/@lb][attribute::s='false'])" />
<xsl:if test="$failureCount > 0">
<xsl:for-each select="/testResults/*[@lb = current()/@lb][attribute::s='false']">
<h3><xsl:value-of select="@tn" />---<xsl:value-of select="@lb" /><a><xsl:attribute name="name"><xsl:value-of select="@tn" /></xsl:attribute></a></h3> <table align="center" class="details" border="0" cellpadding="5" cellspacing="2" width="95%">
<tr valign="top">
<th>http请求</th>
<th>失败详细信息</th>
<xsl:if test="$showData = 'y'">
<th>响应数据</th>
</xsl:if>
</tr> <tr>
<td><xsl:value-of select="java.net.URL" /> </td>
<td><xsl:value-of select="assertionResult/failureMessage" /></td>
<xsl:if test="$showData = 'y'">
<td><xsl:value-of select="responseData" /></td>
</xsl:if>
</tr> </table>
</xsl:for-each>
</xsl:if> </xsl:for-each>
</xsl:if>
</xsl:template> <xsl:template name="min">
<xsl:param name="nodes" select="/.." />
<xsl:choose>
<xsl:when test="not($nodes)">NaN</xsl:when>
<xsl:otherwise>
<xsl:for-each select="$nodes">
<xsl:sort data-type="number" />
<xsl:if test="position() = 1">
<xsl:value-of select="number(.)" />
</xsl:if>
</xsl:for-each>
</xsl:otherwise>
</xsl:choose>
</xsl:template> <xsl:template name="max">
<xsl:param name="nodes" select="/.." />
<xsl:choose>
<xsl:when test="not($nodes)">NaN</xsl:when>
<xsl:otherwise>
<xsl:for-each select="$nodes">
<xsl:sort data-type="number" order="descending" />
<xsl:if test="position() = 1">
<xsl:value-of select="number(.)" />
</xsl:if>
</xsl:for-each>
</xsl:otherwise>
</xsl:choose>
</xsl:template> <xsl:template name="display-percent">
<xsl:param name="value" />
<xsl:value-of select="format-number($value,'0.00%')" />
</xsl:template> <xsl:template name="display-time">
<xsl:param name="value" />
<xsl:value-of select="format-number($value,'0 ms')" />
</xsl:template> </xsl:stylesheet>
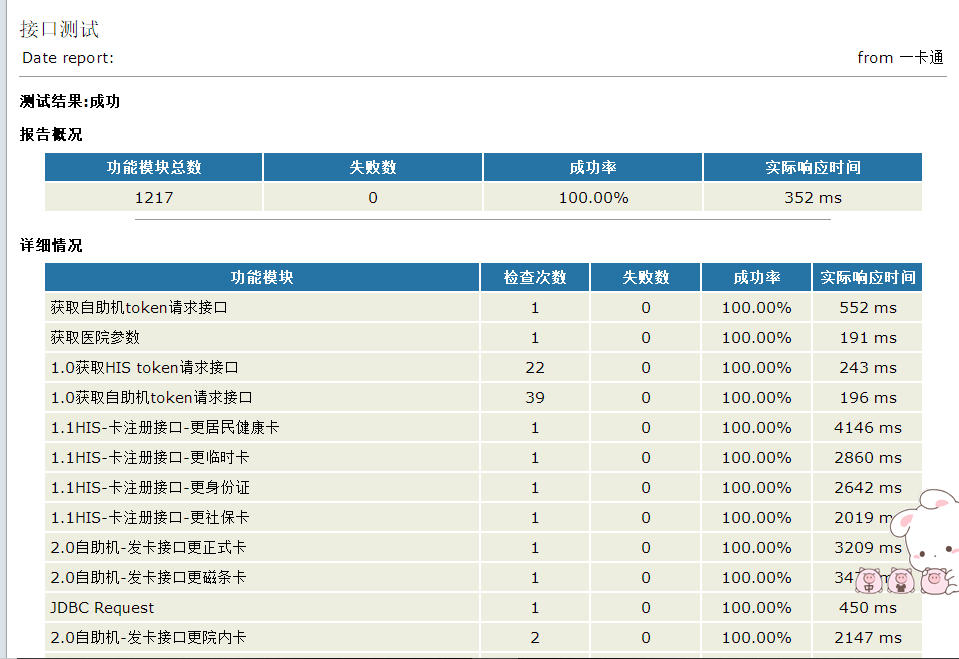
模板的截图如下:
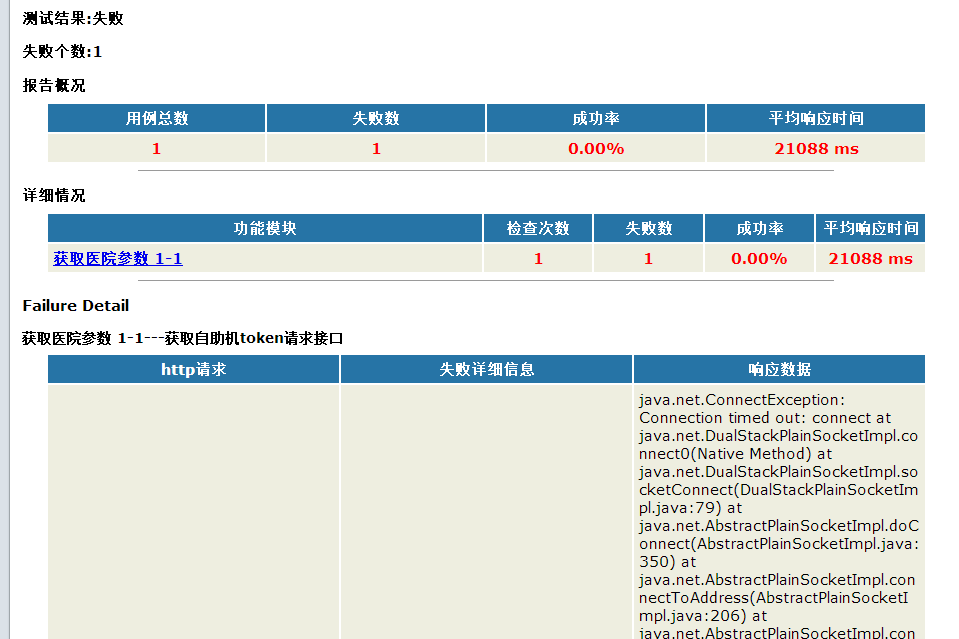
jmeter接口自动化部署jenkins教程的更多相关文章
- Jenkins+Ant+Jmeter接口自动化集成测试实例
Jenkins+Ant+Jmeter接口自动化集成测试实例 一.Jenkins安装配置 1.安装配置JDK1.6+环境变量: 2.下载jenkins.war,放入C:\jenkins目录下,目录位置随 ...
- 转载:python + requests实现的接口自动化框架详细教程
转自https://my.oschina.net/u/3041656/blog/820023 摘要: python + requests实现的接口自动化框架详细教程 前段时间由于公司测试方向的转型,由 ...
- python + requests实现的接口自动化框架详细教程
前段时间由于公司测试方向的转型,由原来的web页面功能测试转变成接口测试,之前大多都是手工进行,利用postman和jmeter进行的接口测试,后来,组内有人讲原先web自动化的测试框架移驾成接口的自 ...
- 第9期《jmeter接口自动化实战》零基础入门!
2019年 第9期<jmeter接口自动化实战>课程,12月6号开学! 上课方式:QQ群视频在线教学 本期上课时间:12月6号-1月18号,每周五.周六晚上20:00-22:00 报名费: ...
- JMeter接口自动化发包与示例
JMeter接口自动化发包与示例 近期需要完成对于接口的测试,于是了解并简单做了个测试示例,看了看这款江湖上声名远播的强大的软件-Jmeter靠不靠谱. 官网:https://jmeter.apach ...
- Jenkins+ant+Jmeter接口自动化框架搭建
工具准备 JDK: jdk1.8.0_111 Ant: apache-ant-1.9.9 Jmeter: apache-jmeter-3.1 Jenkins: jenkins-2.7.4 JDK安装 ...
- Jmeter 接口自动化-脚本数据分离实例
一. 背景: 为了让大家更加的了解Jmeter,并且使用起来游刃有余.这篇我们主要讲一下,如何优雅的使用Jmeter一步步的实现接口自动化,完成脚本与数据分离,把可能对Jmeter脚本的维护转移到c ...
- jmeter接口自动化集成
接口自动化集成 一.jmeter基础学习 1.博客 :http://www.cnblogs.com/fnng/category/345478.html 2.博客 http://www.cnblo ...
- jmeter接口自动化和性能学习目录
目录黑色代表未完成的,绿色代表已完成的文章.目录的作用的为了引导和总结自己的学习,也是为了更好的分享给大家. 一.接口自动化 jmeter解决登录token获取 jmeter五种提取器 之 正则表达 ...
随机推荐
- C#程序集问题:混合模式程序集是针对“v2.0.50727”版的运行时生成的.....
今天在把以前写的代码生成工具从原来的.NET3.5升级到.NET4.0,同时准备进一步完善,将程序集都更新后,一运行程序在一处方法调用时报出了一个异常: 混合模式程序集是针对“v2.0.50727”版 ...
- 1.6getId()方法
getId()方法的作用是取得线程的唯一标识. package com.cky.test; /** * Created by chenkaiyang on 2017/12/2. */ public c ...
- eclipse环境搭建(插件安装)
转自:http://www.iteye.com/topic/982182 使用eclipse真的有年头了,相信java程序员没有不知道它的,最近在给团队中新来的应届生做指导,专门讲解了一下Eclips ...
- css,jQuery,js部分注释
注释:在开头加上<!--,以-->结尾 alt属性,也被称为alt text, 是当图片无法加载时显示的替代文本 action属性的值指定了表单提交到服务器的地址 除了分别指定元素的 pa ...
- HDU 2057 十六进制加减法
http://acm.hdu.edu.cn/showproblem.php?pid=2057 水题,%I64X 长整形十六进制输入输出 #include<stdio.h> in ...
- noip第17课作业
1. 召见骑士 [问题描述] 某王国有5位骑士,每位骑士都有自己的编号,且这个王国的编号都为奇数,分别为1,3,5,7,9,在国王召见他们之前他们都必须经过只能从一边进出的长廊,长廊的宽度只能坐一个 ...
- Maven中项目的启动
在run选项卡中,选择Run Configurations
- windows 2008远程桌面企业协议号
windows 2008远程桌面企业协议号 6565792 (2015-01-07 14:47:31) 转载▼ 标签: it 桌面 终端服务器 客户端 服务器 分类: 操作系统/办公软件 微软的终端服 ...
- Linux-帮助与基本命令
1.获取命令帮助 Linux中的命令按可分类shell内嵌命令.外部命令,获取命令帮助信息前需要区分命令类型. 1.1 type - 查看命令类型 [root@VM_0_171_centos ~]# ...
- C#: 以管理员权限运行包含有cd命令的.bat文件
最近在做项目的时候遇到一种情:用C#程序以管理员权限去执行一个bat文件,且此bat文件里面有cd命令来进入文件的下一级目录,比如: echo test begin cd test1 setup1.e ...