
多线程学习笔记四之Condition实现分析
简介
在使用内置锁synchronized时,通过调用java.lang.Objec中定义的监视器方法,主要有wait()、wait(long timeout)、notify()和notifyAll()方法,可以实现等待/通知模式。Codition接口中也定义了类似的监视器方法,与显示锁Lock配合使用也可以实现等待/通知模式。
当线程需要利用Condition对象进行等待时,需要提前获取到Condition对象关联的显示锁Lock对象,使用案例如下:
    Lock lock = new ReentrantLock();

    Condition condition = lock.newCondition();

	//等待

    public void coditionWait() throws InterruptedException {

        lock.lock();

        try {

            condition.await();

        }finally {

            lock.unlock();

        }

    }

	//通知

    public void coditionSignal() throws InterruptedException {

        lock.lock();

        try {

            condition.signal();

        }finally {

            lock.unlock();

        }

    }
Condition接口由同步器AbstractQueuedSynchronizer内部类ConditionObject提供实现,而显示锁Lock对象实现时内部类Sync会继承AQS,从而把Condition对象与Lock对象关联起来。
等待队列
在上一篇博客中介绍到为了处理多个线程竞争同一把锁,同步器AQS中维护了一个先入先出的双向同步队列,让竞争失败的线程进入同步队列等待。同样,AQS在实现Condition接口也维护了一个先入先出的单向等待队列,当一个与Lock对象关联的Condition对象调用await方法,获得锁的线程就要释放锁,并推出同步队列head头节点,进入condition等待队列。condition队列规定了头节点firstWaiter和尾节点lastWaiter。
public class ConditionObject implements Condition, java.io.Serializable {

        private static final long serialVersionUID = 1173984872572414699L;

        /** First node of condition queue. */

        private transient Node firstWaiter;

        /** Last node of condition queue. */

        private transient Node lastWaiter;

}

AQS中构建等待队列复用了内部类Node结点类
    static final class Node {

		//等待状态

        volatile int waitStatus;

		//前驱结点

        volatile Node prev;

		//后继节点

        volatile Node next;

		//等待获取锁的线程

        volatile Thread thread;

		//condition队列的后继节点

        Node nextWaiter;

    }
nextWaiter
从上图可以发现,Condition等待队列是一个先入先出的单向链表,从链表尾部加入元素,头部移出链表。使用nextWaiter指向下一个等待节点,构成链表的基本元素是节点Node,复用了AQS中的Node类,nextWaiter并不单单在Condition链表指向下一个等待节点。这是Node类定义nextWaiter的注释:
Link to next node waiting on condition, or the special value SHARED. Because condition queues are accessed only when holding in exclusive mode, we just need a simple linked queue to hold nodes while they are waiting on conditions. They are then transferred to the queue to re-acquire. And because conditions can only be exclusive,we save a field by using special value to indicate sharedmode.
大意是只有独占锁才会关联Condition队列,通过nextWaiter变量在构成同步队列节点标识同步锁是独占锁还是共享锁,从以下方法可以看出AQS使用nextWaiter来表示锁:
	/** Marker to indicate a node is waiting in shared mode */

    static final Node SHARED = new Node();

    /** Marker to indicate a node is waiting in exclusive mode */

    static final Node EXCLUSIVE = null;

	//判断是否是共享锁

    final boolean isShared() {

        return nextWaiter == SHARED;

    }

	//构建同步队列节点,nextWaiter标识同步锁是独占锁还是共享锁

	Node(Thread thread, Node mode) {     // Used by addWaiter

        this.nextWaiter = mode;

        this.thread = thread;

    }

	//构建等待队列节点,nextWaiter指向单向链表下一个节点

    Node(Thread thread, int waitStatus) { // Used by Condition

        this.waitStatus = waitStatus;

        this.thread = thread;

    }
从以上分析可以看出:AQS复用了Node类来构建同步队列和等待队列,Node用来构建同步队列节点,nextWaiter标识同步锁是独占锁还是共享锁;Node用来构建等待队列节点,nextWaiter指向单向链表下一个节点。刚开始看这一部分时,对我造成了很大的困扰,所以特地写出来。
源码分析
await()
await实现等待考虑到了中断,若当前线程等待期间发生中断,抛出InterruptedException异常。线程在等待期间会被阻塞,直到发生中断或者Condition对象调用signal方法。基本流程:首先将node加入condition队列,然后释放锁,挂起当前线程等待唤醒,唤醒后线程重新进入同步队列并调用acquireQueued获取锁。流程图如下:
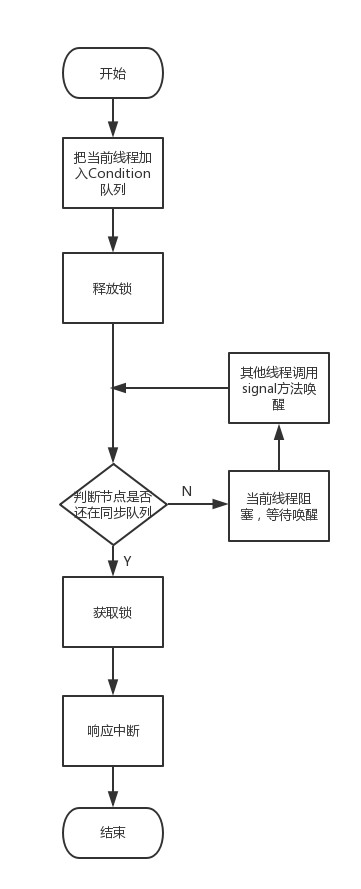
    public final void await() throws InterruptedException {

        if (Thread.interrupted())

            throw new InterruptedException();

		//将当前线程加入Condition等待队列

        Node node = addConditionWaiter();

        int savedState = fullyRelease(node);

        int interruptMode = 0;

		//判断当前线程是否在同步队列中

        while (!isOnSyncQueue(node)) {

			//阻塞当前线程

            LockSupport.park(this);

			//在阻塞的过程中发生中断

            if ((interruptMode = checkInterruptWhileWaiting(node)) != 0)

                break;

        }

		//被其他线程唤醒,退出Condition等待队列加入同步队列

		//获取锁

        if (acquireQueued(node, savedState) && interruptMode != THROW_IE)

            interruptMode = REINTERRUPT;

        if (node.nextWaiter != null) // clean up if cancelled

            unlinkCancelledWaiters();

        if (interruptMode != 0)

            reportInterruptAfterWait(interruptMode);

    }
- addConditionWaiter()
以当前线程构成节点Node加入等待队列,因为加入Condition等待队列在释放锁之前,所以不需要考虑并发的情况,就不需要像加入同步队列采用循环加CAS的机制。
    private Node addConditionWaiter() {

        Node t = lastWaiter;

        // If lastWaiter is cancelled, clean out.

		//如果尾节点lastWaiter等待状态是CANCELLED,将队列所有CANCELLED节点清除

        if (t != null && t.waitStatus != Node.CONDITION) {

            unlinkCancelledWaiters();

            t = lastWaiter;

        }

		//以当前线程构成节点

        Node node = new Node(Thread.currentThread(), Node.CONDITION);

		//尾节点为空,等待队列为空,进行初始化,当前节点是等待队列的头节点

        if (t == null)

            firstWaiter = node;

		//否则添加到等待队列的尾部,当前节点是等待队列新的lastWaiter

        else

            t.nextWaiter = node;

        lastWaiter = node;

        return node;

    }

	//unlinkCancelledWaiters方法遍历CONDITION队列,删除状态为CANCELLED的节点。

	private void unlinkCancelledWaiters() {

		//首节点

        Node t = firstWaiter;

		//保存遍历节点前驱节点的引用

        Node trail = null;

		//单向链表从前往后遍历

        while (t != null) {

			//下一个节点

            Node next = t.nextWaiter;

			//节点t的waitStatus为CANCELLED

            if (t.waitStatus != Node.CONDITION) {

                 t.nextWaiter = null;

                if (trail == null)

                    firstWaiter = next;

                else

                     trail.nextWaiter = next;

                if (next == null)

                    lastWaiter = trail;

            }

            else

                trail = t;

            t = next;

        }

    }
- fullyRelease(Node node)
完全释放锁,释放成功则返回,失败则将当前节点(在Condition队列)的状态设置成CANCELLED表示当前节点失效
	final int fullyRelease(Node node) {

	    boolean failed = true;

	    try {

			//获取同步状态

	        int savedState = getState();

			//如果是重入锁,要多次释放

	        if (release(savedState)) {

	            failed = false;

	            return savedState;

	        } else {

	            throw new IllegalMonitorStateException();

	        }

	    } finally {

	        if (failed)

	            node.waitStatus = Node.CANCELLED;

	    }

	}
- isOnSyncQueue(Node node)
判断node节点是否被signal方法从condition队列转移到同步队列
    final boolean isOnSyncQueue(Node node) {

		//转移到同步队列,CONDITION状态会被清除

		//同步队列prev表示前驱结点,不为null

        if (node.waitStatus == Node.CONDITION || node.prev == null)

            return false;

		//同步队列next表示后继节点,不为null

        if (node.next != null) // If has successor, it must be on queue

            return true;

        /*

         * node.prev can be non-null, but not yet on queue because

         * the CAS to place it on queue can fail. So we have to

         * traverse from tail to make sure it actually made it.  It

         * will always be near the tail in calls to this method, and

         * unless the CAS failed (which is unlikely), it will be

         * there, so we hardly ever traverse much.

         */

		//遍历同步队列,一个一个找

        return findNodeFromTail(node);

    }
- checkInterruptWhileWaiting(Node node)
检查当前线程在等待状态时中断状态,返回REINTERRUPT标志位,退出等待状态时调用selfInterrupt方法产生中断;返回THROW_IE标志位,线程退出等待状态时会抛出InterruptedException异常。
        //表示从等待状态退出时会重新产生一个中断,但不会抛出异常

        private static final int REINTERRUPT =  1;

        //从等待状态退出时抛出InterruptedException异常

        private static final int THROW_IE    = -1;

        /**

         * Checks for interrupt, returning THROW_IE if interrupted

         * before signalled, REINTERRUPT if after signalled, or

         * 0 if not interrupted.

         */

        private int checkInterruptWhileWaiting(Node node) {

            return Thread.interrupted() ?

                (transferAfterCancelledWait(node) ? THROW_IE : REINTERRUPT) :

                0;

        }
- reportInterruptAfterWait(int interruptMode)
根据interruptMode对应的标志位响应中断
    private void reportInterruptAfterWait(int interruptMode)

        throws InterruptedException {

		//产生异常

        if (interruptMode == THROW_IE)

            throw new InterruptedException();

		//产生中断

        else if (interruptMode == REINTERRUPT)

            selfInterrupt();

    }
signal()
检查当前线程是否占据独占锁,唤醒等待在当前Condition对象等待最久的线程(等待队列的头节点)
    public final void signal() {

		//检查当前线程是否占据独占锁,如果不是没有权限唤醒等待线程,抛出异常

        if (!isHeldExclusively())

            throw new IllegalMonitorStateException();

        Node first = firstWaiter;

        if (first != null)

            doSignal(first);

    }

	private void doSignal(Node first) {

        do {

            if ( (firstWaiter = first.nextWaiter) == null)

                lastWaiter = null;

            first.nextWaiter = null;

        } while (!transferForSignal(first) &&

                (first = firstWaiter) != null);

    }
- transferForSignal(Node node)
将当前线程从Condition等待队列转移到同步队列中,看到这里应该明白为什么await方法以节点是否在同步队列(isOnSyncQueue(node))做为循环条件了。
    final boolean transferForSignal(Node node) {

        /*

         * If cannot change waitStatus, the node has been cancelled.

         */

		//如果CAS设置失败,说明节点在signal之前被取消了,返回false

        if (!compareAndSetWaitStatus(node, Node.CONDITION, 0))

            return false;

		//CAS设置成功,入队

		//插入节点的前驱节点

        Node p = enq(node);

		//前驱节点的等待状态

        int ws = p.waitStatus;

		//如果p等待状态为CANECLLED或对p进行CAS设置失败,则唤醒线程,让node中线程进入acquireQueued方法。否则

		//由于前驱节点等待状态为signal,由同步器唤醒线程

        if (ws > 0 || !compareAndSetWaitStatus(p, ws, Node.SIGNAL))

            LockSupport.unpark(node.thread);

        return true;

    }
signalAll()
将等待队列所有节点依次转移到同步队列末尾。
    public final void signalAll() {

        if (!isHeldExclusively())

            throw new IllegalMonitorStateException();

        Node first = firstWaiter;

        if (first != null)

            doSignalAll(first);

    }

    private void doSignalAll(Node first) {

        lastWaiter = firstWaiter = null;

        do {

			//first节点从condition队列移出

            Node next = first.nextWaiter;

            first.nextWaiter = null;

			//first节点加入同步队列

            transferForSignal(first);

			//更新first节点指向

            first = next;

        } while (first != null);

    }
总结
以上是对AQS中内部类ConditionObject对Condition接口实现的简单分析。
多线程学习笔记四之Condition实现分析的更多相关文章
- java多线程学习笔记——详细
一.线程类 1.新建状态(New):新创建了一个线程对象. 2.就绪状态(Runnable):线程对象创建后,其他线程调用了该对象的start()方法.该状态的线程位于可运行线程池中, ...
- 多线程学习笔记九之ThreadLocal
目录 多线程学习笔记九之ThreadLocal 简介 类结构 源码分析 ThreadLocalMap set(T value) get() remove() 为什么ThreadLocalMap的键是W ...
- ZooKeeper学习笔记四:使用ZooKeeper实现一个简单的分布式锁
作者:Grey 原文地址: ZooKeeper学习笔记四:使用ZooKeeper实现一个简单的分布式锁 前置知识 完成ZooKeeper集群搭建以及熟悉ZooKeeperAPI基本使用 需求 当多个进 ...
- C#可扩展编程之MEF学习笔记(四):见证奇迹的时刻
前面三篇讲了MEF的基础和基本到导入导出方法,下面就是见证MEF真正魅力所在的时刻.如果没有看过前面的文章,请到我的博客首页查看. 前面我们都是在一个项目中写了一个类来测试的,但实际开发中,我们往往要 ...
- IOS学习笔记(四)之UITextField和UITextView控件学习
IOS学习笔记(四)之UITextField和UITextView控件学习(博客地址:http://blog.csdn.net/developer_jiangqq) Author:hmjiangqq ...
- memcached学习笔记——存储命令源码分析下篇
上一篇回顾:<memcached学习笔记——存储命令源码分析上篇>通过分析memcached的存储命令源码的过程,了解了memcached如何解析文本命令和mencached的内存管理机制 ...
- memcached学习笔记——存储命令源码分析上篇
原创文章,转载请标明,谢谢. 上一篇分析过memcached的连接模型,了解memcached是如何高效处理客户端连接,这一篇分析memcached源码中的process_update_command ...
- java之jvm学习笔记四(安全管理器)
java之jvm学习笔记四(安全管理器) 前面已经简述了java的安全模型的两个组成部分(类装载器,class文件校验器),接下来学习的是java安全模型的另外一个重要组成部分安全管理器. 安全管理器 ...
- Learning ROS for Robotics Programming Second Edition学习笔记(四) indigo devices
中文译著已经出版,详情请参考:http://blog.csdn.net/ZhangRelay/article/category/6506865 Learning ROS for Robotics Pr ...
随机推荐
- Linux 之 crontab 使用
定时任务 任务调度的crond常驻命令crond 是linux用来定期执行程序的命令.当安装完成操作系统之后,默认便会启动此任务调度命令.crond命令每分锺会定期检查是否有要执行的工作,如果有要执行 ...
- Sql Server数据库小知识点总结
把我在开发时候遇到的一点小知识持续更新在这里~ 1.where条件时常变 where UserID='1' 这里的UserID呢,它的值是经常在变化的,有时候要查2,有时候要查3的,有时候要查全部人! ...
- AngularJS总结
因为最近想学习一下ionic框架,了解到ionic是基于AngularJS语法,并且通过SASS构建应用程序,之前自己一直用Vue框架,还有Less,刚刚好趁此机会,学习一下AngularJS与SAS ...
- SQL记录-PLSQL-DBMS输出
PL/SQL DBMS输出 DBMS_OUTPUT是一个内置的软件包,能够显示输出显示调试信息,并从PL/ SQL块,子程序,包和触发器发送消息.我们已经使用这个包在我们所有的教程中. 让我们来看 ...
- Lua程序设计(一)面向对象概念介绍
完整代码 local mt = {} mt.__add = function(t1,t2) print("两个Table 相加的时候会调用我") end local t1 = {} ...
- Java入门系列(七)Java 集合框架(JCF, Java Collections Framework)
Java 集合概述 List.Set.Map可以看做集合的三大类 java集合就像一个容器,可以将多个对象的引用丢进该容器中. Collection和Map是java集合的根接口. List List ...
- CSS-3 新弹性盒模型属性
flex 语法:flex:none | [ flex-grow ] || [ flex-shrink ] || [ flex-basis ] 取值: none:none关键字的计算值为: 0 0 au ...
- 20155303 2016-2017-2 《Java程序设计》第六周学习总结
20155303 2016-2017-2 <Java程序设计>第六周学习总结 课堂笔记 高效学习法推荐 看视频学习(2h)→ 以代码为中心看课本,思考运行结果并验证(3h)→ 课后作业验证 ...
- CSSOM
概要 狭义的 DOM API 仅仅包含 DOM 树形结构相关的内容. DOM 中的所有的属性都是用来表现语义的属性,CSSOM 的则都是表现的属性. CSSOM 是 CSS 的对象模型,在 W3C 标 ...
- 【ORACLE】oracl基本操作笔记
1.用命令导入导出表 C:\Users\xiang>imp bjlims/bjlims@orcl file="c:\tjlims.dmp" full=y C:\Users\x ...