自定义UICollectinviewFlowLayout,即实现瀑布流
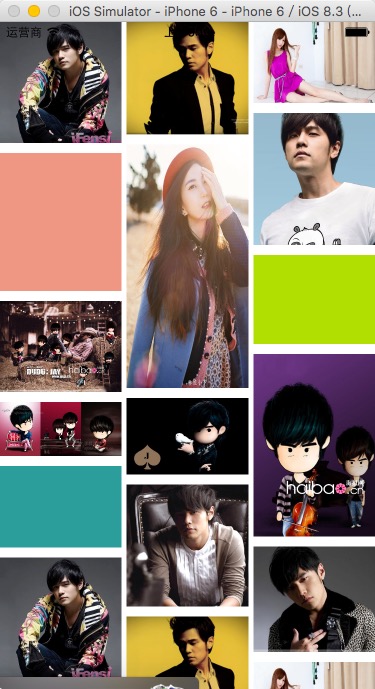
如图所示,通过实现不规则的网格分布,来显示出不同的效果。因为集合视图必须要指定布局还可以显示,所以自定义布局就可以实现瀑布流的效果。
//创建布局对象

    WaterFlowLayout *flowLayout = [[WaterFlowLayout alloc] init];

    flowLayout.delegate = self;

    flowLayout.numberOfColumn = ;

    //创建集合视图

    UICollectionView *collectionView = [[UICollectionView alloc] initWithFrame:[UIScreen mainScreen].bounds collectionViewLayout:flowLayout];
因为系统自带的布局有四个方法,分别实现了item大小,分区间隔,最小行间距,item之间的间隙大小
@protocol UICollectionViewDelegateFlowLayout <UICollectionViewDelegate>

@optional

- (CGSize)collectionView:(UICollectionView *)collectionView layout:(UICollectionViewLayout*)collectionViewLayout sizeForItemAtIndexPath:(NSIndexPath *)indexPath;

- (UIEdgeInsets)collectionView:(UICollectionView *)collectionView layout:(UICollectionViewLayout*)collectionViewLayout insetForSectionAtIndex:(NSInteger)section;

- (CGFloat)collectionView:(UICollectionView *)collectionView layout:(UICollectionViewLayout*)collectionViewLayout minimumLineSpacingForSectionAtIndex:(NSInteger)section;

- (CGFloat)collectionView:(UICollectionView *)collectionView layout:(UICollectionViewLayout*)collectionViewLayout minimumInteritemSpacingForSectionAtIndex:(NSInteger)section;
所以,自定义FlowLayout,并定义协议,以便定义这些方法。
@protocol WaterFlowLayoutDelegate <NSObject>

//关键方法,此方法的作用是返回每一个item的size大小

//数据中原始图片大小

- (CGSize)collectionView:(UICollectionView *)collectionView layout:(WaterFlowLayout *)collectionViewLayout sizeForItemAtIndexPath:(NSIndexPath *)indexPath;

//分区间隔

- (UIEdgeInsets)collectionView:(UICollectionView *)collectionView layout:(WaterFlowLayout *)collectionViewLayout insetForSectionAtIndex:(NSInteger)section;

//得到 item之间的间隙大小

- (CGFloat)collectionView:(UICollectionView *)collectionView layout:(WaterFlowLayout *)collectionViewLayout minimumLineSpacingForSectionAtIndex:(NSInteger)section;

//最小行间距

- (CGFloat)collectionView:(UICollectionView *)collectionView layout:(WaterFlowLayout *)collectionViewLayout minimumInteritemSpacingForSectionAtIndex:(NSInteger)section;

@end

@interface WaterFlowLayout : UICollectionViewLayout

//瀑布流一共多少列

@property (nonatomic, assign) NSUInteger numberOfColumn;

@property (nonatomic, assign) id<WaterFlowLayoutDelegate>delegate;
看图可知,最小高的的item,将作为下一列item的起点。
@interface WaterFlowLayout ()

//存放每一列的高度

@property (nonatomic, retain) NSMutableArray *columnHeightsArray;

//存放 每一个item的 属性 包含 frame以及下标

@property (nonatomic, retain) NSMutableArray *attributesArray;

@end

@implementation WaterFlowLayout

//获取最小高度的方法

- (CGFloat)minHeight

{

    CGFloat min = ;

    for (NSNumber *height in _columnHeightsArray) {

        CGFloat h = [height floatValue];

        if (min > h) {

            min = h;

        }

    }

    return min;

}

//获取最大值

- (CGFloat)maxHeight

{

    CGFloat max = ;

    for (NSNumber *height in _columnHeightsArray) {

        CGFloat h = [height floatValue];

        if (max < h) {

            max = h;

        }

    }

    return max;

}

//找到最小高的下标

- (NSUInteger)indexOfMinHeight

{

    NSUInteger index = ;

    for (int i = ; i < [_columnHeightsArray count]; i ++) {

        CGFloat height = [_columnHeightsArray[i] floatValue];

        if (height == [self minHeight]) {

            index = i;

            return index;

        }

    }

    return index;

}

//重写父类的布局方法

- (void)prepareLayout

{

    [super prepareLayout];

    _attributesArray = [[NSMutableArray alloc] init];

    _columnHeightsArray = [[NSMutableArray alloc] initWithCapacity:self.numberOfColumn];

    //给列高数组里面的对象赋初值

    for (int i = ; i < self.numberOfColumn; i ++) {

        [_columnHeightsArray addObject:@0.0];

    }

    CGFloat totalWidth = self.collectionView.frame.size.width;

    //创建 每个item frame中的x、y

    CGFloat x = ;

    CGFloat y = ;

    NSUInteger itemCount = [self.collectionView numberOfItemsInSection:];

    for (int i = ; i < itemCount; i ++) {

        //得到集合视图中 列间隙的个数

        NSUInteger numberOfSpace = self.numberOfColumn - ;

        //代理对象执行代理方法,得到 item之间的间隙大小

        CGFloat spaceWidth = [_delegate collectionView:self.collectionView layout:self minimumInteritemSpacingForSectionAtIndex:];

        //求每列的宽度,也就是每个item的width

        CGFloat width = (totalWidth - spaceWidth * numberOfSpace) / self.numberOfColumn;

        //获取每一个itemSize的大小

        NSIndexPath *indexPath = [NSIndexPath indexPathForItem:i inSection:];

        //数据中原始图片大小

        CGSize imageSize = [_delegate collectionView:self.collectionView layout:self sizeForItemAtIndexPath:indexPath];

        //通过 约分公式得到固定宽之后的高度是多少

        CGFloat height = width * imageSize.height / imageSize.width;

        UICollectionViewLayoutAttributes *attribute = [UICollectionViewLayoutAttributes layoutAttributesForCellWithIndexPath:indexPath];

        //记录每一个item的大小和位置

        attribute.frame = CGRectMake(x, y, width, height);

        //数组保存每个item的位置信息

        [_attributesArray addObject:attribute];

        NSLog(@"item = %d",i);

        NSLog(@"x = %.2f y = %.2f width = %.2f height = %.2f",x,y,width,height);

        //求列高最小的那一列的下标

        NSUInteger minHeightIndex = [self indexOfMinHeight];

        //求出最小列的高度

        CGFloat minHeight = [_columnHeightsArray[minHeightIndex] floatValue];

        //求出行高

        CGFloat lineHeight = [_delegate collectionView:self.collectionView layout:self minimumLineSpacingForSectionAtIndex:];

        //上一次总的列高 加上 行高 加上新加上的item的height,才是现在这一列的总高度

        //minHeight为最小列现在的高度

        //lineHeight为行间距

        //height为新加的item的高

        _columnHeightsArray[minHeightIndex] = [NSNumber numberWithFloat:minHeight + lineHeight + height];

        //重新算最小列高的下标

        minHeightIndex = [self indexOfMinHeight];

        //算下一次新加的item的x和y值

        x = (spaceWidth + width) * minHeightIndex;

        y = [self minHeight];

    }

}

//重写这个方法,可以返回集合视图的总高度

- (CGSize)collectionViewContentSize

{

    return CGSizeMake(self.collectionView.frame.size.width, [self maxHeight]);

}

- (NSArray *)layoutAttributesForElementsInRect:(CGRect)rect

{

    return _attributesArray;

}
注意,最后一个方法的实现,即- (NSArray *)layoutAttributesForElementsInRect:(CGRect)rect,如果这个方法不写,集合视图是显示不出来的,这个方法是次保存的每个item的信息重新告诉集合视图,进行显示。
自定义UICollectinviewFlowLayout,即实现瀑布流的更多相关文章
- 自定义UICollectionViewLayout 布局实现瀑布流
自定义 UICollectionViewLayout 布局,实现瀑布流:UICollectionView和UICollectionViewCell 另行创建,这只是布局文件, 外界控制器只要遵守协议并 ...
- 自定义基于jquery竖向瀑布流插件
公司新项目做了一个关于图片的板块,网上找了一些瀑布流插件都不是很适合自己,于是就自己造轮子写一个,并封装成插件github 于是就想分享一下,主要是为了更好的学习与记忆. 如果大家进来了,希望能给我g ...
- iOS开发之窥探UICollectionViewController(三) --使用UICollectionView自定义瀑布流
上篇博客的实例是自带的UICollectionViewDelegateFlowLayout布局基础上来做的Demo, 详情请看<iOS开发之窥探UICollectionViewControlle ...
- iOS---UICollectionView自定义流布局实现瀑布流效果
自定义布局,实现瀑布流效果 自定义流水布局,继承UICollectionViewLayout 实现一下方法 // 每次布局之前的准备 - (void)prepareLayout; // 返回所有的尺寸 ...
- iOS开发之窥探UICollectionViewController(四) --一款功能强大的自定义瀑布流
在上一篇博客中<iOS开发之窥探UICollectionViewController(三) --使用UICollectionView自定义瀑布流>,自定义瀑布流的列数,Cell的外边距,C ...
- 自定义UICollectionLayout布局 —— UIKit之学习UICollectionView记录一《瀑布流》
一.思路 思路一:比较每一行所有列的cell的高度,从上到下(也就是从第一行开始),从最短的开始计算,(记录下b的高度和索引,从开始计算,依次类推) 思路二:设置上.下.左.右间距和行间距.列间距及列 ...
- 自定义UICollectionViewLayout之瀑布流
目标效果 因为系统给我们提供的 UICollectionViewFlowLayout 布局类不能实现瀑布流的效果,如果我们想实现 瀑布流 的效果,需要自定义一个 UICollectionViewLay ...
- android自定义viewgroup之我也玩瀑布流
先看效果图吧, 继上一篇<android自定义viewgroup实现等分格子布局>中实现的布局效果,这里稍微有些区别,每个格子的高度不规则,就是传说的瀑布流布局,一般实现这种效果,要么用第 ...
- iOS自定义UICollectionViewLayout之瀑布流
目标效果 因为系统给我们提供的 UICollectionViewFlowLayout 布局类不能实现瀑布流的效果,如果我们想实现 瀑布流 的效果,需要自定义一个 UICollectionViewLay ...
随机推荐
- jsp添加背景音乐
在<head></head>间假如标签<embed src="文件地址" loop="11" autostar="tru ...
- 如何在 Delphi 中静态链接 SQLite
搞了我几个小时,终于成功在 Delphi 中静态链接了 SQLite (v3.5.4),下一步就是研究加密了,呵呵中间其实遇到很多问题,今天累了,就不说了,改天补上 下载测试工程 下面说说方法 1.当 ...
- Random
/* * Random:产生随机数的类 * * 构造方法: * public Random():没有给种子,用的是默认种子,是当前时间的毫秒值 * public Random(long seed):给 ...
- 用git管理自己读的书
福昕阅读器,可以方便地做书签和备注.使用git去管理图书和示例代码,一方面能够很好地保存这些资料,方便查找:另外一方面,无论在家,还是在公司,都能很好地同步自己学习的进度. 福昕阅读器5(视图--&g ...
- 13 年的 Bug 调试经验总结
在<Learning From Your Bugs>一文中,我写了关于我是如何追踪我所遇到的一些最有趣的bug.最近,我回顾了我所有的194个条目(从13岁开始),看看有什么经验教训是我可 ...
- 关于CSS学习的第一章
1.CSS三种书写的方式:嵌入式.外链式.行内式 嵌入式就是将CSS写入在<style></style> 外链式将外面的CSS文件通过HTML中的标记链接过来:<link ...
- easyUI datagrid中 checkbox 各属性和事件
DataGrid其中与选择,勾选相关 DataGrid属性:singleSelect boolean 如果为true,则只允许选择一行. false ctrlSelect boolean 在启用多行 ...
- 搞定迅雷固件在TP-LINK WR720N,127.0.0.1 9000 获取不到激活码
本帖最后由 exzzzipad 于 2014-7-2 22:33 编辑 基本情况:设备:TP-LINK WR720N目前固件:[antclan][20120825]720N-4M-NAS-withSA ...
- zz Must read
http://www.opengpu.org/forum.php?mod=viewthread&tid=965&extra=page%3D1 游戏引擎剖析(Game Engine An ...
- IOS 判断耳机插入/拔出
一. 方式 1.注册监听 //注册监听耳机设备的插入/拔出 AudioSessionAddPropertyListener (kAudioSessionProperty_AudioRouteChang ...