消息中间件——activeMQ
Activemq使用教程
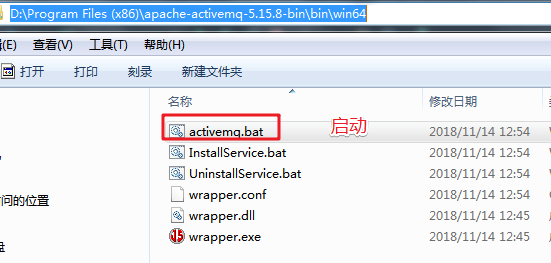
解压activmq进入bin\win64 启动activemq.bat
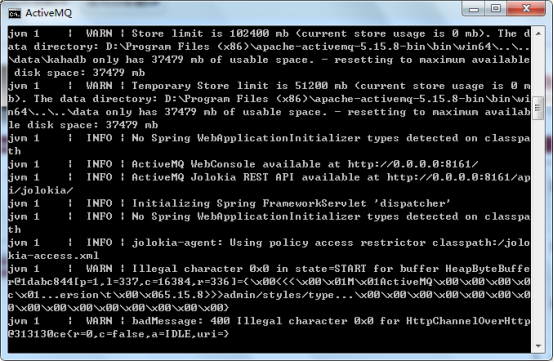
启动成功
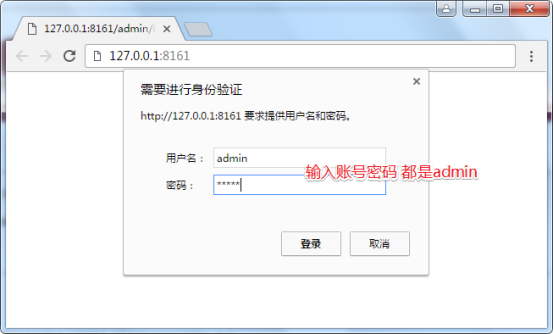
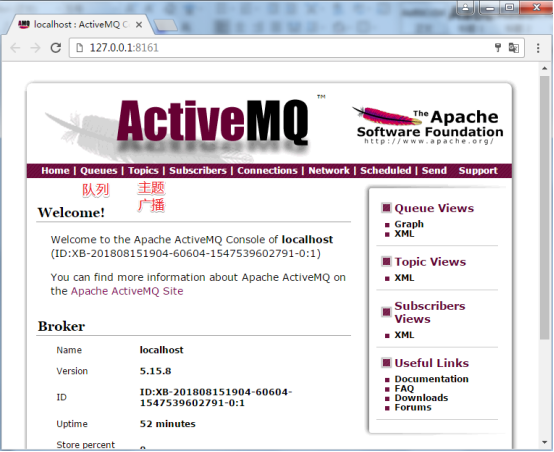
浏览器访问http://127.0.0.1:8161
创建maven工程
在pom.xml中添加依赖
 <dependency>

    <groupId>org.apache.activemq</groupId>

    <artifactId>activemq-all</artifactId>

    <version>5.15.8</version>

  </dependency>

</dependencies>
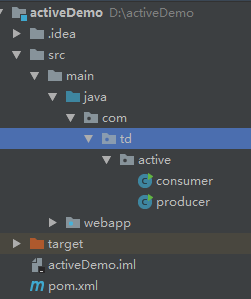
创建创建者和发布者
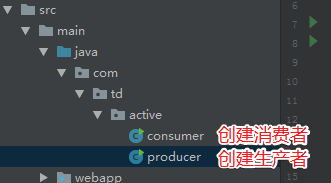
Producer 代码
package com.td.active;

import org.apache.activemq.ActiveMQConnectionFactory;

import javax.jms.*;

public class producer {

    public static void main(String[] args) throws JMSException {

        //1、创建工厂连接对象,需要指定ip和端口号

        ConnectionFactory connectionFactory = new ActiveMQConnectionFactory("tcp://127.0.0.1:61616");

        //2、使用连接工厂创建一个连接对象

        Connection connection = connectionFactory.createConnection();

        //3、开启连接

        connection.start();

        //4、使用连接对象创建会话(session)对象

        Session session = connection.createSession(false, Session.AUTO_ACKNOWLEDGE);

        //5、使用会话对象创建目标对象,包含queue和topic(一对一和一对多)

        Queue queue = session.createQueue("test-queue");

        //6、使用会话对象创建生产者对象

        MessageProducer producer = session.createProducer(queue);

        //7、使用会话对象创建一个消息对象

        TextMessage textMessage = session.createTextMessage("hello!test-queue");

        //8、发送消息

        producer.send(textMessage);

        //9、关闭资源

        producer.close();

        session.close();

        connection.close();

    }

}
consumer 代码
public class consumer {

    public static void main(String[] args) throws JMSException, IOException {

        //1、创建工厂连接对象,需要制定ip和端口号

        ConnectionFactory connectionFactory = new ActiveMQConnectionFactory("tcp://127.0.0.1:61616");

        //2、使用连接工厂创建一个连接对象

        Connection connection = connectionFactory.createConnection();

        //3、开启连接

        connection.start();

        //4、使用连接对象创建会话(session)对象

        Session session = connection.createSession(false, Session.AUTO_ACKNOWLEDGE);

        //5、使用会话对象创建目标对象,包含queue和topic(一对一和一对多)

        Queue queue = session.createQueue("test-queue");

        //6、使用会话对象创建生产者对象

        MessageConsumer consumer = session.createConsumer(queue);

        //7、向consumer对象中设置一个messageListener对象,用来接收消息

        consumer.setMessageListener(new MessageListener() {

            @Override

            public void onMessage(Message message) {

                // TODO Auto-generated method stub

                if(message instanceof TextMessage){

                    TextMessage textMessage = (TextMessage)message;

                    try {

                        System.out.println(textMessage.getText());

                    } catch (JMSException e) {

                        // TODO Auto-generated catch block

                        e.printStackTrace();

                    }

                }

            }

        });

        //8、程序等待接收用户消息

        System.in.read();

        //9、关闭资源

        consumer.close();

        session.close();

        connection.close();

    }

}
开启生产者生产消息
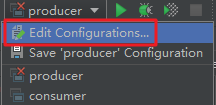
如果出现以下路径错误
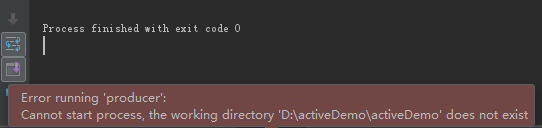
生产者启动成功生成一条消息在浏览器中可以看到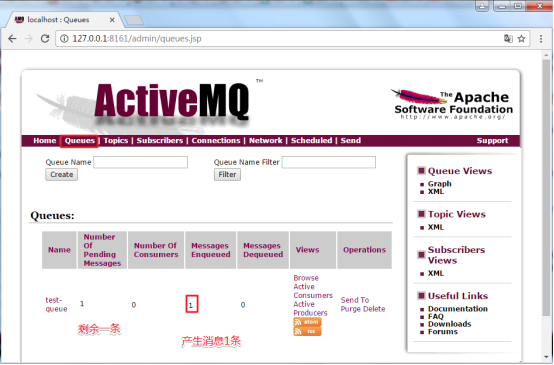
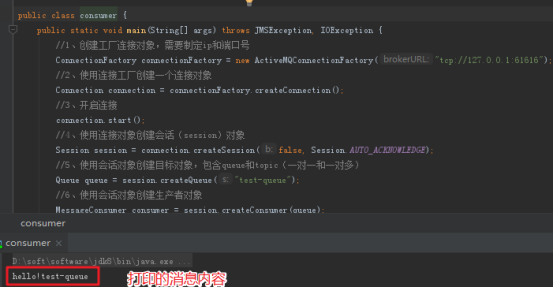
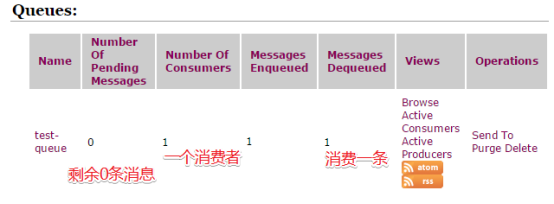
启动消费者
ActiveMQ整合spring及项目中运用
activeMQ与spring看一整合到一起使用,除了添加ActiveMQ相关的jar包外,还需要添加spring的jar包:
<dependency>

  <groupId>org.springframework</groupId>

  <artifactId>spring-context</artifactId>

</dependency>
然后编写applicationContext-activemq.xml文件,
<?xml version="1.0" encoding="UTF-8"?>

<beans xmlns="http://www.springframework.org/schema/beans"

       xmlns:context="http://www.springframework.org/schema/context"

       xmlns:p="http://www.springframework.org/schema/p"

       xmlns:aop="http://www.springframework.org/schema/aop"

       xmlns:tx="http://www.springframework.org/schema/tx"

       xmlns:xsi="http://www.w3.org/2001/XMLSchema-instance"

       xsi:schemaLocation="http://www.springframework.org/schema/beans http://www.springframework.org/schema/beans/spring-beans.xsd

    http://www.springframework.org/schema/context http://www.springframework.org/schema/context/spring-context.xsd

    http://www.springframework.org/schema/aop http://www.springframework.org/schema/aop/spring-aop.xsd

    http://www.springframework.org/schema/tx http://www.springframework.org/schema/tx/spring-tx.xsd

    http://www.springframework.org/schema/util http://www.springframework.org/schema/util/spring-util.xsd">

    <!-- 配置能够产生connection的connectionfactory,由JMS对应的服务厂商提供 -->

    <bean id="tagertConnectionFactory" class="org.apache.activemq.ActiveMQConnectionFactory">

        <constructor-arg name="brokerURL" value="tcp://127.0.0.1:61616"/>

    </bean>

    <!-- 配置spring管理真正connectionfactory的connectionfactory,相当于spring对connectionfactory的一层封装 -->

    <bean id="connectionFactory" class="org.springframework.jms.connection.SingleConnectionFactory">

        <property name="targetConnectionFactory" ref="tagertConnectionFactory"/>

    </bean>

    <!-- 配置生产者 -->

    <!-- Spring使用JMS工具类,可以用来发送和接收消息 -->

    <bean id="jmsTemplate" class="org.springframework.jms.core.JmsTemplate">

        <!-- 这里是配置的spring用来管理connectionfactory的connectionfactory -->

        <property name="connectionFactory" ref="connectionFactory"/>

    </bean>

    <!-- 配置destination -->

    <!-- 队列目的地 -->

    <bean id="queueDestination" class="org.apache.activemq.command.ActiveMQQueue">

        <constructor-arg value="spring-queue"/>

    </bean>

    <!-- 话题目的地 -->

    <bean id="itemAddTopic" class="org.apache.activemq.command.ActiveMQTopic">

        <constructor-arg value="item-add-topic"/>

    </bean>

</beans>
在使用的类中注入模板来使用
@Autowired

private JmsTemplate jmsTemplate;

@Resource(name="itemAddTopic")

private Destination destination;
发送消息的示例
发送消息列表
public void  addUser(){

    //第一个参数目的地  可以是队列的名称spring-queue 也可以是ip

    //第二个参数是发送消息的对象

    jmsTemplate.send("spring-queue", new MessageCreator() {

        @Override

        public Message createMessage(Session session) throws JMSException {

            return session.createTextMessage("要发送的消息");

        }

    });

}
发送主题
try {

    Topic topic = jmsTemplate.getConnectionFactory().createConnection().createSession(false, Session.AUTO_ACKNOWLEDGE).createTopic("item-add-topic");

    jmsTemplate.send(topic, new MessageCreator() {

        @Override

        public Message createMessage(Session session) throws JMSException {

            return session.createTextMessage("要发送的消息");

        }

    });

} catch (JMSException e) {

    e.printStackTrace();

}
消费者项目
<?xml version="1.0" encoding="UTF-8"?>

<beans xmlns="http://www.springframework.org/schema/beans"

       xmlns:xsi="http://www.w3.org/2001/XMLSchema-instance"

       xsi:schemaLocation="http://www.springframework.org/schema/beans http://www.springframework.org/schema/beans/spring-beans.xsd">

    <!-- 配置能够产生connection的connectionfactory,由JMS对应的服务厂商提供 -->

    <bean id="tagertConnectionFactory" class="org.apache.activemq.ActiveMQConnectionFactory">

        <constructor-arg name="brokerURL" value="tcp://127.0.0.1:61616"/>

    </bean>

    <!-- 配置spring管理真正connectionfactory的connectionfactory,相当于spring对connectionfactory的一层封装 -->

    <bean id="connectionFactory" class="org.springframework.jms.connection.SingleConnectionFactory">

        <property name="targetConnectionFactory" ref="tagertConnectionFactory"/>

    </bean>

    <!-- 配置destination -->

    <!-- 队列目的地 -->

    <bean id="queueDestination" class="org.apache.activemq.command.ActiveMQQueue">

        <constructor-arg value="spring-queue"/>

    </bean>

    <!-- 话题目的地 -->

    <bean id="itemAddTopic" class="org.apache.activemq.command.ActiveMQTopic">

        <constructor-arg value="item-add-topic"/>

    </bean>

    <!-- 配置监听器 -->

    <bean id="myListener" class="com.td.active.MyListener"/>

    <bean id="itemAddListener" class="com.td.active.ItemAddListener"/>

    <!-- 配置系统监听器 消息列表 -->

    <!--    <bean class="org.springframework.jms.listener.DefaultMessageListenerContainer">

            <property name="connectionFactory" ref="connectionFactory"/>

            <property name="destination" ref="queueDestination"/>

            <property name="messageListener" ref="myListener"/>

        </bean> -->

    <bean class="org.springframework.jms.listener.DefaultMessageListenerContainer">

        <property name="connectionFactory" ref="connectionFactory"/>

        <property name="destination" ref="itemAddTopic"/>

        <property name="messageListener" ref="itemAddListener"/>

    </bean>

</beans>
通过配置监听器实现接收消息
列表监听器
public class MyListener implements MessageListener {

    @Override

    public void onMessage(Message message) {

        try {

            TextMessage testMessage = (TextMessage) message;

            String text = testMessage.getText();

            System.out.println("接收到消息 = " + text);

        } catch (JMSException e) {

            e.printStackTrace();

        }

    }

}
主题监听器
public class ItemAddListener implements MessageListener {

    @Override

    public void onMessage(Message message) {

        try {

            TextMessage testMessage = (TextMessage) message;

            String text = testMessage.getText();

            System.out.println("接收到消息 = " + text);

        } catch (JMSException e) {

            e.printStackTrace();

        }

    }

}
消息中间件——activeMQ的更多相关文章
- 消息中间件ActiveMQ使用详解
消息中间件ActiveMQ使用详解 一.消息中间件的介绍 介绍 消息队列 是指利用 高效可靠 的 消息传递机制 进行与平台无关的 数据交流,并基于 数据通信 来进行分布式系统的集成. 特点(作用) ...
- 消息中间件ActiveMQ及Spring整合JMS的介绍
一 .消息中间件的基本介绍 1.1 消息中间件 1.1.1 什么是消息中间件 消息中间件利用高效可靠的消息传递机制进行平台无关的数据交流,并基于数据通信来进行分布式系统的集成.通过提供消息传递和消息排 ...
- 消息中间件--ActiveMQ&JMS消息服务
### 消息中间件 ### ---------- **消息中间件** 1. 消息中间件的概述 2. 消息中间件的应用场景 * 异步处理 * 应用解耦 * 流量削峰 * 消息通信 --------- ...
- 消息中间件activemq的使用场景介绍(结合springboot的示例)
一.消息队列概述 消息队列中间件是分布式系统中重要的组件,主要解决应用耦合,异步消息,流量削锋等问题.实现高性能,高可用,可伸缩和最终一致性架构.是大型分布式系统不可缺少的中间件. 目前在生产环境,使 ...
- ElasticSearch(九):springboot项目集成消息中间件activeMQ
目的:为了将elasticsearch做成单独的服务,那么我们必须解耦,也就是业务逻辑和搜索模块是没有关系的,并且是异步的.那么项目之间通信,使用的选择有限,消息中间件是一个不错的选择. 消息中间件常 ...
- 消息中间件ActiveMQ、RabbitMQ、RocketMQ、ZeroMQ、Kafka如何选型?
最近要为公司的消息队列中间件进行选型,市面上相关的开源技术又非常多,如ActiveMQ.RabbitMQ.ZeroMQ.Kafka,还有阿里巴巴的RocketMQ等. 这么多技术,如何进行选型呢? 首 ...
- 消息中间件ActiveMQ及Spring整合JMS
一 .消息中间件的基本介绍 1.1 消息中间件 1.1.1 什么是消息中间件 消息中间件利用高效可靠的消息传递机制进行平台无关的数据交流,并基于数据通信来进行分布式系统的集成.通过提供消息传递和消息排 ...
- 消息中间件-activemq安全机制
activemq作为消息中间件这样一个独立的个体存在,连通用户和服务器.如果没有一套完备的安全机制去设置用户权限设置消息分发机制可想后果是非常严重.ActiveMQ如果不加入安全机制的话,任何人只要知 ...
- 消息中间件-activemq入门(二)
上一节我们了解了JMS规范并且知道了JMS规范的良好实现者-activemq.今天我们就去了解一下activemq的使用.另外我们应该抱着目的去学习,别忘了我们为什么要使用消息中间件:解耦系统之间的联 ...
- 品优购商城项目(五)消息中间件 ActiveMQ
消息中间件用于降低各个项目模块的耦合,适用于不需要等待返回消息才能进入下一个业务环节的模块,以及实时要求性不高的业务模块. 一.JMS JMS(Java Messaging Service)是Java ...
随机推荐
- C#设计模式(4)——抽象工厂模式(Abstract Factory)
简单工厂模式: 简单工厂模式的工厂类随着产品类的增加需要增加额外的代码 工厂方法模式: 工厂方法模式每个具体工厂类只完成单个实例的创建,所以它具有很好的可扩展性 但是在实际应用中,一个工厂不止会创建单 ...
- js跳转新窗口
语法:window.open(url,[target]); eg: window.open("index.html"); window.open("index.html& ...
- Python函数学习
def func(x, y): print(x) print(y) func(x=1,2) #报错,关键参数一定不能放在位置参数前面 func(1,y=2) #可以正常运行 #参数组,适用于实参个数不 ...
- 用ActiveX 创建自己的comboBox 控件(二)
3.0 添加事件 3.1 添加OnSelChange 事件 当用户选中列表项的时候触发该事件.(不只是选择改变时触发,本次选择和上次相同时也触发): 添加完成后,在ActivexcomboBox.id ...
- java MD5/AES/DES加解密汇总
package com.test.test1.util; import java.security.MessageDigest; import java.security.SecureRandom; ...
- 目标检测之faster-RCNN和FPN
今年(2017年第一季度),何凯明大神出了一篇文章,叫做fpn,全称是:feature pyramid network for object Detection,为什么发这篇文章,根据 我现在了解到的 ...
- C++继承中关于子类构造函数的写法
构造方法用来初始化类的对象,与父类的其它成员不同,它不能被子类继承(子类可以继承父类所有的成员变量和成员方法,但不继承父类的构造方法).因此,在创建子类对象时,为了初始化从父类继承来的数据成员,系统需 ...
- Python基础-python简介(一)
一.简介: python是一种面向对象的解释性计算机程序设计语言,由荷兰人Guido von Rossum于1989年的圣诞节发明. Python语言的特色: 1.python是一门解释性语言 解 ...
- pushf和popf
pushf的功能是将标志寄存器的值压栈,而popf是从栈中弹出数据,送入标志寄存器中.
- eclipse 如何安装freemaker ftl 插件
借鉴原链接 https://blog.csdn.net/lsygood/article/details/80565933 在线安装的方法是:Help –> Install New Softw ...