Android 布局方式学习
一.LinearLayout线性布局:
线性布局是程序中最常见的一种布局方式,线性布局可以分为水平线性布局和垂直线性布局两种, 通过android:orientation属性可以设置线性布局的方向
1.在LinearLayout中设置排列方式为水平时只有垂直方向的设置是有效的,水平方向的设置是无效的:即left,right,center_horizontal 是不生效的
2.在LinearLayout中设置排列方式为垂直时只有水平方向设置是有效的,垂直方向的设置是无效的是无效的:即top,bottom,center_vertical 是无效的;
布局一源码:
android:orientation="vertical" 表示竖直方式对齐
     android:orientation="horizontal"表示水平方式对齐
LinearLayout布局方式一布局源码:

<LinearLayout xmlns:android="http://schemas.android.com/apk/res/android"

    xmlns:tools="http://schemas.android.com/tools"

    android:layout_width="match_parent"

    android:layout_height="match_parent"

    android:orientation="vertical"

    tools:context=".LinearLayoutOneActivity" >

    <EditText android:layout_width="fill_parent"

        android:layout_height="wrap_content"/>

    <LinearLayout android:layout_width="fill_parent"

        android:layout_height="wrap_content"

        android:orientation="horizontal">

         <Button android:layout_width="wrap_content"

             android:layout_height="wrap_content"

             android:text="登陆"/>

         <Button android:layout_width="wrap_content"

              android:layout_height="wrap_content"

              android:text="退出"/>

    </LinearLayout>

</LinearLayout>
效果图:

3.LinearLayout 布局中 android:gravity:
该属性用于控制布局中控件的对齐方式。如果是没有子控件的控件设置此属性,表示其内容的对齐方式,比如说TextView里面文字的对齐方式;若是有子控件的控件设置此属性,则表示其子控件的对齐方式。 4.android: layout_weight
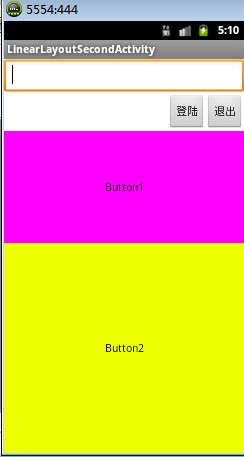
通过设置控件的layout_weight属性以控制各个控件在布局中的相对大小。layout_weight属性是一个非负整数值。线性布局会根据该控件layout_weight值与其所处布局中所有控件layout_weight值之和的比值为该控件分配占用的区域。例如,在水平布局的LinearLayout中有两个Button,这两个Button的layout_weight属性值都为1,那么这两个按钮都会被拉伸到整个屏幕宽度的一半。如果layout_weight指为0,控件会按原大小显示,不会被拉伸;对于其余layout_weight属性值大于0的控件,系统将会减去layout_weight属性值为0的控件的宽度或者高度,再用剩余的宽度或高度按相应的比例来分配每一个控件显示的宽度或高度 LinearLayoutSecond布局显示图
布局源码:
<LinearLayout xmlns:android="http://schemas.android.com/apk/res/android"

    xmlns:tools="http://schemas.android.com/tools"

    android:layout_width="match_parent"

    android:layout_height="match_parent"

    android:orientation="vertical"

    tools:context=".LinearLayoutOneActivity" >

    <EditText android:layout_width="fill_parent"

        android:layout_height="wrap_content"/>

    <LinearLayout android:layout_width="fill_parent"

        android:layout_height="wrap_content"

        android:orientation="horizontal"

        android:gravity="right">

         <Button android:layout_width="wrap_content"

             android:layout_height="wrap_content"

             android:text="登陆"/>

         <Button android:layout_width="wrap_content"

              android:layout_height="wrap_content"

              android:text="退出"/>

    </LinearLayout>

    <Button android:layout_width="fill_parent"

        android:layout_height="wrap_content"

        android:background="#ff00ff"

        android:layout_weight="1"

        android:text="Button1"/>

    <Button android:layout_width="fill_parent"

        android:layout_height="wrap_content"

        android:background="#eeff00"

        android:layout_weight="2"

        android:text="Button2"/>

</LinearLayout>
5.LinearLayout综合应用 效果图

布局源码:
<LinearLayout xmlns:android="http://schemas.android.com/apk/res/android"

    xmlns:tools="http://schemas.android.com/tools"

    android:layout_width="match_parent"

    android:layout_height="match_parent"

    android:orientation="vertical"

    tools:context=".LinearLayoutThirdActivity" >

   <LinearLayout android:layout_width="fill_parent"

        android:layout_height="wrap_content"

        android:orientation="horizontal"

        android:layout_weight="1">

      <!-- 文本水平垂直居中 -->

      <TextView android:layout_width="wrap_content"

          android:layout_height="fill_parent"

          android:layout_weight="1"

          android:gravity="center_horizontal|center_vertical"

          android:background="#aa0000"

          android:text="红色"/>

         <!-- 水平居中 顶部对齐 -->

       <TextView android:layout_width="wrap_content"

           android:layout_height="fill_parent"

           android:layout_weight="1"

           android:gravity="top|center_horizontal"

           android:background="#00aa00"

           android:text="绿色"/>

       <!-- 水平居中顶部对齐 -->

       <TextView android:layout_width="wrap_content"

           android:layout_height="fill_parent"

           android:layout_weight="1"

           android:background="#0000aa"

           android:gravity="center_horizontal|bottom"

           android:text="蓝色"/>

       <!-- 垂直居中 水平靠左 -->

       <TextView android:layout_width="wrap_content"

           android:layout_height="fill_parent"

           android:background="#aaaa00"

           android:layout_weight="1"

           android:gravity="center_vertical|left"

           android:text="黄色"/>

    </LinearLayout>

    <LinearLayout android:orientation="vertical"

        android:layout_width="fill_parent"

        android:layout_height="wrap_content"

        android:layout_weight="1">

        <Button android:layout_width="fill_parent"

            android:layout_height="wrap_content"

            android:layout_weight="1"

            android:gravity="left"

            android:text="第一行"/>

        <Button android:layout_width="fill_parent"

            android:layout_height="wrap_content"

            android:layout_weight="1"

            android:text="第二行"/>

        <Button android:layout_width="fill_parent"

            android:layout_height="wrap_content"

            android:layout_weight="1"

            android:text="第三行"/>

        <Button android:layout_width="fill_parent"

            android:layout_height="wrap_content"

            android:layout_weight="1"

            android:text="第四行"/>

    </LinearLayout>

</LinearLayout>
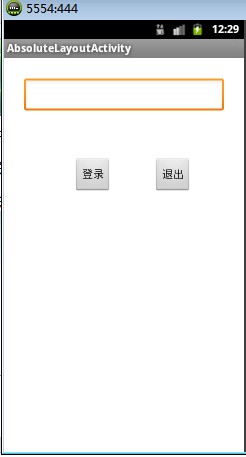
二.AbsoluteLayout绝对位置布局:
指定子控件的xy精确坐标的布局。绝对布局缺乏灵活性,在没有绝对定位的情况下相比其他类型的布局更难维护。
布局效果图:
布局源码:
<AbsoluteLayout xmlns:android="http://schemas.android.com/apk/res/android"

    xmlns:tools="http://schemas.android.com/tools"

    android:layout_width="match_parent"

    android:layout_height="match_parent"

    tools:context=".AbsoluteLayoutActivity" >

    <EditText android:layout_width="200px"

        android:layout_x="20px"

        android:layout_y="20px"

        android:layout_height="wrap_content"/>

    <Button android:layout_width="wrap_content"

        android:layout_height="wrap_content"

        android:layout_x="70px"

        android:layout_y="100px"

        android:text="登录"/>

    <Button android:layout_width="wrap_content"

        android:layout_height="wrap_content"

        android:layout_x="150px"

        android:layout_y="100px"

        android:text="退出"/>

</AbsoluteLayout>
三.AbsoluteLayout绝对位置布局:
    所有添加到这个布局中的视图都以层叠的方式显示。第一个添加的组件放到最底层,最后添加到框架中的视图显示在最上面。上一层的会覆盖下一层的控件
java.lang.Object
↳ android.view.View
↳ android.view.ViewGroup
↳ android.widget.FrameLayout
布局效果一:

布局源码:
<FrameLayout xmlns:android="http://schemas.android.com/apk/res/android"

    xmlns:tools="http://schemas.android.com/tools"

    android:layout_width="match_parent"

    android:layout_height="match_parent"

    tools:context=".FrameLayoutOneActivity" >

    <TextView

        android:layout_width="fill_parent"

        android:layout_height="fill_parent"

        android:background="#aa0000"

        android:gravity="right"

        android:text="布局一" />

    <TextView android:layout_width="150px"

        android:layout_height="fill_parent"

        android:background="#00aa00"

        android:gravity="bottom"

        android:text="布局二"/>

    <TextView android:layout_width="190px"

        android:layout_height="300px"

        android:gravity="bottom"

        android:background="#0000aa"

        android:text="布局三"/>

</FrameLayout>
android:gravity / android:layout_gravity区别:
android:gravity 是设置该view里面的内容相对于该view的位置,例如设置button里面的text相对于view的靠左,居中等位置。(也可以在Layout布局属性中添加,设置Layout中组件的位置)
android:layout_gravity 是用来设置该view相对与父view的位置,例如设置button在layout里面的相对位置:屏幕居中,水平居中等。 即android:gravity用于设置View中内容相对于View组件的对齐方式,而android:layout_gravity用于设置View组件相对于Container的对齐方式。 说的再直白点,就是android:gravity只对该组件内的东西有效,android:layout_gravity只对组件自身有效
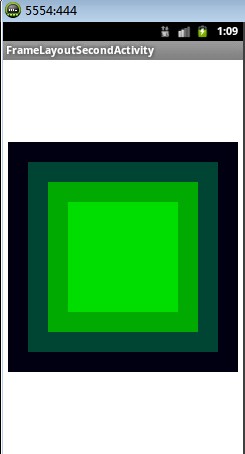
布局效果二:
布局源码:
<FrameLayout xmlns:android="http://schemas.android.com/apk/res/android"

    xmlns:tools="http://schemas.android.com/tools"

    android:layout_width="match_parent"

    android:layout_height="match_parent"

    tools:context=".FrameLayoutSecondActivity" >

    <TextView

        android:layout_gravity="center"

        android:layout_width="230px"

        android:layout_height="230px"

        android:background="#000011" />

   <TextView android:layout_gravity="center"

       android:layout_width="190px"

       android:layout_height="190px"

       android:background="#004433"/>

     <TextView android:layout_gravity="center"

       android:layout_width="150px"

       android:layout_height="150px"

       android:background="#00aa00"/>

     <TextView android:layout_gravity="center"

       android:layout_width="110px"

       android:layout_height="110px"

       android:background="#00dd00"/>

</FrameLayout>
Android 布局方式学习的更多相关文章
- 五大Android布局方式浅析
Android布局是应用界面开发的重要一环,在Android中,共有五种布局方式,分别是:FrameLayout(框架布局),LinearLayout (线性布局),AbsoluteLayout(绝对 ...
- Android布局方式总结
Android的布局分别是:线性布局LinearLayout.相对布局RelativeLayout.帧布局FrameLayout.网格布局GridLayout.约束布局ConstraintLayout ...
- Android 布局优化 -- 学习笔记
通过一些惯用.有效的布局原则,我们可以制作出加载效率高并且复用性高的UI.简单来说,在Android UI布局过程中,需要遵守的原则包括如下几点: 尽量多使用RelativeLayout,不要使用绝对 ...
- Android布局方式_RelativeLayout
RelativeLayout(相对布局)允许子元素指定它们相对于其他元素或父元素的位置(通过ID指定),因此用户可以右对齐,或上下对齐,或置于屏幕中央的形式来排列两个元素. RelativeLayou ...
- Android布局方式
1. LinearLayout(线性布局) android:orientation="vertical" android:layout_width="wra ...
- kivy八种布局方式学习
kivy八种布局:FloatLayout.BoxLayout.AnchorLayout.GridLayout.PageLayout.RelativeLayout.ScatterLayout.Stack ...
- 【Android学习】四种布局方式
一.LinearLayout 线性布局,即一行展开或者一列展开,也可以嵌套,需要注意的属性如下: android:orentation //对齐方式 二.FrameLayout 帧布局,即一层层叠起 ...
- Android学习笔记④——页面的布局方式
FrameLayout(帧布局) 这个布局的特点是简单的默认把每一个视图组件都放在边框内且放在左上角,即使添加多个视图组件,他们也都是重叠在左上角,新的视图会遮挡住旧的视图.可以根据gravity来改 ...
- 【转】Android开发学习笔记:5大布局方式详解
Android中常用的5大布局方式有以下几种: 线性布局(LinearLayout):按照垂直或者水平方向布局的组件. 帧布局(FrameLayout):组件从屏幕左上方布局组件. 表格布局(Tabl ...
随机推荐
- python学习笔记二:if语句及循环语句,断点,模块,pyc
if语句 注意:语句块中的内容要强制缩进,否则出错.IndentationError,缩进错误 所有代码,如果是顶级的,必须顶格写,前面不能有空格 if … : … elif … : … else: ...
- centos7 杂记
yum 源 https://www.cnblogs.com/renpingsheng/p/7845096.html 安装nginx php mysql https://www.cnblogs.com/ ...
- 为什么我要放弃javaScript数据结构与算法(第九章)—— 图
本章中,将学习另外一种非线性数据结构--图.这是学习的最后一种数据结构,后面将学习排序和搜索算法. 第九章 图 图的相关术语 图是网络结构的抽象模型.图是一组由边连接的节点(或顶点).学习图是重要的, ...
- bos开发日记一
BOS项目 第1天 项目12天安排: 1-2天:项目概述.搭建开发环境.主页设计.持久层和表现层设计 3-6天:项目业务开发(取派员.区域.分区.定区.业务受理)---整个项目分为基础设置.取派.中转 ...
- WMI、WQL语言、WQL测试工具wbemtest.exe
Windows Management Instrumentation (WMI) 是 Windows 操作系统的一个组件,允许通过编程方式访问应用程序.服务和其他计算机组件的管理信息(例如,配置设置和 ...
- Android:Gradle报错——No resource found that matches the given name (at 'dialogCornerRadius' with value '?android:attr/dialogCornerRadius')
今天在使用科大讯飞语音识别SDK进行语音识别功能实现时,莫名的引入了这个错误.不得不吐槽Android Studio再引入别的包时太容易出现冲突,然后导致无法找到R文件,项目无法执行. 1. 具体报错 ...
- [转帖]localhost与127.0.0.1的区别
localhost与127.0.0.1的区别 https://www.cnblogs.com/hqbhonker/p/3449975.html 前段时间用PG的时候总有问题 当时没有考虑 localh ...
- mysql5.6 无法远程连接问题解决
需要配置mysql5.6版本的my.cnf文件,我的my.cnf文件配置如下: port=3306是我后来自己加上的.加上这个之后重启mysql service mysqld restart 记得给r ...
- keepalived+nginx实现高可用+tomcat
1.keepalived的yum安装 安装依赖包[root@localhost ~]# yum install -y curl gcc openssl-devel libnl3-devel net-s ...
- (Pyhton爬虫03)爬虫初识
原本的想法是这样的:博客整理知识学习的同时,也记录点心情...集中式学习就没这么多好记录的了! 要学习一门技术,首先要简单认识一下爬虫!其实可以参考爬虫第一章! 整体上介绍该技术包含技能,具体能做什么 ...