为centos7配置阿里yum源遇到的问题以及解决方法
【问题背景】
卸载安装的Ambari,之前都是因为卸载不干净。这次重写安装,卸载完之后,发现httpd无法启动,所以想卸载httpd进行重新安装,但是执行命令yum list | grep httpd报错。
【遇到的问题】
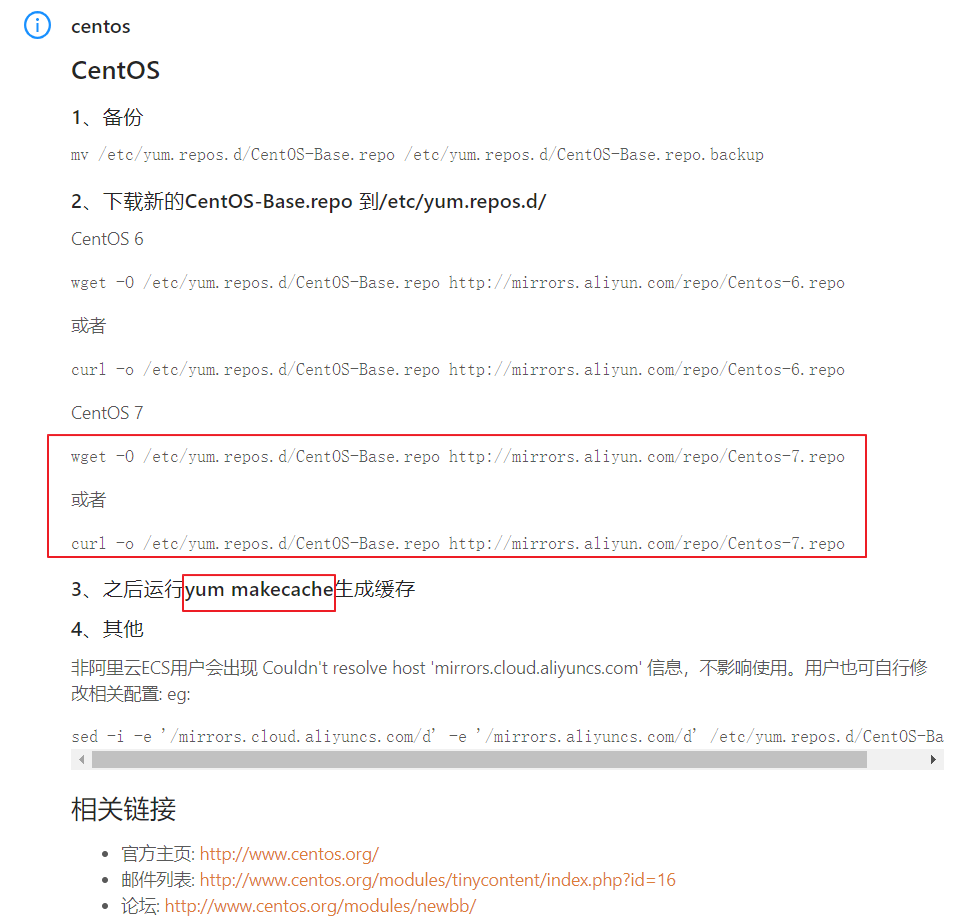
配置过程很简单,去https://opsx.alibaba.com/mirror 获得执行命令:

但是我在执行yum makecache时报错,报错信息如下:
Loaded plugins: fastestmirror, langpacks, priorities

Repository epel is listed more than once in the configuration

Cleaning repos: base epel extras updates

Cleaning up everything

Maybe you want: rm -rf /var/cache/yum, to also free up space taken by orphaned data from disabled or removed repos

Cleaning up list of fastest mirrors

[root@hadoop01 yum.repos.d]# yum makecache

Loaded plugins: fastestmirror, langpacks, priorities

Repository epel is listed more than once in the configuration

Determining fastest mirrors

 * base: mirrors.aliyun.com

 * extras: mirrors.aliyun.com

 * updates: mirrors.aliyun.com

http://mirrors.aliyun.com/centos/%24releasever/os/x86_64/repodata/repomd.xml: [Errno 14] HTTP Error 404 - Not Found

Trying other mirror.

To address this issue please refer to the below wiki article

https://wiki.centos.org/yum-errors

If above article doesn't help to resolve this issue please use https://bugs.centos.org/.

http://mirrors.aliyuncs.com/centos/%24releasever/os/x86_64/repodata/repomd.xml: [Errno 12] Timeout on http://mirrors.aliyuncs.com/centos/$releasever/os/x86_64/repodata/repomd.xml: (28, 'Connection timed out after 30000 milliseconds')

Trying other mirror.

http://mirrors.cloud.aliyuncs.com/centos/%24releasever/os/x86_64/repodata/repomd.xml: [Errno 14] curl#6 - "Could not resolve host: mirrors.cloud.aliyuncs.com; Unknown error"

Trying other mirror.

http://mirrors.aliyuncs.com/centos/%24releasever/os/x86_64/repodata/repomd.xml: [Errno 12] Timeout on http://mirrors.aliyuncs.com/centos/$releasever/os/x86_64/repodata/repomd.xml: (28, 'Connection timed out after 30001 milliseconds')

Trying other mirror.

http://mirrors.aliyuncs.com/centos/%24releasever/os/x86_64/repodata/repomd.xml: [Errno 12] Timeout on http://mirrors.aliyuncs.com/centos/$releasever/os/x86_64/repodata/repomd.xml: (28, 'Connection timed out after 30001 milliseconds')

Trying other mirror.

http://mirrors.aliyuncs.com/centos/%24releasever/os/x86_64/repodata/repomd.xml: [Errno 12] Timeout on http://mirrors.aliyuncs.com/centos/$releasever/os/x86_64/repodata/repomd.xml: (28, 'Connection timed out after 30001 milliseconds')

Trying other mirror.

http://mirrors.aliyuncs.com/centos/%24releasever/os/x86_64/repodata/repomd.xml: [Errno 12] Timeout on http://mirrors.aliyuncs.com/centos/$releasever/os/x86_64/repodata/repomd.xml: (28, 'Connection timed out after 30001 milliseconds')

Trying other mirror.

http://mirrors.aliyuncs.com/centos/%24releasever/os/x86_64/repodata/repomd.xml: [Errno 12] Timeout on http://mirrors.aliyuncs.com/centos/$releasever/os/x86_64/repodata/repomd.xml: (28, 'Connection timed out after 30001 milliseconds')

Trying other mirror.

...
【解决方法】
在网上找了好多帖子,都没能解决我的问题,后来看到是HTTP请求失败,尝试本地访问之前wget下来的 CentOS-Base.repo 发现其中的:
http://mirrors.aliyun.com/centos/$releasever/os/$basearch/
等URL通过http的形式根本无法访问,此时将变量$releasever改为7(我的系统是centos 7),发现可以访问了,顺便将所有的变量$releasever都改为7。感觉这个变量$releasever根本就没起作用呀。
改完之后,执行yum clean all 以及 yum makecache 成功。
oaded plugins: fastestmirror, langpacks

Determining fastest mirrors

 * base: mirrors.aliyun.com

 * extras: mirrors.aliyun.com

 * updates: mirrors.aliyun.com

base                                                                                                                 | 3.6 kB  ::

extras                                                                                                               | 3.4 kB  ::

updates                                                                                                              | 3.4 kB  ::

(/): base/x86_64/group_gz                                                                                         |  kB  ::

(/): base/x86_64/primary_db                                                                                       | 6.0 MB  ::

(/): base/x86_64/filelists_db                                                                                     | 7.1 MB  ::

(/): base/x86_64/other_db                                                                                         | 2.6 MB  ::

(/): extras/x86_64/prestodelta                                                                                    |   kB  ::

(/): extras/x86_64/primary_db                                                                                     |  kB  ::

(/): extras/x86_64/other_db                                                                                       |  kB  ::

(/): extras/x86_64/filelists_db                                                                                   |  kB  ::

(/): updates/x86_64/prestodelta                                                                                   |  kB  ::

(/): updates/x86_64/filelists_db                                                                                 | 5.2 MB  ::

(/): updates/x86_64/other_db                                                                                     |  kB  ::

(/): updates/x86_64/primary_db                                                                                   | 7.4 MB  ::

Metadata Cache Created
为centos7配置阿里yum源遇到的问题以及解决方法的更多相关文章
- centos7配置阿里yum源
首先刚刚安装完的centos并不像Ubuntu系统那样有很多的源来可以供您使用 所以我们需要通过下载阿里云的yum源在下载epel-release.noarch扩展包就可以了 操作如下: 1.首先这是 ...
- 配置阿里yum源,设置命令
配置阿里yum源 #linux的软件包管理 安装 软件的方式有三种 .源代码编译安装() .下载python3的源代码 .解压缩源代码 .进入源代码目录,开始编译安装 .配置环境变量 .yum方式安装 ...
- CentOS7 配置163 yum源(详细步骤)
CentOS7 配置163 yum源 1)下载repo文件 wget http://mirrors.163.com/.help/CentOS7-Base-163.repo 2)备份并替换系统的r ...
- 虚拟机centos7配置本地yum源
在虚拟机中要使用yum命令,就要先配置一下yum源,下面就分享一下这个过程: 1. 挂载iso到vmware,首先得确保CD/DVD连接到镜像.可以这样操作 2. 执行下面的命令 # mkdir /m ...
- CentOS7使用阿里yum源安装Docker
yum install -y yum-utils device-mapper-persistent-data lvm2安装所需的包 # yum-config-manager --add-repo ht ...
- centos7配置国内yum源
文章目录 1.什么是yum仓库? 2.yum仓库配置 2.1.阿里镜像仓库配置 2.1.1.配置步骤 2.1.2.epel源 安装和配置 2.1.3.查看yum源 2.2.配置 清华大学镜像仓库 1. ...
- 详解centos7配置本地yum源的方法
近在使用虚拟机时遇到一些麻烦,因为公司内部有网络管理,所以vm连接不上外网,yum无法安装软件,怎么解决呢?–使用iso做本地yum源,可以解决大部份的包安装. vm安装的是centos7. 1.挂载 ...
- centos 7下配置阿里yum源
1.打开centos的yum文件夹 cd /etc/yum.repos.d/ 2.用wget下载repo文件 wget http://mirrors.aliyun.com/repo/Centos-7. ...
- CentOS7配置本地Yum源
从CentOS7官网下载DVD中存在需要的大部分软件,所以在没有网络的情况下可以配置yum源为本地的DVD,下载速度快,软件稳定.1. 如果使用虚拟机,那么就在虚拟机中挂载DVD的iso文件.2. 使 ...
随机推荐
- iOS - 外包开发常用第三方库(1)
一:第三方插件1:基于响应式编程思想的oc地址:https://github.com/ReactiveCocoa/ReactiveCocoa2:hud提示框地址:https://github.com/ ...
- vue打包后.woff字体文件路径问题处理
在执行 npm run build 命令打包后,如果出现 .woff 等字体文件找不到的情况 通过设置 vue-style-loader 打包前缀路径解决
- js数组实现上移下移
up(index) { if(index === 0) { return } //在上一项插入该项 this.list.splice(index - 1, 0, (this.list[index])) ...
- iptables的nat规则骚操作
水一枪 我对防火墙这块的认知是比较低的, 之前一直没怎么去用 最多的要么就是 iptables -A INPUT -p tcp --dport 80 -j ACCEPT iptables -A OUT ...
- 前台.cshtml得到cookie值方法
function Cookie_() { $.ajax({ url: "/Login_/do_cookie",//请求地址 dataType: "json",/ ...
- Linux下安装php 扩展fileinfo
在项目初始部署环境的时候,可能考虑的并不全面,就会少装一些扩展,这里讲解如何添加fileinfo扩展 1.找到php安装的压缩包 2.将压缩包cp到 /data目录下,并解压 cp php-7.0.3 ...
- c# 类嵌套
- Django组件之modelformset
ModelFormSet 基于modelform 实现的批量处理 前端: <form method="post" action=""> {% csr ...
- JavaScript 中 var 和 let 和 const 关键字的区别
var与let.const的区别 在最新的 ES6 中,新添加了两个用于变量声明的关键字 let 和 const 一.var声明的变量会挂载在window上,而let和const声明的变量不会: va ...
- 剑指Offer(二十九):最小的K个数
剑指Offer(二十九):最小的K个数 搜索微信公众号:'AI-ming3526'或者'计算机视觉这件小事' 获取更多算法.机器学习干货 csdn:https://blog.csdn.net/baid ...
