双链路接入(双出口)isp运营商(负载分担)
USG作为校园或大型企业出口网关可以实现内网用户通过两个运营商访问Internet,并保护内网不受网络攻击。
组网需求
某学校网络通过USG连接到Internet,校内组网情况如下:
校内用户主要分布在教学楼和宿舍区,通过汇聚交换机连接到USG。
学校分别通过两个不同运营商(ISP1和ISP2)连接到Internet,两个运营商分别为该校分配了4个IP地址。ISP1分配的IP地址是200.1.1.1~200.1.1.4,ISP2分配的IP地址是234.1.1.1~234.1.1.4,掩码均为24位。
该学校网络需要实现以下需求:
- 校内用户能够通过两个运营商访问Internet,且去往不同运营商的流量由USG上连接该运营商的对应的接口转发。
- 当通往两个运营商链路都正常工作的情况下,宿舍区用户通过运营商ISP1访问Internet,教学楼用户通过运营商ISP2访问Internet。
- 当一条链路出现故障时,流量可以被及时切换到另一条链路上,避免网络长时间中断。
- 保护内部网络不受SYN Flood、UDP Flood和ICMP Flood的攻击。
图1 出口网关双链路接入不同运营商举例二组网图
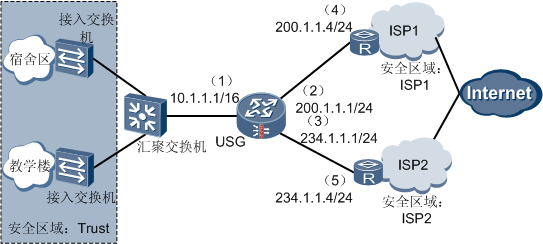
接口号:GigabitEthernet 0/0/1                      校内用户分配到网段为10.1.0.0/16的私网地址,部署在Trust区域。

IP地址:10.1.1.1/16

安全区域:Trust
接口号:GigabitEthernet 0/0/2 连接ISP1的接口,去往ISP1所属网段的数据通过此接口转发。
IP地址:200.1.1.1/24
安全区域:ISP1
安全优先级:15接口号:GigabitEthernet 0/0/3 连接ISP2的接口。去往ISP2所属网段的数据通过接口此接口转发。
IP地址:234.1.1.1/24
安全区域:ISP2
安全优先级:20IP地址:200.1.1.4/24 ISP1端与USG相连的接口。IP地址:234.1.1.4/24 ISP2端与USG相连的接口。ISP1分配给学校的IP地址 200.1.1.1~200.1.1.3,掩码24位。
其中200.1.1.1用作USG的出接口地址,200.1.1.2和200.1.1.3用作Trust-ISP1域间的NAT地址池1的地址。
ISP2分配给学校的IP地址 234.1.1.1~234.1.1.3,掩码24位。
其中234.1.1.1用作USG的出接口地址,234.1.1.2和234.1.1.3用作Trust-ISP2域间的NAT地址池2的地址。
配置思路
为了实现校园网内多个用户使用有限公网IP地址接入Internet,需要配置NAPT方式的NAT,借助端口将多个私网IP地址转换为有限的公网IP地址。
由于校园网连接两个运营商,因此需要分别进行地址转换,将私网地址转换为公网地址。即创建两个安全区域ISP1和ISP2,并分别在Trust-ISP1域间、Trust-ISP2域间配置NAT策略。
为了实现去往不同运营商的流量由对应接口转发,需要收集ISP1和ISP2所属网段的信息,并配置到这些网段的静态路由。使去往ISP1的流量通过连接ISP1的接口转发,去往ISP2的流量通过连接ISP2的接口转发。
为了实现宿舍区用户通过运营商ISP1访问Internet,教学楼用户通过运营商ISP2访问Internet,需要配置策略路由。
为了提高链路的可靠性,避免业务中断,即当一条链路出现故障时,流量可以被及时切换到另一条链路上,需要配置IP-Link和两条优先级相同的默认路由。
在USG上启用攻击防范功能,保护校园网内部网络。
操作步骤
1.配置USG各接口的IP地址并将接口加入安全区域。
# 配置USG各接口的IP地址。
<USG> system-view

[USG] interface GigabitEthernet 0/0/1

[USG-GigabitEthernet0/0/1] ip address 10.1.1.1 16

[USG-GigabitEthernet0/0/1] quit

[USG] interface GigabitEthernet 0/0/2

[USG-GigabitEthernet0/0/2] ip address 200.1.1.1 24

[USG-GigabitEthernet0/0/2] quit

[USG] interface GigabitEthernet 0/0/3

[USG-GigabitEthernet5/0/0] ip address 234.1.1.1 24

[USG-GigabitEthernet5/0/0] quit
# 将GigabitEthernet 0/0/1接口加入Trust安全区域
[USG] firewall zone trust

[USG-zone-trust] add interface GigabitEthernet 0/0/1

[USG-zone-trust] quit
# 创建安全区域ISP1,并将GigabitEthernet 0/0/2接口加入ISP1。
[USG] firewall zone name isp1

[USG-zone-isp1] set priority 15

[USG-zone-isp1] add interface GigabitEthernet 0/0/2

[USG-zone-isp1] quit
# 创建安全区域ISP2,并将GigabitEthernet 0/0/3接口加入ISP2。
[USG] firewall zone name isp2

[USG-zone-isp2] set priority 20

[USG-zone-isp2] add interface GigabitEthernet 0/0/3

[USG-zone-isp2] quit
2.配置域间包过滤及ASPF功能,对校内外数据流进行访问控制。
# 配置Trust-ISP1的域间包过滤,允许校内用户访问ISP1。
[USG] policy interzone trust isp1 outbound

[USG-policy-interzone-trust-isp1-outbound] policy 1

[USG-policy-interzone-trust-isp1-outbound-1] policy source 10.1.0.0 0.0.255.255

[USG-policy-interzone-trust-isp1-outbound-1] action permit

[USG-policy-interzone-trust-isp1-outbound-1] quit

[USG-policy-interzone-trust-isp1-outbound] quit
# 配置Trust-ISP2的域间包过滤,允许校内用户访问ISP2。
[USG] policy interzone trust isp2 outbound

[USG-policy-interzone-trust-isp2-outbound] policy 1

[USG-policy-interzone-trust-isp2-outbound-1] policy source 10.1.0.0 0.0.255.255

[USG-policy-interzone-trust-isp2-outbound-1] action permit

[USG-policy-interzone-trust-isp2-outbound-1] quit

[USG-policy-interzone-trust-isp2-outbound] quit
# 在域间开启ASPF功能,防止多通道协议无法建立连接。
[USG] firewall interzone trust isp1

[USG-interzone-trust-isp1] detect ftp

[USG-interzone-trust-isp1] detect qq

[USG-interzone-trust-isp1] detect msn

[USG-interzone-trust-isp1] quit

[USG] firewall interzone trust isp2

[USG-interzone-trust-isp2] detect ftp

[USG-interzone-trust-isp2] detect qq

[USG-interzone-trust-isp2] detect msn

[USG-interzone-trust-isp2] quit
3.配置NAT策略,使内网用户通过转换后的公网IP地址访问Internet。
# 配置应用于Trust-ISP1域间的NAT地址池1。地址池1包括ISP1提供的两个IP地址200.1.1.2和200.1.1.3。
[USG] nat address-group 1 200.1.1.2 200.1.1.3# 配置应用于Trust-ISP2域间的NAT地址池2。地址池2包括ISP2提供的两个IP地址234.1.1.2和234.1.1.3。
[USG] nat address-group 2 234.1.1.2 234.1.1.3# 在Trust-ISP1域间配置NAT策略,将校内用户的私网IP地址转换为ISP1提供的公网IP地址。
[USG] nat-policy interzone trust isp1 outbound

[USG-nat-policy-interzone-trust-isp1-outbound] policy 1

[USG-nat-policy-interzone-trust-isp1-outbound-1] policy source 10.1.0.0 0.0.255.255

[USG-nat-policy-interzone-trust-isp1-outbound-1] action source-nat

[USG-nat-policy-interzone-trust-isp1-outbound-1] address-group 1

[USG-nat-policy-interzone-trust-isp1-outbound-1] quit

[USG-nat-policy-interzone-trust-isp1-outbound] quit
# 在Trust-ISP2域间配置NAT策略,将校内用户的私网IP地址转换为ISP2提供的公网IP地址。
[USG] nat-policy interzone trust isp2 outbound

[USG-nat-policy-interzone-trust-isp2-outbound] policy 1

[USG-nat-policy-interzone-trust-isp2-outbound-1] policy source 10.1.0.0 0.0.255.255

[USG-nat-policy-interzone-trust-isp2-outbound-1] action source-nat

[USG-nat-policy-interzone-trust-isp2-outbound-1] address-group 2

[USG-nat-policy-interzone-trust-isp2-outbound-1] quit

[USG-nat-policy-interzone-trust-isp2-outbound] quit
4.配置IP-Link、多条静态路由和两条缺省路由,实现网络的双出口特性和链路的可靠性。
配置链路可达性检查后,当发现该链路不可达时,则选择另一条链路可达的路由。
# 配置IP-Link,并使用ICMP报文进行链路检测。
[USG] ip-link check enable

[USG] ip-link 1 destination 200.1.1.4 mode icmp

[USG] ip-link 2 destination 234.1.1.4 mode icmp
# 配置两条缺省路由并绑定IP-Link,当报文无法匹配静态路由时,通过缺省路由发送给下一跳。
[USG] ip route-static 0.0.0.0 0.0.0.0 GigabitEthernet 0/0/2 200.1.1.4 track ip-link 1

[USG] ip route-static 0.0.0.0 0.0.0.0 GigabitEthernet 0/0/3 234.1.1.4 track ip-link 2
5.配置策略路由功能,使来自宿舍区用户(10.1.1.2~10.1.1.100)和教学楼用户(10.1.1.101~10.1.1.254)访问Internet的报文分别通过不同接口转发。
a.配置流分类。
# 创建地址集ispa和ispb,分别包括访问Internet的报文默认由ISP1链路转发和由ISP2链路转发的源地址段。
[USG] ip address-set ispa type object

[USG-object-address-set-ispa] address range 10.1.1.2 10.1.1.100

[USG-object-address-set-ispa] quit

[USG] ip address-set ispb type object

[USG-object-address-set-ispb] address range 10.1.1.101 10.1.1.254

[USG-object-address-set-ispb] quit
# 创建ACL 3001和3002,分别允许源地址集ispa和ispb。
[USG] acl 3001

[USG-acl-adv-3001] rule permit ip source address-set ispa

[USG-acl-adv-3001] quit

[USG] acl 3002

[USG-acl-adv-3002] rule permit ip source address-set ispb

[USG-acl-adv-3002] quit
b.定义5号节点和10号节点,使地址集ispa中的源地址访问Internet下一跳地址为200.1.1.4,地址集ispb中的源地址访问Internet下一跳地址为234.1.1.4
[USG] policy-based-route test permit node 5

[USG-policy-based-route-test-5] if-match acl 3001

[USG-policy-based-route-test-5] apply ip-address next-hop 200.1.1.4

[USG-policy-based-route-test-5] quit

[USG] policy-based-route test permit node 10

[USG-policy-based-route-test-10] if-match acl 3002

[USG-policy-based-route-test-10] apply ip-address next-hop 234.1.1.4

[USG-policy-based-route-test-10] quit
c.在接口GigabitEthernet 0/0/1中应用策略路由。
[USG] interface GigabitEthernet 0/0/1

[USG-GigabitEthernet0/0/1] ip policy-based-route test

[USG-GigabitEthernet0/0/1] quit
6.配置攻击防范功能,保护校园网络。
请根据网络实际情况开启攻击防范功能和调整报文速率阈值,本例中配置的攻击防范功能仅供参考。
# 开SYN Flood、UDP Flood和ICMP Flood攻击防范功能,并限制每条会话允许通过的ICMP报文最大速率为5包/秒。
[USG] firewall defend syn-flood enable

[USG] firewall defend udp-flood enable

[USG] firewall defend icmp-flood enable

[USG] firewall defend icmp-flood base-session max-rate 5
结果验证
1.执行命令display nat address-group,可以看到配置的NAT地址池信息。
[USG] display nat address-group

NAT address-group information:

 number        : 1                       name          : ---

 startaddr     : 200.1.1.2               endaddr       : 200.1.1.3

 reference     : 0                       vrrp          : ---

 vpninstance   : public

 number        : 2                       name          : ---

 startaddr     : 234.1.1.2               endaddr       : 234.1.1.3

 reference     : 0                       vrrp          : ---

 vpninstance   : public

  Total   2 address-groups
2.在双链路均可达的情况下,来自宿舍区的用户访问Internet报文经USG转发后应全部流入链路ISP1,来自教学楼的用户访问Internet报文经USG转发后应全部流入链路ISP2。
# 执行命令display ip-link,应查看到IP-Link状态均为Up。
[USG] display ip-link

num state timer vpn-instance     ip-address      interface-name  mode  vgmp next

-hop

1   up    3                      200.1.1.4                       icmp  none

2   up    3                      234.1.1.4                       icmp  none
3.在其中一条故障的情况下,USG应查找备份路由,将报文转发到另一条链路上。以当链路ISP1出现故障时为例进行说明。来自宿舍区的用户访问Internet报文经USG转发后全部流入链路ISP2。
# 执行命令display ip-link,应查看到通往ISP2链路状态均为Up,通往ISP1链路状态为Down。
[USG] display ip-link

num state timer vpn-instance     ip-address      interface-name  mode  vgmp next

-hop

1   down  3                      200.1.1.4                       icmp  none

2   up    3                      234.1.1.4                       icmp  none
4.通过在网络中操作,检查业务是否能够正常实现。
# 在宿舍区内的一台主机上,访问ISP1所属网段的一台服务器(IP地址为200.1.2.3),通过执行命令display firewall session table,可以看到私网IP地址转换成了ISP1的公网IP地址。
[USG] display firewall session table

 Current Total Sessions : 1

  http  VPN: public -> public  10.1.2.2:1674[200.1.1.2:12889]-->200.1.2.3:80
# 在教学楼内的一台主机上,访问ISP2所属网段的一台服务器(IP地址为234.1.2.3),通过执行命令display firewall session table,可以看到私网IP地址转换成了ISP2的公网IP地址。
[USG] display firewall session table

 Current Total Sessions : 1

  http  VPN: public -> public  10.1.2.2:1674[234.1.1.2:12889]-->234.1.2.3:80
5.执行命令display current-configuration | include firewall defend,可以检查攻击配置的防范功能。
配置脚本
USG配置脚本:
#

 nat address-group 1 200.1.1.2 200.1.1.3

 nat address-group 2 234.1.1.2 234.1.1.3

#

 firewall defend icmp-flood enable

 firewall defend udp-flood enable

 firewall defend syn-flood enable

 firewall defend icmp-flood base-session max-rate 5

#

interface GigabitEthernet0/0/1

 ip address 10.1.1.1 255.255.0.0

#

interface GigabitEthernet0/0/2

 ip address 200.1.1.1 255.255.255.0

#

interface GigabitEthernet0/0/3

 ip address 234.1.1.1 255.255.255.0

#

firewall zone local

 set priority 100

#

firewall zone trust

 set priority 85

 add interface GigabitEthernet0/0/1

#

firewall zone untrust

 set priority 5

#

firewall zone dmz

 set priority 50

#

firewall zone name isp1

 set priority 15

 add interface GigabitEthernet0/0/2

#

firewall zone name isp2

 set priority 20

 add interface GigabitEthernet0/0/3

#

firewall interzone trust isp1

 detect ftp

 detect qq

 detect msn

#

firewall interzone trust isp2

 detect ftp

 detect qq

 detect msn

#

 ip-link check enable

 ip-link 1 destination 200.1.1.4

 ip-link 2 destination 234.1.1.4

#

 ip route-static 0.0.0.0 0.0.0.0 GigabitEthernet0/0/2 200.1.1.4 track ip-link 1

 ip route-static 0.0.0.0 0.0.0.0 GigabitEthernet0/0/3 234.1.1.4 track ip-link 2

#

interface GigabitEthernet0/0/1

 ip address 10.1.1.1 255.255.255.0

 ip policy-based-route test

#

acl number 3001

 rule 5 permit ip source address-set ispa

#

acl number 3002

 rule 5 permit ip source address-set ispb

#

 policy-based-route test permit node 5

  if-match acl 3001

  apply ip-address next-hop 200.1.1.10

 policy-based-route test permit node 10

  if-match acl 3002

  apply ip-address next-hop 234.1.1.10

#

ip address-set ispa type object

 address 0 range 10.1.1.2 10.1.1.100

#

ip address-set ispb type object

 address 0 range 10.1.1.101 10.1.1.254

#

policy interzone trust isp1 outbound

 policy 1

 action permit

 policy source 10.1.0.0 0.0.255.255

#

policy interzone trust isp2 outbound

 policy 1

 action permit

 policy source 10.1.0.0 0.0.255.255

#

nat-policy interzone trust isp1 outbound

 policy 1

 action source-nat

 policy source 10.1.0.0 0.0.255.255

 address-group 1

#

nat-policy interzone trust isp2 outbound

 policy 1

 action source-nat

 policy source 10.1.0.0 0.0.255.255

 address-group 2

#

return
双链路接入(双出口)isp运营商(负载分担)的更多相关文章
- HUAWEI防火墙双出口据链路带宽负载分担
组网图形 组网需求 通过配置根据链路带宽负载分担,使流量按照带宽的比例分担到各链路上,保证带宽资源得到充分利用. 如图1所示,企业分别从ISP1和ISP2租用了一条链路,ISP1链路的带宽为100M, ...
- IP地址数据库-ISP运营商列表(2017年1月)
IP地址数据库 微信号:qqzeng-ip [全球旗舰版][国内精华版][国外拓展版][英文版][掩码版] http://qqzeng.com 中国大陆:三大基础运营商 中国电信中国联通中国 ...
- 如何破解海蜘蛛ISP6.1.5 极其isp运营商 v6.1.5
海蜘蛛ISPV6.1.5,目前破解版本中最稳定的!破解步骤如下:一.安装完毕进控制台二.使用muddyboot登陆 密码(123456)三.输入root回车四.输入regtools回车五.在web控制 ...
- 国内各运营商(ISP)IP段表
国内各运营商(ISP)IP段表 来源:http://bbs.hh010.com/forum.php?mod=viewthread&tid=490529&orderby=dateline ...
- 新手教程:电信+广电(或其他运营商)双WAN设置
由于国内不同运营商之间互联互通存在问题,假如用联通的线路去访问电信的站点那么会比较卡,反之亦然:所以如果两个WAN的线路不是同一个运营商,一般都是建议用户双WAN模式选为“智能路由”.经过本人测试发现 ...
- 5G信令(就是用户身份信息)——手机开机后,先从USIM中读取之前运营商分配的临时身份信息GUTI/TMSI,发送携带该身份信息的信令给基站,请求接入运营商网络。
5G时代,跟IMSI-CATCHER SAY GOODBYE from:https://unicorn.360.com/blog/2018/04/18/GoodBye_5G_IMSI-Catcher/ ...
- 华为S5700系列交换机AR配置静态IP双链路负载分担
适用于:有多个以太WAN口的机型. 业务需求: 运营商1分配的接口IP为100.100.1.2,子网掩码为255.255.255.252,网关IP为100.100.1.1. 运营商2分配的接口IP为2 ...
- BGP多线 有些BGP IP也会被极少数运营商劫持 取Ip逻辑
小结: 1.租用的服务器只有一个IP,用户的访问路线是由路由器根据访客的实际访问速度选择最优访问路径,来选择访问的.而且不占用任何的服务器资源.服务器的上行和下行都是有路由器来选择最佳的路线,所以这样 ...
- 你们以为运营商只是HTTP插点广告而已么?
国内某邮件服务商,近期在某南方地区有大量客户反应登录时出错和异常,于是工作人员进行了一下跟进,发现如下: 首先,邮件服务商登陆页面为普通HTTP协议发送,提交时通过JS进行RSA加密(没错,JS的RS ...
随机推荐
- Java学习之随堂笔记系列——day03
内容回顾:1.标识符和类型转换 1.1 标识符:给类.方法.变量取得名字就是标识符. 命名规则: 1.必须是字母.数字._.$组成 2. ...
- 获取用户id的方法
/** 获取ip */function getip() { if(getenv("HTTP_X_FORWARDED_FOR")!=''){ $cip = getenv(" ...
- 对OOP的理解
OOP是面向对象编程Object Oriented Programming,特征分别是封装.继承.多态.抽象. 封装:封装是指将对象信息状态通过访问权限修饰符隐藏在对象内部,不允许外部程序直接访问,如 ...
- Abp vNext 番外篇-疑难杂症丨浅谈扩展属性与多用户设计
说明 Abp vNext基础篇的文章还差一个单元测试模块就基本上完成了我争取10.1放假之前给大家赶稿出来,后面我们会开始进阶篇,开始拆一些东西,具体要做的事我会单独开一个文章来讲 缘起 本篇文章缘起 ...
- B站视频:CocosCreator Bundle 特性三个实例详解,轻松实现大厅子游戏模式
详细内容:https://forum.cocos.org/t/topic/112146
- FastAPI 学习之路(十七)上传文件
系列文章: FastAPI 学习之路(一)fastapi--高性能web开发框架 FastAPI 学习之路(二) FastAPI 学习之路(三) FastAPI 学习之路(四) FastAPI 学习之 ...
- 乘风破浪,遇见最美Windows 11之新微软商店(Microsoft Store)生态 - 安卓(Android™)开发体验指南
什么是Windows 11的安卓(Android)应用 2021年6月25日,微软召开线上发布会,对外宣告下一代Windows操作系统Windows 11,Windows 11为用户重新打造的Micr ...
- javascript-jquery对象的css处理
一.css基本属性处理 1.css()方法:获取css属性值.$("选择器").css(name);//获取匹配选择器的元素指定css属性值. 2.css()方法:设置css属性值 ...
- bash反弹shell
part1:不求甚解的本地复现 攻击端Debian 10.x: 192.168.208.134 受害端Ubuntu : 192.168.208.135 攻击端打开(监听)某端口: 键入命令:[nc ...
- 为Kubernetes集群添加用户认证
Kubernetes中的用户 K8S中有两种用户(User)--服务账号(ServiceAccount)和普通意义上的用户(User) ServiceAccount是由K8S管理的,而User通常是在 ...