C#开发医学影像胶片打印系统(一):万能花式布局的实现思路
本篇文章将介绍开发医学影像胶片打印系统(printscu模式)遇到不规则排版时的一种思路,
一般来讲,医院打印胶片时都是整张胶片打印,但有时需要将多个病人或一个病人的多个检查打印在同一张胶片上,
这时候就需要不规则排版来满足打印需求,使胶片利用率最大化。
国际惯例,先看效果:

常规打印业务流程:
1、编辑布局模板
2、载入布局模板
3、选择标记模板
4、下载与选择影像
5、微调影像
6、超清预览、发送打印
编辑布局模板:
我们在一个Grid中,通过行数和列数循环创建带边框的Border来显示表格,并添加鼠标事件:
                for (int i = 0; i < row; i++)

                {

                    for (int j = 0; j < col; j++)

                    {

                        Border border = new Border

                        {

                            Width = w,

                            Height = h,

                            HorizontalAlignment = HorizontalAlignment.Left,

                            VerticalAlignment = VerticalAlignment.Top,

                            Margin = new Thickness(j * w, i * h, 0, 0),

                            BorderThickness = new Thickness(1),

                            BorderBrush = ColorHandler.GetColorBrush("#CCCCCC"),

                            Background = ColorHandler.GetColorBrush("#000000"),

                        };

                        border.MouseEnter += Border_MouseEnter;

                        border.MouseLeftButtonDown += Border_MouseLeftButtonDown;

                        GridTempl.Children.Add(border);

                    }

                }
点击单元格时将改变背景颜色,在鼠标按下时并移动鼠标,触发MouseEnter,选择多个单元格:
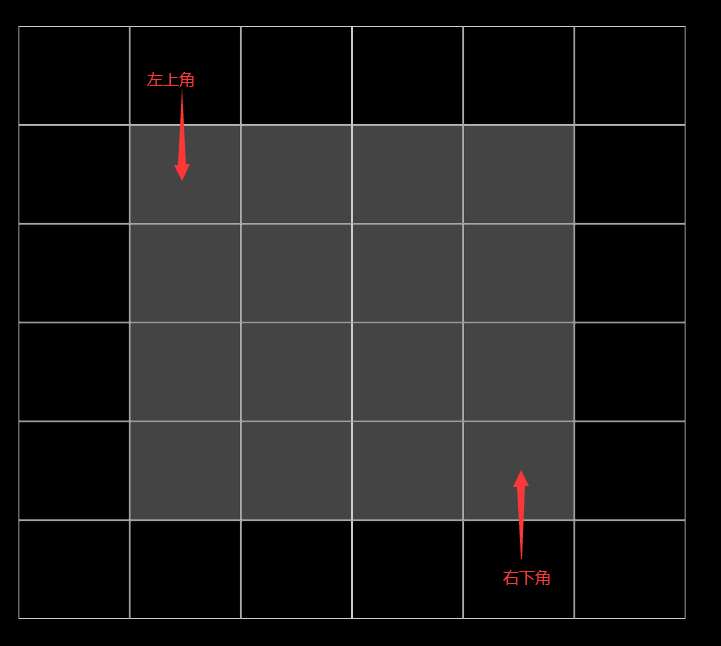
因为合并单元格是不能为不规则形状,所以多选的单元格整体必须为一个矩形,
因此多选时首先记录所有选中的单元格,然后通过坐标判断左上角和右下角的单元格位置,这样整体矩形的宽和高的范围就确定了,
在此矩形范围内的单元格将自动全部选中:
但也有特殊情况:如果矩形范围包含大小不一的单元格 这时候计算范围就会不准确:
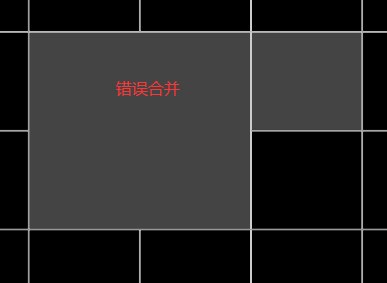
通过以下几种情况来判断大单元格与小单元格的包含关系:
        /// <summary>

        /// 筛选出已经合并的cell并计算最大选中范围

        /// </summary>

        private void CheckCell()

        {

            List<Border> bors = new List<Border>();

            for (int i = 0; i < GridTempl.Children.Count; i++)

            {

                Border border = (GridTempl.Children[i] as Border);

                if (((SolidColorBrush)border.Background).Color == Color.FromRgb(68, 68, 68))

                {

                    bors.Add(border);

                }

            }

            double cellMinLeft = bors[0].Margin.Left;

            double cellMaxLeft = 0;

            double cellMinTop = bors[0].Margin.Top;

            double cellMaxTop = 0;

            for (int i = 0; i < bors.Count; i++)

            {

                if (bors[i].Margin.Left < cellMinLeft)

                {

                    cellMinLeft = bors[i].Margin.Left;

                }

                if (bors[i].Margin.Top < cellMinTop)

                {

                    cellMinTop = bors[i].Margin.Top;

                }

                if (bors[i].Margin.Top + bors[i].Height > cellMaxTop)

                {

                    cellMaxTop = bors[i].Margin.Top + bors[i].Height;

                }

                if (bors[i].Margin.Left + bors[i].Width > cellMaxLeft)

                {

                    cellMaxLeft = bors[i].Margin.Left + bors[i].Width;

                }

            }

            for (int i = 0; i < GridTempl.Children.Count; i++)

            {

                Border otherBor = GridTempl.Children[i] as Border;

                if (bors.Contains(otherBor))

                {

                    continue;

                }

                //包含左上角

                if (otherBor.Margin.Left > cellMinLeft

                        && (otherBor.Margin.Left) < cellMaxLeft

                        && otherBor.Margin.Top > cellMinTop

                        && (otherBor.Margin.Top) < cellMaxTop)

                {

                    otherBor.Background = ColorHandler.GetColorBrush("#444444");

                    CheckCell();

                    return;

                }

                //包含右上角

                if (otherBor.Margin.Left + otherBor.Width > cellMinLeft

                         && (otherBor.Margin.Left + otherBor.Width) < cellMaxLeft

                         && otherBor.Margin.Top > cellMinTop

                         && (otherBor.Margin.Top) < cellMaxTop)

                {

                    otherBor.Background = ColorHandler.GetColorBrush("#444444");

                    CheckCell();

                    return;

                }

                //包含右下角

                if (otherBor.Margin.Left + otherBor.Width > cellMinLeft

                           && (otherBor.Margin.Left + otherBor.Width) < cellMaxLeft

                           && (otherBor.Margin.Top + otherBor.Height) > cellMinTop

                           && (otherBor.Margin.Top + otherBor.Height) < cellMaxTop)

                {

                    otherBor.Background = ColorHandler.GetColorBrush("#444444");

                    CheckCell();

                    return;

                }

                //包含左下角

                if (otherBor.Margin.Left > cellMinLeft

                          && (otherBor.Margin.Left) < cellMaxLeft

                          && (otherBor.Margin.Top + otherBor.Height) > cellMinTop

                          && (otherBor.Margin.Top + otherBor.Height) < cellMaxTop)

                {

                    otherBor.Background = ColorHandler.GetColorBrush("#444444");

                    CheckCell();

                    return;

                }

                //水平分割

                if (otherBor.Margin.Left > cellMinLeft

                          && (otherBor.Margin.Left) < cellMaxLeft

                          && (otherBor.Margin.Top) <= cellMinTop

                          && (otherBor.Margin.Top + otherBor.Height) >= cellMaxTop)

                {

                    otherBor.Background = ColorHandler.GetColorBrush("#444444");

                    CheckCell();

                    return;

                }

                //垂直分割

                if (otherBor.Margin.Left <= cellMinLeft

                          && (otherBor.Margin.Left + otherBor.Width) >= cellMaxLeft

                          && (otherBor.Margin.Top) > cellMinTop

                          && (otherBor.Margin.Top + otherBor.Height) < cellMaxTop)

                {

                    otherBor.Background = ColorHandler.GetColorBrush("#444444");

                    CheckCell();

                    return;

                }

            }

        }
通过递归填充单元格达到矩形范围的同行同列自动选择,接下来就可以合并所选择的单元格:
计算最大宽度和最大高度,并且使左上角的单元格等于最大宽高,以实现合并效果:
            //计算最大宽度

            double w = borderFirst.Width;

            for (int i = 0; i < bors.Count; i++)

            {

                if (bors[i] != borderFirst && borderFirst.Margin.Top == bors[i].Margin.Top)

                {

                    w += bors[i].Width;

                }

            }

            //计算最大高度

            double h = borderFirst.Height;

            for (int i = 0; i < bors.Count; i++)

            {

                if (bors[i] != borderFirst && borderFirst.Margin.Left == bors[i].Margin.Left)

                {

                    h += bors[i].Height;

                }

            }

            borderFirst.Tag = Math.Round(h / borderFirst.Height) + "#" + Math.Round(w / borderFirst.Width);

            borderFirst.Width = w;

            borderFirst.Height = h;
看效果:
将布局通过自定义格式保存到本地文件,就可以在排版界面载入布局模板。
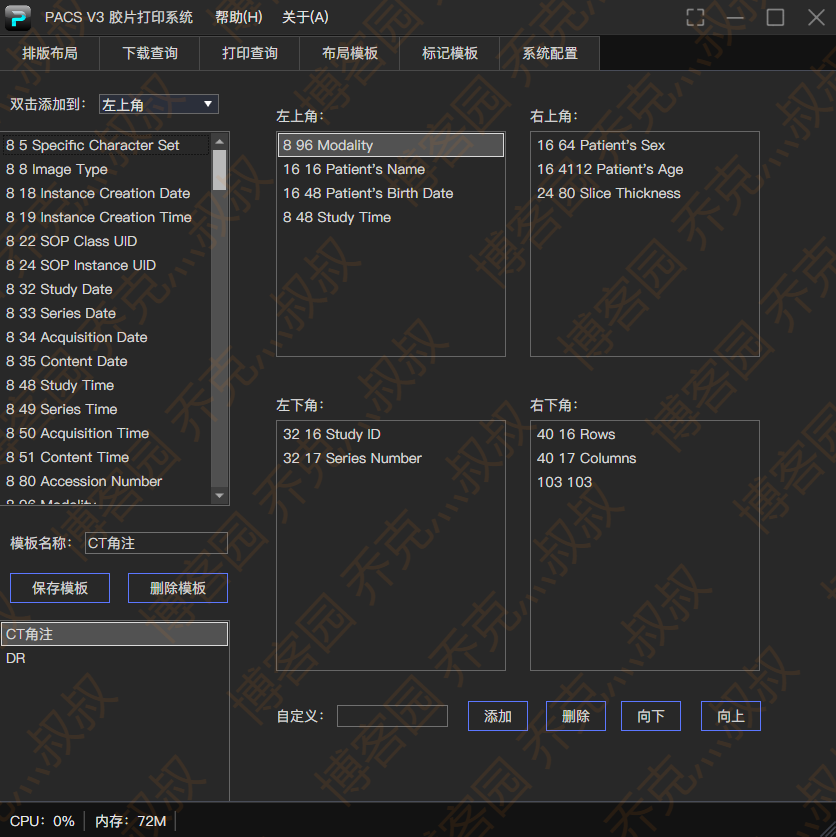
编辑标记模板:
选择常用Tag添加到胶片的四个角,以便在后面载入影像的时候读取标记信息:
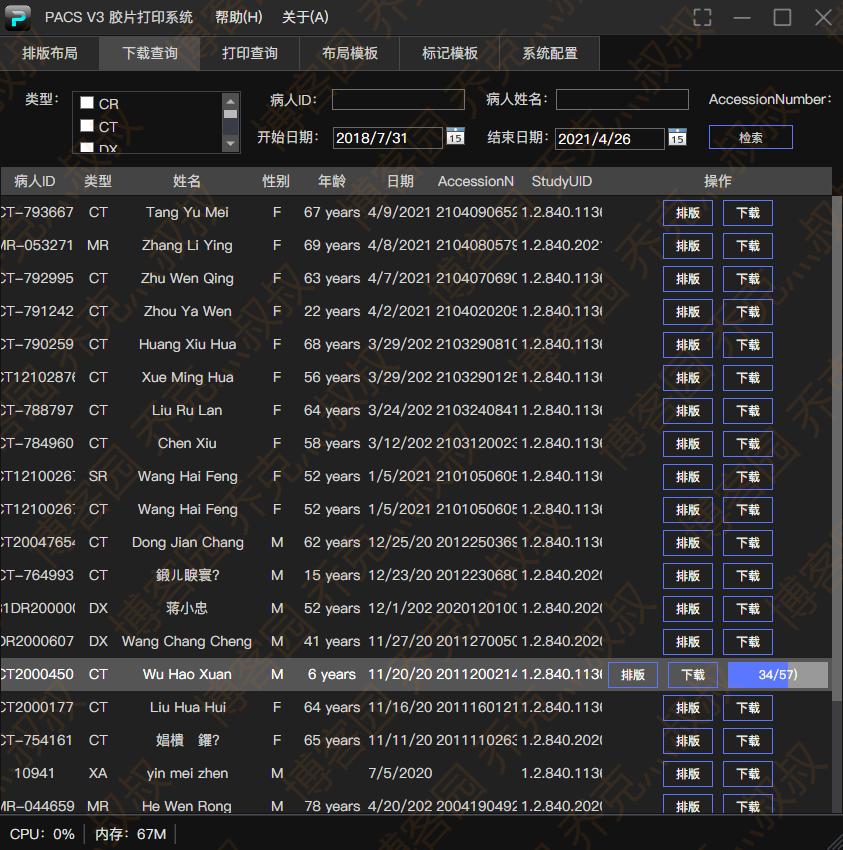
读取检查列表和下载影像:
可以参考本系列教程文章:
C#开发PACS医学影像处理系统(五):查询病人信息列表
载入影像并微调(平移,缩放,自由旋转等二维操作):
使用1:1像素超清预览查看打印细节:

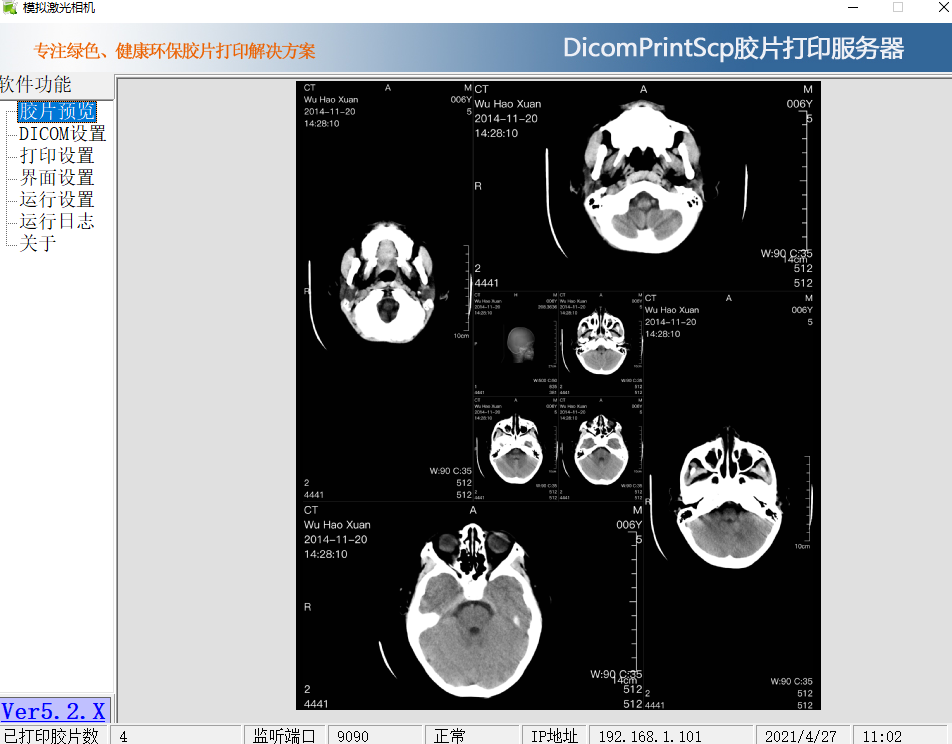
下载一个打印服务端模拟接受打印:
我这里使用的是模拟激光相机5.0版本,下载地址:https://www.fxxz.com/soft/47115.html
设置好端口并发送,查看握手状态和通讯包:
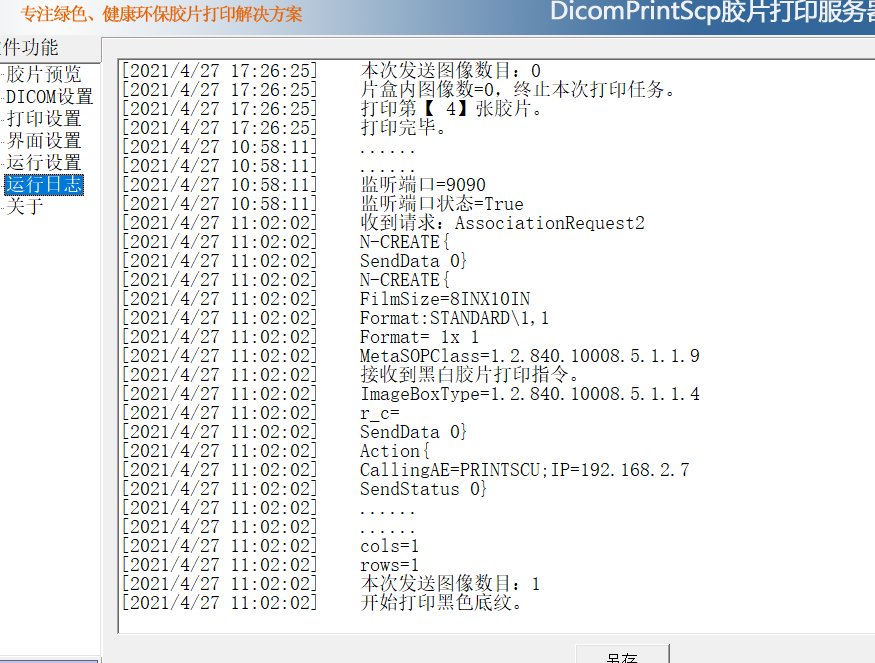
查看打印结果:

C#开发医学影像胶片打印系统(一):万能花式布局的实现思路的更多相关文章
- C#开发PACS医学影像处理系统(二):界面布局之菜单栏
在菜单栏布局上,为了使用自定义窗体样式和按钮,我们需要先将窗体设置为无边框,然后添加一个Grid作为菜单栏并置顶,VerticalAlignment="Top" logo图片和标题 ...
- C#开发PACS医学影像处理系统(三):界面布局之工具栏
工具栏布局采用WPF中Grid作为容器,按钮采用自定义样式和图标,并采用Separator分割线: XAML设计器代码: 其中 Style="{StaticResource ButtonS ...
- 医学影像工作站程序ProDicom的说明
转载 http://blog.csdn.net/prodicom/article/details/4015064 注意:以下内容为转载,但保留了第一人称,请注意,以免造成不必要的麻烦. 医网联影像工作 ...
- SNF快速开发平台MVC-Grid++集成打印
一.显示效果: 二.程序实现: 1.先要在 打印模版程序 给指定页面进行在线设计打印模版 2.在使用的程序当中,增加如下代码即可.程序上是可以挂多个打印模版的,程序页面的代码不用动直接可以读取到打印模 ...
- SNF快速开发平台3.0之--系统里广播的作用--迅速及时、简明扼要的把信息发送给接收者
广播信息,即速度快捷.迅速及时.简明扼要的把信息发送给接收者. 当然在SNF快速开发平台上你也可以作为公告使用.不管当做什么使用要满足以下需求: 简单操作:页面操作简单 只需要输入内容就可以发送. 灵 ...
- Linux下通用打印系统CUPS使用教程
昨天研究了一下关于在Linux下实现打印操作的相关内容,整理记录如下: 1.什么是CUPS CUPS(Common UNIX Printing System,即通用Unix打印系统)是FedoraCo ...
- 7-STM32物联网开发WIFI(ESP8266)+GPRS(Air202)系统方案安全篇(GPRS模块SSL连接MQTT)
6-STM32物联网开发WIFI(ESP8266)+GPRS(Air202)系统方案安全篇(Wi-Fi模块SSL连接MQTT) 由于GPRS是直接和GPRS基站进行连接,其实对于GPRS而言,即使不加 ...
- 释放至强平台 AI 加速潜能 汇医慧影打造全周期 AI 医学影像解决方案
基于英特尔架构实现软硬协同加速,显著提升新冠肺炎.乳腺癌等疾病的检测和筛查效率,并帮助医疗科研平台预防"维度灾难"问题 <PAGE 1 LEFT COLUMN: CUSTOM ...
- 基于cornerstone.js的dicom医学影像查看浏览功能
最近由于项目需求,需要医学影像.dcm文件的预览功能,功能完成后,基于原生Demo做一个开源分享. 心急的小伙伴可以先看如下基于原生js的全部代码: 一.全部代码 <!DOCTYPE html& ...
随机推荐
- 181. 超过经理收入的员工 + join + MySql
181. 超过经理收入的员工 LeetCode_MySql_181 题目描述 方法一:笛卡尔积 # Write your MySQL query statement below select e1.N ...
- django Form 效验
Django 登入效验 .py from django import forms from student import models from django.core.exceptions impo ...
- 测试平台系列(1) 搭建Flask服务
搭建Flask服务 项目地址 点我进入项目地址 代码都会在这里有所展示,喜欢的话可以帮点个star,谢谢大家了!如果你喜欢该教程,也可以分享给其他人. 关于选型 想了很久,本来打算用「Gin」做为后端 ...
- TensorFlow学习(1)-初识
初识TensorFlow 一.术语潜知 深度学习:深度学习(deep learning)是机器学习的分支,是一种试图使用包含复杂结构或由多重非线性变换构成的多个处理层对数据进行高层抽象的算法. 深度学 ...
- kubernetes生产实践之mysql
简介 kubedb mysql 生命周期及特性 Supported MySQL Features Features Availability Clustering ✓ Persistent Volum ...
- C# 应用 - 使用 HttpWebRequest 发起 Http 请求
helper 类封装 调用 1. 引用的库类 \Reference Assemblies\Microsoft\Framework\.NETFramework\v4.6\System.dll Syste ...
- Git Fetch failed解决办法
Git 下拉过程中,电脑死机了,重启后出现问题 找到的解决办法 https://blog.csdn.net/qq_33330887/article/details/80242206
- Bug调试专项训练四笔记
Ajax案例一 导入项目直接运行出现联想无反应 错误原因: 错误1: 55行找不到方法: 错误1解决方案: 解决错误1点击仍无反应 错误2:通过浏览器得出错误2:58行找不到方法 错误2解决方案: 解 ...
- python学习8 文件的操作
本文拷贝了on testing 的<python之文件操作:文件的读写>,只做学习之用 python的文件读写通过 一.用open函数 二.对文件读写操作 三.读取文件位置定位 1. op ...
- 攻防世界 reverse 进阶 15-Reversing-x64Elf-100
15.Reversing-x64Elf-100 这题非常简单, 1 signed __int64 __fastcall sub_4006FD(__int64 a1) 2 { 3 signed int ...