【PyQt5 学习记录】005:QMainWindow 及状态栏、菜单栏和工具栏
 #!/usr/bin/env python

 import sys

 from PyQt5.QtWidgets import (QApplication,

                              QMainWindow,

                              QWidget,

                              QAction,

                              QLabel,

                              QTextEdit,

                              QLineEdit,

                              QPushButton,

                              QGridLayout)

 from PyQt5.QtCore import Qt

 from PyQt5.QtGui import QIcon

 class MainWindow(QMainWindow):

     def __init__(self, parent=None):

         super(MainWindow, self).__init__(parent, Qt.Window)

         # 创建一个菜单栏:

         bar_menu = self.menuBar()

         # 为菜单栏添加文件菜单

         menu_file = bar_menu.addMenu('文件(&F)')

         # 为菜单栏添加编辑菜单

         menu_edit = bar_menu.addMenu('编辑(&E)')

         # 添加一个动作:

         action_file = QAction('打开', self)

         # 为动作添加快捷建:

         # 值得注意的是在 MAC os 中 Ctrl 指的是 command 。

         action_file.setShortcut('Ctrl+O')

         # 为动作添加图标:

         action_file.setIcon(QIcon('open.png'))

         # 将点击动作的信号连接到 action_open 方法:

         action_file.triggered.connect(self.action_open)

         # 将打开动作添加到文件菜单中:

         menu_file.addAction(action_file)

         action_copy = QAction('复制', self)

         action_copy.setIcon(QIcon('copy.png'))

         # 在 MAC os 中 Meta 才是 Ctrl 按钮:

         action_copy.setShortcut('Meta+C')

         action_copy.triggered.connect(self.action_copy)

         menu_edit.addAction(action_copy)

         # 创建一个工具栏:

         bar_tool = self.addToolBar('工具栏')

         # 为工具栏添加按钮:

         bar_tool.addAction(action_file)

         # 为添加分割线:

         bar_tool.addSeparator()

         bar_tool.addAction(action_copy)

         label_1 = QLabel('居右')

         # 设置Label的文字为居右并垂直居中:

         label_1.setAlignment(Qt.AlignRight | Qt.AlignVCenter)

         label_2 = QLabel('宽度因子为 1')

         label_3 = QLabel('居中')

         # 设置Label的文字为居中并垂直居中:

         label_3.setAlignment(Qt.AlignCenter | Qt.AlignVCenter)

         self.label_4 = QLabel('Label_4')

         # 创建一个状态栏:

         status = self.statusBar()

         # 在状态栏显示信息:

         # 注意:显示信息时,组件不会显示

         # status.showMessage("Ready!")

         # 为状态栏添加一个stretch(拉伸因子)为1的Label

         status.addWidget(label_1, 1)

         status.addWidget(label_2, 1)

         status.addWidget(label_3, 3)

         status.addWidget(self.label_4, 1)

         """

         为 QMainWindow 添加其他组件的方法:

         1. 将组件添加到一个布局中;

         2. 创建一个 QWidget 设置为 1 中的布局;

         3. 将 2 中的 QWidget 设为central widget 。

         """

         line_edit = QLineEdit()

         # 为 line_edit 设置灰色提示文字:

         line_edit.setPlaceholderText('请输入...')

         push_button = QPushButton()

         push_button.setText('确认')

         text_edit = QTextEdit()

         text_edit.setPlaceholderText("编辑结果...")

         # 创建一个网格布局:

         layout_grid = QGridLayout()

         layout_grid.addWidget(line_edit, 0, 0)

         layout_grid.addWidget(push_button, 0, 1)

         layout_grid.addWidget(text_edit, 1, 0, 2, 2)

         # 创建一个 QWidget ,并将其布局设置为 layout_grid :

         widget = QWidget()

         widget.setLayout(layout_grid)

         # 将 widget 设为主窗口的 central widget :

         self.setCentralWidget(widget)

         # 设置窗口大小:

         self.resize(500, 500)

         # 设置窗口标题:

         self.setWindowTitle(u"QMainWindow")

         # 显示窗口:

         self.show()

     def action_open(self):

         self.label_4.setText("按下了打开按钮!")

     def action_copy(self):

         self.label_4.setText("按下了复制按钮!")

 if __name__ == "__main__":

     app = QApplication(sys.argv)

     window = MainWindow()

     sys.exit(app.exec_())
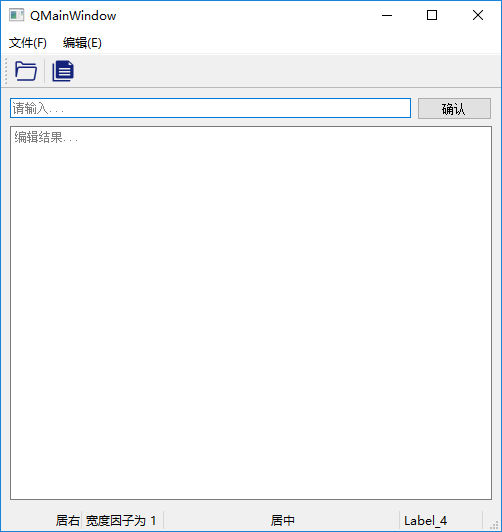
效果如下图:
【PyQt5 学习记录】005:QMainWindow 及状态栏、菜单栏和工具栏的更多相关文章
- 【PyQt5 学习记录】006:重写窗口事件及QMessageBox
#!/usr/bin/env python import sys from PyQt5.QtWidgets import (QApplication, QMainWindow, QMessageBox ...
- 【PyQt5 学习记录】011:使用 QListWidet 创建列表
使用 QListWidet 创建列表 作者: 八月未见 博客: https://www.cnblogs.com/jmtm/ 创建列表: list_widget = QListWidget() 插入项目 ...
- 【PyQt5 学习记录】010:QSplitter
import sys from PyQt5.QtWidgets import (QApplication, QWidget, QSplitter, QTextEdit, QPushButton, QL ...
- 【PyQt5 学习记录】008:改变窗口样式之二
super(MainWindow, self).__init__(parent, flags=Qt.Widget) 首先需要关闭窗口的默认样式,以方便定时想要的样式: self.setWindowFl ...
- 【PyQt5 学习记录】007:改变窗口样式之一
class MainWindow(QMainWindow): 2 def __init__(self, parent=None): 3 super(MainWindow, self).__init__ ...
- 【PyQt5 学习记录】004:简单QThread笔记
在文本编辑框中每隔几秒添加一行文本,代码如下: #!/usr/bin/python3 # -*- coding:utf-8 -*- import sys from PyQt5.QtWidgets im ...
- 【PyQt5 学习记录】001:第一个界面
PyQt5 的安装很简单: pip3 install PyQt5 然后就是写一个最简单的界面试试手: import sys from PyQt5.QtWidgets import QApplicati ...
- 【PyQt5 学习记录】009:批量创建组件并查找
这里需要在创建组件时使用 setObjectName() 为其添加 objectName 属性,再通过 findChild() 或者 findChildren() 函数来查找. 举个栗子,批量创建10 ...
- 【PyQt5 学习记录】003:水平布局和获取屏幕尺寸
#!/usr/bin/python3 # -*- coding:utf-8 -*- import sys from PySide2.QtWidgets import (QApplication, QW ...
随机推荐
- mysql-mmm
查看mmm集群状态: mmm_control show 给主机设置ip: mmm_control set_ip ip host 改变状态: mmm_control set_passive|active ...
- Python小白学习之路(二)—【Pycharm安装与配置】【创建项目】【运算符】【数据类型】
写在前面: 第二天的学习,感觉比昨天学习相对轻松一些,但是对于我这个编程语言功底很弱的人来说,还是稍稍微有些.....哈尔滨的天气一天天冷了下来,还飘着小雨,不过还是挺有意境的.充实而又忙碌的生活,让 ...
- execvp php-fpm reload使用的函数
php重启 本质上是调用 execvp("/usr/local/php/sbin/php-fpm"); execvp就是用一个新的进程把自己替换掉,一个进程一旦调用exec类函数, ...
- SQLAlchemy 代码学习
1.Dialect:英文含义为方言,这边只模块对不同的数据库的连接以及操作的实现. 2.engine:引擎,代表到数据库的一个连接,数据库自身有一个连接最大限制,不能超过这个限制.这里引擎可以连接多个 ...
- 用Python玩转数据——第五周数据统计和可视化
一.数据获取 1.本地数据 with 语句,pd.read_csv('data.csv') 2.网站上数据 2.1 直接获取网页源码,在用正则表达式进行删选 2.2 API接口获取---以豆瓣为例 i ...
- 添加或删除 HTML dom元素
添加或删除 HTML dom元素 创建新的 HTML 元素 如需向 HTML DOM 添加新元素,您必须首先创建该元素(元素节点),然后向一个已存在的元素追加该元素. <div id=" ...
- .Net Core Nuget还原失败
项目获取后发现所有项目的依赖项全部报黄.. 展开发现所有的Nuget包都没有引用.. 按错误窗口的提示使用解决方案上"Nuget包还原"来解决却没有任何进展.. 错误窗口报文 找不 ...
- (转)MySQL中show语法
MySQL中show语法 1. show tables或show tables from database_name; -- 显示当前数据库中所有表的名称. 2. show databases; -- ...
- MySQL 5.6 在线主从复制
设:主库为master,从库为slave 1.备份主库数据(全库),且记录下 master_log_file,master_log_pos,用于后面设置slave时指定 备份脚本: mysqldump ...
- AndroidStudio生成自己的Compile依赖
在AndroidStudio中经常使用compile的方式来导入第三方代码,如图所示: 想要拥有自己的依赖,可参考本篇的方法 在github上托管一个带有Android Libray的项目,我们要co ...