【PyQt5 学习记录】005:QMainWindow 及状态栏、菜单栏和工具栏
 #!/usr/bin/env python

 import sys

 from PyQt5.QtWidgets import (QApplication,

                              QMainWindow,

                              QWidget,

                              QAction,

                              QLabel,

                              QTextEdit,

                              QLineEdit,

                              QPushButton,

                              QGridLayout)

 from PyQt5.QtCore import Qt

 from PyQt5.QtGui import QIcon

 class MainWindow(QMainWindow):

     def __init__(self, parent=None):

         super(MainWindow, self).__init__(parent, Qt.Window)

         # 创建一个菜单栏:

         bar_menu = self.menuBar()

         # 为菜单栏添加文件菜单

         menu_file = bar_menu.addMenu('文件(&F)')

         # 为菜单栏添加编辑菜单

         menu_edit = bar_menu.addMenu('编辑(&E)')

         # 添加一个动作:

         action_file = QAction('打开', self)

         # 为动作添加快捷建:

         # 值得注意的是在 MAC os 中 Ctrl 指的是 command 。

         action_file.setShortcut('Ctrl+O')

         # 为动作添加图标:

         action_file.setIcon(QIcon('open.png'))

         # 将点击动作的信号连接到 action_open 方法:

         action_file.triggered.connect(self.action_open)

         # 将打开动作添加到文件菜单中:

         menu_file.addAction(action_file)

         action_copy = QAction('复制', self)

         action_copy.setIcon(QIcon('copy.png'))

         # 在 MAC os 中 Meta 才是 Ctrl 按钮:

         action_copy.setShortcut('Meta+C')

         action_copy.triggered.connect(self.action_copy)

         menu_edit.addAction(action_copy)

         # 创建一个工具栏:

         bar_tool = self.addToolBar('工具栏')

         # 为工具栏添加按钮:

         bar_tool.addAction(action_file)

         # 为添加分割线:

         bar_tool.addSeparator()

         bar_tool.addAction(action_copy)

         label_1 = QLabel('居右')

         # 设置Label的文字为居右并垂直居中:

         label_1.setAlignment(Qt.AlignRight | Qt.AlignVCenter)

         label_2 = QLabel('宽度因子为 1')

         label_3 = QLabel('居中')

         # 设置Label的文字为居中并垂直居中:

         label_3.setAlignment(Qt.AlignCenter | Qt.AlignVCenter)

         self.label_4 = QLabel('Label_4')

         # 创建一个状态栏:

         status = self.statusBar()

         # 在状态栏显示信息:

         # 注意:显示信息时,组件不会显示

         # status.showMessage("Ready!")

         # 为状态栏添加一个stretch(拉伸因子)为1的Label

         status.addWidget(label_1, 1)

         status.addWidget(label_2, 1)

         status.addWidget(label_3, 3)

         status.addWidget(self.label_4, 1)

         """

         为 QMainWindow 添加其他组件的方法:

         1. 将组件添加到一个布局中;

         2. 创建一个 QWidget 设置为 1 中的布局;

         3. 将 2 中的 QWidget 设为central widget 。

         """

         line_edit = QLineEdit()

         # 为 line_edit 设置灰色提示文字:

         line_edit.setPlaceholderText('请输入...')

         push_button = QPushButton()

         push_button.setText('确认')

         text_edit = QTextEdit()

         text_edit.setPlaceholderText("编辑结果...")

         # 创建一个网格布局:

         layout_grid = QGridLayout()

         layout_grid.addWidget(line_edit, 0, 0)

         layout_grid.addWidget(push_button, 0, 1)

         layout_grid.addWidget(text_edit, 1, 0, 2, 2)

         # 创建一个 QWidget ,并将其布局设置为 layout_grid :

         widget = QWidget()

         widget.setLayout(layout_grid)

         # 将 widget 设为主窗口的 central widget :

         self.setCentralWidget(widget)

         # 设置窗口大小:

         self.resize(500, 500)

         # 设置窗口标题:

         self.setWindowTitle(u"QMainWindow")

         # 显示窗口:

         self.show()

     def action_open(self):

         self.label_4.setText("按下了打开按钮!")

     def action_copy(self):

         self.label_4.setText("按下了复制按钮!")

 if __name__ == "__main__":

     app = QApplication(sys.argv)

     window = MainWindow()

     sys.exit(app.exec_())
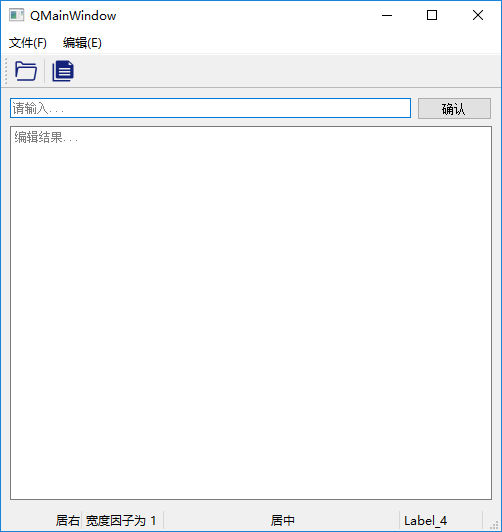
效果如下图:
【PyQt5 学习记录】005:QMainWindow 及状态栏、菜单栏和工具栏的更多相关文章
- 【PyQt5 学习记录】006:重写窗口事件及QMessageBox
#!/usr/bin/env python import sys from PyQt5.QtWidgets import (QApplication, QMainWindow, QMessageBox ...
- 【PyQt5 学习记录】011:使用 QListWidet 创建列表
使用 QListWidet 创建列表 作者: 八月未见 博客: https://www.cnblogs.com/jmtm/ 创建列表: list_widget = QListWidget() 插入项目 ...
- 【PyQt5 学习记录】010:QSplitter
import sys from PyQt5.QtWidgets import (QApplication, QWidget, QSplitter, QTextEdit, QPushButton, QL ...
- 【PyQt5 学习记录】008:改变窗口样式之二
super(MainWindow, self).__init__(parent, flags=Qt.Widget) 首先需要关闭窗口的默认样式,以方便定时想要的样式: self.setWindowFl ...
- 【PyQt5 学习记录】007:改变窗口样式之一
class MainWindow(QMainWindow): 2 def __init__(self, parent=None): 3 super(MainWindow, self).__init__ ...
- 【PyQt5 学习记录】004:简单QThread笔记
在文本编辑框中每隔几秒添加一行文本,代码如下: #!/usr/bin/python3 # -*- coding:utf-8 -*- import sys from PyQt5.QtWidgets im ...
- 【PyQt5 学习记录】001:第一个界面
PyQt5 的安装很简单: pip3 install PyQt5 然后就是写一个最简单的界面试试手: import sys from PyQt5.QtWidgets import QApplicati ...
- 【PyQt5 学习记录】009:批量创建组件并查找
这里需要在创建组件时使用 setObjectName() 为其添加 objectName 属性,再通过 findChild() 或者 findChildren() 函数来查找. 举个栗子,批量创建10 ...
- 【PyQt5 学习记录】003:水平布局和获取屏幕尺寸
#!/usr/bin/python3 # -*- coding:utf-8 -*- import sys from PySide2.QtWidgets import (QApplication, QW ...
随机推荐
- PHP之旅5 php的函数
函数的结构 php的函数和其他语言的函数基本类似,和C语言比较的话主要区别在于php是一个弱语言,对类型不敏感,在函数的表现上就是,php函数没有类型定义,不像语言即使无参也要定义为void,而且不管 ...
- nginx配置跨域、gzip加速、代理详细讲解
1.配置跨域 这个很简单,直接打开配置nginx.conf ,在http下配置下面三行代码:当然如果你是想某一个虚拟主机下跨域,那就在哪个server下面添加 add_header Access-Co ...
- 【2018北京集训6】Lcm DFT&FWT
首先我们来看下此题的模数232792561. 232792561=lcm(1,2,3.......20)+1.这个性质将在求值时用到. 我们将n分解质因数,令$m$为$n$的素因子个数,设n=$\Pi ...
- commons-pool2
转载请注明源出处:http://www.cnblogs.com/lighten/p/7375611.html 1.前言 本章介绍一下常用基础Jar包commons-pools2,最近使用到了thrif ...
- Java之集合(二十二)PriorityBlockingQueue
转载请注明源出处:http://www.cnblogs.com/lighten/p/7510799.html 1.前言 本章介绍阻塞队列PriorityBlockingQueue.这是一个无界有序的阻 ...
- 【数组】Best Time to Buy and Sell Stock I/II
Best Time to Buy and Sell Stock I 题目: Say you have an array for which the ith element is the price o ...
- javac之BridgeMethod及泛型擦除重写
When compiling a class or interface that extends a parameterized class or implements a parameterized ...
- 两个字符串 char* a, char* b,输出b在a中的位置次序。
/** 题目: 两个字符串 char* a, char* b,输出b在a中的位置次序. void output_postion(const char* a, const char* b); 如:a = ...
- elasticsearch(四) 之 elasticsearch常用的一些集群命令
目录 elasticsearch常用的一些集群命令 查看集群健康状态 查看集群的节点列表 查看所有的索引 删除索引 查询索引的某个文档内容 更新文档 删除文档 自动创建索引 定时删除索引 elasti ...
- logback 日志打印输出
slf4j 其实是一个日志的抽象层, 其本质仍然需要真正的实现 他可以解决代码中独立于任意特定的日志类库, 可以减少很多维护日志的麻烦, 除此之外, 还有占位符的特性, {}, 类似于String#f ...