git的安装教程
团队开发的时候常要用到git来对代码进行管理,平时开发的时候也需要使用git来做一些事情,如给vue项目进行代码编译等等。
那下面我们开始
一、安装和配置环境
首先下载git安装包(去官网下载,https://gitforwindows.org/ 我现在用的是2.17版本的,如果是新版本可能会有部分不同),然后双击安装包打开

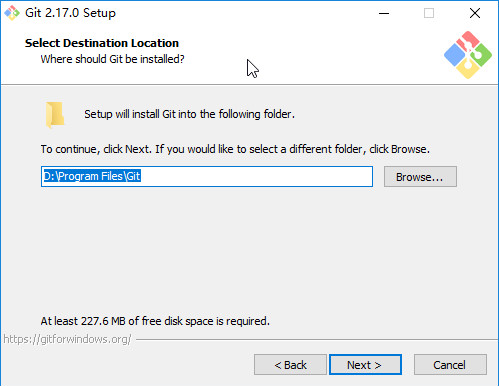
点击 next 下一步 , 选择安装位置
继续点击next 下一步,选择组件

下面是每个选项的意思:
Additional icons 附加图标 ( On the Desktop 在桌面上)
Windows Explorer integration 电脑系统的资源管理器集成鼠标右键菜单 Git Bash Here Git GUI Here (一般这个都选择添加上,因为方便)
Git LFS (Large File Support) 大文件支持
Associate .git* configuration files with the default text editor 将 .git 配置文件与默认文本编辑器相关联
Associate .sh files to be run with Bash 将.sh文件关联到Bash运行
Use a TrueType font in all console windows 在所有控制台窗口中使用TrueType字体
Check daily for Git for Windows updates 每天检查Git是否有Windows更新
选择完之后点击next下一步,创建开始菜单目录

然后点击next下一步,选择Git使用的默认编辑器(一般使用图中这个选项,使用vim编辑器)
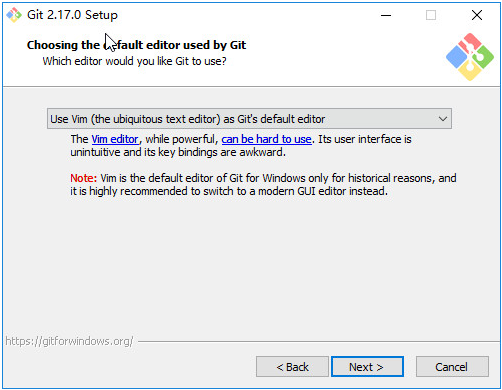
里面的选项的意思(一般使用第二个,即 vim编辑器):
Use the Nano editor by default 默认使用 Nano 编辑器
Use Vim (The ubiquitous text editor) as Git's default editor 使用 Vim 作为 Git 的默认编辑器
Use Notepad++ as Git's default editor 使用 Notepad++ 作为 Git 的默认编辑器
Use Visual Studio Code as Git's default editor 使用 Visual Studio Code 作为 Git 的默认编辑器
选择完之后点击next,下一步 ,配置PATH环境

这里每个选项的意思:
Use Git from Git Bash only
仅从Git Bash使用Git
This is the safest choice as your PATH will not be modified at all.You will only be able to use the Git command line tools form Git Bash.
这是最安全的选择,因为您的PATH根本不会被修改。您只能使用 Git Bash 的 Git 命令行工具。
Use Git from the Windows Command Prompt
从Windows命令提示符使用Git
This option is considered safe as it only adds some minimal Git wrappers to your PATH to avoid cluttering your environment with optional Unix tools . You will be able to use Git from both Git Bash and the Windows Command Prompt.
这个选项被认为是安全的,因为它只向PATH添加一些最小的 Git包,以避免使用可选的Unix工具混淆环境。 您将能够从 Git Bash 和 Windows 命令提示符中使用 Git。
Use Git and optional Unix tools from the Windows Command Prompt
从Windows命令提示符使用Git和可选的Unix工具
Both Git and the optional Unix tools will be added to you PATH
Git和可选的Unix工具都将添加到您计算机的 PATH 中
Warning:This will override Windows tools like "find and sort".Only use this option if you understand the implications.
警告:这将覆盖Windows工具,如 “ find 和 sort ”。只有在了解其含义后才使用此选项。
一般情况下选择中间那项
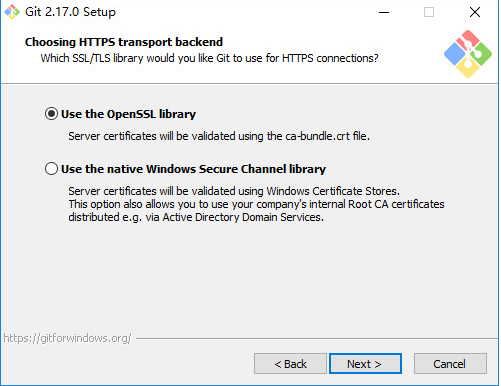
选择完成之后,点击next进入下一步, 选择HTTPS传输后端 (按图中的选择就可以)
选项目意思:
Use the OpenSSL library
使用 OpenSSL 库
Server certificates will be validated using the ca-bundle.crt file.
服务器证书将使用ca-bundle.crt文件进行验证。
Use the native Windows Secure Channel library
使用本地 Windows 安全通道库
Server certificates will be validated using Windows Certificate Stores.This option also allows you to use your company's internal Root CA certificates distributed e.g. via Active Directory Domain Services.
服务器证书将使用Windows证书存储验证。此选项还允许您使用公司的内部根CA证书,例如, 通过Active Directory Domain Services 。
选择完成之后点击next ,进入下一步 ,配置行结束转换(按图中选择)

选项意思:
Checkout Windows-style,commit Unix-style line endings
签出Windows风格,提交Unix风格的行尾
Git will convert LF to CRLF when checking out text files.When committing text files,CRLF will be converted to LF .For cross-pltform projects,this is the recommended setting on Windows ("core.autocrlf" is set to "true")
在检出文本文件时,Git会将LF转换为CRLF。当提交文本文件时,CRLF将转换为LF。 对于跨平台项目,这是Windows上推荐的设置(“core.autocrlf”设置为“true”)
Checkout as-is , commit Unix-style line endings
按原样签出,提交Unix样式的行尾
Git will not perform any conversion when checking out text files. When committing text files, CRLF will be converted to LF. For cross-platform projects,this is the recommended setting on Unix ("core.autocrlf" is set to "input")
在检出文本文件时,Git不会执行任何转换。 提交文本文件时,CRLF将转换为LF。 对于跨平台项目,这是Unix上的推荐设置 (“core.autocrlf”设置为“input”)
Checkout as-is,commit as-is、
按原样签出,按原样提交
Git will not perform any conversions when checking out or committing text files.Choosing this option is not recommended for cross-platform projects ("core.autocrlf"is set to "false")
在检出或提交文本文件时,Git不会执行任何转换。对于跨平台项目,不推荐使用此选项(“core.autocrlf”设置为“false”)
选择完成之后,点击next下一步, 配置终端模拟器以与 Git Bash 一起使用 (选择和图中一样)

选项意思:
Use MinTTY (the default terminal of MSYS2)
使用MinTTY(MSYS2的默认终端)
Git Bash will use MinTTY as terminal emulator,which sports a resizable window,non-rectangular selections and a Unicode font. Windows console programs (such as interactive Python) must be launched via 'winpty' to work in MinTTY.
Git Bash将使用MinTTY作为终端模拟器,该模拟器具有可调整大小的窗口,非矩形选区和Unicode字体。 Windows控制台程序(如交互式Python)必须通过'winpty'启动才能在MinTTY中运行。
Use Windows' default console window
使用Windows的默认控制台窗口
Git will use the default console window of Windows ("cmd.exe"),which works well with Win32 console programs such as interactive Python or node.js , but has a very limited default scroll-back,needs to be configured to use aUnicode font in order to display non-ASCII characters correctly,and prior to Windows 10 its windows was not freely resizable and it only allowed rectangular text selections.
Git将使用Windows的默认控制台窗口(“cmd.exe”),该窗口可以与Win32控制台程序(如交互式Python或node.js)一起使用,但默认的回滚非常有限,需要配置为使用unicode 字体以正确显示非ASCII字符,并且在Windows 10之前,其窗口不能自由调整大小,并且只允许矩形文本选择。
选择完成之后,点击next进入下一步,配置额外的选项

选项意思:
Enable file system caching
启用文件系统缓存
File system data will be read in bulk and cached in memory for certain operations ("core.fscache" is set to "true"). This provides a significant performance boost.
文件系统数据将被批量读取并缓存在内存中用于某些操作(“core.fscache”设置为“true”)。 这提供了显着的性能提升。
Enable Git Credential Manager
启用Git凭证管理器
The Git Credential Manager for Windows provides secure Git credential storage for Windows,most notably multi-factor authentication support for Visual Studio Team Services and GitHub. (requires .NET framework v4.5.1 or or later).
Windows的Git凭证管理器为Windows提供安全的Git凭证存储,最显着的是对Visual Studio Team Services和GitHub的多因素身份验证支持。 (需要.NET Framework v4.5.1或更高版本)。
Enable symbolic links
启用符号链接
Enable symbolic links (requires the SeCreateSymbolicLink permission).Please note that existing repositories are unaffected by this setting.
启用符号链接(需要SeCreateSymbolicLink权限)。请注意,现有存储库不受此设置的影响。
设置完成之后点击 Install 安装。

安装完成之后,里面的选项
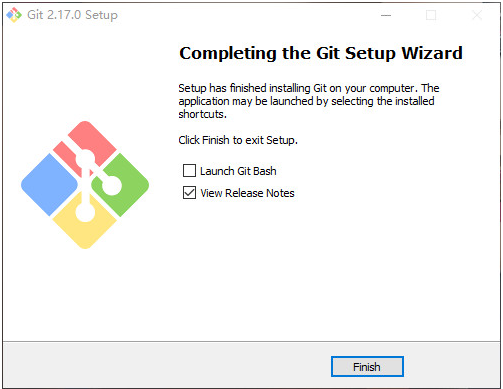
Launch Git Bash 是启动git的意思
view Release Notes 是查看发行说明
选不选择看你自己喜欢
到这里就安装完成了。
git的安装教程的更多相关文章
- git 小乌龟安装教程
一.windows系统安装git 首先下载git for windows客户端http://msysgit.github.io/ 安装过程没什么特别的,不停next就ok了 图太多就不继续了~ ...
- Git+windows安装教程(一)
一:Git是什么? Git是目前世界上最先进的分布式版本控制系统. 二:SVN与Git的最主要的区别? SVN是集中式版本控制系统,版本库是集中放在中央服务器的,而干活的时候,用的都是自己的电脑,所以 ...
- git&nodejs安装教程
git https://www.cnblogs.com/ximiaomiao/p/7140456.html nodejs https://jingyan.baidu.com/article/e7505 ...
- git 安装教程
昆,简单说下安装教程1,安装Git2,安装TortoiseGit3,打开第一步安装的git工具GIT BASH
- Git配置安装使用教程操作github上传克隆数据
Git是何方神圣? Git是用C语言开发的分布版本控制系统.版本控制系统可以保留一个文件集合的历史记录,并能回滚文件集合到另一个状态(历史记录状态).另一个状态可以是不同的文件,也可以是不同的文件内容 ...
- git\CentOS6.5中gitlab安装教程
一.Git 起源: Git是一个开源的分布式版本控制系统,用于敏捷高效地处理任何或小或大的项目. Git 是 Linus Torvalds 为了帮助管理 Linux 内核开发而开发的一个开放源码的版本 ...
- Git的安装和使用教程详解
---恢复内容开始--- 本篇笔记聊聊Git的安装和使用教程 一.认 识 Git ...
- Windows系统Git安装教程(详解Git安装过程)
Windows系统Git安装教程(详解Git安装过程) 今天更换电脑系统,需要重新安装Git,正好做个记录,希望对第一次使用的博友能有所帮助! 获取Git安装程序 到Git官网下载,网站地址: ...
- Git git2.8.1客户端安装教程
Git git2.8.1客户端安装教程 一 Git介绍 git是一款免费.开源的分布式版本控制系统,用于敏捷高效地处理任何或小或大的项目. 分布式相比于集中式的最大区别在于开发者可以提交到本地,每个开 ...
随机推荐
- Angular build编译内存溢出"JavaScript heap out of memory"的解决办法
关于最近使用angular build编译打包的时候,遇到内存溢出的突发情况,做一个简单记录 编译报错如下↓↓↓ 报错信息很直观地指出是内存溢出了.是什么导致了内存溢出呢?其根本原因在于 nodejs ...
- XXE漏洞简析
0x00.什么是XXE? XML外部实体注入(XML External Entity Injection) XML基础 XML用于标记电子文件使其具有结构性的标记语言,可以用来标记数据.定义数据类型. ...
- [转贴]Linux内核LTS长期支持版生命周期
Linux内核LTS长期支持版生命周期 https://blog.51cto.com/dangzhiqiang/1894026 搞不懂长期支持版本的特点和区别. 党志强关注0人评论4371人阅读201 ...
- 小菜鸟之JAVA面试题库1
四次挥手 客户端发送释放连接报文,关闭客户端到服务端的数据传输 服务端收到后,发送确认报文给客户端 服务端发送释放连接报文,关闭服务端到客户端的数据传输 客户端发送一个确认报文给服务端 ------- ...
- C++练习 | 文件流应用(1)
#include <iostream> #include <cmath> #include <cstring> #include <string> #i ...
- python中迭代器和生成器的详细解释
https://www.cnblogs.com/wilber2013/p/4652531.html
- Git服务器搭建与配置管理
Git for Windows TortoiseGit:是一个开放的git版本控制系统的源客户端,支持Winxp/vista/win7.离不开真正的Git(Git for windows版本名字又叫M ...
- Vue首页加载过慢 解决方案
一.什么导致了首页初步加载过慢:app.js文件体积过大 二.解决方法: 1.Vue-router懒加载 vue-router懒加载可以解决首次加载资源过多导致的速度缓慢问题:vue-router支持 ...
- vue+element 使用Export2Excel导出表格组件
下载表格组件是根据我自己的业务需求来封装的 使用的是vue中 xlsx 的插件,需要安装新的依赖及配置 仅供参考 不保证和你百分百匹配 安装依赖 npm install -S file-saver x ...
- react 基础语法使用
刚开始不久react,在菜鸟上及其他前辈网站上学习,下面开始我的自学笔记. 包括: 渲染元素 组件(函数方法定义.es6 class定义) 事件处理 条件渲染 列表 下面代码部分将不会再写html部分 ...