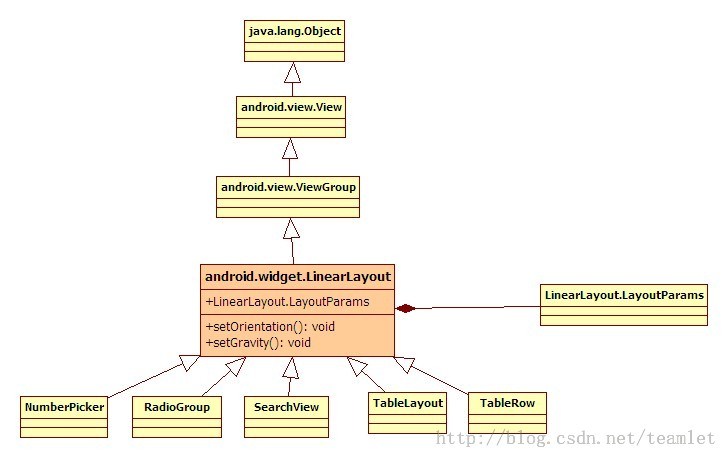
LinearLayout
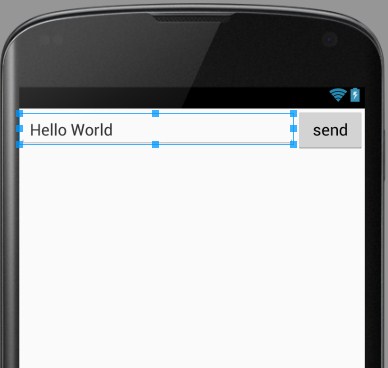
<?xml version="1.0" encoding="utf-8"?>
<LinearLayout xmlns:android="http://schemas.android.com/apk/res/android"
    android:orientation="horizontal"
    android:layout_width="match_parent"
    android:layout_height="match_parent"
    android:layout_alignParentTop="true"
    android:layout_alignParentLeft="true"
    android:layout_alignParentStart="true">

    <EditText
        android:layout_width="0dp"
        android:layout_height="wrap_content"
        android:id="@+id/editText2"
        android:layout_weight="4" />

    <Button
        android:layout_width="0dp"
        android:layout_height="wrap_content"
        android:text="send"
        android:id="@+id/btn_send"
        android:layout_weight="1" />
</LinearLayout>
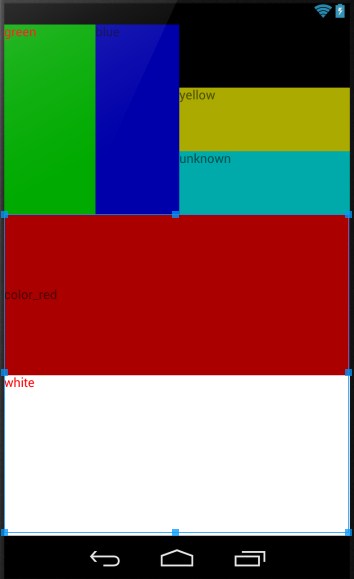
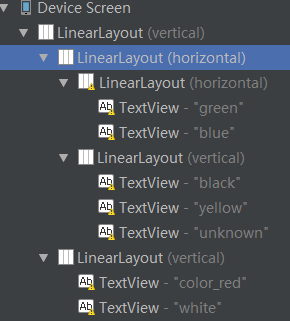
<?xml version="1.0" encoding="utf-8"?>
<LinearLayout xmlns:android="http://schemas.android.com/apk/res/android"
    android:layout_width="fill_parent"
    android:layout_height="fill_parent"
    android:orientation="vertical" >
    <LinearLayout
        android:orientation="horizontal"
        android:layout_width="fill_parent"
        android:layout_height="wrap_content"
        android:baselineAligned="false"
        android:layout_weight="1"  >

        <LinearLayout
            android:orientation="horizontal"
            android:layout_width="wrap_content"
            android:layout_height="fill_parent"
            android:layout_weight="1">
            <TextView
                android:text="green"
                android:textColor="#ff0000"
                android:background="#00aa00"
                android:layout_width="wrap_content"
                android:layout_height="fill_parent"
                android:layout_weight="1"/>
            <TextView
                android:text="blue"
                android:background="#0000aa"
                android:layout_width="wrap_content"
                android:layout_height="fill_parent"
                android:layout_weight="1"/>
        </LinearLayout>
        <LinearLayout
            android:orientation="vertical"
            android:layout_width="wrap_content"
            android:layout_height="fill_parent"
            android:layout_weight="1">
            <TextView
                android:text="black"
                android:background="#000000"
                android:layout_width="fill_parent"
                android:layout_height="wrap_content"
                android:layout_weight="1"/>
            <TextView
                android:text="yellow"
                android:background="#aaaa00"
                android:layout_width="fill_parent"
                android:layout_height="wrap_content"
                android:layout_weight="1"/>
            <TextView
                android:text="unknown"
                android:background="#00aaaa"
                android:layout_width="fill_parent"
                android:layout_height="wrap_content"
                android:layout_weight="1"/>
        </LinearLayout>
    </LinearLayout>
    <LinearLayout
        android:orientation="vertical"
        android:layout_width="fill_parent"
        android:layout_height="wrap_content"
        android:layout_weight="2">
        <TextView
            android:text="color_red"
            android:gravity="fill_vertical"
            android:background="#aa0000"
            android:layout_width="fill_parent"
            android:layout_height="wrap_content"
            android:layout_weight="2"/>
        <TextView
            android:text="white"
            android:textColor="#ff0000"
            android:background="#ffffff"
            android:layout_width="fill_parent"
            android:layout_height="wrap_content"
            android:layout_weight="2"/>
    </LinearLayout>

</LinearLayout>
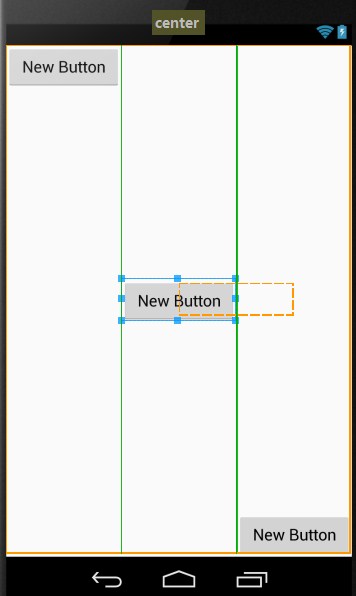
<?xml version="1.0" encoding="utf-8"?>
<LinearLayout xmlns:android="http://schemas.android.com/apk/res/android"
    android:layout_width="match_parent"
    android:layout_height="match_parent">

    <Button
        android:layout_width="wrap_content"
        android:layout_height="wrap_content"
        android:text="New Button"
        android:id="@+id/button3"
        android:layout_gravity="bottom|right|top"
        android:layout_weight="1"/>

    <Button
        android:layout_width="wrap_content"
        android:layout_height="wrap_content"
        android:text="New Button"
        android:id="@+id/button2"
        android:layout_gravity="center_vertical"
        android:layout_weight="1"/>

    <Button
        android:layout_width="wrap_content"
        android:layout_height="wrap_content"
        android:text="New Button"
        android:id="@+id/button"
        android:layout_gravity="bottom"
        android:layout_weight="1" />
</LinearLayout>
LinearLayout的更多相关文章
- Android中的LinearLayout布局
LinearLayout : 线性布局 在一般情况下,当有很多控件需要在一个界面列出来时,我们就可以使用线性布局(LinearLayout)了, 线性布局是按照垂直方向(vertical)或水平方向 ...
- 和我一起看API(一)你所不知道的LinearLayout补充
楼主英语水平差,翻译的不好的话请多多指正,嘿嘿... A Layout that arranges its children in a single column or a single row. T ...
- Android-RelativeLayout(相对布局)、LinearLayout(线性布局)
RelativeLayout(相对布局):按照各子元素之间的位置关系完成布局. 定位:android:layout_above="@id/xxx" --将控件置于给定ID控件之上 ...
- LinearLayout布局问题
LinearLayout是平时开发中很常见的线性布局方式,分为水平和竖直2种,笔者在实际使用中发现了如下问题,希望能帮到别人. 横着的LinearLayout,凡是设置x坐标的属性都不起作用,比如la ...
- 动态添加LinearLayout的高度
WindowManager wm = (WindowManager) getContext() .getSystemService(Context.WINDOW_SERVICE); int width ...
- 动态生成linearLayout
LinearLayout linearLayout=new LinearLayout(this); linearLayout.setOrientation(LinearLayout.VERTICAL) ...
- Android的学习第六章(布局一LinearLayout)
今天我们来说一下Android五大布局-LinearLayout布局(线性布局) 含义:线性布局,顾名思义,指的是整个Android布局中的控件摆放方式是以线性的方式摆放的, 主要作用:主要对整个界面 ...
- This TableLayout layout or its LinearLayout parent is possibly useless
<?xml version="1.0" encoding="utf-8"?> <LinearLayout xmlns:android=&quo ...
- Record:Handle onClick for our custom LinearLayout for Gallery-like HorizontalScrollView
Handle onClick for our custom LinearLayout for Gallery-like HorizontalScrollView The post "Im ...
- Andriod中textview垂直水平居中及LinearLayout内组件的垂直布局
1.textview 垂直水平居中的设置 Android:gravity="center_vertical|center" 2.LinearLayout中设置控件垂直布局,默认的是 ...
随机推荐
- 在Nginx服务器中设置多个站点
这里以配置1个站点(1个域名)为例,n 个站点可以相应增加调整, 假设:IP地址: 127.0.0.1域名1 phpmyadmin.zhengwen.cn 放在 /www/phpmyadmin.zhe ...
- springmvc请求参数获取的几种方法
1.直接把表单的参数写在Controller相应的方法的形参中,适用于get方式提交,不适用于post方式提交. /** * 1.直接把表单的参数写在Controller相应的方法的形参中 * @pa ...
- css居中总结
水平居中 1. inline和inline-*元素水平居中:text-align:center 2. block元素水平居中: block定宽:margin-left: auto; margin-ri ...
- Xshell中文版使用说明/下载
个人本来一直用SecureCRT的这几天朋友推荐用xshell就尝试下载了一个结果发现这个比SecureCRT和puttytel好使多了切更能更完善强大特此推荐附带注册码一枚可装999台机器 1309 ...
- 【8-17】c++学习笔记01
控制台程序不自动退出方法: system("pause"); getchar() 使用执行 ctrl+F5,开始调试 F5会出现闪退 动态内存分配 //construct c st ...
- c# 多线程 --Mutex(互斥锁)
互斥锁(Mutex) 互斥锁是一个互斥的同步对象,意味着同一时间有且仅有一个线程可以获取它. 互斥锁可适用于一个共享资源每次只能被一个线程访问的情况 函数: //创建一个处于未获取状态的互斥锁 Pub ...
- php json_decode 函数
json_decode 函数 url地址:http://php.net/manual/en/function.json-decode.php json_decode (PHP 5 >= 5.2. ...
- winScp如何通过隧道代理进行远程连接
目标机器:a ip为192.168.2.150(内网ip) a.xxx.x.xx(外网ip) 跳板机器:b ip为192.168.2.151(内网ip) b.xxx.xx.xx(外网ip) 目标机 ...
- 黑客攻防技术宝典Web实战篇(二)工具篇
扫描工具.中间攻击工具.加密解密工具等. 1 TM Thread Module 2 burpsuite 代理.中间攻击.repeatur.spider.暴力破解(intrude).加密.解密.扫描器 ...
- ImageView.ScaleType8种用法
1·ImageView.ScaleType.center:图片位于视图中间,但不执行缩放. 2·ImageView.ScaleType.CENTER_CROP 按统一比例缩放图片(保持图片的尺寸比例) ...