[转]How to Download and Setup Blue Prism
本文转自:https://www.hopetutors.com/blog/uncategorized/how-to-download-and-setup-blue-prism/
The Download and Installation of Blue Prism
Blue Prism is one of the leading tools in the market right now for RPA and everyone is talking about it. The opportunities in Blue Prism are endless. Most of the tech companies are hiring Blue Prism professionals in large numbers currently.
Prerequisites
- Windows 7, Windows 8, Windows 8.1, Windows XP (any Windows based software). We will be using Windows 7, 64 bit in this tutorial.
- The second component you require is the Blue Prism installation software. It can be either 64 bit or 32 bit depending on your OS. We can request for a Blue Prism Software from Blue Prism directly and they will help you with the installation file. This will be a trial version for 15 or 30 days.
- The third and the most important aspect which we require is the Blue Prism license file. This license file is mandatory and only after getting a licensed software can we work properly on Blue Prism.
- The fourth and another important thing we require is a single SQL server instance. We are using SQL server 2012 Express Edition for tutorial purposes. We can use any SQL server instance after 2008. This again can be 64 bit or 32 bit depending on your OS.
Moving on straight to the installation part, we have downloaded all the files here.
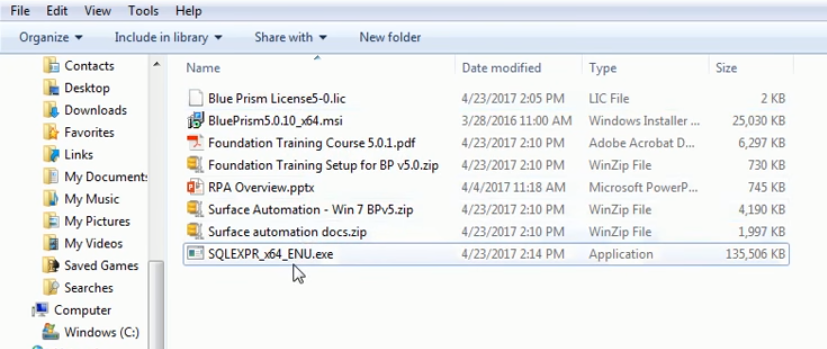
The second file in the list is the Blue Prism software file, the first file is the license file, and the last item in the list is the SQL server.
SQL Server Installation
Before we move forward we need to have SQL Express installed in our system. Only then will we be able to install Blue Prism. So let’s get started with the SQL server installation. We can get the free version of SQL server from tech giant Google.
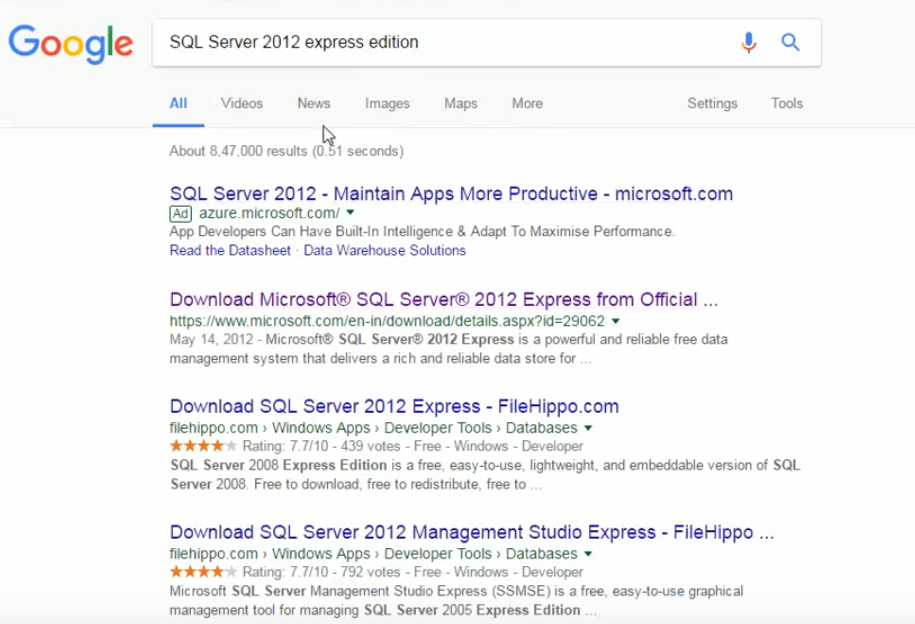
Step 1 – We have to go to Google and type “SQL Server 2012 express edition” in the search bar as shown in the image below.
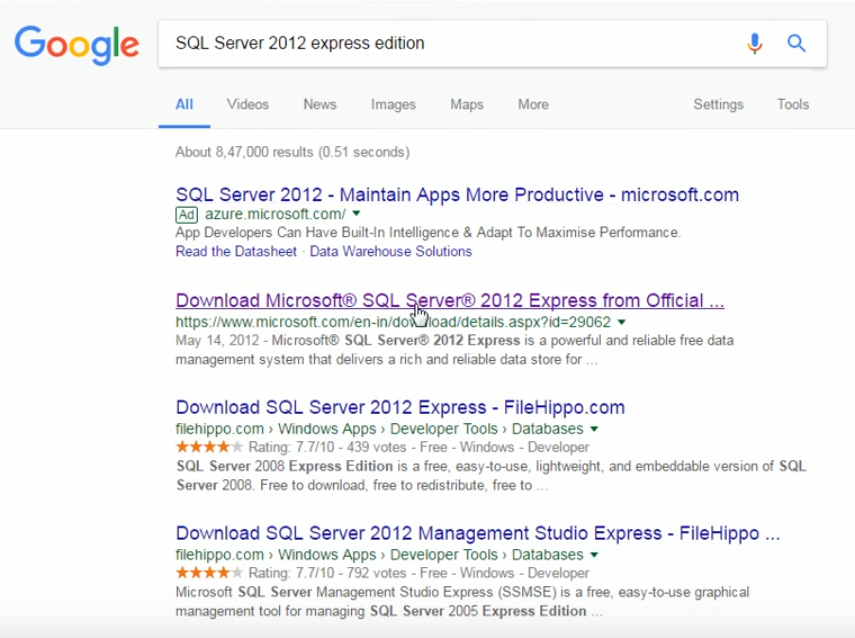
Step 2 – Your next task is to click on the Microsoft Website which is the second link in this scenario.
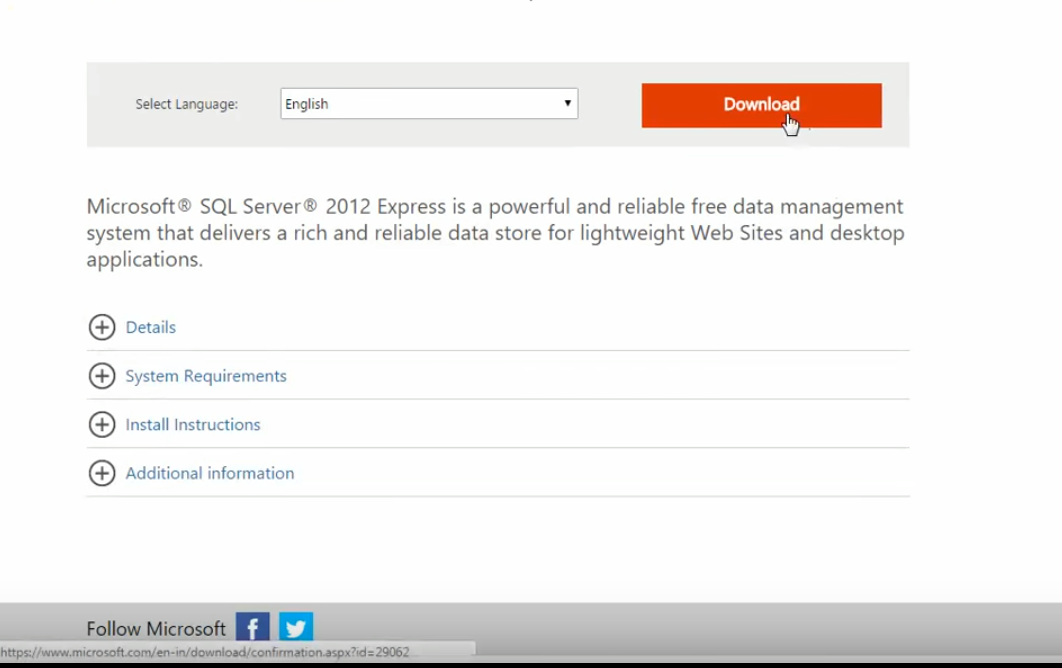
Step 3 – After entering the Microsoft Website, we have to scroll down and click on the red Download button as shown in the image below.
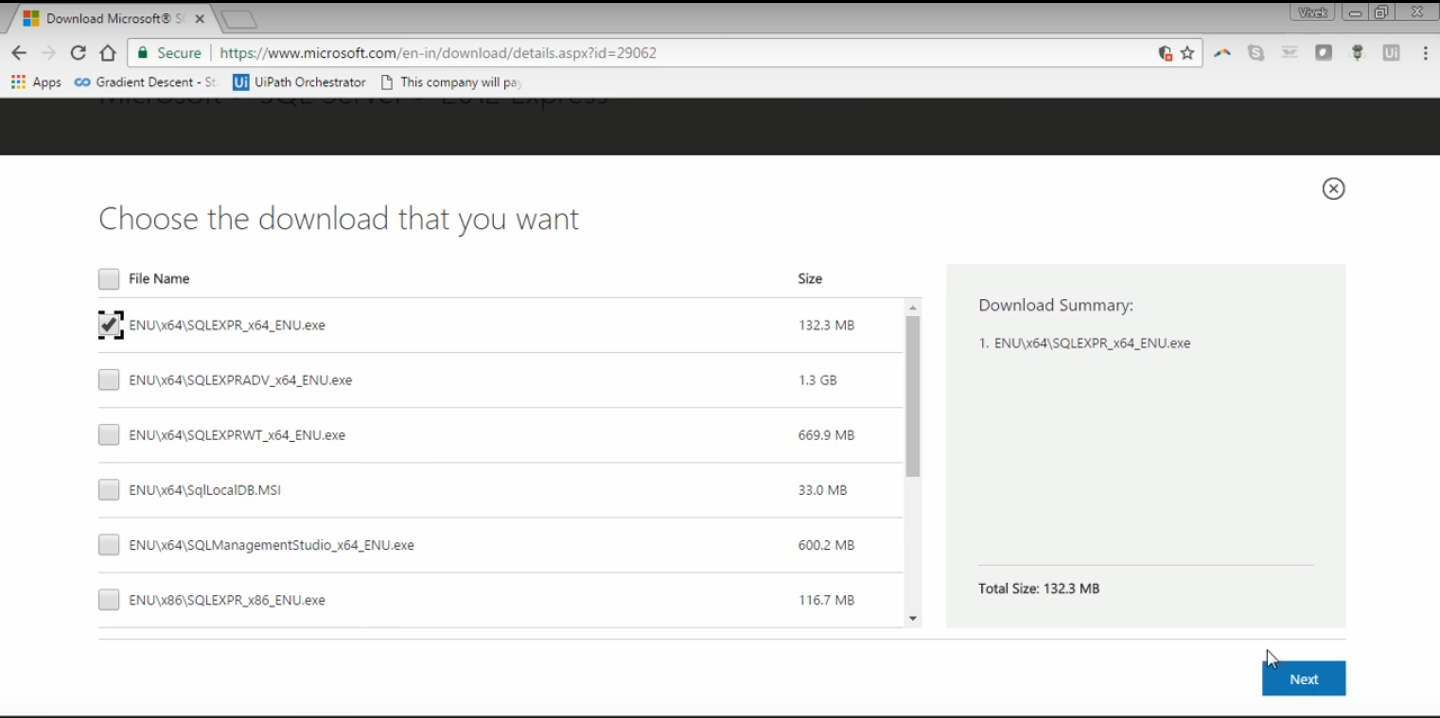
Step 4 – Once you have clicked on the Download button select the first option which is the Express Edition option.
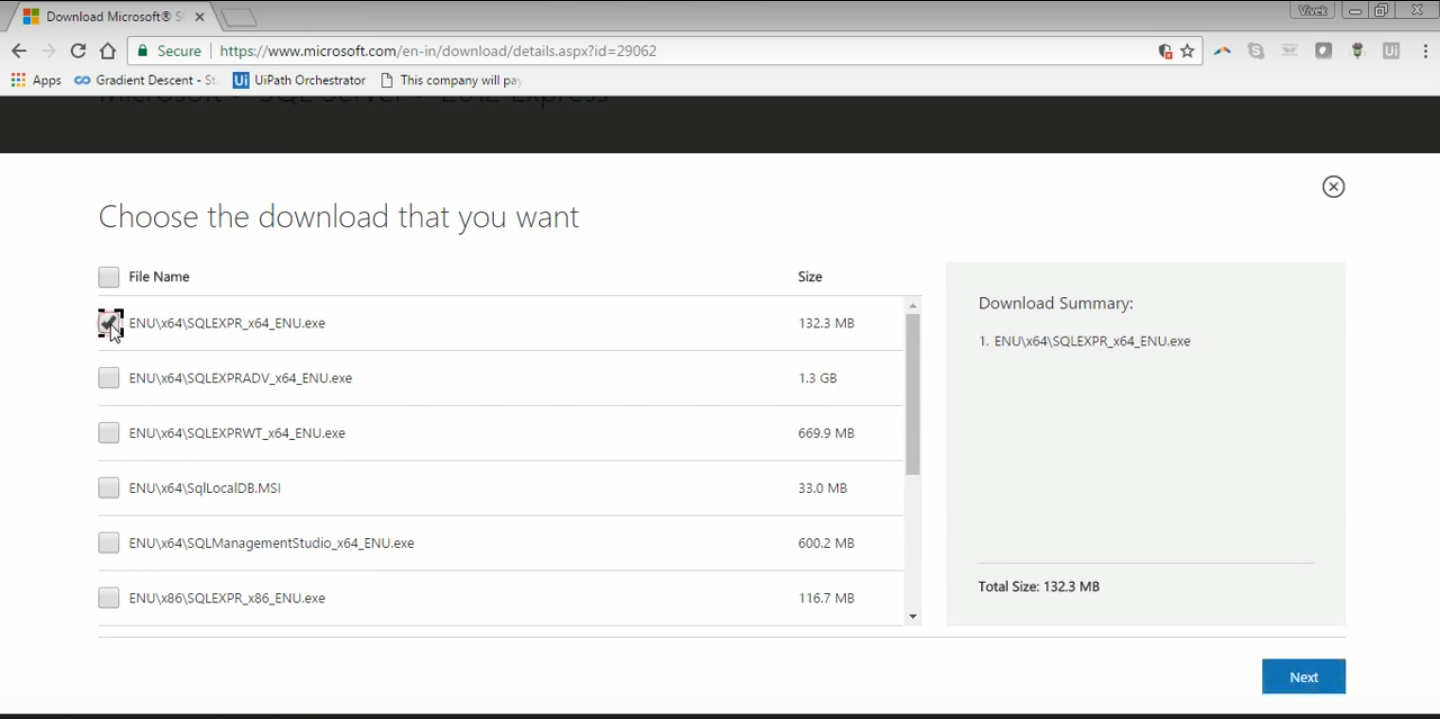
Step 5 – After this step we have to click on the next option in the bottom right corner of the screen and it will be downloaded to our system.
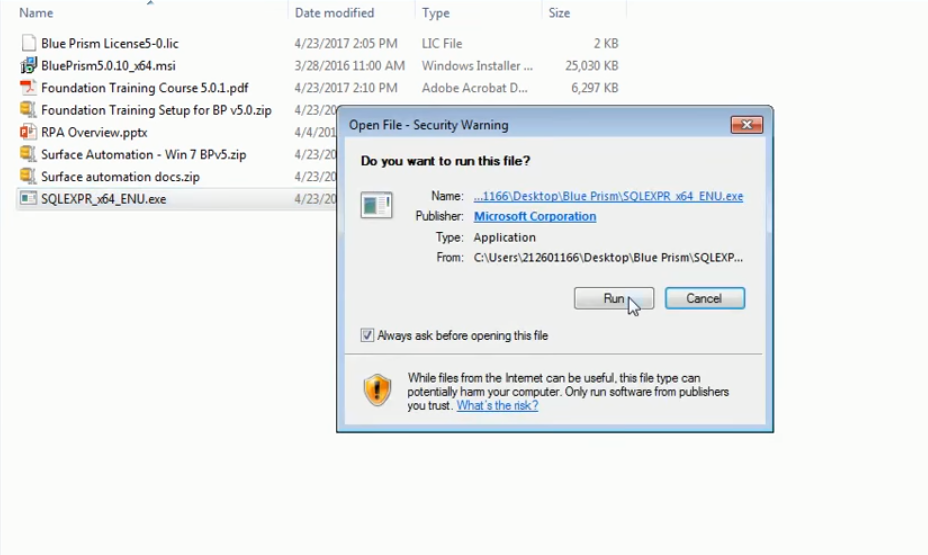
Once we are done with the steps mentioned above for downloading the SQL Server, we will get the installation file. The SQL installation file is the last file in the snapshot below.

Step 6 – The next step is to double click on this installed file and then we have to click on run.
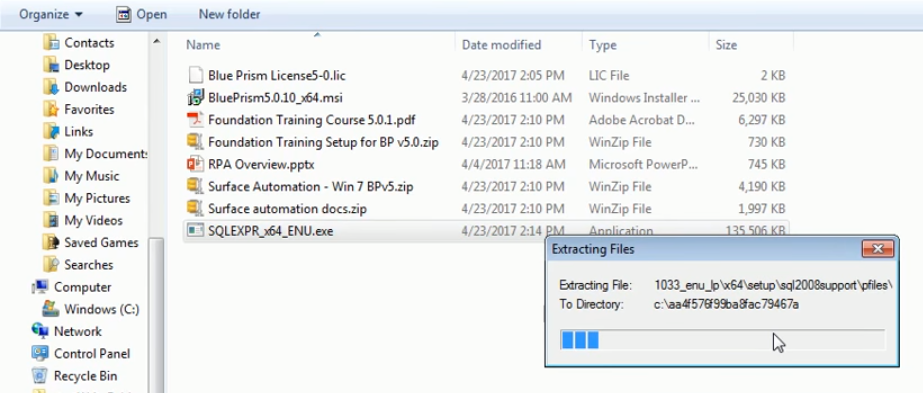
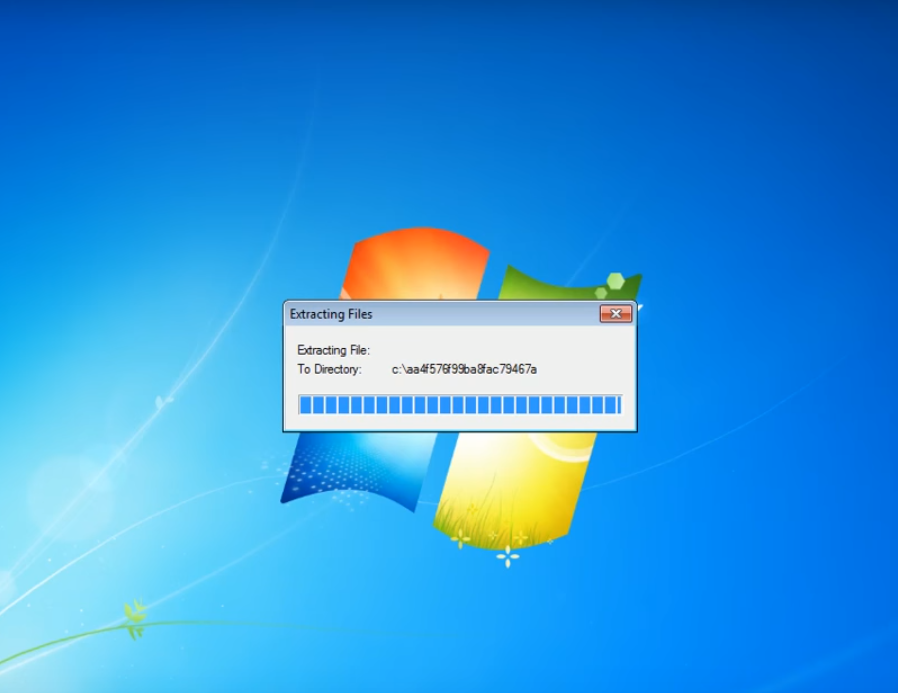
Once you click on run, the installation process will start. The image below is a depiction of the installation process.
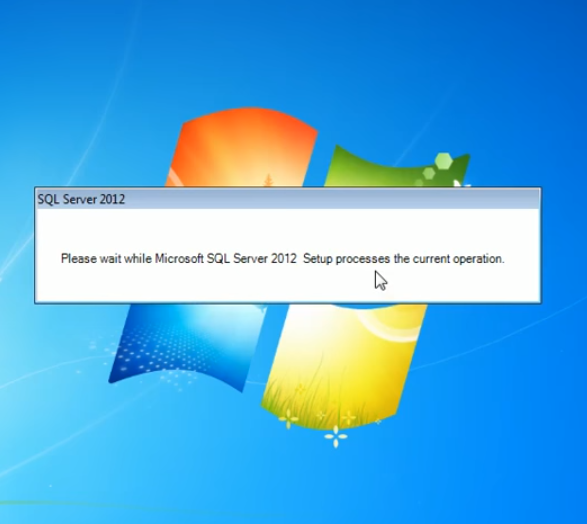
It normally takes around five to six minutes for the installation of the SQL Server to complete. On top of this we will see how to install Blue Prism application and then link it to the existing installation of the SQL Server. The images below show the various screens that we encounter while installing the server.
Step 7 – When the new window pops up we have to select the stand-alone installation option. We can install Blue Prism at the enterprise level as well but for this tutorial we are doing a New SQL Server stand-alone installation. If you already have any of the older versions like 2005 or 2008 of SQL Server already installed in your system, then you can either upgrade or do a new stand-alone installation as well.

Once you click on the Stand-alone installation option, the setup will start.
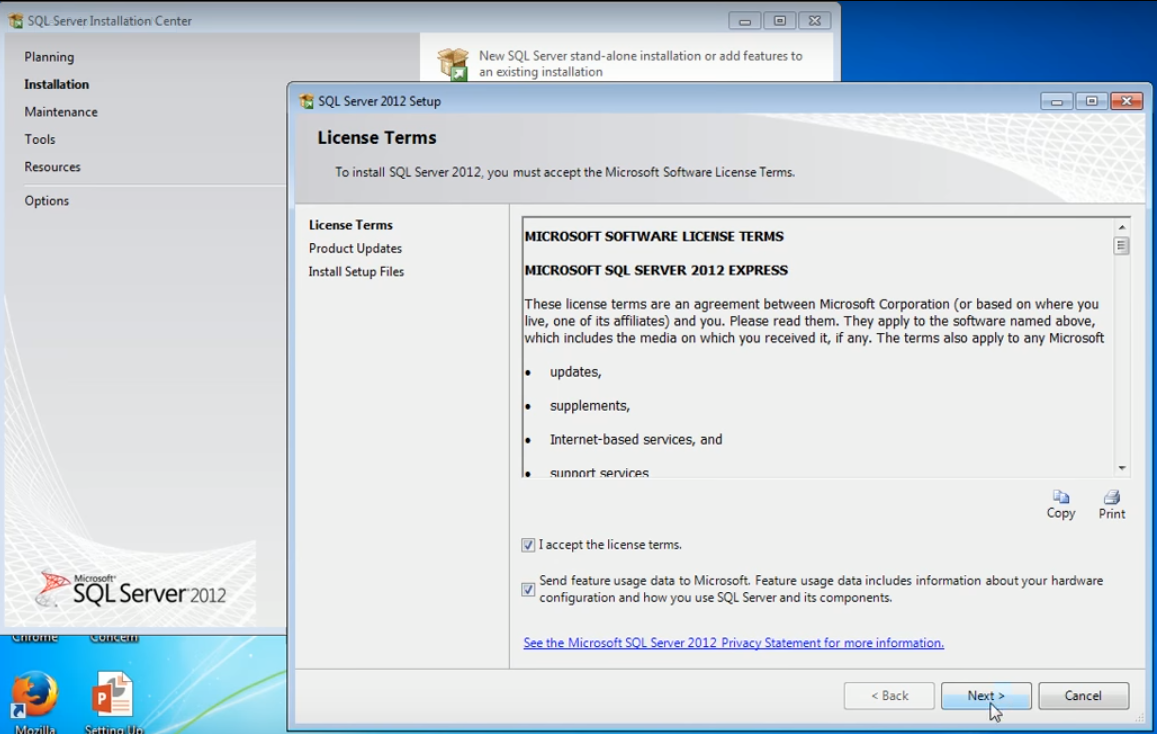
Step 8 – When the below mentioned window opens we have to click on “I accept the license terms” option and the “Send feature usage data to Microsoft” option and then click on the next button.
Once we click on next the following windows will appear in sequence.
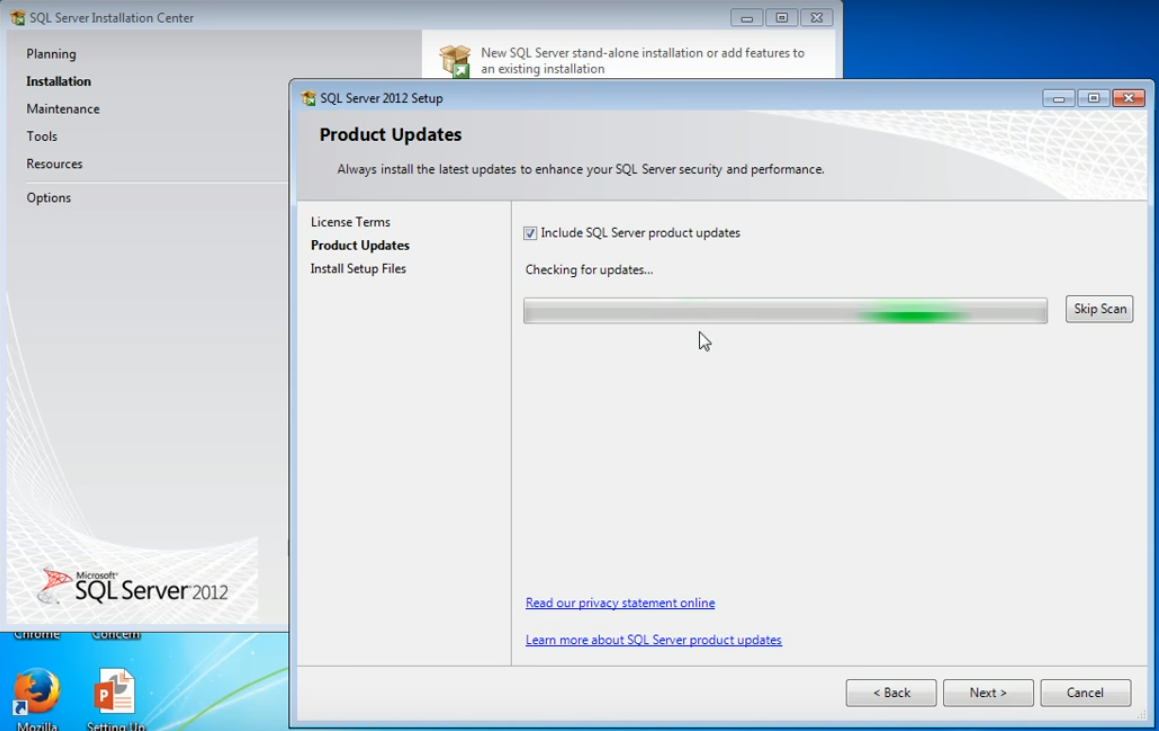
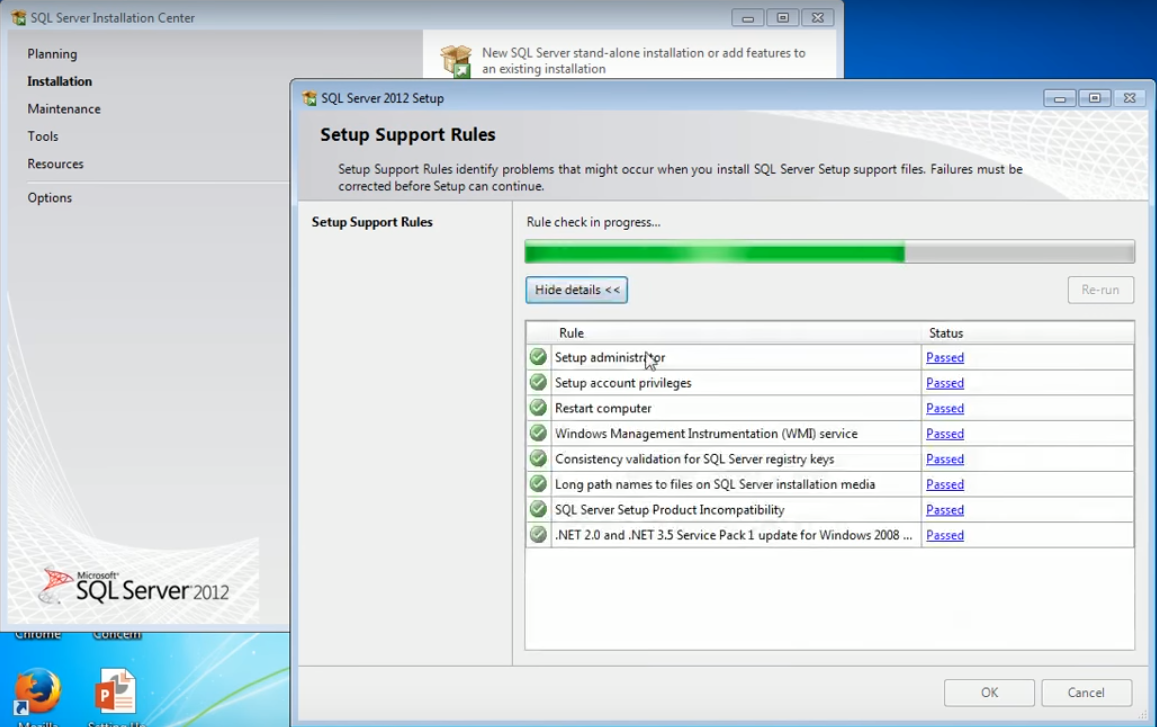
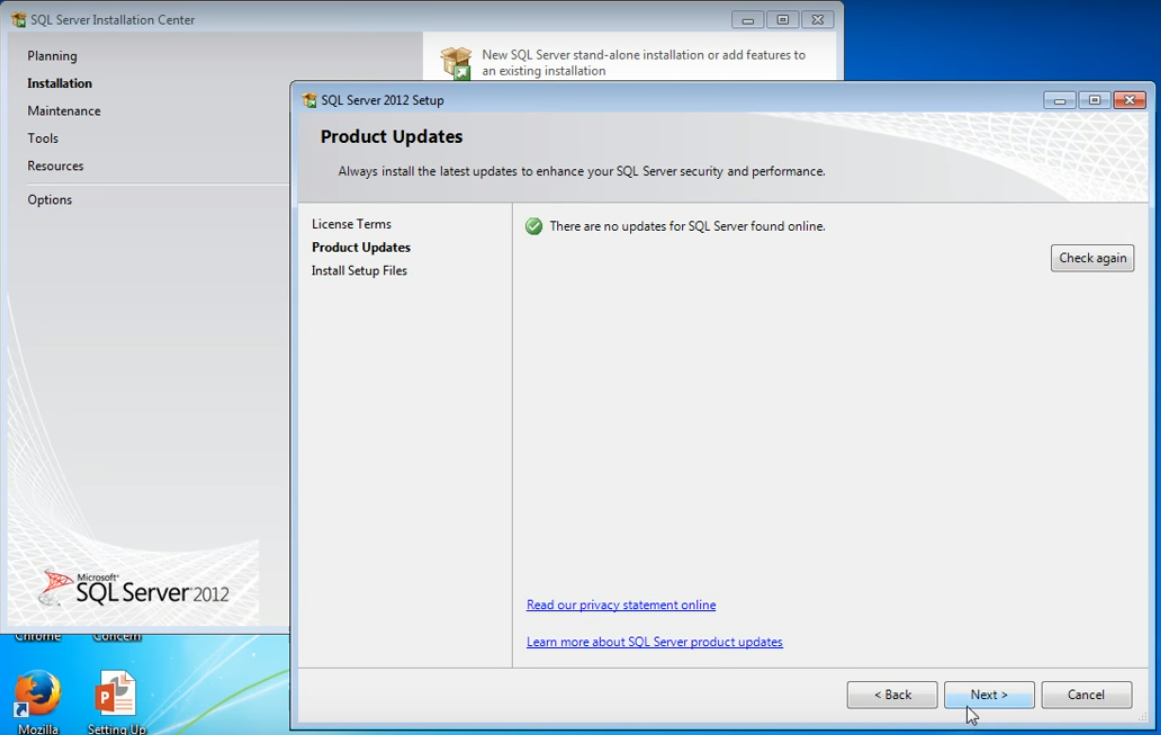
Step 9 – Once the scan is complete the following window will appear. We have to click on the Next option again.
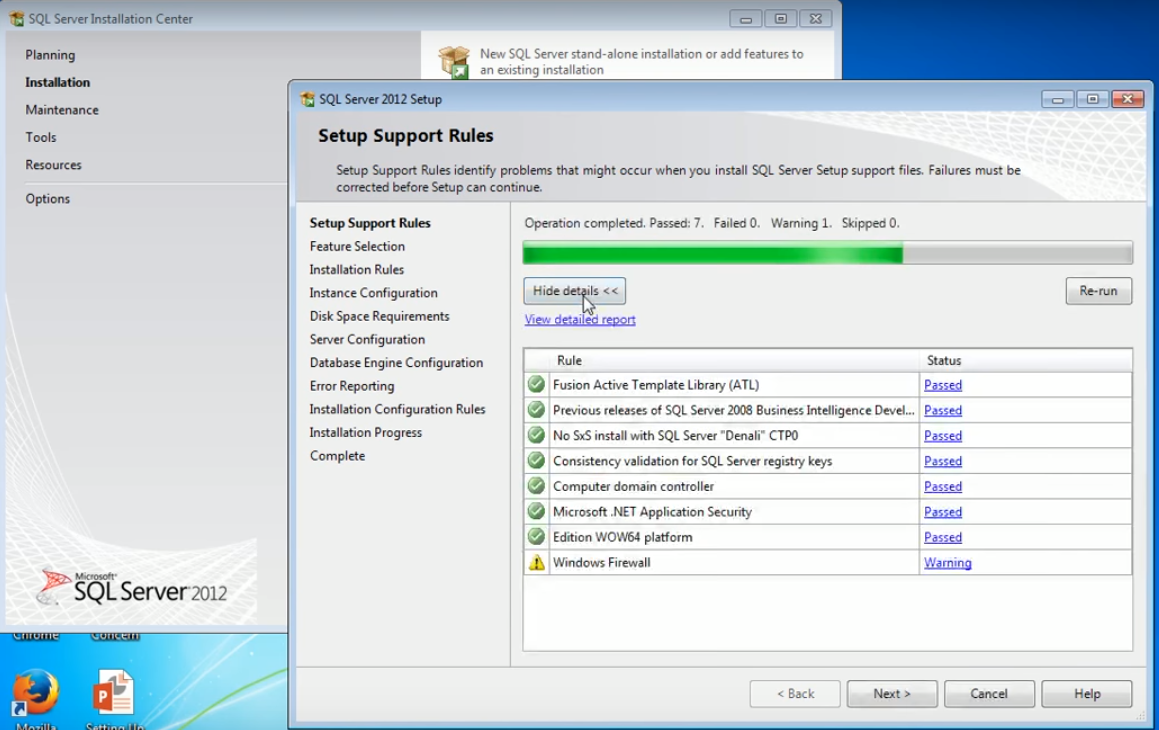
Once we click on the next button the following window will appear.

After this window it will set up and install the SQL Server on your local machine. During installation we need to note down few values which we will be using to indicate Blue Prism’s application to this particular instance of the SQL Server. We will take a look at those values as we move forward with the tutorial.
Step 10 – The SQL server 2012 setup dialog window will open after this. We can click on the “show details” button to see the details of the installation.
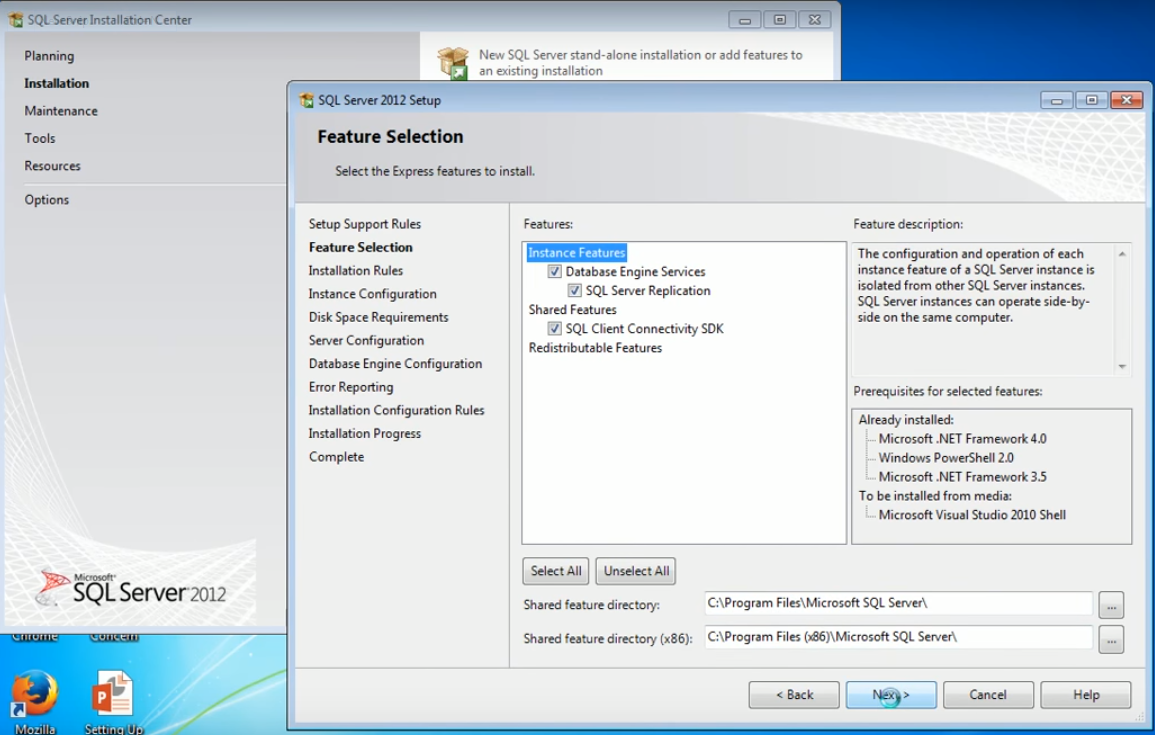
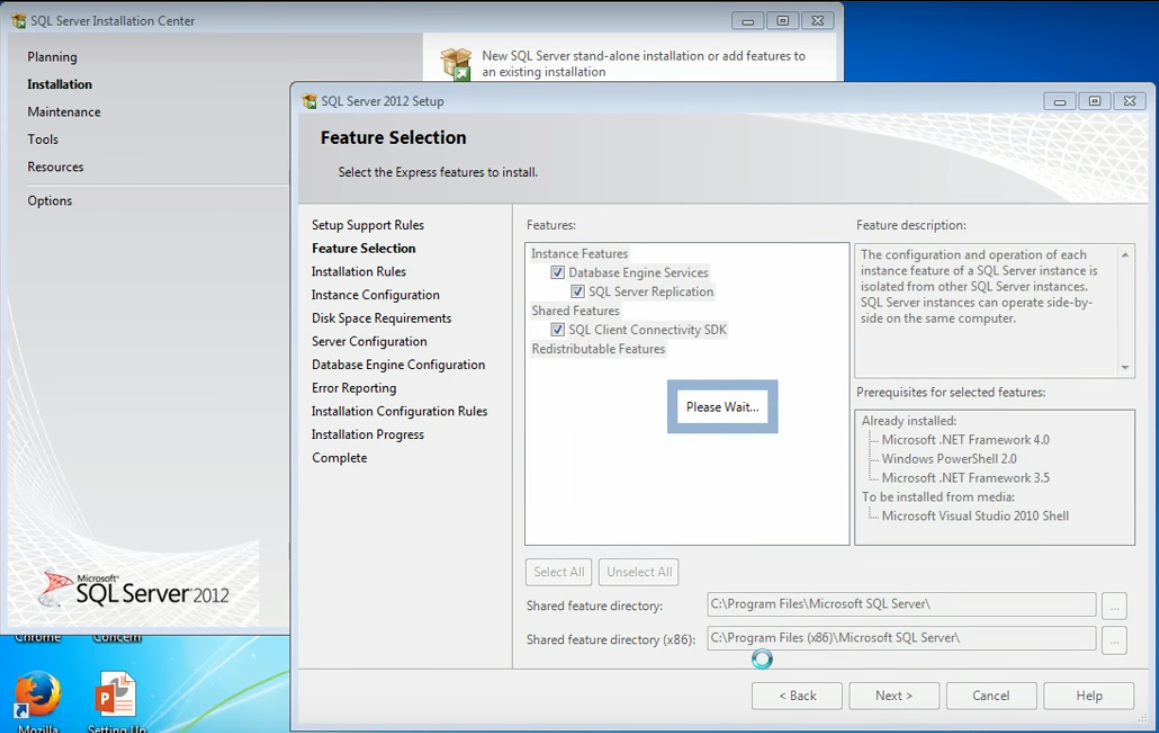
Step 11 – The following window will open. For the main heading of Instance Features, we need to check the box for database Engine Services. We do not need the shared features so we can put it as default (all three boxes will be checked automatically) and then note down the directories and then click on next.
On clicking the next button the following screen will appear.
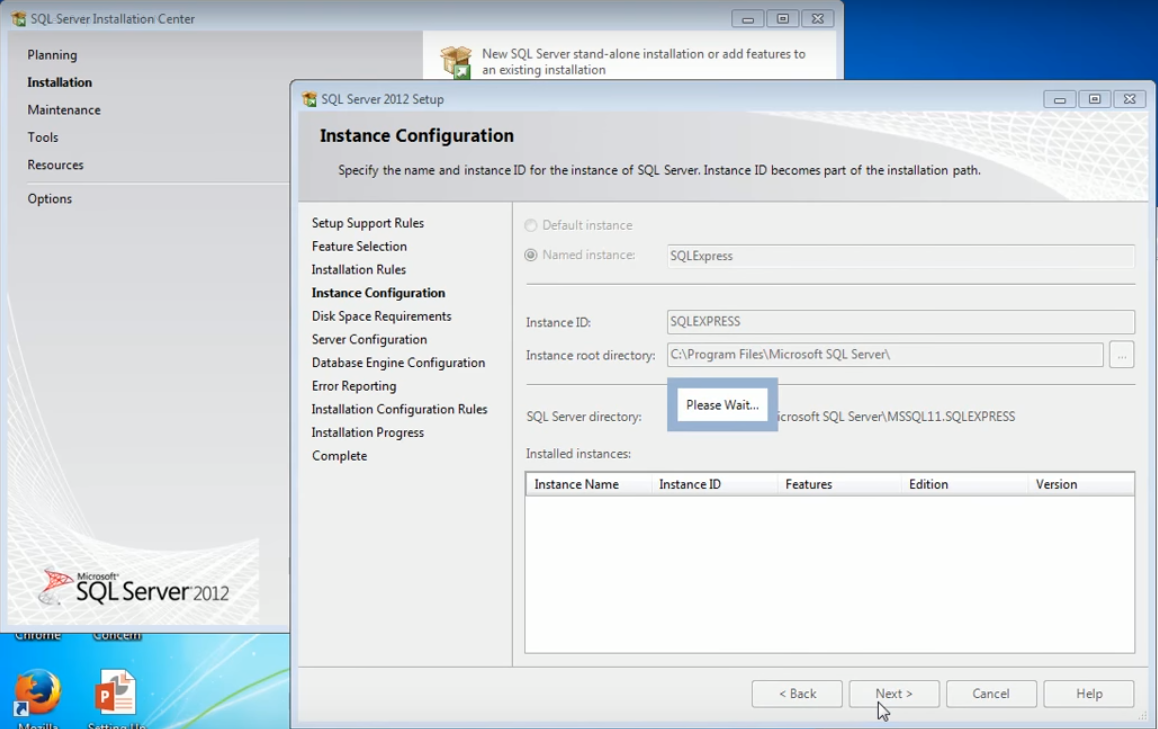
Step 12 – After this step an Instance Configuration window will open and we have to note down the Named Instance and the Instance ID. The Instance ID in our tutorial is SQL EXPRESS. We will note both of them down in a notepad down so that we can use it for linking the Blue Prism application. Once you have noted down the values click on next.
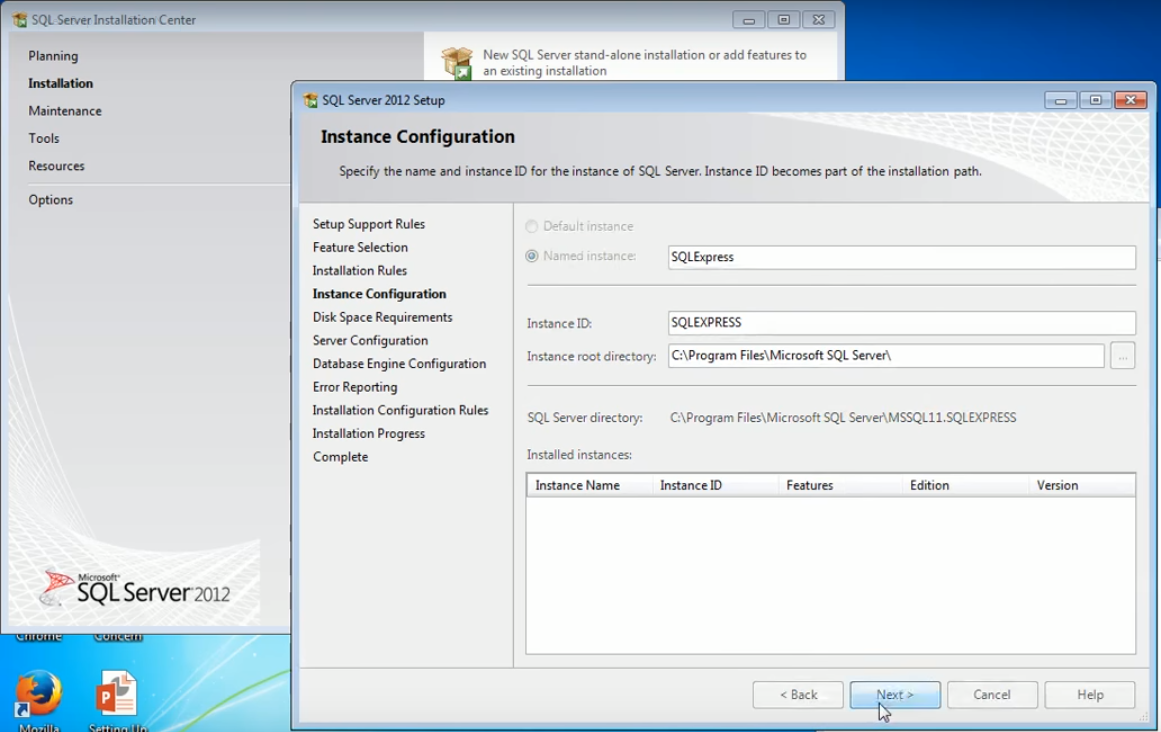
Once we click on next the following screen will appear.
After this window the Server Configuration window will open.

Step 13 – If we look closely we will find that the SQL Server Database Engine is authenticated by NT service and the SQL Server Browser is authenticated by anti-authority local system. We will not change anything in the above window. After that we have to click on the Next button. After doing so the following window will open.
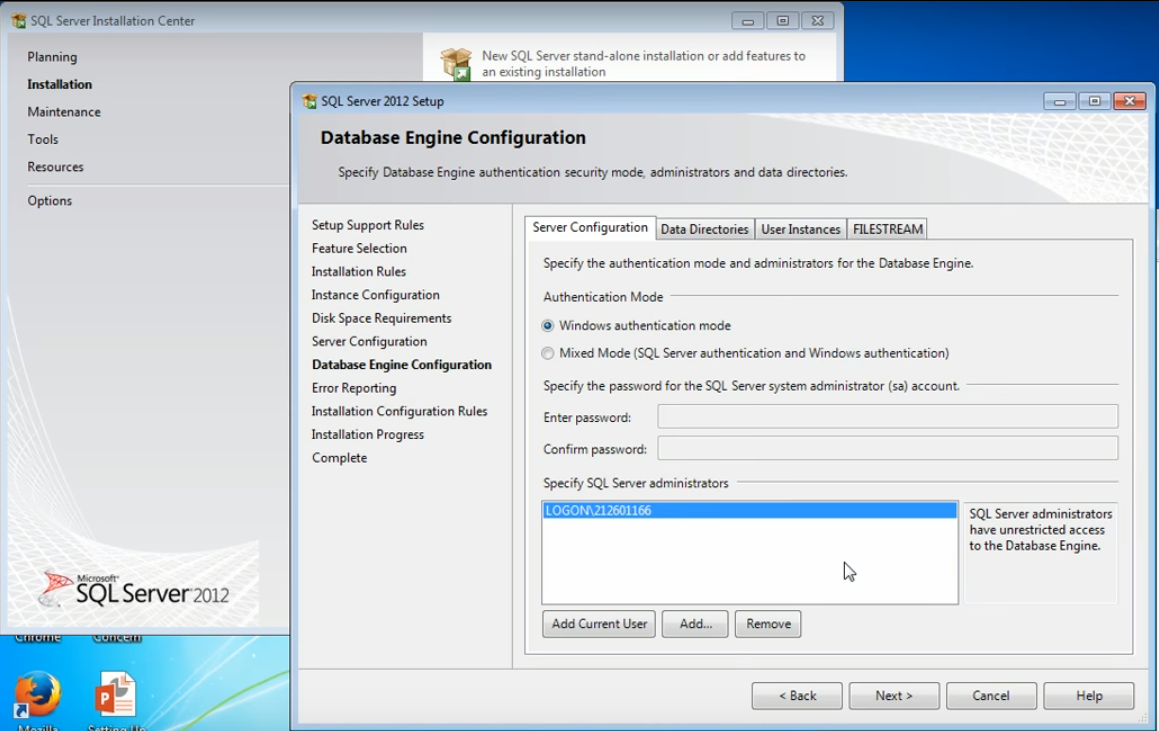
Step 14 – Here we will keep the Windows Authentication mode so that the SQL Server may use the same LOGON ID which we used to log in to our system. This is done to login into the SQL Server instance. Alternatively, we can select Server authentication windows as well depending on the preferences and choices of the user. In this tutorial we shall be using Windows Authentication mode. Then we click on the next option. Once we click on the next option the following window will open.
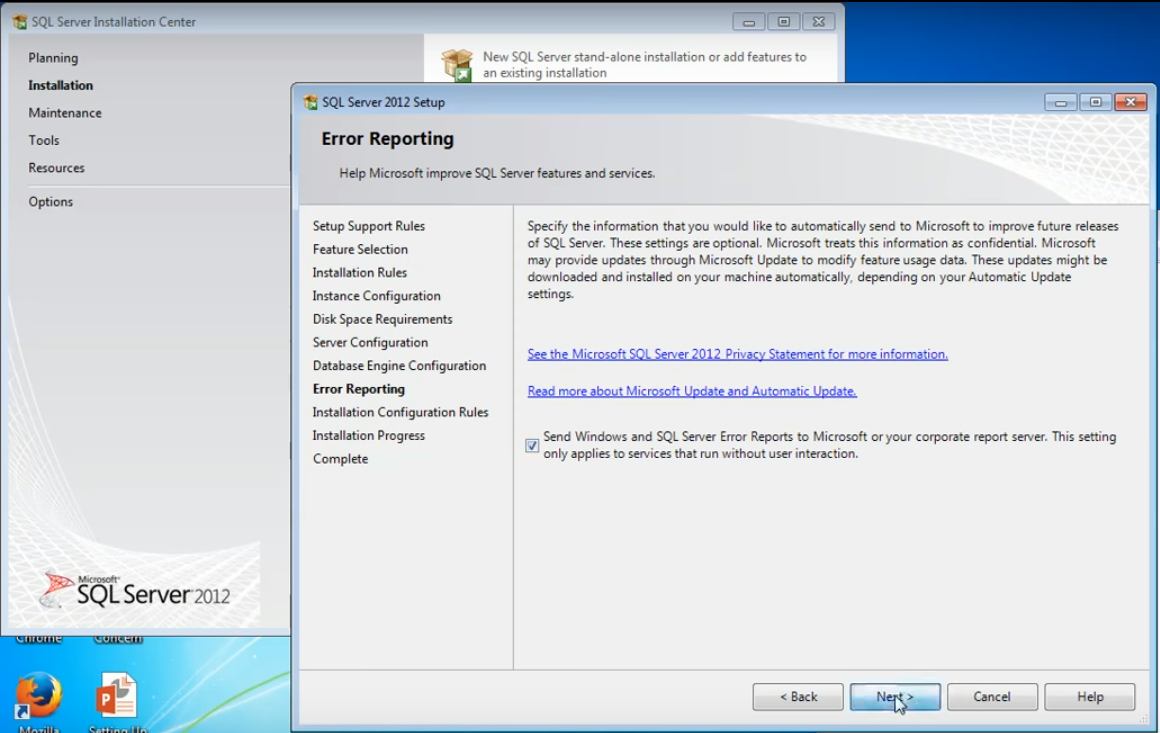
Step 15 – Once the above window we have to check the box with the option, “Send Windows and SQL Server Error Reports to Microsoft or your corporate report server. This setting only applies to services that run without user interaction” and then click on next.
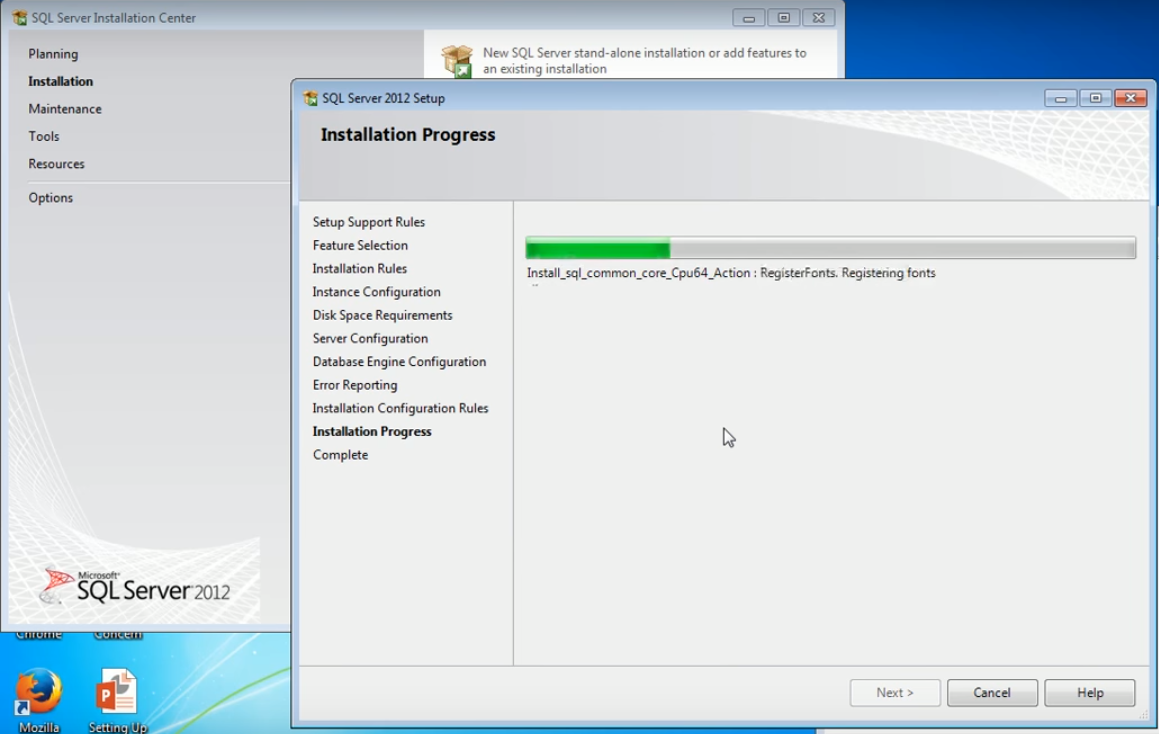
Once you click on next the installation will start properly as shown in the image below. It normally takes about three to four minutes to complete.
By the time this installation completes we can have a warm cup of coffee. It does not require a lot of knowledge to work on Blue Prism or any other RPA tool. It’s just that if an individual is good with algorithms, that’s enough for learning RPA. Automation Anywhere, Blue Prism and UiPath tools are not rocket science. They are pretty easy and we can learn them very fast and virtually automate every application that you can think of. The main benefit of RPA as we might be aware is that it sits on top of your ID layer so we don’t have to worry about complex integrations. We just need to create a logic which will substitute the behaviour of a human user. So basically if an individual can do a task on a particular machine, then any of the processes created in any RPA tool is capable of doing the same task as an individual.
As of this moment, we are waiting for the SQL Server to finish installing so that we can install Blue prism.
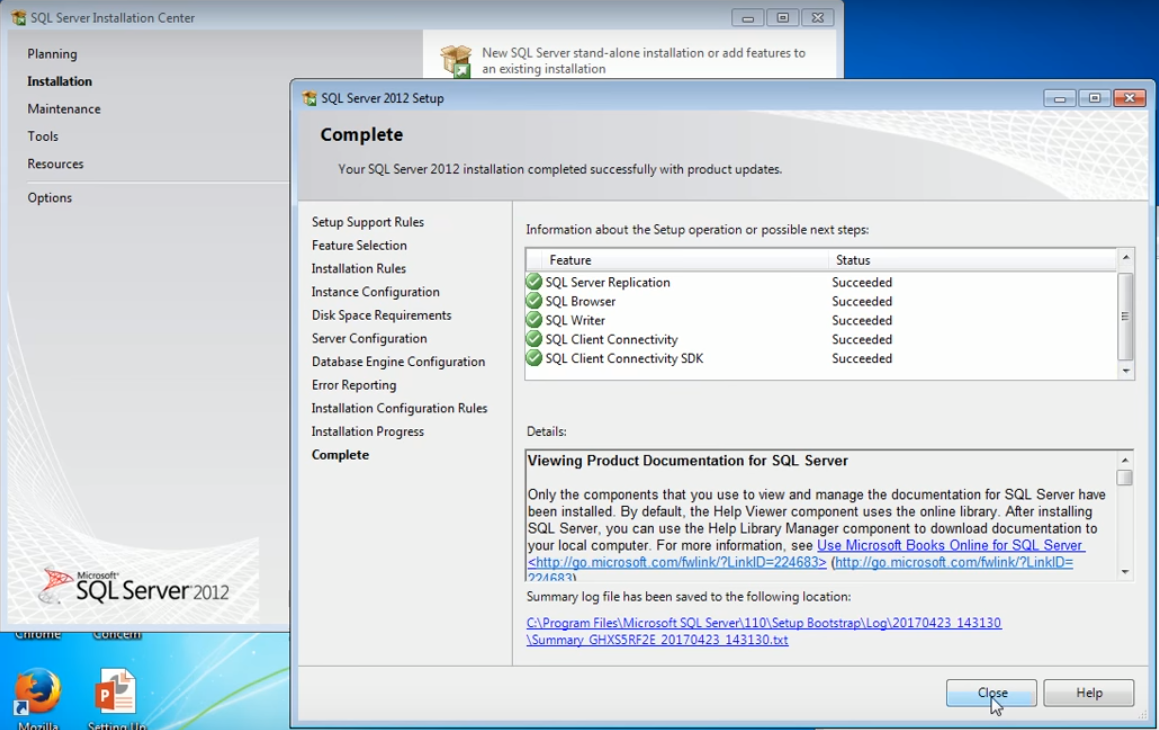
The installation is almost finished. A “Complete” window will open which will show the status of your installation. We can now see that everything is successful and therefore we can safely close the window as shown in the picture below.
Blue Prism Installation
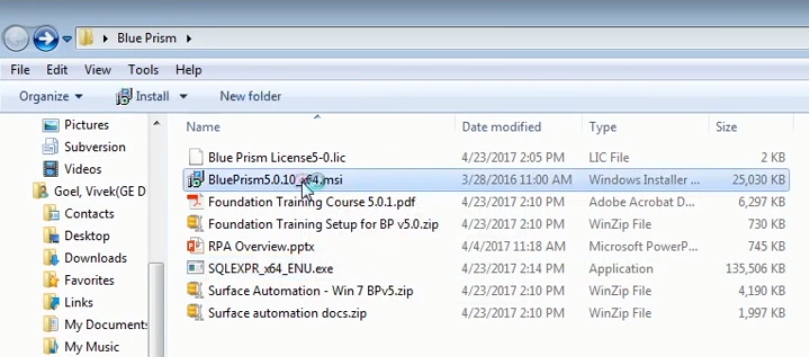
The next thing we need to do is to install the Blue Prism software. It is the 2nd file from the top as shown in the image below.
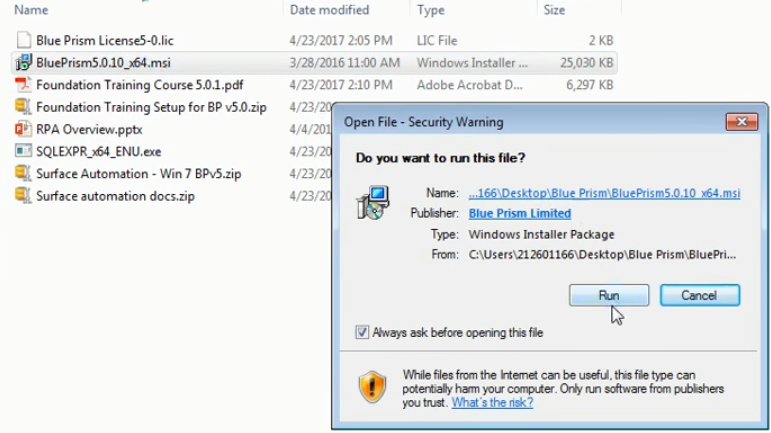
Step 1 – When you double click on the Blue Prism software a dialog box will open. We have to select the Run option and we are going to do that now.
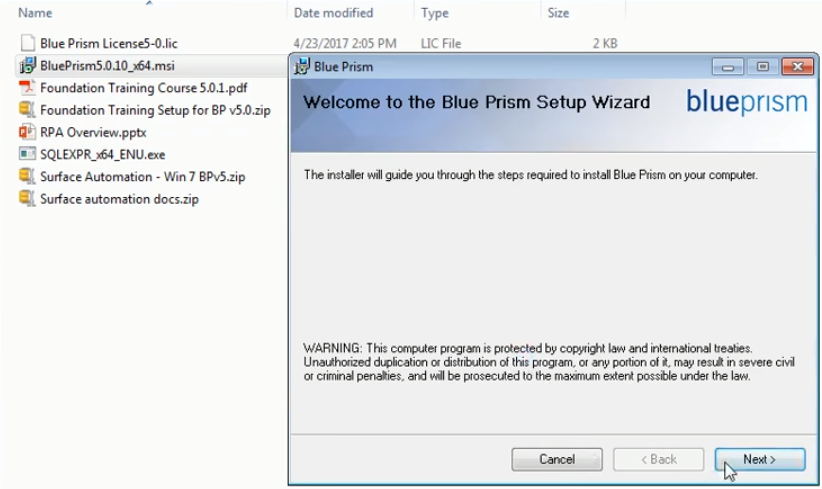
Step 2 – Once you click on the run option the Blue Prism Setup Wizard dialog window will open. Just click on the next button and follow the commands.
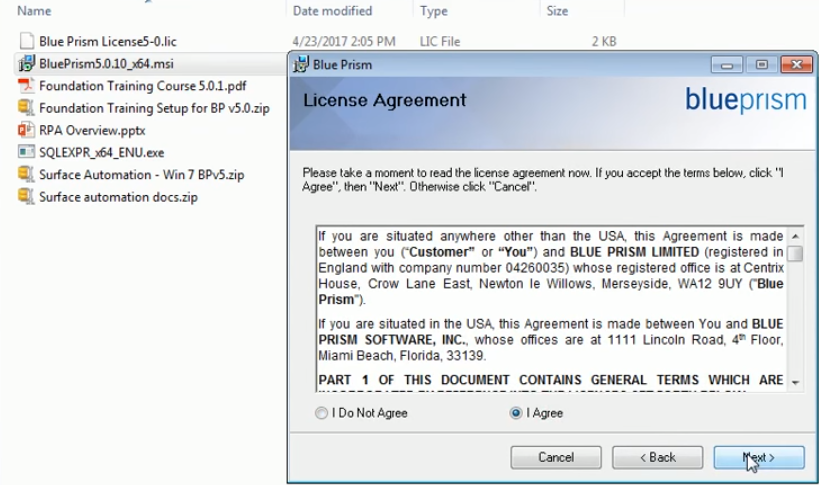
Step 3 – When you click on the next button, the License Agreement window of The Blue Prism will be displayed. We have to select the “I Agree” option and then click on next.
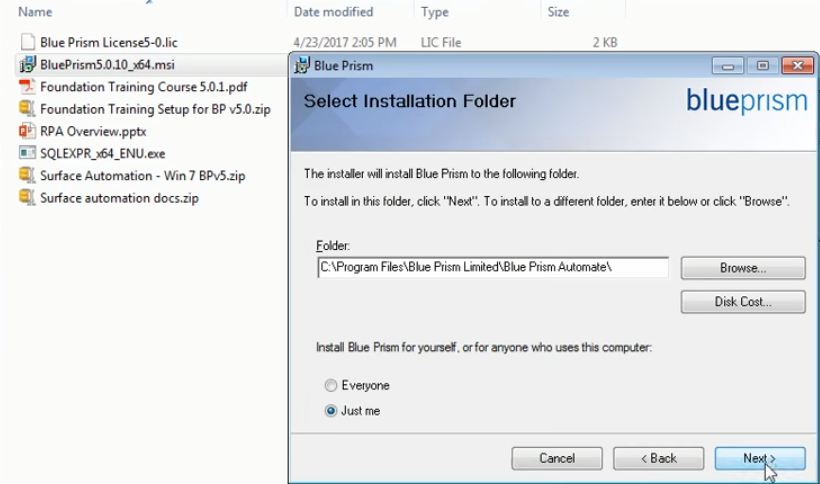
Step 4 – The next window that will open is the Select Installation Folder. This folder is where Blue Prism will finally be installed in your system. We have to take a note of that as well as it will be helpful later in the tutorial. Just below the folder location there is a line that says “Install Blue Prism for yourself, or for anyone who uses this computer”. Below this line there are two options, one is the “everyone” option and the other one is the “Just Me” option. For this tutorial we have selected the “Just me” option.
Step 5 – Once you click on next the following confirm installation window opens. We have to select the next option.
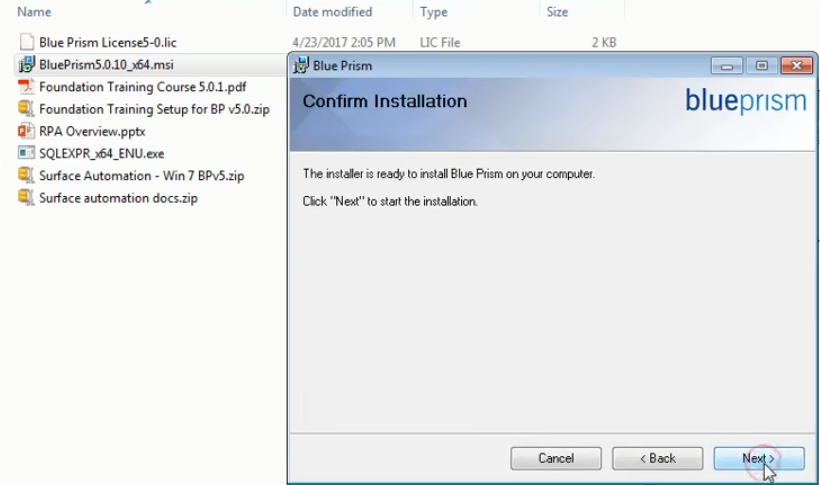
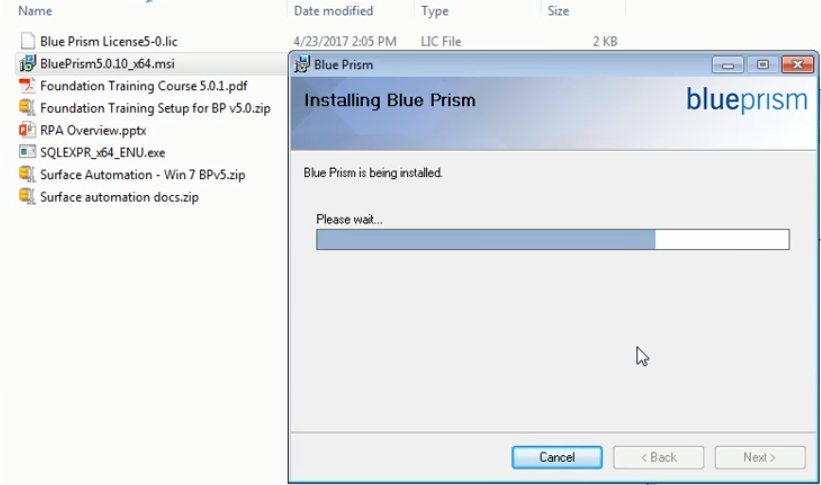
Once we have clicked on next the installation of Blue Prism will start as shown in the image below and it will hardly take about thirty seconds.
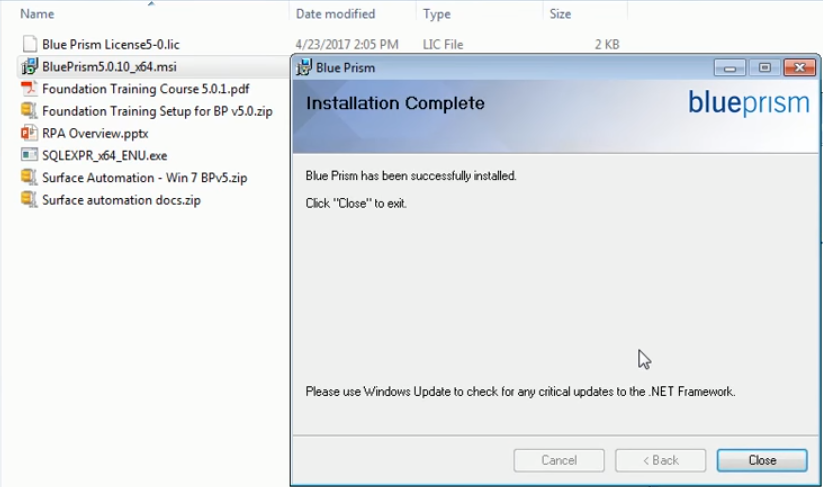
And the Blue Prism installation is complete.
Blue Prism Installation
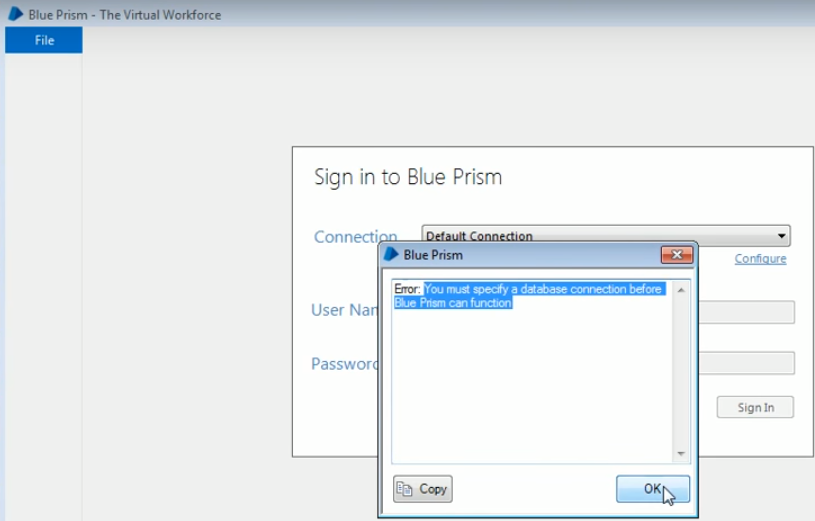
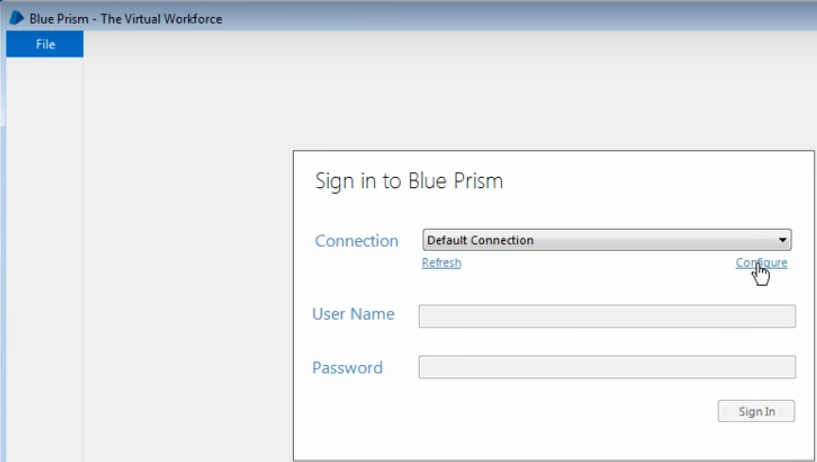
Step 1 – The next step is to install the license. The Blue Prism shortcut will be pasted on your desktop. We must double click on it. When we do that we will see a log in prompt in which we need to configure the connection to database and install the license. The Blue Prism logo on the desktop looks like the image below.

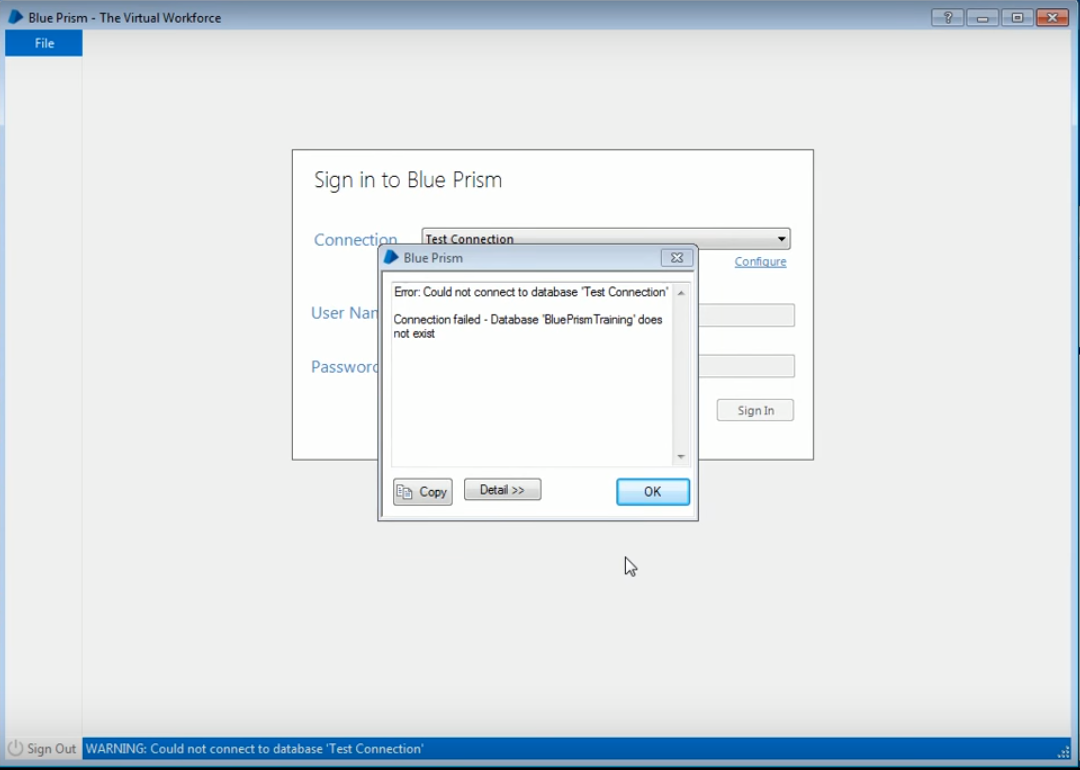
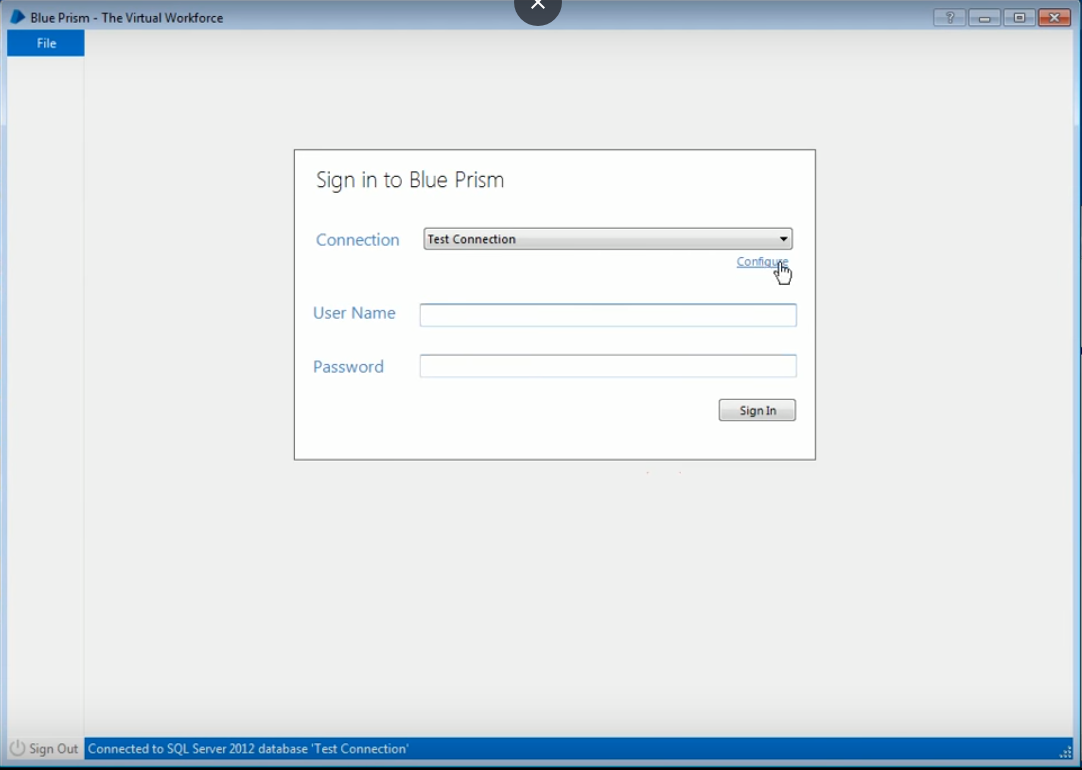
Step 2 – When we open the Blue Prism software for the first time it shows us an error message. The message states, “You must specify a database connection before Blue Prism can function”. When we encounter this error we need to click on okay and then configure.
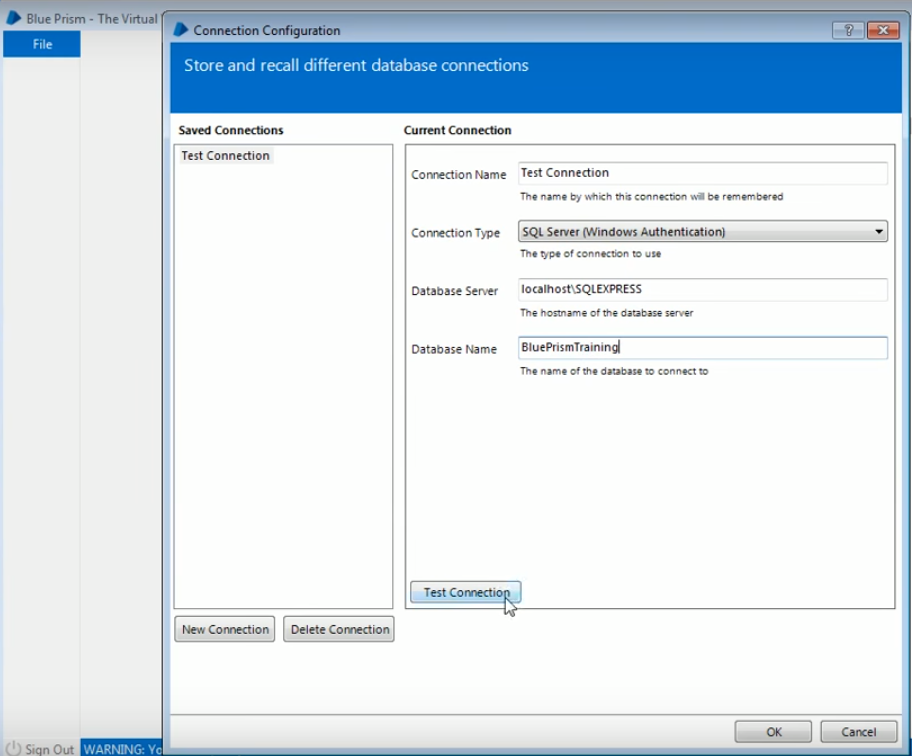
Step 3 – After this we need to configure the database connection so we click on the configure button on the right side of the connection option.
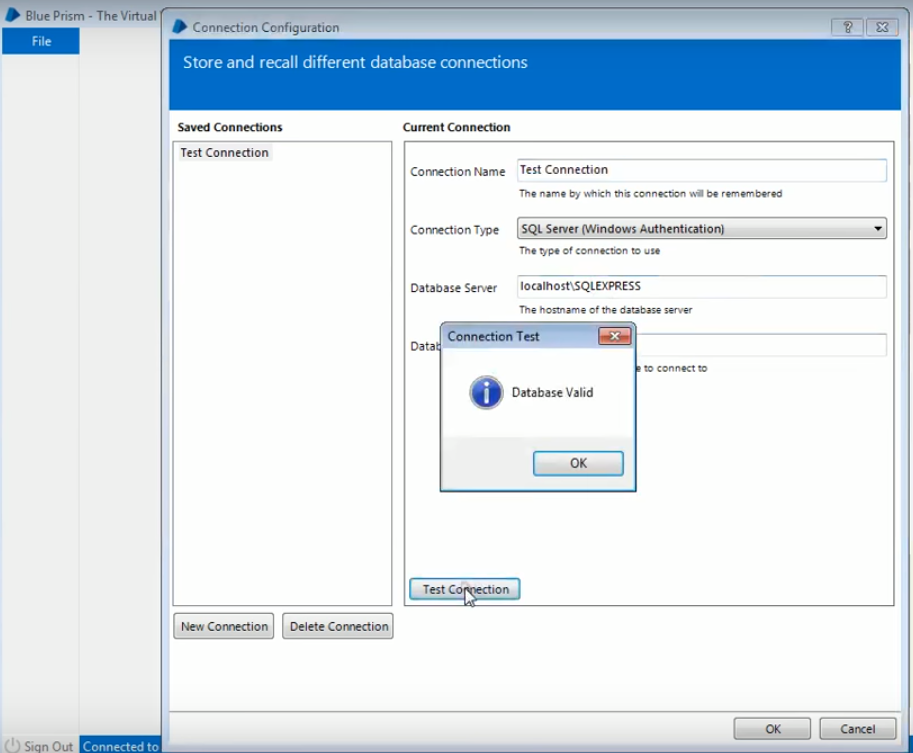
Step 4 – We name this connection as Test Connection for the Connection Name option and the SQL Server (Windows Authentication) for the Connection Type option as shown in the picture below. The other options in connection type are used at the enterprise level when there are a lot of bots that need to be connected to the database through an application server. In such a scenario we shall use the Blue Prism Server. We use the Availability Group (SQL Authentication) for multi robot setups. However, for standard instructions and stand-alone installation we only need The SQL Server (SQL Authentication) or the SQL Server (Windows Authentication) depending on the configuration we selected during the installation of the SQL Server. We will be using Windows Authentication for this tutorial. Next we have to specify the database server. Our database server is localhost \SQLEXPRESS. Now we have to recall the named Instance ID which we already saved in a notepad and put it after localhost/. The next step is to give a Database Name. We can specify any name which we want to give. For this tutorial we have given the name, BluePrismTraining. Once complete we need to test the connection.
When we click on the Test Connection button an error message is displayed which says, “Database ‘BluePrismTraining’ does not exist”.
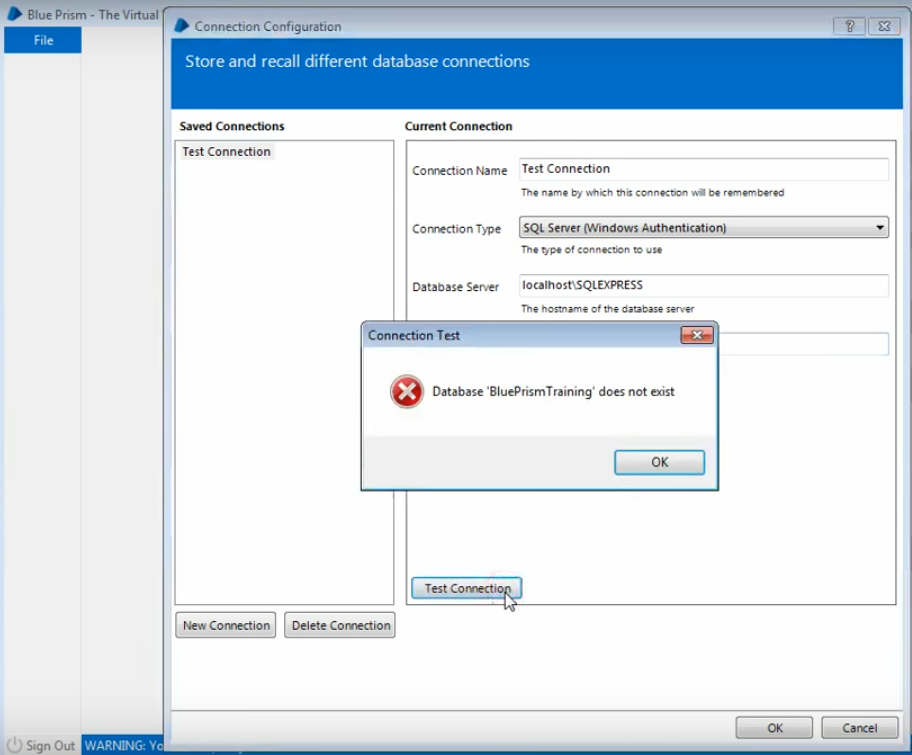
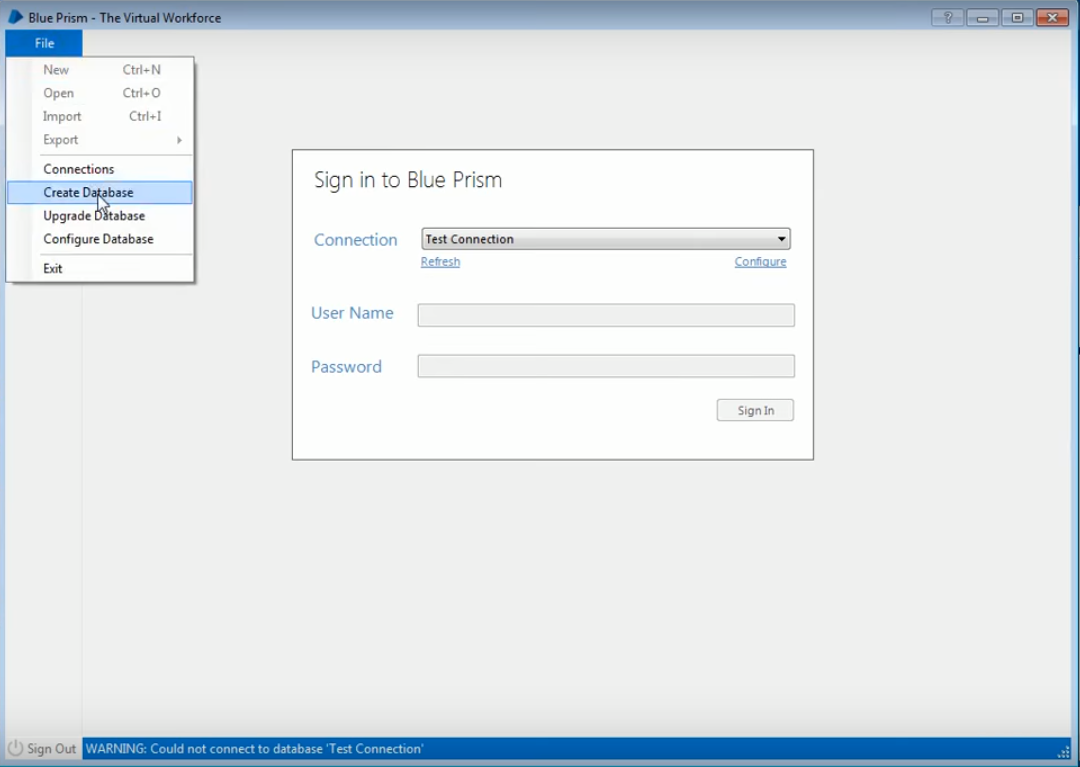
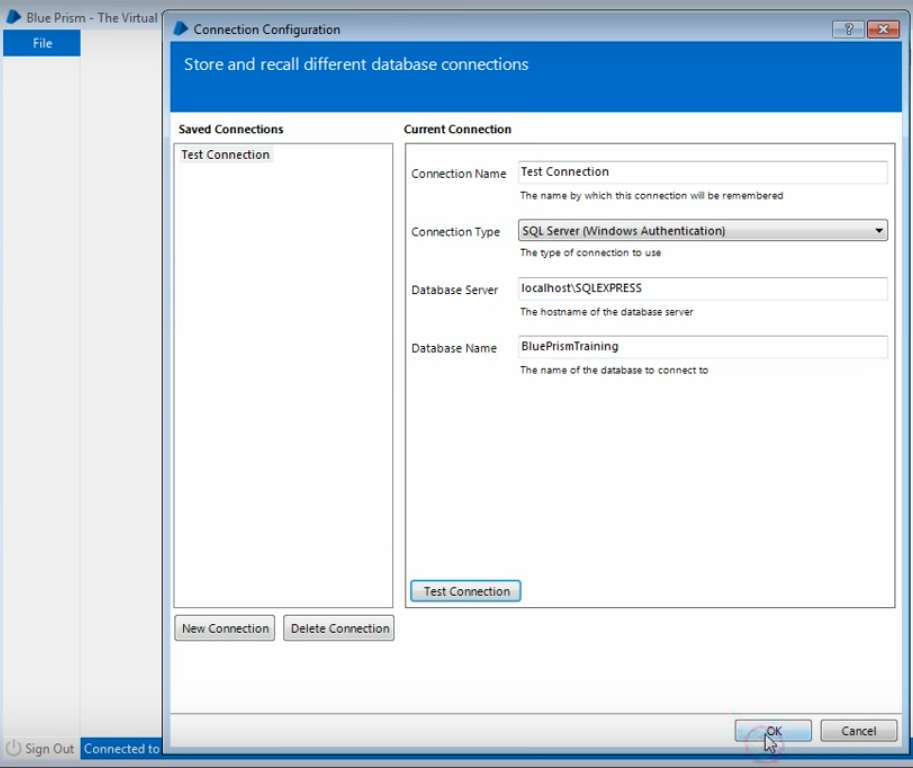
Step 5 – We need to create the database first so for that please make sure that we click on OK and not on Cancel. If we click on Cancel our desired settings will not be saved. If we click on OK the settings will be saved.
Step 6 – After clicking on OK we need to wait for an error to occur that the database does not exist and then we can create the database. In the newer versions of Blue Prism this error has been taken care of when you specify the connection string or when you configure the database, we get an option at that time itself to create a database. When we click on Okay as shown in the previous image the following error will appear.
Step 7 – We click on OK in the image above and then we need to create the database. In order to do that we have to click on the file menu and then click on Create Database.
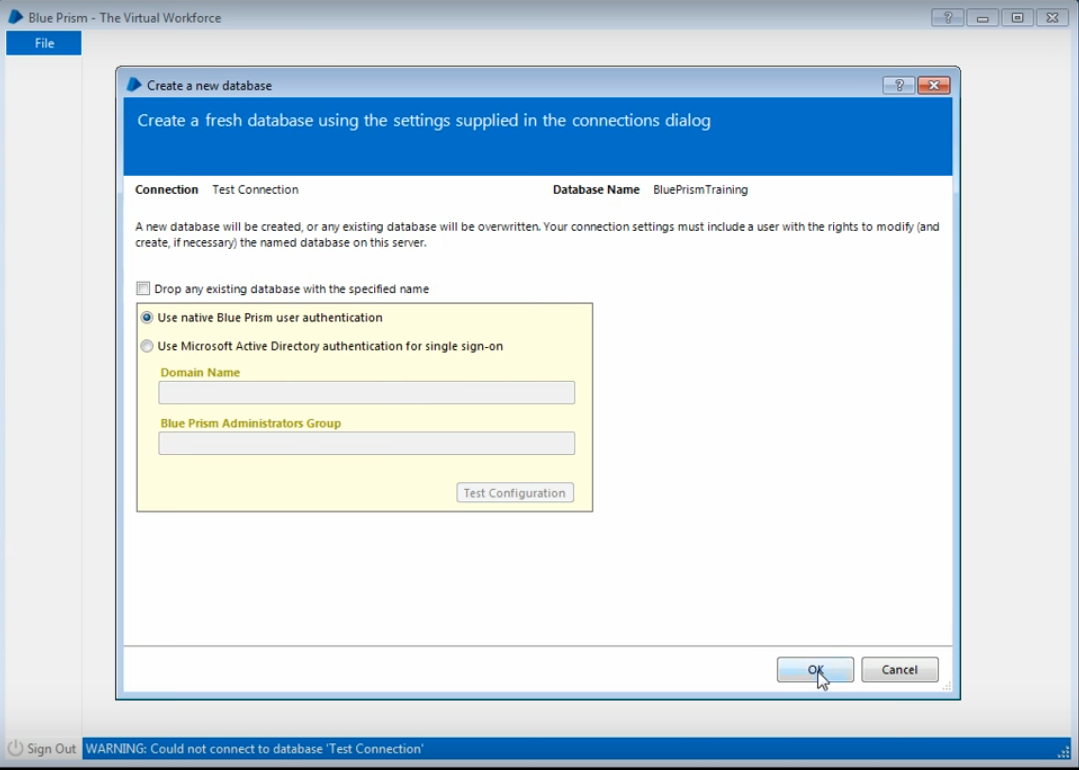
Step 8 – A new window will open. In that we can see that the connection name is saved as Test Connection and the Database name is Blue Prism Training and we have to just click on the OK button.
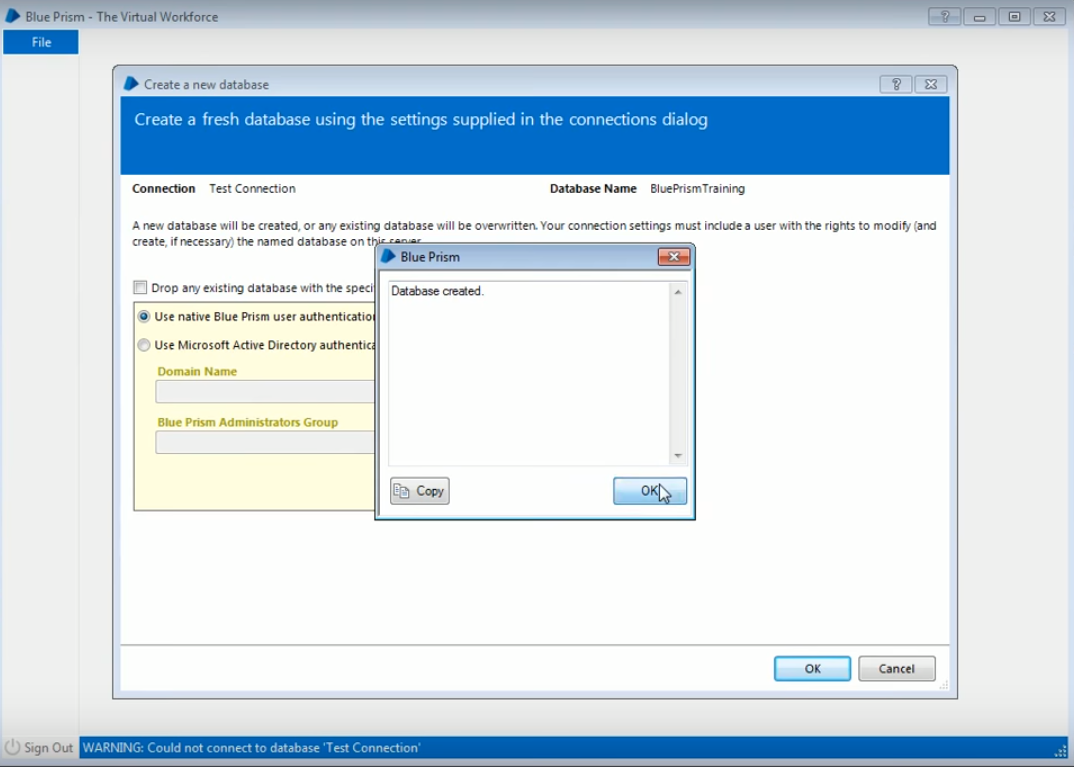
Step 9 – Once we click on Ok we will get a prompt which says “Database Created”. And then we need to click on okay in that prompt.
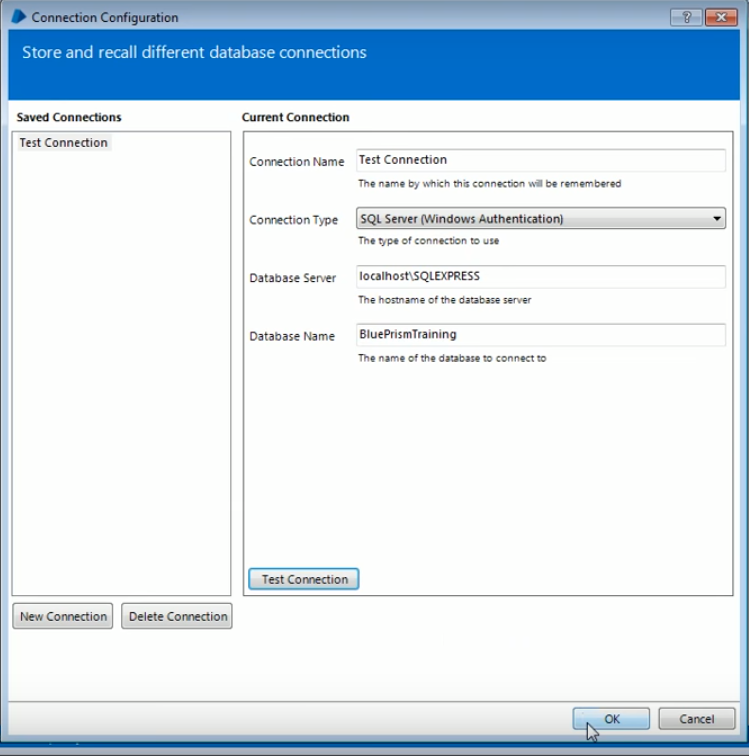
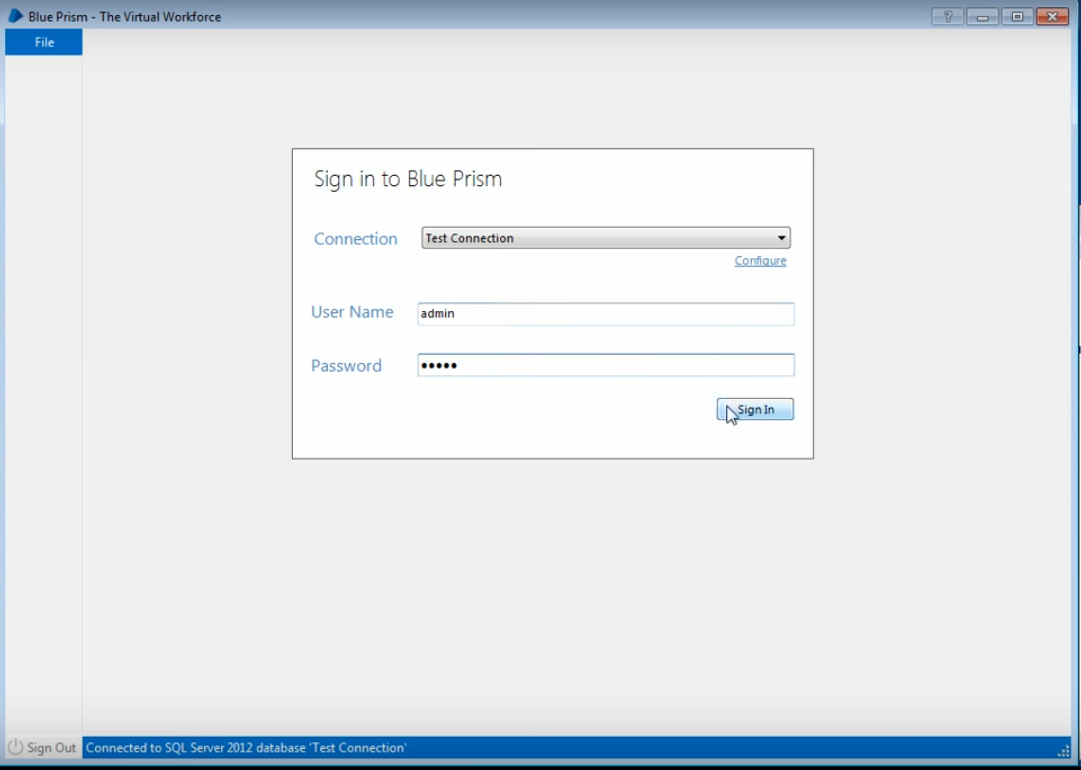
Step 10 – After we click on Ok we will get a Sign in to Blue Prism dialog box. We have to click on configure and then on test connection, we will see that the database is valid.
Step 11 – After that we have to click on okay on the bottom right of the screen. Once we click on okay we will be guided back to the “Sign in to Blue Prism” page.
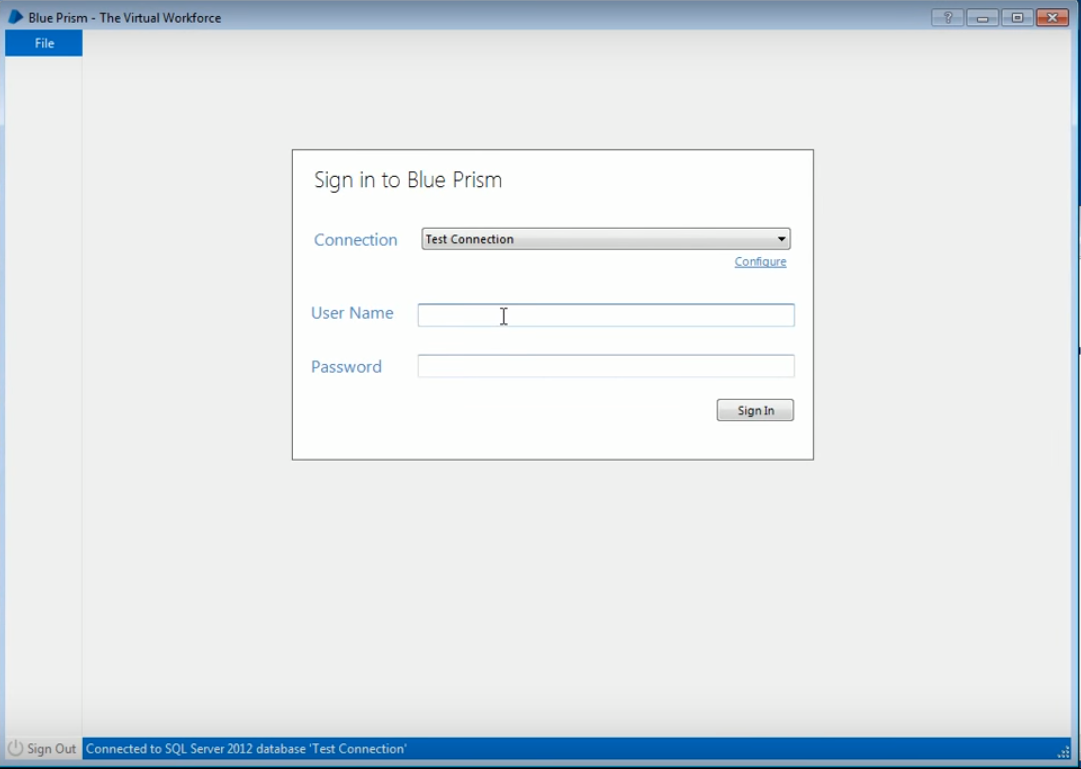
Step 12 – We have to enter the username and password. The default username and password is admin.
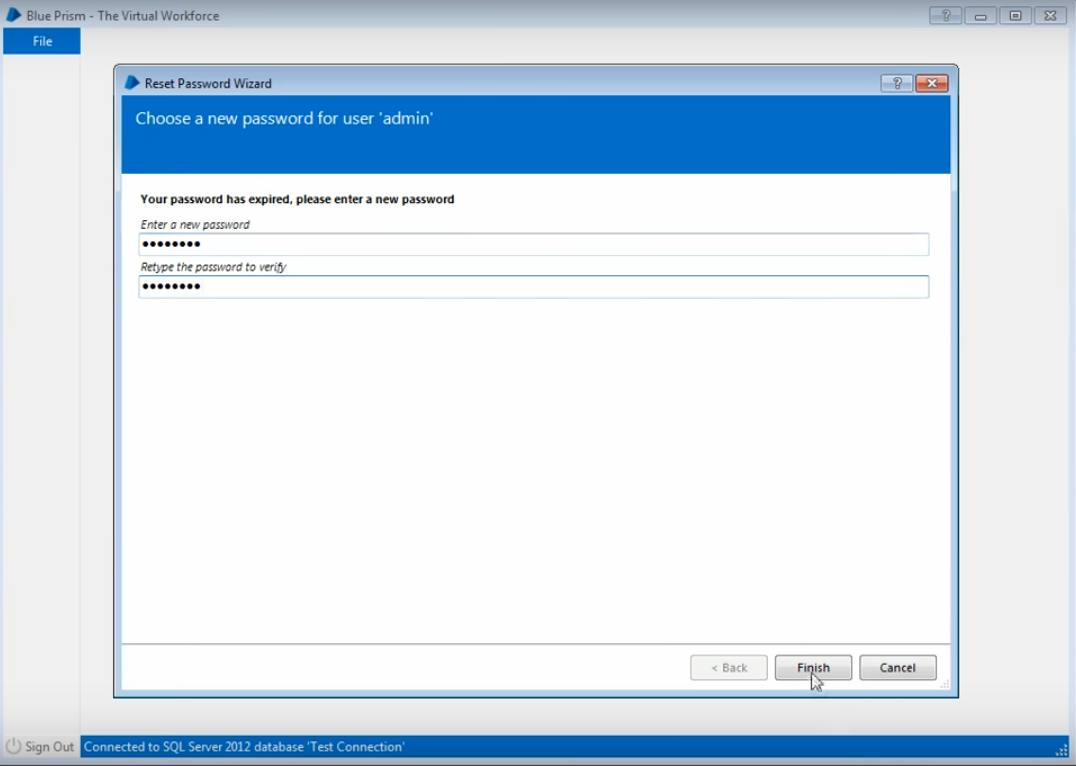
Step 13 – Once you click on sign in a new window will appear which will ask you to change your credentials. You have to create a new password. We set a new password as per our choice and then we have to click on finish.
Step 14 – You get a prompt from Blue Prism which says “The password has been successfully amended”. We have to click on OK.
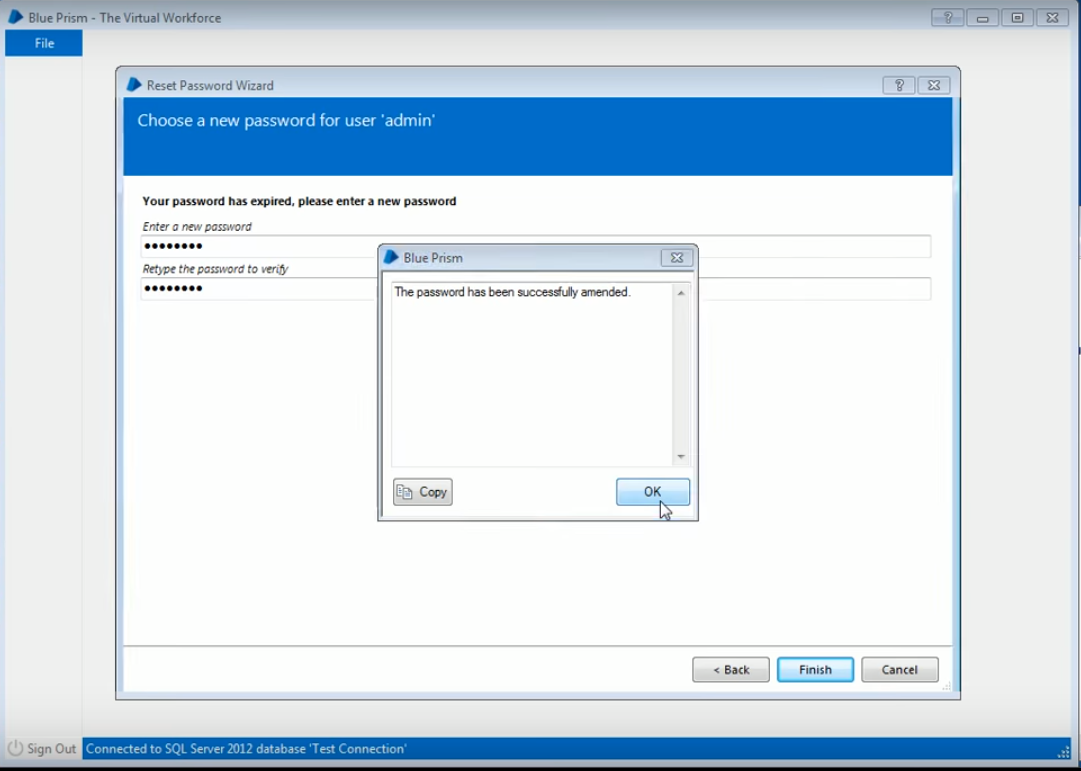
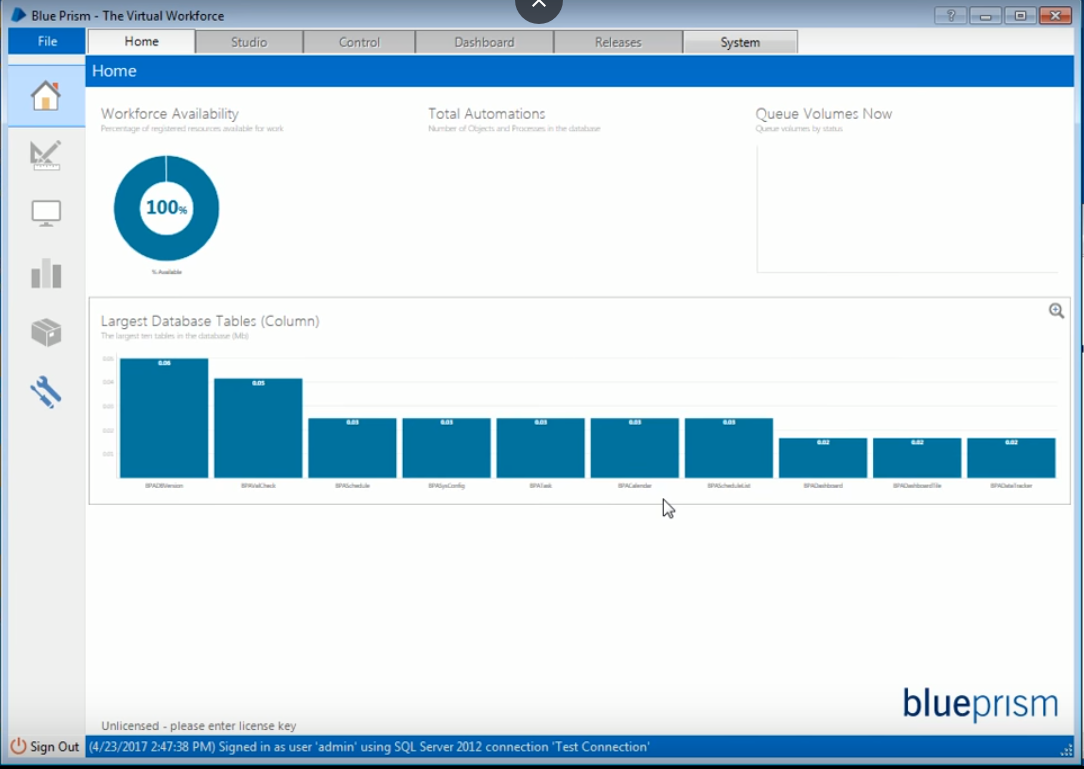
Step 15 – Once you click on OK your installed Blue Prism software will open.
Blue Prism License Installation
Please note that we have to install the license properly in order to use all the features of the Blue Prism software.
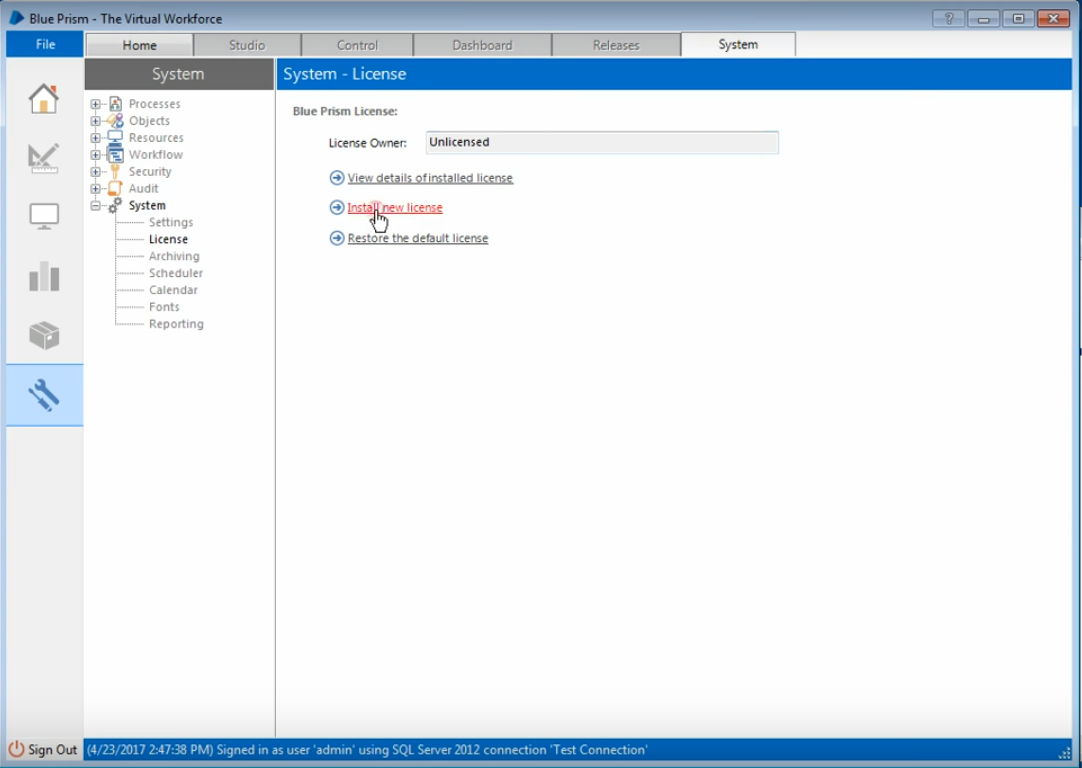
Step 1 – In order to install the license we have to click on the System tab on the top right corner of the screen.

Step 2 – After doing so we have to click on the Install New License option.
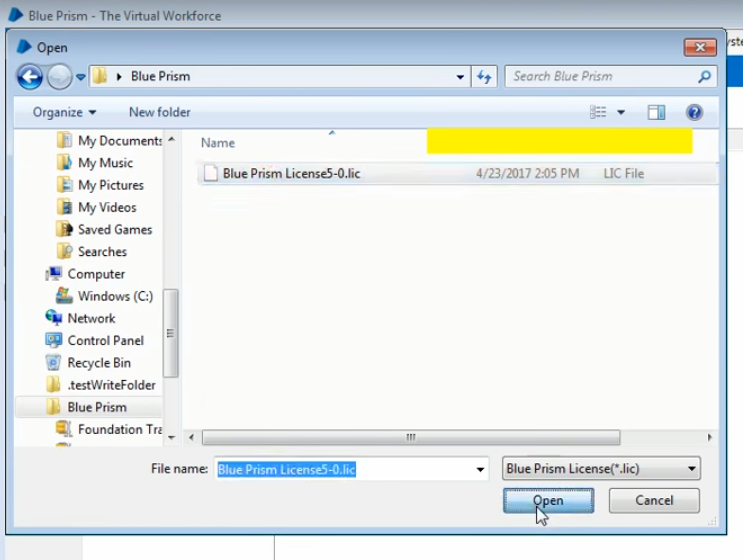
Step 3 – When you click on Install New License, it opens a dialog prompt. We have to navigate to the license file and then select it and click on the open button.
Once we click on the Open button we get a notification which says “Success – License key successfully updated”.
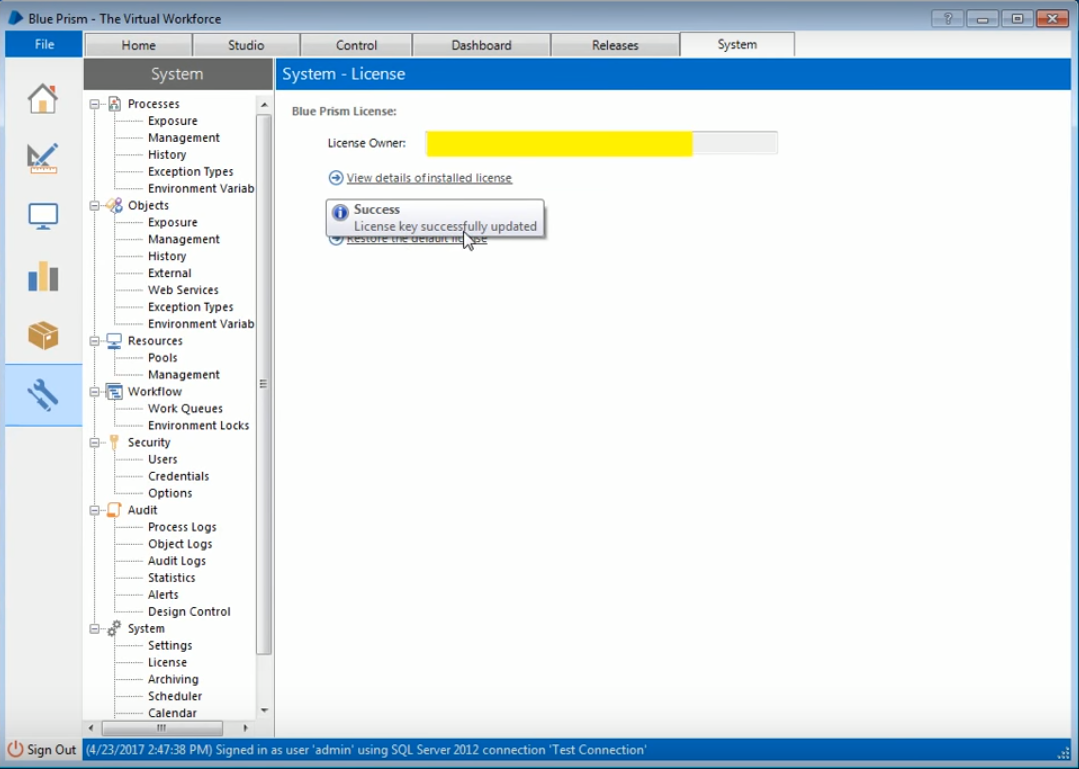
Once the license key has been successfully updated, all the features of Blue Prism will be unlocked for our use.
Hope Tutors Reviews
[转]How to Download and Setup Blue Prism的更多相关文章
- 下载并安装Prism5.0库 Download and Setup Prism Library 5.0 for WPF(英汉对照版)
Learn what’s included in Prism 5.0 including the documentation, WPF code samples, and libraries. Add ...
- [转]Blue Prism VBO Cheat Sheet
本文转自:https://www.cheatography.com/ethanium/cheat-sheets/blue-prism-vbo/ Blue Prism MAPIEx Configure ...
- [转]Blue Prism Architecture
本文转自:https://mindmajix.com/blue-prism-architecture Introduction Automation technology is widely bloo ...
- [转]MS Excel VBO option missing in Blue Prism
本文转自:https://stackoverflow.com/questions/48706743/ms-excel-vbo-option-missing-in-blue-prism 问: I am ...
- [转]Blue Prism Interview Questions and Answers
本文转自:https://www.rpatraining.co.in/blue-prism-interview-questions/ What is a Visual Business Object? ...
- [转]Blue Prism Login Agent 使用指导手册
本文转自:https://cloud.tencent.com/developer/news/83035 咳!咳!咳! 第一篇RPA技术文,还是贼拉鸡冻.各位大侠要多多支持啊 1.Login Agent ...
- [转]What is Blue Prism?
本文转自:https://www.guru99.com/blue-prism-tutorial.html#5 What is Blue Prism? Blue Prism is a UK-based ...
- [转]How to mouse hover using Blue prism on a web page
本文转自:https://stackoverflow.com/questions/53126436/how-to-mouse-hover-using-blue-prism-on-a-web-page/ ...
- [转]Blue Prism Opening a password protected Excel workbook?
本文转自:https://www.rpaforum.net/threads/opening-a-password-protected-excel-workbook.470/ 问: As the tit ...
随机推荐
- node.js与ThreadLocal
ThreadLocal变量的说法来自于Java,这是在多线程模型下出现并发问题的一种解决方案. ThreadLocal变量作为线程内的局部变量,在多线程下可以保持独立,它存在于 线程的生命周期内,可以 ...
- ASP.NET Core在CentOS上的最小化部署实践
引言 本文从Linux小白的视角, 在CentOS 7.x服务器上搭建一个Nginx-Powered AspNet Core Web准生产应用. 在开始之前,我们还是重温一下部署原理,正 ...
- SpringBoot从零单排 ------ 拦截器的使用
在项目开发中我们常常需要对请求进行验证,如登录校验.权限验证.防止重复提交等等,通过拦截器来过滤请求.自定义一个拦截器需要实现HandlerInterceptor接口.代码如下: import org ...
- asp.net core 系列之并发冲突
本文介绍如何处理多个用户并发更新同一实体(同时)时出现的冲突 . 主要是两种:一种,检查属性并发冲突,使用 [ConcurrencyCheck] ;另一种,检测行的并发冲突,使用 rowversion ...
- [Linux] host dig nslookup查询域名的DNS解析
root@VM-38-204-ubuntu:~# host baidu.com baidu.com has address 220.181.57.216 baidu.com has address 1 ...
- 基于Vue2-Calendar改进的日历组件(含中文使用说明)
一,前言 我是刚学Vue的菜鸟,在使用过程中需要用到日历控件,由于项目中原来是用jQuery写的,因此用了bootstarp的日历控件,但是配合Vue实在有点蛋疼,不够优雅…… 于是网上搜了好久找到了 ...
- CSS引入本地字体与在线字体
有些时候为了强调某些文字,需要使用一些比较特别的字体,CSS中现在也可以比较方便的引入字体了,如下: /* 定义字体 */ @font-face{ font-family: Arista2; src: ...
- Android startActivity原理分析(基于Android 8.1 AOSP)
应用进程内 如何使用Intent做Activity的跳转 Intnet intent = new Intent(MainActivity.this,TestActivity.class); start ...
- Git默认用户名和密码设置
使用git的时候每次都需要输入密码,操作过程十分繁琐,非常不人性化,增加开发工作时间,也特别烦恼. 今天我们就来说说这个问题: 首先,如果我们git clone的下载代码的时候是连接的https:// ...
- 学习ELk之----02. Elastic Search操作入门
我们将使用Postman来进行日志写入操作.Postman的下载地址,你可以Google一下. 1. 在上一节中,我们启动完成ELK的Docker后,可以在浏览器中打开:http://192.168. ...