
[Laravel] 06 - Project: from Usercase to View
故事背景
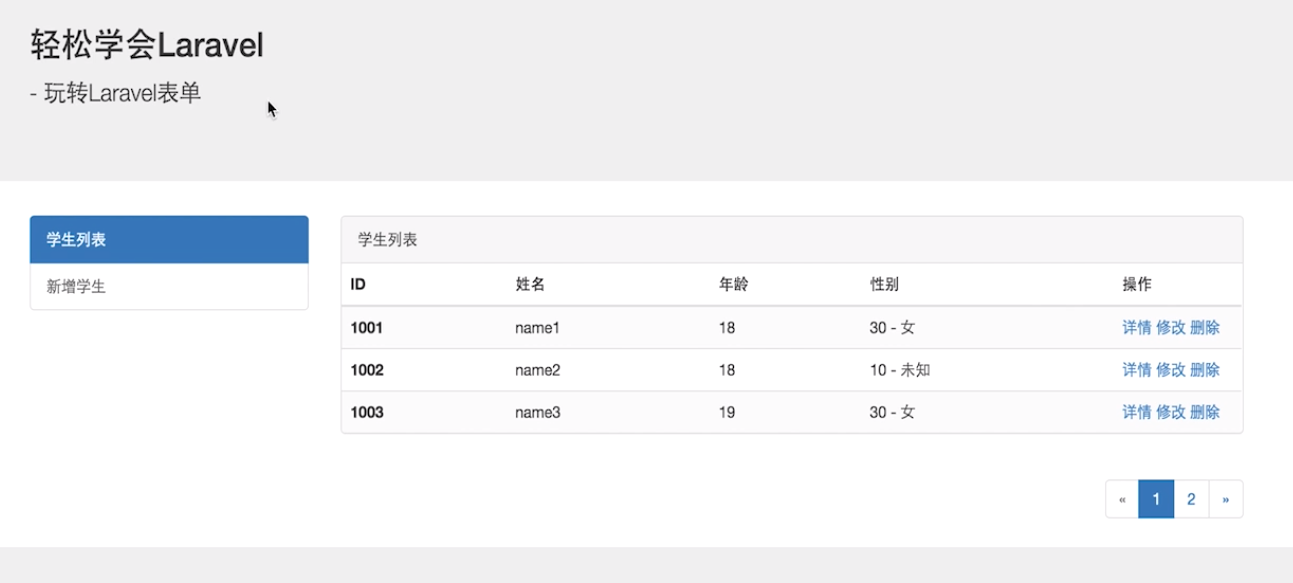
一、项目预览
From: https://www.imooc.com/video/12518
二、知识点
通过项目复习之前的重难点,在此列出并解决。
/* implement */
项目开始
一、布局分析
- 通过纯html文件给布局打底稿
共同的头部
共同的侧边栏
共同的尾部
只是右侧内容不同。
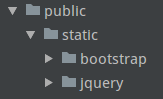
- Move/add bootstrap and jquery under public/static/
二、打通 MVC
- 路由
Route::get('student/index', ['uses' => 'StudentController@index']); ----> 控制器文件
- 控制器
[StudentController.php]
class StudentController extends Controller

{

    // 学生列表页

    public function index()

    {
     return view('student.index');  ----> 视图文件
    }
}
- 视图
[resources/views/student/index.blade.php]
只是一个blade模板布局。可以暂时随便写点什么显示出来打通MVC即可。
- 模型
暂时不用
三、Usercase到视图
视图也就是usercase的直接对接物,所以从这里开始。
- 静态资源管理 以及 模板布局
Ref: https://www.imooc.com/video/12519, 06:38 / 11:48
[views/common/layouts.blade.php]
第一步,静态页面,找到共同部分
<!DOCTYPE html>
<html lang="zh-CN"> ---------------------------------------------------------------------------
<head>
<meta charset="utf-8">
<meta http-equiv="X-UA-Compatible" content="IE=edge">
<meta name="viewport" content="width=device-width, initial-scale=1">
<title>轻松学会Laravel</title>
<title>轻松学会Laravel - @yield('title')</title>
# 占位符
<!-- Bootstrap CSS 文件 -->
<link rel="stylesheet" href="./static/bootstrap/css/bootstrap.min.css">
<link rel="stylesheet" href="{{ asset('./static/bootstrap/css/bootstrap.min.css') }}"> @section('style')
// Jeff: 难点一
@show
</head> ---------------------------------------------------------------------------
<body> <!-- 头部 -->
<div class="jumbotron">
<div class="container">
<h2>轻松学会Laravel</h2> <p> - 玩转Laravel表单</p>
</div>
</div> <!-- 中间内容区局 -->
<div class="container">
<div class="row">
--------------------------------------------------------------
@section(...)
<!-- 左侧菜单区域 -->
<div class="col-md-3">
<div class="list-group">
<a href="#" class="list-group-item active">学生列表</a>
<a href="#" class="list-group-item">新增学生</a>
</div>
</div>
@show
---------------------------------------------------------------
<!-- 右侧内容区域 -->
<div class="col-md-9">
---------------------------------------------------------------------------------
单独放在另一个文件中,例如同级目录下的message.blade.php
---------------------------------------------------------------------------------
<!-- 成功提示框 -->
<div class="alert alert-success alert-dismissible" role="alert">
<button type="button" class="close" data-dismiss="alert" aria-label="Close">
<span aria-hidden="true">×</span>
</button>
<strong>成功!</strong> 操作成功提示!
</div> <!-- 失败提示框 -->
<div class="alert alert-danger alert-dismissible" role="alert">
<button type="button" class="close" data-dismiss="alert" aria-label="Close">
<span aria-hidden="true">×</span>
</button>
<strong>失败!</strong> 操作失败提示!
</div>
---------------------------------------------------------------------------------- ##################################################################################
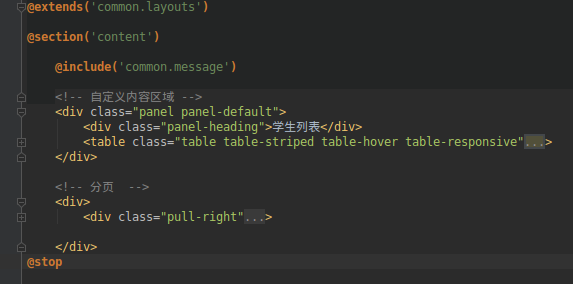
以下就是内容区域,移动到index文件中,单独处理。
这里使用占位符:@yield('content')
当然,这个index文件要继承该模板,通过 @extends('common.layouts')
##################################################################################
<!-- 自定义内容区域 -->
<div class="panel panel-default">
<div class="panel-heading">学生列表</div>
<table class="table table-striped table-hover table-responsive">
<thead>
<tr>
<th>ID</th>
<th>姓名</th>
<th>年龄</th>
<th>性别</th>
<th>添加时间</th>
<th width="120">操作</th>
</tr>
</thead>
<tbody>
<tr>
<th scope="row">1</th>
<td>Mark</td>
<td>18</td>
<td>男</td>
<td>2016-01-01</td>
<td>
<a href="">详情</a>
<a href="">修改</a>
<a href="">删除</a>
</td>
</tr>
<tr>
<th scope="row">1</th>
<td>Mark</td>
<td>18</td>
<td>男</td>
<td>2016-01-01</td>
<td>
<a href="">详情</a>
<a href="">修改</a>
<a href="">删除</a>
</td>
</tr>
<tr>
<th scope="row">1</th>
<td>Mark</td>
<td>18</td>
<td>男</td>
<td>2016-01-01</td>
<td>
<a href="">详情</a>
<a href="">修改</a>
<a href="">删除</a>
</td>
</tr>
</tbody>
</table>
</div> <!-- 分页 -->
<div>
<ul class="pagination pull-right">
<li>
<a href="#" aria-label="Previous">
<span aria-hidden="true">«</span>
</a>
</li>
<li class="active"><a href="#">1</a></li>
<li><a href="#">2</a></li>
<li><a href="#">3</a></li>
<li><a href="#">4</a></li>
<li><a href="#">5</a></li>
<li>
<a href="#" aria-label="Next">
<span aria-hidden="true">»</span>
</a>
</li>
</ul>
</div>
################################################################################## </div>
</div>
</div> <!-- 尾部 -->
<div class="jumbotron" style="margin:0;">
<div class="container">
<span> @2016 imooc</span>
</div>
</div> <!-- jQuery 文件 -->
<script src="./static/jquery/jquery.min.js"></script>
<!-- Bootstrap JavaScript 文件 -->
<script src="./static/bootstrap/js/bootstrap.min.js"></script>
@section('javascript')
// Jeff 留给js的一块地皮
@show
</body>
</html>
- 使用模板
- 先继承模板;
- 再填充content的内容:@yield('content')
- 提示内容通过调用子视图搞定:@include
- 样式调整
asset 到底是什么?
asset()方法用于引入 CSS/JavaScript/images 等文件,文件必须存放在public文件目录下。
[1] <link rel="stylesheet" href="./static/bootstrap/css/bootstrap.min.css">

[2] <link rel="stylesheet" href="{{ asset('./static/bootstrap/css/bootstrap.min.css') }}">
难点一
Ref: Laravel5.4初试-@yield @section @show @stop @append标签区别
Ref: 关于 @section...@show;@section....@endsection 的用法分析
/* implement */
难点二
保持结构,改变内容
@section...@show可以改变内容
/* implement */
难点三
固定区域,内容灵活
/* implement */
四、分页的实现
分页上是网页内容,也就是Student Info。
所以,需要定义模型。
"模型 --> 控制器 --> 分页视图"
- 视图 - 模板

- 视图 - php循环写网页
  <!-- 自定义内容区域 -->

    <div class="panel panel-default">

        <div class="panel-heading">学生列表</div>

        <table class="table table-striped table-hover table-responsive">

            <thead> #表头

            <tr>

                <th>ID</th>

                <th>姓名</th>

                <th>年龄</th>

                <th>性别</th>

                <th>添加时间</th>

                <th width="120">操作</th>

            </tr>

            </thead>

            <tbody> #表体

            ------------------------------------------------------------------------------------------
                @foreach($students as $student)

                <tr>

                    <th scope="row">{{ $student->id }}</th>

                    <td>{{ $student->name }}</td>

                    <td>{{ $student->age }}</td>

                    <td>{{ $student->sex($student->sex) }}</td>

                    <td>{{ date('Y-m-d', $student->created_at) }}</td>

                    <td>

                        <a href="{{ url('student/detail', ['id' => $student->id]) }}">详情</a>

                        <a href="{{ url('student/update', ['id' => $student->id]) }}">修改</a>

                        <a href="{{ url('student/delete', ['id' => $student->id]) }}"

                           onclick="if (confirm('确定要删除吗?') == false) return false;">删除</a>

                    </td>

                </tr>

                @endforeach
            ------------------------------------------------------------------------------------------

            </tbody>

        </table>

    </div>
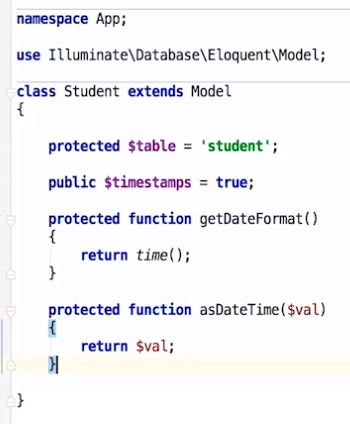
$students 作为参数 是从哪里来的? ---- "模型Student" 中定义
- 控制器 为 视图 提供数据
<?php

namespace App\Http\Controllers;

use App\Student;

use Illuminate\Http\Request;

class StudentController extends Controller

{

    // 学生列表页

    public function index()

    {

        $students = Student::paginate(5);  <----  mysql

        return view('student.index', [

            'students' => $students,         -----> 为'视图'提供参数

        ]);

    }
}
到此,布局设计的套路就有了。
[Laravel] 06 - Project: from Usercase to View的更多相关文章
- [Laravel] 07 - Project: functions in Controller
故事背景 一.项目预览 From: https://www.imooc.com/video/12521 表单操作 一.新增信息 既然是操作,自然会想到:控制器. 控制器 [1] 路由 ----> ...
- Laravel 控制器 Controller 传值到 视图 View 的几种方法总结
单个值的传递 with public function index() { $test = "测试"; return view('test.index')->with(' ...
- [Code::Blocks] Install wxWidgets & openCV
The open source, cross platform, free C++ IDE. Code::Blocks is a free C++ IDE built to meet the most ...
- 本人SW知识体系导航 - Programming menu
将感悟心得记于此,重启程序员模式. js, py, c++, java, php 融汇之全栈系列 [Full-stack] 快速上手开发 - React [Full-stack] 状态管理技巧 - R ...
- [Full-stack] 世上最好语言 - PHP
前言 本篇是对个人PHP, Laravel系列博文的总结与思考. 目的在于理清并熟练如下过程: "需求 --> Usercase --> UI --> 框架 --> ...
- Project Management Process
Project Management ProcessDescription .............................................................. ...
- laravel速记(笔记)
命令行: php artisan controller:make UserController This will generate the controller at /app/controller ...
- laravel 心得
1.安装 使用composer安装laravel ,切换到你想要放置该网站的目录下,运行命令: composer create-project laravel/larevel project 4.1 ...
- [Laravel] 14 - REST API: Laravel from scratch
前言 一.基础 Ref: Build a REST API with Laravel API resources Goto: [Node.js] 08 - Web Server and REST AP ...
随机推荐
- Codeforces Round #404 (Div. 2) D. Anton and School - 2 数学
D. Anton and School - 2 题目连接: http://codeforces.com/contest/785/problem/D Description As you probabl ...
- [Java web]Spring+Struts2+Hibernate整合过程
摘要 最近一直在折腾java web相关内容,这里就把最近学习的spring+struts2+hibernate进行一个整合,也就是大家经常说的ssh. 环境 工具IDE :Idea 2018 数据库 ...
- centos7 设置tomcat自启动
1 .vi /etc/init.d/tomcat8 #!/bin/bash # # tomcat startup script for the Tomcat server # # chkconfig ...
- goto语句引起的crosses initialization of XXX
1. 背景 goto语句虽然目前已经不提倡使用,但是用起来还是很方便,尤其是老代码中见的比较多. 在改动有goto语句的老代码时需要特别注意,是否跳过来资源的释放.有用变量的初始化等等. 很久之前写c ...
- Openstack配置文件管理的变迁之路
在管理一个Openstack集群时,如何维护配置文件无疑是其中最艰难和繁琐的任务之一.因为你不仅要面对众多的核心服务(nova,keystone,glance,cinder,etc)的配置文件,还需要 ...
- mod_wsgi的工作模式和配置
Openstack所有提供API接口的服务都是python web server,而其本身性能很弱,目前已经将它们配置到了apache上.但对于如何设置mod_wsgi的参数,我一直没有好好去阅读其文 ...
- 【POJ 3694】 Network(割边<桥>+LCA)
[POJ 3694] Network(割边+LCA) Network Time Limit: 5000MS Memory Limit: 65536K Total Submissions: 7971 ...
- 关于tomcat session机制梳理
一道题目引起的思考:"tomcat里怎样禁止服务端自己主动创建session". 1背景知识: 要说tomcat的机制.先从session说起. http是无状态协议(http详 ...
- Vue中CSS模块化最佳实践
Vue风格指南中介绍了单文件组件中的Style是必须要有作用域的,否则组件之间可能相互影响,造成难以调试. 在Vue Loader Scope CSS和Vue Loader CSS Modules两节 ...
- 【Windows】Windows中解析DOS的DIR命令使用
总结一下cmd中的dir命令的用法 64位win10系统上,打印帮助文档. D:\test>dir /? 显示目录中的文件和子目录列表. DIR [drive:][path][filename] ...