Http 调用netty 服务,服务调用客户端,伪同步响应.ProtoBuf 解决粘包,半包问题.
实际情况是: 公司需要开发一个接口给新产品使用,需求如下
1.有一款硬件设备,客户用usb接上电脑就可以,但是此设备功能比较单一,所以开发一个服务器程序,辅助此设备业务功能
2.解决方案,使用Socket调用此设备
3.增强此设备功能,增加Socket客户端连接到Socket服务端
4.Http请求,同步响应
测试注意:
1.nettyServer 在ubuntu下编码,使用Epoll
2.Http请求的测试最好运行再Linux 下进行,因为Windows 可能会因为并发高的时候占满端口限制,HttpClient或者RestTemplate 请求不了.
3.ProtoBuf 插件无论再Windows,还是linux同样适用,在linux 下,会自动下载 protoc-3.5.1-linux-x86_64.exe
简单的流程如下
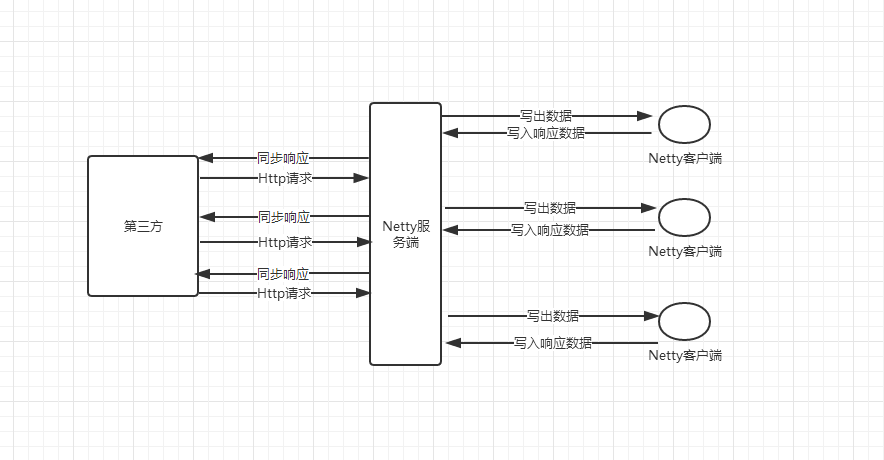
解决方案:
1.使用Netty框架
2.使用ProtoBuf,配合Netty 对ProtoBuf解决半包问题
3.Future 实现伪同步响应
4.SpringBoot + jetty
pom.xml 添加ProtoBuf依赖以及插件
 <properties>

        <project.build.sourceEncoding>UTF-8</project.build.sourceEncoding>

        <project.reporting.outputEncoding>UTF-8</project.reporting.outputEncoding>

        <java.version>1.8</java.version>

        <grpc.version>1.11.0</grpc.version>

        <protobuf.version>3.5.1</protobuf.version>

    </properties>
  <dependency>

            <groupId>com.google.protobuf</groupId>

            <artifactId>protobuf-java</artifactId>

            <version>${protobuf.version}</version>

        </dependency>

        <dependency>

            <groupId>io.grpc</groupId>

            <artifactId>grpc-netty</artifactId>

            <version>${grpc.version}</version>

            <scope>provided</scope>

        </dependency>

        <dependency>

            <groupId>io.grpc</groupId>

            <artifactId>grpc-protobuf</artifactId>

            <version>${grpc.version}</version>

            <scope>provided</scope>

        </dependency>

        <dependency>

            <groupId>io.grpc</groupId>

            <artifactId>grpc-stub</artifactId>

            <version>${grpc.version}</version>

            <scope>provided</scope>

        </dependency>

        <dependency>

            <groupId>com.googlecode.protobuf-java-format</groupId>

            <artifactId>protobuf-java-format</artifactId>

            <version>1.4</version>

        </dependency>
插件
    <build>

        <extensions>

            <extension>

                <groupId>kr.motd.maven</groupId>

                <artifactId>os-maven-plugin</artifactId>

                <version>1.5.0.Final</version>

            </extension>

        </extensions>

        <plugins>

            <plugin>

                <groupId>org.apache.maven.plugins</groupId>

                <artifactId>maven-compiler-plugin</artifactId>

                <configuration>

                    <source>1.8</source>

                    <target>1.8</target>

                </configuration>

            </plugin>

            <plugin>

                <groupId>org.xolstice.maven.plugins</groupId>

                <artifactId>protobuf-maven-plugin</artifactId>

                <version>0.5.1</version>

                <configuration>

                    <protocArtifact>com.google.protobuf:protoc:${protobuf.version}:exe:${os.detected.classifier}</protocArtifact>

                    <pluginId>grpc-java</pluginId>

                    <pluginArtifact>io.grpc:protoc-gen-grpc-java:${grpc.version}}:exe:${os.detected.classifier}</pluginArtifact>

                </configuration>

                <executions>

                    <execution>

                        <goals>

                            <goal>compile</goal>

                            <goal>compile-custom</goal>

                        </goals>

                    </execution>

                </executions>

            </plugin>

        </plugins>

    </build>
屏蔽Tomcat 使用 Jetty
        <dependency>

            <groupId>org.springframework.boot</groupId>

            <artifactId>spring-boot-starter-web</artifactId>

            <exclusions>

                <exclusion>

                    <groupId>org.springframework.boot</groupId>

                    <artifactId>spring-boot-starter-tomcat</artifactId>

                </exclusion>

            </exclusions>

        </dependency>

        <dependency>

            <groupId>org.springframework.boot</groupId>

            <artifactId>spring-boot-starter-jetty</artifactId>

        </dependency>
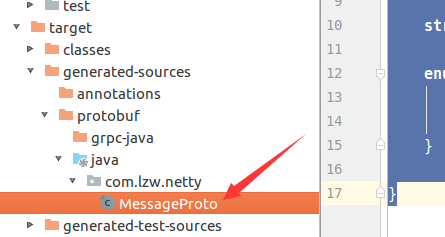
编写proto:再/src/main中创建文件夹 proto,创建一个Message.proto

文件内容
syntax = "proto3";

option java_package = "com.lzw.netty";

option java_outer_classname = "MessageProto";

message Message {

    int32 type = 1;

    sfixed64 id = 2;

    string msgBody = 3;

    enum Type {

        ACTIVE = 0;

        MESSAGE = 1;

    }

}
生成java 文件

文件目录,挪到自己需要的包下面
服务端代码
/**

 * User: laizhenwei

 * Date: 2018-03-26 Time: 21:46

 * Description:

 */

public class EchoServer {

    //缓存ResponseFuture

    public static Map<Long, ResponseFuture<MessageProto.Message>> responseFutureMap = new HashMap<>();

    private final int port;

    public EchoServer(int port) {

        this.port = port;

    }

    public void start() throws InterruptedException {

        EventLoopGroup bossGroup = new EpollEventLoopGroup(1);

        EventLoopGroup workerGroup = new EpollEventLoopGroup();

        ServerBootstrap bootstrap = new ServerBootstrap();

        bootstrap.group(bossGroup,workerGroup).channel(EpollServerSocketChannel.class)

                .localAddress(new InetSocketAddress(port))

                .childHandler(new MyServerChannelInitializer());

        try {

            ChannelFuture f = bootstrap.bind().sync();

            //清理不可预知而失败的脏数据

            f.channel().eventLoop().scheduleAtFixedRate(() -> {

                long nowTime = System.currentTimeMillis();

                responseFutureMap.entrySet().stream().filter(e -> (nowTime - e.getValue().getBeginTime()) > 60000).map(e -> e.getKey()).forEach(k->responseFutureMap.remove(k));

            }, 300, 300, TimeUnit.SECONDS);

            f.channel().closeFuture().sync();

        } finally {

            bossGroup.shutdownGracefully().sync();

            workerGroup.shutdownGracefully().sync();

        }

    }

}
ContextHelper缓存ChannelHandlerContext
/**

 * User: laizhenwei

 * Date: 2018-03-26 Time: 21:46

 * Description: 缓存客户端的ChannelHandlerContext

 */

public class ContextHelper {

    private final static Map<String, ChannelHandlerContext> clientMap = new ConcurrentHashMap<>();

    public static Map<String, ChannelHandlerContext> getClientMap() {

        return Collections.unmodifiableMap(clientMap);

    }

    public static ChannelHandlerContext get(String id){

        return clientMap.get(id);

    }

    public static void add(String id, ChannelHandlerContext ctx) {

        clientMap.put(id, ctx);

    }

    public static void remove(String id) {

        clientMap.remove(id);

    }

}
MyServerHandler
/**

 * User: laizhenwei

 * Date: 2018-03-26 Time: 21:46

 * Description:

 */

@Slf4j

@ChannelHandler.Sharable

public class MyServerHandler extends SimpleChannelInboundHandler<MessageProto.Message> {

    @Override

    protected void channelRead0(ChannelHandlerContext channelHandlerContext, MessageProto.Message msg) {

        String message = msg.getMsgBody();

        if ((MessageProto.Message.Type.ACTIVE_VALUE) == msg.getType()) {

            Attribute<String> attribute = channelHandlerContext.channel().attr(AttributeKey.valueOf("userName"));

            //连接上以后获取消息参数,设置到channelAttr

            String userName = message.split(":")[1];

            attribute.setIfAbsent(userName);

            //缓存channelHandlerContext

            ContextHelper.add(userName, channelHandlerContext);

        } else if (MessageProto.Message.Type.MESSAGE_VALUE == msg.getType()) {

            ResponseFuture<MessageProto.Message> resutl = EchoServer.responseFutureMap.get(msg.getId());

            if (resutl == null)

                log.warn("result is null ! msgId:" + msg.getId());

            MessageProto.Message message1 = MessageProto.Message.newBuilder().setId(msg.getId()).setType(MessageProto.Message.Type.MESSAGE_VALUE).setMsgBody("接收成功!msg:" + message).build();

            resutl.setResponse(message1);

        }

//        System.out.println("Client->Server:" + channelHandlerContext.channel().remoteAddress() + " send " + msg.getMsgBody());

    }

    @Override

    public void channelInactive(ChannelHandlerContext ctx){

        Attribute<String> attribute = ctx.channel().attr(AttributeKey.valueOf("userName"));

        ContextHelper.remove(attribute.get());

    }

    @Override

    public void exceptionCaught(ChannelHandlerContext ctx, Throwable cause) {

        cause.printStackTrace();

    }

}
ChannelInitializer,添加 Netty 支持 ProtoBuf 的拆包处理,以及编码解码
/**

 * User: laizhenwei

 * Date: 2018-03-26 Time: 21:46

 * Description:

 */

public class MyServerChannelInitializer extends ChannelInitializer<SocketChannel> {

    @Override

    protected void initChannel(SocketChannel socketChannel) throws Exception {

        socketChannel.pipeline()

                .addLast(new ProtobufVarint32FrameDecoder())

                .addLast(new ProtobufDecoder(MessageProto.Message.getDefaultInstance()))

                .addLast(new ProtobufVarint32LengthFieldPrepender())

                .addLast(new ProtobufEncoder())

                .addLast(new MyServerHandler());

    }

}
ResponseFuture
@NoArgsConstructor

public class ResponseFuture<T> implements Future<T> {

    // 因为请求和响应是一一对应的,因此初始化CountDownLatch值为1。

    private CountDownLatch latch = new CountDownLatch(1);

    // 响应结果

    private T response;

    // Futrue的请求时间,用于计算Future是否超时

    private long beginTime = System.currentTimeMillis();

    @Override

    public boolean cancel(boolean mayInterruptIfRunning) {

        return false;

    }

    @Override

    public boolean isCancelled() {

        return false;

    }

    @Override

    public boolean isDone() {

        if (response != null)

            return true;

        return false;

    }

    // 获取响应结果,直到有结果才返回。

    @Override

    public T get() throws InterruptedException {

        latch.await();

        return this.response;

    }

    // 获取响应结果,直到有结果或者超过指定时间就返回。

    @Override

    public T get(long timeout, TimeUnit unit) throws InterruptedException {

        if (latch.await(timeout, unit))

            return this.response;

        return null;

    }

    // 用于设置响应结果,并且做countDown操作,通知请求线程

    public void setResponse(T response) {

        this.response = response;

        latch.countDown();

    }

    public long getBeginTime() {

        return beginTime;

    }

}
ApplicationStartup SpringBoot 完全启动以后,运行Netty服务
/**

 * User: laizhenwei

 * Date: 2018-03-26 Time: 21:46

 * Description:

 */

@Component

public class ApplicationStartup implements CommandLineRunner {

    @Override

    public void run(String... args) throws Exception {

        new EchoServer(5000).start();

    }

}
客户端 EchoClient
/**

 * User: laizhenwei

 * Date: 2018-03-27 Time: 21:50

 * Description:

 */

public class EchoClient {

    private final String host;

    private final int port;

    public EchoClient(String host,int port){

        this.host = host;

        this.port = port;

    }

    public void start(String userName) throws InterruptedException {

        EventLoopGroup group = new NioEventLoopGroup();

        Bootstrap b = new Bootstrap();

        b.group(group).channel(NioSocketChannel.class)

                .remoteAddress(new InetSocketAddress(host,port))

                .handler(new ChannelInitializer<SocketChannel>(){

                    @Override

                    protected void initChannel(SocketChannel socketChannel){

                        socketChannel.attr(AttributeKey.valueOf("userName")).setIfAbsent(userName);

                        socketChannel.pipeline()

                                .addLast(new ProtobufVarint32FrameDecoder())

                                .addLast(new ProtobufDecoder(MessageProto.Message.getDefaultInstance()))

                                .addLast(new ProtobufVarint32LengthFieldPrepender())

                                .addLast(new ProtobufEncoder())

                                .addLast(new MyClientHandler());

                    }

                });

       try {

           ChannelFuture f = b.connect().sync();

           f.channel().closeFuture().sync();

       }finally {

           group.shutdownGracefully().sync();

       }

    }

    public static void main(String[] args){

        threadRun("Athos");

        threadRun("Nero");

        threadRun("Dante");

        threadRun("Vergil");

        threadRun("lzw");

        threadRun("Churchill");

        threadRun("Peter");

        threadRun("Bob");

    }

    private static void threadRun(String userName){

        new Thread(()-> {

            try {

                new EchoClient("192.168.1.8",5000).start(userName);

            } catch (InterruptedException e) {

                e.printStackTrace();

            }

        }).start();

    }

}
MyClientHandler
/**

 * User: laizhenwei

 * Date: 2018-04-09 Time: 11:20

 * Description:

 */

@ChannelHandler.Sharable

public class MyClientHandler extends SimpleChannelInboundHandler<MessageProto.Message> {

    @Override

    public void channelActive(ChannelHandlerContext ctx) {

        Attribute<Object> attribute = ctx.channel().attr(AttributeKey.valueOf("userName"));

        String m = "userName:" + attribute.get();

        MessageProto.Message.Builder builder = MessageProto.Message.newBuilder();

        builder.setType(MessageProto.Message.Type.ACTIVE_VALUE).setMsgBody(m);

        ctx.writeAndFlush(builder.build());

    }

    @Override

    protected void channelRead0(ChannelHandlerContext channelHandlerContext, MessageProto.Message msg) {

        MessageProto.Message.Builder builder = MessageProto.Message.newBuilder();

        //把接收到的消息写回到服务端

        builder.setId(msg.getId()).setType(MessageProto.Message.Type.MESSAGE_VALUE).setMsgBody(msg.getMsgBody());

        channelHandlerContext.channel().writeAndFlush(builder.build());

    }

    @Override

    public void exceptionCaught(ChannelHandlerContext ctx, Throwable cause) {

        cause.printStackTrace();

        ctx.close();

    }

}
JunitTest
    @Test

    public void testRest() throws InterruptedException {

        final Gson gson = new Gson();

        AtomicLong atomicLong = new AtomicLong(0);

        ThreadPoolTaskExecutor executor = new ThreadPoolTaskExecutor();

        executor.setCorePoolSize(50);

        executor.setMaxPoolSize(50);

        executor.setQueueCapacity(512);

        executor.setThreadNamePrefix("Executor-");

        executor.setAllowCoreThreadTimeOut(false);

        executor.setRejectedExecutionHandler(new ThreadPoolExecutor.CallerRunsPolicy());

        executor.setWaitForTasksToCompleteOnShutdown(true);

        executor.initialize();

        String[] userNames = {"Athos", "Nero", "Dante"

                , "Vergil", "lzw", "Churchill"

                , "Peter", "Bob"};

//        String[] userNames = {"Athos"};

        RestTemplate restTemplate = new RestTemplate();

        HttpHeaders httpHeaders = new HttpHeaders();

        httpHeaders.setAccept(Arrays.asList(MediaType.APPLICATION_JSON_UTF8));

        httpHeaders.add("connection", "keep-alive");

//        httpHeaders.setConnection("close");

        List<CompletableFuture<Boolean>> futures = new ArrayList<>();

        long begin = System.nanoTime();

        Arrays.stream(userNames).forEach(userName -> new Thread(() -> {

            for (int i = 0; i < 100000; i++) {

                futures.add(CompletableFuture.supplyAsync(() -> {

                    long currentId = atomicLong.getAndIncrement();

                    MultiValueMap<String, String> params = new LinkedMultiValueMap<>();

                    params.add("userName", userName);

                    params.add("msg", "你好啊!" + currentId);

                    HttpEntity<MultiValueMap<String, String>> httpEntity = new HttpEntity<>(params, httpHeaders);

                    String response = restTemplate.postForObject("http://192.168.91.130:8010/process", httpEntity, String.class);

                    if (response != null) {

                        Map<String, Object> responseMap;

                        responseMap = gson.fromJson(response, HashMap.class);

                        return responseMap.get("msgBody").equals("接收成功!msg:你好啊!" + currentId);

                    }

                    return false;

                }, executor));

            }

        }).start());

        while(futures.size()!=(100000*userNames.length)){

            TimeUnit.MILLISECONDS.sleep(500);

        }

        List<Boolean> result = futures.stream().map(CompletableFuture::join).collect(Collectors.toList());

        System.out.println((System.nanoTime() - begin) / 1000000);

        result.stream().filter(r -> !r).forEach(r -> System.out.println(r));

    }
1.启动NettyServer
2.启动NettyClient
3.启动N个JunitTest windows 启动5个,Linux 启动5个


看看server输出,从请求到响应非常迅速

Client 多个线程也没有看到输出有false,证明伪同步响应成功
Http 调用netty 服务,服务调用客户端,伪同步响应.ProtoBuf 解决粘包,半包问题.的更多相关文章
- Netty 粘包/半包原理与拆包实战
Java NIO 粘包 拆包 (实战) - 史上最全解读 - 疯狂创客圈 - 博客园 https://www.cnblogs.com/crazymakercircle/p/9941658.html 本 ...
- netty解决粘包半包问题
前言:开发者用到TCP/IP交互时,偶尔会遇到粘包或者半包的数据,这种情况有时会对我们的程序造成严重的影响,netty框架为解决这种问题提供了若干框架 1. LineBasedFrameDecoder ...
- Netty - 粘包和半包(上)
在网络传输中,粘包和半包应该是最常出现的问题,作为 Java 中最常使用的 NIO 网络框架 Netty,它又是如何解决的呢?今天就让我们来看看. 定义 TCP 传输中,客户端发送数据,实际是把数据写 ...
- 客户端(springmvc)调用netty构建的nio服务端,获得响应后返回页面(同步响应)
后面考虑通过netty做一个真正意义的简约版RPC框架,今天先尝试通过正常调用逻辑调用netty构建的nio服务端并同步获得返回信息.为后面做铺垫 服务端实现 我们先完成服务端的逻辑,逻辑很简单,把客 ...
- 使用Spring Cloud Feign作为HTTP客户端调用远程HTTP服务
在Spring Cloud Netflix栈中,各个微服务都是以HTTP接口的形式暴露自身服务的,因此在调用远程服务时就必须使用HTTP客户端.我们可以使用JDK原生的URLConnection.Ap ...
- spring Cloud Feign作为HTTP客户端调用远程HTTP服务
在Spring Cloud Netflix栈中,各个微服务都是以HTTP接口的形式暴露自身服务的,因此在调用远程服务时就必须使用HTTP客户端.我们可以使用JDK原生的URLConnection.Ap ...
- Spring Cloud 入门教程(六): 用声明式REST客户端Feign调用远端HTTP服务
首先简单解释一下什么是声明式实现? 要做一件事, 需要知道三个要素,where, what, how.即在哪里( where)用什么办法(how)做什么(what).什么时候做(when)我们纳入ho ...
- spring cloud 声明式rest客户端feign调用远程http服务
在Spring Cloud Netflix栈中,各个微服务都是以HTTP接口的形式暴露自身服务的,因此在调用远程服务时就必须使用HTTP客户端.Feign就是Spring Cloud提供的一种声明式R ...
- wcf 中客户端调用之死 感悟 wcf与原来的webservice2.0 的客户端调用区别(wcf调用完不关闭的话那就把web服务搞死了)
说到wcf,本人也是刚刚使用所以不是很熟悉 在做项目的时候采用webservice+客户端程序架构 写了一个wcf中的webservice之后,又写了很多的客户端exe程序,有的是轮询调用这个webs ...
随机推荐
- javascript 原生常用api 数组方法大全
<!DOCTYPE html> <html> <head> <meta charset="UTF-8"> <title> ...
- android:ListView 的简单用法
首 先新 建 一个 ListViewTest 项 目, 并 让 ADT 自 动帮 我 们创 建 好 活动 . 然后 修 改 activity_main.xml 中的代码,如下所示: <Linea ...
- Oracle 11g不同情形下的登录分析
对于Oracle刚開始学习的人.甚至有些经验的Oracle DBA来说,Oracle的账户登录问题往往非常棘手.即便成功登录oracle也是知其然而不知其所以然. 作者经过系统学习和重复实践,本着打破 ...
- web架构延变
在现代的软件系统中,几乎所有的系统都使用到了数据库,不论是关系型数据,例如MySql.SQLite.Oracle.SQLServer等,还是非关系性数据,例如mongoDB.redis等.本文已web ...
- mysql yum安装
# 下载yum源的rpm包wget https://dev.mysql.com/get/mysql57-community-release-el7-11.noarch.rpm# 安装rpm包rpm - ...
- MongoDB学习笔记(一)安装配置
文档存储:文档存储一般用类似json的格式存储,存储的内容是文档型的. MongoDB 将数据存储为一个文档,数据结构由键值(key=>value)对组成.MongoDB 文档类似于 JSON ...
- STC单片机 IAP(EEPROM)的使用
STC89C51.52内部都自带有2K字节的EEPROM,54.55和58都自带有16K字节的EEPROM,STC单片机是利用IAP技术实现的EEPROM,内部Flash擦写次数可达100,000 次 ...
- C# System.Collections.ArrayList
using System; using System.Collections; public class SamplesArrayList { public static void Main() { ...
- Oracle 12c中文乱码,修改字符集的方法
在windows 7 64位上安装Oracle 12c没有设定字符集,采用的是操作系统默认字符集:WE8MSWIN1252,将字符集修改为:ZHS16GBK.由于过程不可逆,首先需要备份数据库. 1. ...
- 【ML】Predict and Constrain: Modeling Cardinality in Deep Structured Prediction -预测和约束:在深度结构化预测中建模基数
[论文标题]Predict and Constrain: Modeling Cardinality in Deep Structured Prediction (35th-ICML,PMLR) [ ...