ASP.NET AJAX入门系列(5):使用UpdatePanel控件(二) UpdatePanel
UpdatePanel可以用来创建丰富的局部更新Web应用程序,它是ASP.NET 2.0 AJAX Extensions中很重要的一个控件,其强大之处在于不用编写任何客户端脚本,只要在一个页面上添加几个UpdatePanel控件和一个ScriptManager控件就可以自动实现局部更新。通过本文来学习一下UpdatePanel其他的一些使用方法(第二篇)。
主要内容
1.用编程的方法控制UpdatePanel的更新
2.UpdatePanel的嵌套使用
3.同一页面上使用多个UpdatePanel
一.用编程的方法控制UpdatePanel的更新
对于UpdatePanel,我们也可以使用编程的方法来控制它的更新,可以通过ScriptManager的RegisterAsyncPostBackControl()方法注册一个异步提交的控件,并且调用UpdatePanel的Update()方法来让它更新。再次用我在前面的文章中用到的一个无聊的时间更新例子来看一下,有时候我觉得例子过于复杂更加不好说明白所要讲的内容,如下代码所示,注意Button1并不包含在UpdatePanel中:
<%@ Page Language="C#" AutoEventWireup="true" CodeFile="Default.aspx.cs" Inherits="_Default" %>

<script runat="server">

    void Button1_Click(object sender, EventArgs e)

    {

        this.Label2.Text = DateTime.Now.ToString();

    }

</script>

<html xmlns="http://www.w3.org/1999/xhtml">

<head runat="server">

    <title>Refreshing an UpdatePanel Programmatically</title>

</head>

<body>

    <form id="form1" runat="server">

        <asp:ScriptManager ID="ScriptManager1" runat="server"/>

        <div>

            <asp:UpdatePanel ID="UpdatePanel1" runat="server" UpdateMode="Conditional">

                <ContentTemplate>

                    <asp:Label ID="Label1" runat="server" Text="更新时间:"></asp:Label>

                    <asp:Label ID="Label2" runat="server" Text="Label" ForeColor="Red"></asp:Label><br/><br/>

                </ContentTemplate>

            </asp:UpdatePanel>

             <asp:Button ID="Button1" runat="server" Text="Button"  OnClick = "Button1_Click"/>

        </div>

    </form>

</body>

</html>
这时候不用多说,肯定是整页提交了,运行如下图所示:

再次修改上面的例子,使用ScriptManager的RegisterAsyncPostBackControl()注册Button1为一个异步提交控件,并且调用UpdatePanel的Update()方法:
<%@ Page Language="C#" AutoEventWireup="true" CodeFile="Default.aspx.cs" Inherits="_Default" %>

<script runat="server">

    void Page_Load(object sender, EventArgs e)

    {

        ScriptManager1.RegisterAsyncPostBackControl(Button1);

    }

    void Button1_Click(object sender, EventArgs e)

    {

        this.Label2.Text = DateTime.Now.ToString();

        this.UpdatePanel1.Update();

    }

</script>

<html xmlns="http://www.w3.org/1999/xhtml">

<head runat="server">

    <title>Refreshing an UpdatePanel Programmatically</title>

</head>

<body>

    <form id="form1" runat="server">

        <asp:ScriptManager ID="ScriptManager1" runat="server"/>

        <div>

            <asp:UpdatePanel ID="UpdatePanel1" runat="server" UpdateMode="Conditional">

                <ContentTemplate>

                    <asp:Label ID="Label1" runat="server" Text="更新时间:"></asp:Label>

                    <asp:Label ID="Label2" runat="server" Text="Label" ForeColor="Red"></asp:Label><br/><br/>

                </ContentTemplate>

            </asp:UpdatePanel>

             <asp:Button ID="Button1" runat="server" Text="Button"  OnClick = "Button1_Click"/>

        </div>

    </form>

</body>

</html>
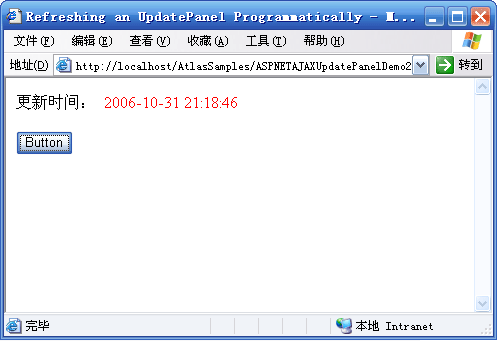
这时候可以看到,已经是异步提交了:
二. UpdatePanel的嵌套使用
UpdatePanel还可以嵌套使用,即在一个UpdatePanel的ContentTemplate中还可以放入另一个UpdatePanel。当最外面的UpdatePanel被触发更新时,它里面的子UpdatePanel也随着更新,里面的UpdatePanel触发更新时,只更新它自己,而不会更新外层的UpdatePanel。看下面的例子:
<%@ Page Language="C#" AutoEventWireup="true" CodeFile="Default2.aspx.cs" Inherits="Default2" %>

<script runat="server">

</script>

<html xmlns="http://www.w3.org/1999/xhtml">

<head id="Head1" runat="server">

    <title>UpdatePanelUpdateMode Example</title>

    <style type="text/css">

    div.NestedPanel

    {

      position: relative;

      margin: % % % %;

    }

    </style>

</head>

<body>

    <form id="form1" runat="server">

        <div>

            <asp:ScriptManager ID="ScriptManager"

                               runat="server" />

            <asp:UpdatePanel ID="OuterPanel"

                             UpdateMode="Conditional"

                             runat="server">

                <ContentTemplate>

                    <div>

                        <fieldset>

                            <legend>Outer Panel </legend>

                            <br />

                            <asp:Button ID="OPButton1"

                                        Text="Outer Panel Button"

                                        runat="server" />

                            <br />

                            Last updated on

                            <%= DateTime.Now.ToString() %>

                            <br />

                            <br />

                            <asp:UpdatePanel ID="NestedPanel1"

                                               UpdateMode="Conditional"

                                               runat="server">

                                <ContentTemplate>

                                    <div class="NestedPanel">

                                        <fieldset>

                                            <legend>Nested Panel </legend>

                                            <br />

                                            Last updated on

                                            <%= DateTime.Now.ToString() %>

                                            <br />

                                            <asp:Button ID="NPButton1"

                                                        Text="Nested Panel 1 Button"

                                                        runat="server" />

                                        </fieldset>

                                    </div>

                                </ContentTemplate>

                            </asp:UpdatePanel>

                        </fieldset>

                    </div>

                </ContentTemplate>

            </asp:UpdatePanel>

        </div>

    </form>

</body>

</html>
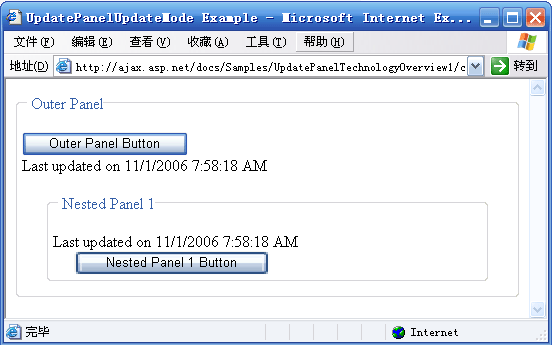
运行后如下:
三.同一页面上使用多个UpdatePanel
使用UpdatePanel的时候并没有限制在一个页面上用多少个UpdatePanel,所以我们可以为不同的需要局部更新的页面区域加上不同的UpdatePanel。由于UpdatePanel默认的UpdateMode是Always,如果页面上有一个局部更新被触发,则所有的UpdatePanel都将更新,这是我们不愿看到的,我们只需要UpdatePanel在它自己的触发器触发的时候更新就可以了,所以需要把UpdateMode设置为Conditional。
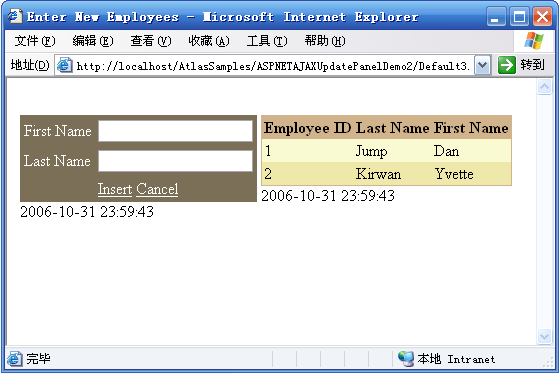
来看一下官方网站上提供的一个例子:包括两个UpdatePanel,其中一个用来用户输入而另一个则用来显示数据,每一个UpdatePanel的UpdateMode属性都设置为Conditional。当我们单击Cancel按钮时,只有用来用户输入的那个UpdatePanel刷新,当单击Insert按钮时,两个UpdatePanel都刷新。代码如下:
<%@ Page Language="C#" %>
<%@ Import Namespace="System.Collections.Generic" %>
<html xmlns="http://www.w3.org/1999/xhtml" >
<head id="Head1" runat="server">
<title>Enter New Employees</title>
<script runat="server">
private List<Employee> EmployeeList;
protected void Page_Load()
{
if (!IsPostBack)
{
EmployeeList = new List<Employee>();
EmployeeList.Add(new Employee(, "Jump", "Dan"));
EmployeeList.Add(new Employee(, "Kirwan", "Yvette"));
ViewState["EmployeeList"] = EmployeeList;
}
else
EmployeeList = (List<Employee>)ViewState["EmployeeList"];
EmployeesGridView.DataSource = EmployeeList;
EmployeesGridView.DataBind();
}
protected void InsertButton_Click(object sender, EventArgs e)
{
if (String.IsNullOrEmpty(FirstNameTextBox.Text) ||
String.IsNullOrEmpty(LastNameTextBox.Text)) { return; }
int employeeID = EmployeeList[EmployeeList.Count-].EmployeeID + ;
string lastName = Server.HtmlEncode(FirstNameTextBox.Text);
string firstName = Server.HtmlEncode(LastNameTextBox.Text);
FirstNameTextBox.Text = String.Empty;
LastNameTextBox.Text = String.Empty;
EmployeeList.Add(new Employee(employeeID, lastName, firstName));
ViewState["EmployeeList"] = EmployeeList;
EmployeesGridView.DataBind();
EmployeesGridView.PageIndex = EmployeesGridView.PageCount;
}
protected void CancelButton_Click(object sender, EventArgs e)
{
FirstNameTextBox.Text = String.Empty;
LastNameTextBox.Text = String.Empty;
}
[Serializable]
public class Employee
{
private int _employeeID;
private string _lastName;
private string _firstName;
public int EmployeeID
{
get { return _employeeID; }
}
public string LastName
{
get { return _lastName; }
}
public string FirstName
{
get { return _firstName; }
}
public Employee(int employeeID, string lastName, string firstName)
{
_employeeID = employeeID;
_lastName = lastName;
_firstName = firstName;
}
}
</script>
</head>
<body>
<form id="form1" runat="server">
<div>
</div>
<asp:ScriptManager ID="ScriptManager1" runat="server" EnablePartialRendering="true" />
<table>
<tr>
<td style="height: 206px" valign="top">
<asp:UpdatePanel ID="InsertEmployeeUpdatePanel" runat="server" UpdateMode="Conditional">
<ContentTemplate>
<table cellpadding="" border="" style="background-color:#7C6F57">
<tr>
<td><asp:Label ID="FirstNameLabel" runat="server" AssociatedControlID="FirstNameTextBox"
Text="First Name" ForeColor="White" /></td>
<td><asp:TextBox runat="server" ID="FirstNameTextBox" /></td>
</tr>
<tr>
<td><asp:Label ID="LastNameLabel" runat="server" AssociatedControlID="LastNameTextBox"
Text="Last Name" ForeColor="White" /></td>
<td><asp:TextBox runat="server" ID="LastNameTextBox" /></td>
</tr>
<tr>
<td></td>
<td>
<asp:LinkButton ID="InsertButton" runat="server" Text="Insert" OnClick="InsertButton_Click" ForeColor="White" />
<asp:LinkButton ID="Cancelbutton" runat="server" Text="Cancel" OnClick="CancelButton_Click" ForeColor="White" />
</td>
</tr>
</table>
<asp:Label runat="server" ID="InputTimeLabel"><%=DateTime.Now %></asp:Label>
</ContentTemplate>
</asp:UpdatePanel>
</td>
<td style="height: 206px" valign="top">
<asp:UpdatePanel ID="EmployeesUpdatePanel" runat="server" UpdateMode="Conditional">
<ContentTemplate>
<asp:GridView ID="EmployeesGridView" runat="server" BackColor="LightGoldenrodYellow" BorderColor="Tan"
BorderWidth="1px" CellPadding="" ForeColor="Black" GridLines="None" AutoGenerateColumns="False">
<FooterStyle BackColor="Tan" />
<SelectedRowStyle BackColor="DarkSlateBlue" ForeColor="GhostWhite" />
<PagerStyle BackColor="PaleGoldenrod" ForeColor="DarkSlateBlue" HorizontalAlign="Center" />
<HeaderStyle BackColor="Tan" Font-Bold="True" />
<AlternatingRowStyle BackColor="PaleGoldenrod" />
<Columns>
<asp:BoundField DataField="EmployeeID" HeaderText="Employee ID" />
<asp:BoundField DataField="LastName" HeaderText="Last Name" />
<asp:BoundField DataField="FirstName" HeaderText="First Name" />
</Columns>
<PagerSettings PageButtonCount="" />
</asp:GridView>
<asp:Label runat="server" ID="ListTimeLabel"><%=DateTime.Now %></asp:Label>
</ContentTemplate>
<Triggers>
<asp:AsyncPostBackTrigger ControlID="InsertButton" EventName="Click" />
</Triggers>
</asp:UpdatePanel>
</td>
</tr>
</table>
</form>
</body>
</html>
运行后效果如下:
示例代码下载:http://files.cnblogs.com/Terrylee/ASPNETAJAXUpdatePanelDemo2.rar
ASP.NET AJAX入门系列(5):使用UpdatePanel控件(二) UpdatePanel的更多相关文章
- ASP.NET AJAX入门系列(4):使用UpdatePanel控件(一)
UpdatePanel可以用来创建丰富的局部更新Web应用程序,它是ASP.NET 2.0 AJAX Extensions中很重要的一个控件,其强大之处在于不用编写任何客户端脚本,只要在一个页面上添加 ...
- ASP.NET AJAX入门系列(1):概述
经常关注我的Blog的朋友可能注意到了,在我Blog的左边系列文章中,已经移除了对Atlas学习手记系列文章的推荐,因为随着ASP.NET AJAX 1.0 Beta版的发布,它们已经不再适用,为了不 ...
- ASP.NET AJAX入门系列
ASP.NET AJAX入门系列将会写关于ASP.NET AJAX一些控件的使用方法以及基础知识,其中部分文章为原创,也有一些文章是直接翻译自官方文档,本部分内容会不断更新. 目录 ASP.NET A ...
- ASP.NET AJAX入门系列(10):Timer控件简单使用
本文主要通过一个简单示例,让Web页面在一定的时间间隔内局部刷新,来学习一下ASP.NET AJAX中的服务端Timer控件的简单使用. 主要内容 Timer控件的简单使用 1.添加新页面并切换到设计 ...
- ASP.NET AJAX入门系列(5):使用UpdatePanel控件(二)
UpdatePanel可以用来创建丰富的局部更新Web应用程序,它是ASP.NET 2.0 AJAX Extensions中很重要的一个控件,其强大之处在于不用编写任何客户端脚本,只要在一个页面上添加 ...
- ASP.NET AJAX入门系列(9):在母版页中使用UpdatePanel
本文简单介绍一下在母版页中使用UpdatePanel控件,翻译自官方文档. 主要内容 1.添加UpdatePanel控件到Content Page 2.通过Master Page刷新UpdatePan ...
- ASP.NET AJAX入门系列(11):在多个UpdatePanle中使用Timer控件
本文将使用Timer控件更新两个UpdatePanel控件,Timer控件将放在UpdatePanel控件的外面,并将它配置为UpdatePanel的触发器,翻译自官方文档. 主要内容 在多个Upda ...
- ASP.NET AJAX入门系列(7):使用客户端脚本对UpdateProgress编程
在本篇文章中,我们将通过编写JavaScript来使用客户端行为扩展UpdateProgress控件,客户端代码将使用ASP.NET AJAX Library中的PageRequestManager, ...
- ASP.NET AJAX入门系列(6):UpdateProgress控件简单介绍
在ASP.NET AJAX Beta2中,UpdateProgress控件已经从“增值”CTP中移到了ASP.NET AJAX核心中.以下两篇关于UpdateProgress的文章基本翻译自ASP.N ...
随机推荐
- 用python从符合一定格式的txt文档中逐行读取数据并按一定规则写入excel(openpyxl支持Excel 2007 .xlsx格式)
前几天接到一个任务,从gerrit上通过ssh命令获取一些commit相关的数据到文本文档中,随后将这些数据存入Excel中.数据格式如下图所示 观察上图可知,存在文本文档中的数据符合一定的格式,通过 ...
- centos7设置默认的内核启动
centos内核启动时会有3个选项,只有一个可以正常登陆到图形界面的桌面: 下面是设置默认内核的顺序: centos的内核文件在/boot/grub2目录下 1.如果想要修改以上三项的显示顺序,只需要 ...
- crontab入门及进阶学习笔记
crontab不是通常意义下的linux指令,它更是一个配置工具.通过这个工具,我们可以为系统定制固定周期的任务. 1.crond和crontab 1) crond:cron服务的守护进程,用于定 ...
- Python扩展库2—matplotlib
1 载入matplotli的绘图模块,并重命名为plt import matplotlib.pyplot as plt 2 折线图 import matplotlib.pyplot as plt im ...
- wx小程序用canvas生成图片流程与注意事项
1.需要画入canvas的 图片都需要先缓存到本地 let ps = [] ps.push(that.loadImageFun(this.statusInfo.avatar_url, "he ...
- wx小程序修改swiper 点的样式
<swiper class="swiper-box" indicator-dots="{{ indicatordots }}" autoplay=&quo ...
- ubuntu ssh 与 Samba安装
ssh 安装:sudo apt-get install openssh-server 确认sshserver是否启动:ps -aux | grep ssh(/etc/init.d/ssh start, ...
- [转]TDD之Dummy Stub Fake Mock
TDD之Dummy Stub Fake Mock 测试驱动大家都很熟悉了,这两天正好看了一个java的书,对TDD中的一些基本概念进行了复习,具体如下: Dummy An object that is ...
- Windows在当前目录打开cmd
/********************************************************************** * Windows在当前目录打开cmd * 说明: * ...
- 通过putty进行端口映射并且启动jupyter notebook
通过内网穿透之后,一般而言,我们访问内网中的机器在ubuntu下一句命令: ssh name@阿里云 -p 6000即可进行访问,其中-p是表示端口号:同样的通过windows下的putty也可修改对 ...