Serial interface (RS-232)
转自:http://www.fpga4fun.com/SerialInterface.html
A serial interface is a simple way to connect an FPGA to a PC. We just need a transmitter and receiver module.
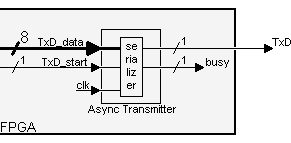
Async transmitter
It creates a signal "TxD" by serializing the data to transmit.
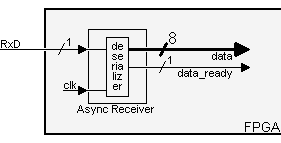
Async receiver
It takes a signal "RxD" from outside the FPGA and "de-serializes" it for easy use inside the FPGA.
This project has 5 parts
How the RS-232 serial interface works
An RS-232 interface has the following characteristics:
- Uses a 9 pins connector "DB-9" (older PCs use 25 pins "DB-25").
- Allows bidirectional full-duplex communication (the PC can send and receive data at the same time).
- Can communicate at a maximum speed of roughly 10KBytes/s.
DB-9 connector

It has 9 pins, but the 3 important ones are:
- pin 2: RxD (receive data).
- pin 3: TxD (transmit data).
- pin 5: GND (ground).
Using just 3 wires, you can send and receive data.
Data is commonly sent by chunks of 8 bits (we call that a byte) and is "serialized": the LSB (data bit 0) is sent first, then bit 1, ... and the MSB (bit 7) last.
Asynchronous communication
This interface uses an asynchronous protocol. That means that no clock signal is transmitted along the data. The receiver has to have a way to "time" itself to the incoming data bits.
In the case of RS-232, that's done this way:
- Both side of the cable agree in advance on the communication parameters (speed, format...). That's done manually before communication starts.
- The transmitter sends "idle" (="1") when and as long as the line is idle.
- The transmitter sends "start" (="0") before each byte transmitted, so that the receiver can figure out that a byte is coming.
- The 8 bits of the byte data are sent.
- The transmitter sends "stop" (="1") after each byte.
Let's see how looks the byte 0x55 when transmitted:

Byte 0x55 is 01010101 in binary. But since it is transmitted LSB (bit-0) first, the line toggles like that: 1-0-1-0-1-0-1-0.
Here's another example:

Here the data is 0xC4, can you see it? The bits are harder to see. That illustrates how important it is for the receiver to know at which speed the data is sent.
How fast can we send data?
The speed is specified in baud, i.e. how many bits-per-seconds can be sent. For example, 1000 bauds would mean 1000 bits-per-seconds, or that each bit lasts one millisecond.
Common implementations of the RS-232 interface (like the one used in PCs) don't allow just any speed to be used. If you want to use 123456 bauds, you're out of luck. You have to settle to some "standard" speed. Common values are:
- 1200 bauds.
- 9600 bauds.
- 38400 bauds.
- 115200 bauds (usually the fastest you can go).
At 115200 bauds, each bit lasts (1/115200) = 8.7µs. If you transmit 8-bits data, that lasts 8 x 8.7µs = 69µs. But each byte requires an extra start and stop bit, so you actually need 10 x 8.7µs = 87µs. That translates to a maximum speed of 11.5KBytes per second.
At 115200 bauds, some PCs with buggy chips require a "long" stop bit (1.5 or 2 bits long...) which make the maximum speed drop to around 10.5KBytes per second.
Physical layer
The signals on the wires use a positive/negative voltage scheme.
- "1" is sent using -10V (or between -5V and -15V).
- "0" is sent using +10V (or between 5V and 15V).
So an idle line carries something like -10V.
Links
Baud generator
Here we want to use the serial link at maximum speed, i.e. 115200 bauds (slower speeds would also be easy to generate). FPGAs usually run at MHz speeds, well above 115200Hz (RS-232 is pretty slow by today's standards). We need to find a way to generate (from the FPGA clock) a "tick" as close as possible to 115200 times a second.
Traditionally, RS-232 chips use a 1.8432MHz clock, because that makes generating the standard baud frequencies very easy... 1.8432MHz divided by 16 gives 115200Hz.
|
// let's assume the FPGA clock signal runs at 1.8432MHz // we create a 4-bit counter reg [3:0] BaudDivCnt; always @(posedge clk) BaudDivCnt <= BaudDivCnt + 1; // count forever from 0 to 15 // and a tick signal that is asserted once every 16 clocks (so 115200 times a second) wire BaudTick = (BaudDivCnt==15); |
That was easy. But what do you do if instead of 1.8432MHz, you have a 2MHz clock? To generate 115200Hz from a 2MHz clock, we need to divide the clock by "17.361111111..." Not exactly a round number. The solution is to divide sometimes by 17, sometimes by 18, making sure the ratio stays "17.361111111". That's actually easy to do.
Look at the following "C" code:
|
while(1) // repeat forever { acc += 115200; if(acc>=2000000) printf("*"); else printf(" "); } |
That prints the "*" in the exact ratio, once every "17.361111111..." loops on average.
To obtain the same thing efficiently in an FPGA, we rely on the fact that the serial interface can tolerate a few % of error in the baud frequency generator.
It is desirable that the 2000000 be a power of two. Obviously 2000000 is not. So we change the ratio... Instead of "2000000/115200", let's use "1024/59" = 17.356. That's very close to our ideal ratio, and makes an efficient FPGA implementation: we use a 10-bit accumulator incremented by 59, with a tick marked everytime the accumulator overflows.
|
// let's assume the FPGA clock signal runs at 2.0000MHz // add 59 to the accumulator at each clock wire BaudTick = acc[10]; // so that the 11th bit is the accumulator carry-out |
Using our 2MHz clock, "BaudTick" is asserted 115234 times a second, a 0.03% error from the ideal 115200.
Parameterized FPGA baud generator
The previous design was using a 10 bits accumulator, but as the clock frequency increases, more bits are required.Here's a design with a 25MHz clock and a 16 bits accumulator. The design is parameterized, so easy to customize.
|
parameter ClkFrequency = 25000000; // 25MHz reg [BaudGeneratorAccWidth:0] BaudGeneratorAcc; |
One last implementation issue: the "BaudGeneratorInc" calculation is wrong, due to the fact that Verilog uses 32 bits intermediate results, and the calculation exceeds that. Change the line as follow for a workaround.
| parameter BaudGeneratorInc = ((Baud<<(BaudGeneratorAccWidth-4))+(ClkFrequency>>5))/(ClkFrequency>>4); |
This line has also the added advantage to round the result instead of truncating.
Now that we have a precise enough Baud generator, we can go ahead with the RS-232 transmitter and receiver modules.
Serial interface (RS-232)的更多相关文章
- Linux/drivers/usb/serial/ftdi_sio.c
Linux/drivers/usb/serial/ftdi_sio.h /* 2 * Driver definitions for the FTDI USB Single Port Serial Co ...
- 串口通信编程向导 Serial Programming Guide for POSIX Operating Systems
https://www.cmrr.umn.edu/~strupp/serial.html#CONTENTS Introduction Chapter 1, Basics of Serial Commu ...
- RS-232, RS-422, RS-485 Serial Communication General Concepts(转载)
前面转载的几篇文章重点介绍了UART及RS-232.在工控领域除了RS-232以外,常用的串行通信还有RS-485.本文转载的文章重点介绍了RS-232.RS-422和RS-485. Overview ...
- USB (Universal Serial Bus)
USB歷史簡介 USB規格演變 標準 USB 2.0 介面 實體層 訊號傳輸 傳輸速率 網路層 USB 通訊模型 Endpoints 傳輸型態 USB 資料連結 Transaction Frame P ...
- [转]Mac's and serial TTY's
Mac's are excellent tools for accessing serial device TTY ports (to console into PBX's, switches, an ...
- Freescale OSBDM JM60仿真器 BGND Interface
The BGND interface provides the standard 6 pin connection for the single wire BGND signal type devel ...
- 【转】Ultra simple ISO-7816 Interface
原文出自 http://hilbert-space.de/?p=135 While laying out a PCB for my SWP reader project I realized that ...
- Blocking Master Example QT 自带 的 serial 即 串口 例子
1.官方解释文档:http://doc.qt.io/qt-5/qtserialport-blockingmaster-example.html Blocking Master shows how to ...
- RFID-RC522、FM1702SL、M1卡初探
catalogue . 引言 . RC522芯片(读卡器)简介 . FM1702SL芯片(读卡器)简介 . RFID M1卡简介 . 读取ID/序列号(arduino uno.MFRC522芯片 Ba ...
随机推荐
- 中心极限定理 | central limit theorem | 大数定律 | law of large numbers
每个大学教材上都会提到这个定理,枯燥地给出了定义和公式,并没有解释来龙去脉,导致大多数人望而生畏,并没有理解它的美. <女士品茶>有感 待续~ 参考:怎样理解和区分中心极限定理与大数定律?
- Spring Batch @EnableBatchIntegration 注解
设置一个远程分块任务需要定义一系列的 beans: 一个连接工程来从消息中间件中获得连接,消息中间件包括有(JMS,AMQP 和其他) 一个 MessagingTemplate 来从主向从发送消息, ...
- 7 selenium 模块
selenium 模块 一.简介 1.Python的一个第三方库,对外提供的接口可以操作浏览器,然后让浏览器完成自动化的操作. 2.自动化测试工具,而爬虫中使用它主要是为了解决requests无法直接 ...
- 在写makefile过程中遇到的问题
老师布置了linux实验作业,本身不打算写了,反正也不交实验报告,但刚好项目也需要,所以就研究了makefile.不过还是要批评自己,怎么能这么的颓废呢? 刚开始做的时候出现了这样的错误,代码如下: ...
- log4j的一些参数说明
参数 说明 例子 %c 列出logger名字空间的全称,如果加上{<层数>}表示列出从最内层算起的指定层数的名字空间 log4j配置文件参数举例 输出显示媒介 假设当前logger名字空间 ...
- HTML相关知识点总结
1.表格<table>常用属性 cellspacing:两个单元格之间的距离 注:属性值为数字,效果图如下(左边cellspacing="0",右边cellspacin ...
- zzw原创_oracle回收站相关操作知识
1.查询回收站状态语句 select * from user_recyclebin order by droptime desc 2.还原回收站 FLASHBACK TABLE << ...
- loj 10117 简单题(cqoi 2006)
题目来源:CQOI 2006 有一个 n 个元素的数组,每个元素初始均为 0.有 m条指令,要么让其中一段连续序列数字反转——0变 1,1 变 0(操作 1),要么询问某个元素的值(操作 2). 例如 ...
- PyCharm+Miniconda3安装配置教程
PyCharm是Python著名的Python集成开发环境(IDE) conda有Miniconda和Anaconda,前者应该是类似最小化版本,后者可能是功能更为强大的版本,我们这里安装Minico ...
- 在springboot中验证表单信息(六)
构建工程 创建一个springboot工程,由于用到了 web .thymeleaf.validator.el,引入相应的起步依赖和依赖,代码清单如下: 1 2 3 4 5 6 7 8 9 10 11 ...