『cs231n』作业3问题4选讲_图像梯度应用强化
【注】,本节(上节也是)的model是一个已经训练完成的CNN分类网络。
随机数图片向前传播后对目标类优化,反向优化图片本体
def create_class_visualization(target_y, model, **kwargs):

  """

  Perform optimization over the image to generate class visualizations.

  Inputs:

  - target_y: Integer in the range [0, 100) giving the target class

  - model: A PretrainedCNN that will be used for generation

  Keyword arguments:

  - learning_rate: Floating point number giving the learning rate

  - blur_every: An integer; how often to blur the image as a regularizer

  - l2_reg: Floating point number giving L2 regularization strength on the image;

    this is lambda in the equation above.

  - max_jitter: How much random jitter to add to the image as regularization

  - num_iterations: How many iterations to run for

  - show_every: How often to show the image

  """

  learning_rate = kwargs.pop('learning_rate', 10000)

  blur_every = kwargs.pop('blur_every', 1)

  l2_reg = kwargs.pop('l2_reg', 1e-6)

  max_jitter = kwargs.pop('max_jitter', 4)

  num_iterations = kwargs.pop('num_iterations', 100)

  show_every = kwargs.pop('show_every', 25)

  X = np.random.randn(1, 3, 64, 64)                                    # 64*64 image

  for t in xrange(num_iterations):                                     # 迭代次数

    # As a regularizer, add random jitter to the image

    ox, oy = np.random.randint(-max_jitter, max_jitter+1, 2)           # 随机抖动生成

    X = np.roll(np.roll(X, ox, -1), oy, -2)                            # 抖动,注意抖动不是随机噪声

    dX = None

    ############################################################################

    # TODO: Compute the image gradient dX of the image with respect to the     #

    # target_y class score. This should be similar to the fooling images. Also #

    # add L2 regularization to dX and update the image X using the image       #

    # gradient and the learning rate.                                          #

    ############################################################################

    scores, cache = model.forward(X, mode='test')

    loss, dscores = softmax_loss(scores, target_y)

    dX, grads = model.backward(dscores, cache)

    dX = dX - 2*l2_reg*X                                               # add L2 regularization to dX

    X = X + learning_rate*dX                                           # update the image X using the image gradient and the learning rate

    ############################################################################

    #                             END OF YOUR CODE                             #

    ############################################################################

    # Undo the jitter

    X = np.roll(np.roll(X, -ox, -1), -oy, -2)                          # 还原抖动

    # As a regularizer, clip the image

    X = np.clip(X, -data['mean_image'], 255.0 - data['mean_image'])    #

    # As a regularizer, periodically blur the image

    if t % blur_every == 0:

      X = blur_image(X)

    # Periodically show the image

    if t % show_every == 0:

      plt.imshow(deprocess_image(X, data['mean_image']))

      plt.gcf().set_size_inches(3, 3)

      plt.axis('off')

      plt.show()

  return X
1.L2正则化参数是可训练的参数,所以这里就是图片的全部像素
2.更新X的时候,需要对目标I(图片)求导,所以有L2正则化偏导数项
3.抖动和之前常接触的噪声是不同的,是指图像行列(单行单列非图像整体)随机平移随机个单位,且在最后需要还原
蜘蛛类图像重建:


随机数图片向前到指定层,对标准图片的特征图计算距离,反向传播优化原图片
def invert_features(target_feats, layer, model, **kwargs):

  """

  Perform feature inversion in the style of Mahendran and Vedaldi 2015, using

  L2 regularization and periodic blurring.

  Inputs:

  - target_feats: Image features of the target image, of shape (1, C, H, W);

    we will try to generate an image that matches these features

  - layer: The index of the layer from which the features were extracted

  - model: A PretrainedCNN that was used to extract features

  Keyword arguments:

  - learning_rate: The learning rate to use for gradient descent

  - num_iterations: The number of iterations to use for gradient descent

  - l2_reg: The strength of L2 regularization to use; this is lambda in the

    equation above.

  - blur_every: How often to blur the image as implicit regularization; set

    to 0 to disable blurring.

  - show_every: How often to show the generated image; set to 0 to disable

    showing intermediate reuslts.

  Returns:

  - X: Generated image of shape (1, 3, 64, 64) that matches the target features.

  """

  learning_rate = kwargs.pop('learning_rate', 10000)

  num_iterations = kwargs.pop('num_iterations', 500)

  l2_reg = kwargs.pop('l2_reg', 1e-7)

  blur_every = kwargs.pop('blur_every', 1)

  show_every = kwargs.pop('show_every', 50)

  X = np.random.randn(1, 3, 64, 64)

  for t in xrange(num_iterations):

    ############################################################################

    # TODO: Compute the image gradient dX of the reconstruction loss with      #

    # respect to the image. You should include L2 regularization penalizing    #

    # large pixel values in the generated image using the l2_reg parameter;    #

    # then update the generated image using the learning_rate from above.      #

    ############################################################################

    feats, cache = model.forward(X, end=layer, mode='test')   # Compute the image gradient dX

    loss = np.sum((feats - target_feats)**2) + l2_reg*np.sum(X**2)    # L2 regularization

    dfeats = 2*(feats - target_feats)

    dX, _ =  model.backforward(dfeats, cache)

    dX += 2 * l2_reg * X

    X -= learning_rate * dX

    ############################################################################

    #                             END OF YOUR CODE                             #

    ############################################################################

    # As a regularizer, clip the image

    X = np.clip(X, -data['mean_image'], 255.0 - data['mean_image'])

    # As a regularizer, periodically blur the image

    if (blur_every > 0) and t % blur_every == 0:

      X = blur_image(X)

    if (show_every > 0) and (t % show_every == 0 or t + 1 == num_iterations):

      plt.imshow(deprocess_image(X, data['mean_image']))

      plt.gcf().set_size_inches(3, 3)

      plt.axis('off')

      plt.title('t = %d' % t)

      plt.show()
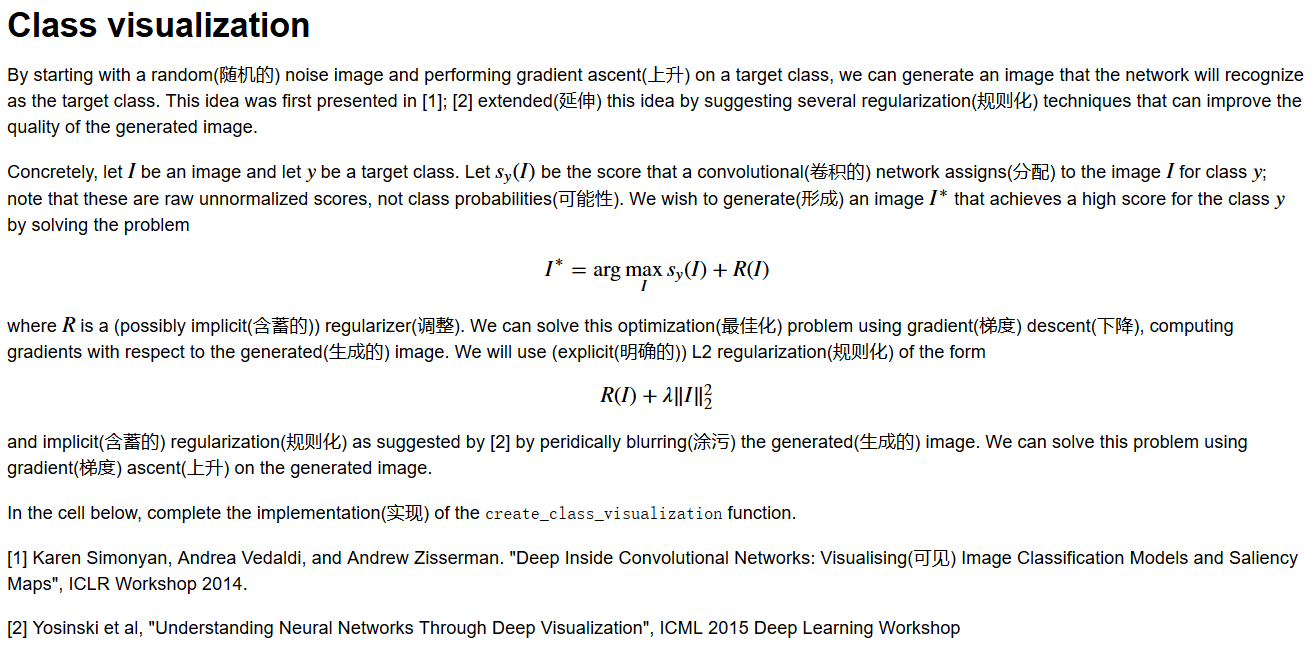
小狗图片浅层特征重建:
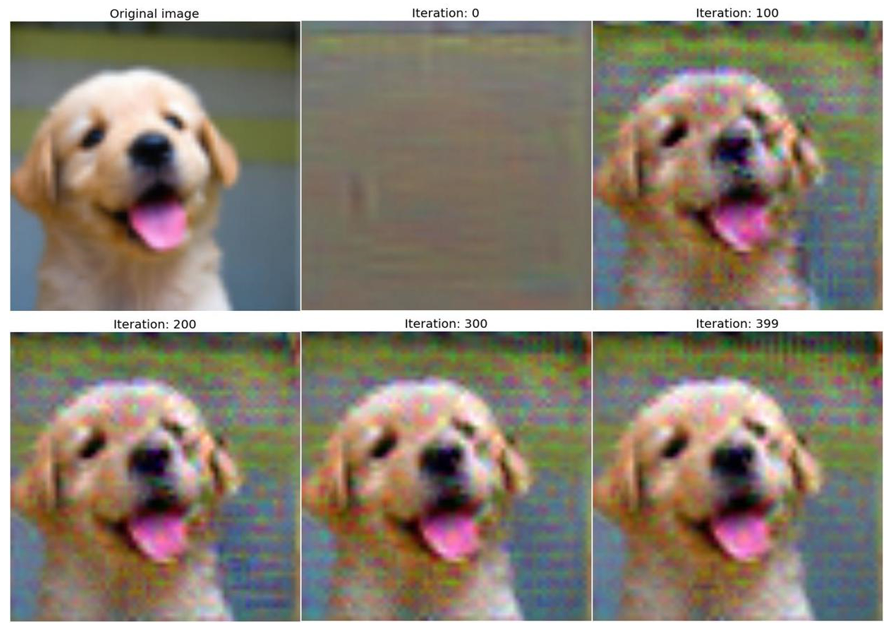
小狗图片深层特征重建,可以看出来特征更为抽象:

目标图片向前传播到指定层,把feature map作为本层梯度反向传播回来,优化原图片
def deepdream(X, layer, model, **kwargs):

  """

  Generate a DeepDream image.

  Inputs:

  - X: Starting image, of shape (1, 3, H, W)

  - layer: Index of layer at which to dream

  - model: A PretrainedCNN object

  Keyword arguments:

  - learning_rate: How much to update the image at each iteration

  - max_jitter: Maximum number of pixels for jitter regularization

  - num_iterations: How many iterations to run for

  - show_every: How often to show the generated image

  """

  X = X.copy()

  learning_rate = kwargs.pop('learning_rate', 5.0)

  max_jitter = kwargs.pop('max_jitter', 16)

  num_iterations = kwargs.pop('num_iterations', 100)

  show_every = kwargs.pop('show_every', 25)

  for t in xrange(num_iterations):

    # As a regularizer, add random jitter to the image

    ox, oy = np.random.randint(-max_jitter, max_jitter+1, 2)   # 随机抖动值生成

    X = np.roll(np.roll(X, ox, -1), oy, -2)                    # 随机抖动

    dX = None

    ############################################################################

    # TODO: Compute the image gradient dX using the DeepDream method. You'll   #

    # need to use the forward and backward methods of the model object to      #

    # extract activations and set gradients for the chosen layer. After        #

    # computing the image gradient dX, you should use the learning rate to     #

    # update the image X.                                                      #

    ############################################################################

    feats, cache = model.forward(X, end=layer, mode='test')   # Compute the image gradient dX

    dX, grads = model.backward(feats, cache)

    X += learning_rate*dX

    ############################################################################

    #                             END OF YOUR CODE                             #

    ############################################################################

    # Undo the jitter

    X = np.roll(np.roll(X, -ox, -1), -oy, -2)

    # As a regularizer, clip the image

    mean_pixel = data['mean_image'].mean(axis=(1, 2), keepdims=True)

    X = np.clip(X, -mean_pixel, 255.0 - mean_pixel)

    # Periodically show the image

    if t == 0 or (t + 1) % show_every == 0:

      img = deprocess_image(X, data['mean_image'], mean='pixel')

      plt.imshow(img)

      plt.title('t = %d' % (t + 1))

      plt.gcf().set_size_inches(8, 8)

      plt.axis('off')

      plt.show()

  return X
迭代次数少的图片没什么效果,迭代次数多的图片贼鸡儿恶心(密控退散图,效果不开玩笑的... ...),不放示例图了,想看的自己搜DeepDream吧,网上图片一堆一堆。Ps,我一直很怀疑这个deepdream这东西除了看起来比较‘玄幻’外到底有什么实际意义... ...
『cs231n』作业3问题4选讲_图像梯度应用强化的更多相关文章
- 『cs231n』作业3问题3选讲_通过代码理解图像梯度
Saliency Maps 这部分想探究一下 CNN 内部的原理,参考论文 Deep Inside Convolutional Networks: Visualising Image Classifi ...
- 『cs231n』作业3问题1选讲_通过代码理解RNN&图像标注训练
一份不错的作业3资料(含答案) RNN神经元理解 单个RNN神经元行为 括号中表示的是维度 向前传播 def rnn_step_forward(x, prev_h, Wx, Wh, b): " ...
- 『cs231n』作业3问题2选讲_通过代码理解LSTM网络
LSTM神经元行为分析 LSTM 公式可以描述如下: itftotgtctht=sigmoid(Wixxt+Wihht−1+bi)=sigmoid(Wfxxt+Wfhht−1+bf)=sigmoid( ...
- 『cs231n』作业2选讲_通过代码理解Dropout
Dropout def dropout_forward(x, dropout_param): p, mode = dropout_param['p'], dropout_param['mode'] i ...
- 『cs231n』作业2选讲_通过代码理解优化器
1).Adagrad一种自适应学习率算法,实现代码如下: cache += dx**2 x += - learning_rate * dx / (np.sqrt(cache) + eps) 这种方法的 ...
- 『cs231n』作业1选讲_通过代码理解KNN&交叉验证&SVM
通过K近邻算法探究numpy向量运算提速 茴香豆的“茴”字有... ... 使用三种计算图片距离的方式实现K近邻算法: 1.最为基础的双循环 2.利用numpy的broadca机制实现单循环 3.利用 ...
- 『cs231n』通过代码理解风格迁移
『cs231n』卷积神经网络的可视化应用 文件目录 vgg16.py import os import numpy as np import tensorflow as tf from downloa ...
- 『cs231n』计算机视觉基础
线性分类器损失函数明细: 『cs231n』线性分类器损失函数 最优化Optimiz部分代码: 1.随机搜索 bestloss = float('inf') # 无穷大 for num in range ...
- 『TensorFlow』DCGAN生成动漫人物头像_下
『TensorFlow』以GAN为例的神经网络类范式 『cs231n』通过代码理解gan网络&tensorflow共享变量机制_上 『TensorFlow』通过代码理解gan网络_中 一.计算 ...
随机推荐
- thinkphp标签实现bootsrtap轮播carousel实例
thinkphp标签实现bootsrtap轮播carousel实例由于轮播carousel第一个div需要设置active样式才能正常显示,上面的圆点也同样需要数字,使用volist标签在循环的同时可 ...
- jquery基础框架
(function(window,undefined){ var arr = [], push = arr.push, slice = arr.slice; //首先要做的就是封装一个parseHtm ...
- 20145227鄢曼君《网络对抗》shellcode注入&Return-to-libc攻击深入
20145227鄢曼君<网络对抗>shellcode注入&Return-to-libc攻击深入 shellcode注入实践 shellcode基础知识 Shellcode实际是一段 ...
- 高级版本VS打开低版本VS工程,无法调试的问题
选中Debugging选项,在Command命令行里面输入生成exe文件的相对路径. 转载:http://blog.csdn.net/x931100537/article/details/405052 ...
- Java位运算实现加减乘除
一.加法 a+b 举例实现:13+9=22 13+9不考虑进位结果为12 只考虑进位结果为10 和刚好是22. 13二进制为1101,9二进制为1001. 不考虑进位结果为0100.算式为a^b 只考 ...
- 三点估算和PERT技术
三点估算是PMP考试中的必考题目,每次约2-4道题目.现在就三点估算和PERT技术做详细讲解,以飨读者. 通过考虑估算中的不确定性和风险,可以提高活动持续时间估算的准确性.这个概念起源于计划评审技术( ...
- 【配置、开发】Spark入门教程[2]
本教程源于2016年3月出版书籍<Spark原理.机制及应用> ,在此以知识共享为初衷公开部分内容,如有兴趣,请支持正版书籍. Spark为使用者提供了大量的工具和脚本文件,使得其部署与开 ...
- mybatis的注解开发之三种动态sql
脚本sql XML配置方式的动态SQL我就不讲了,有兴趣可以自己了解,下面是用<script>的方式把它照搬过来,用注解来实现.适用于xml配置转换到注解配置 @Select(" ...
- pycaffe编译
环境:ubuntu14.04 python2.7 caffe已经成功编译 1,首先确保pip已经安装 sudo apt-get install python-pip 2,在caffe-master ...
- [BZOJ]|[Ural] Formula 1-----插头DP入门
1519. Formula 1 Time limit: 1.0 secondMemory limit: 64 MB Background Regardless of the fact, that Vo ...