
吴裕雄--天生自然python Google深度学习框架:Tensorflow实现迁移学习

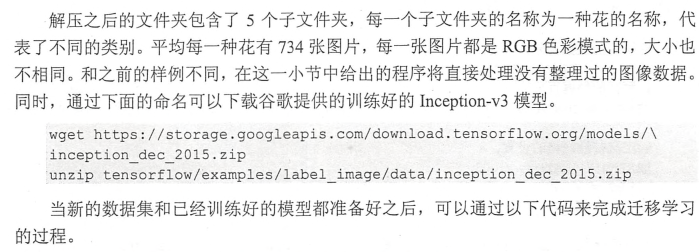
import glob

import os.path

import numpy as np

import tensorflow as tf

from tensorflow.python.platform import gfile

import tensorflow.contrib.slim as slim

# 加载通过TensorFlow-Slim定义好的inception_v3模型。

import tensorflow.contrib.slim.python.slim.nets.inception_v3 as inception_v3

# 处理好之后的数据文件。

INPUT_DATA = '../../datasets/flower_processed_data.npy'

# 保存训练好的模型的路径。

TRAIN_FILE = 'train_dir/model'

# 谷歌提供的训练好的模型文件地址。因为GitHub无法保存大于100M的文件,所以

# 在运行时需要先自行从Google下载inception_v3.ckpt文件。

CKPT_FILE = '../../datasets/inception_v3.ckpt'

# 定义训练中使用的参数。

LEARNING_RATE = 0.0001

STEPS = 300

BATCH = 32

N_CLASSES = 5

# 不需要从谷歌训练好的模型中加载的参数。

CHECKPOINT_EXCLUDE_SCOPES = 'InceptionV3/Logits,InceptionV3/AuxLogits'

# 需要训练的网络层参数明层,在fine-tuning的过程中就是最后的全联接层。

TRAINABLE_SCOPES='InceptionV3/Logits,InceptionV3/AuxLogit'
def get_tuned_variables():

    exclusions = [scope.strip() for scope in CHECKPOINT_EXCLUDE_SCOPES.split(',')]

    variables_to_restore = []

    # 枚举inception-v3模型中所有的参数,然后判断是否需要从加载列表中移除。

    for var in slim.get_model_variables():

        excluded = False

        for exclusion in exclusions:

            if var.op.name.startswith(exclusion):

                excluded = True

                break

        if not excluded:

            variables_to_restore.append(var)

    return variables_to_restore
def get_trainable_variables():

    scopes = [scope.strip() for scope in TRAINABLE_SCOPES.split(',')]

    variables_to_train = []

    # 枚举所有需要训练的参数前缀,并通过这些前缀找到所有需要训练的参数。

    for scope in scopes:

        variables = tf.get_collection(tf.GraphKeys.TRAINABLE_VARIABLES, scope)

        variables_to_train.extend(variables)

    return variables_to_train
def main():

    # 加载预处理好的数据。

    processed_data = np.load(INPUT_DATA)

    training_images = processed_data[0]

    n_training_example = len(training_images)

    training_labels = processed_data[1]

    validation_images = processed_data[2]

    validation_labels = processed_data[3]

    testing_images = processed_data[4]

    testing_labels = processed_data[5]

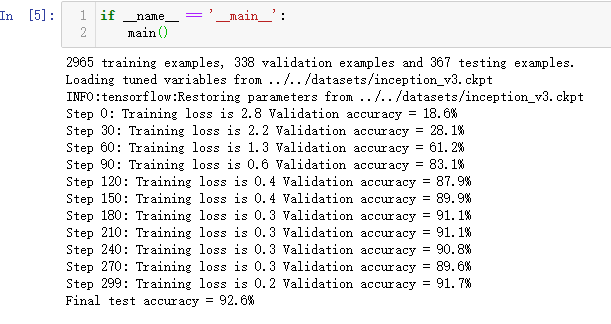
    print("%d training examples, %d validation examples and %d testing examples." % (

        n_training_example, len(validation_labels), len(testing_labels)))

    # 定义inception-v3的输入,images为输入图片,labels为每一张图片对应的标签。

    images = tf.placeholder(tf.float32, [None, 299, 299, 3], name='input_images')

    labels = tf.placeholder(tf.int64, [None], name='labels')

    # 定义inception-v3模型。因为谷歌给出的只有模型参数取值,所以这里

    # 需要在这个代码中定义inception-v3的模型结构。虽然理论上需要区分训练和

    # 测试中使用到的模型,也就是说在测试时应该使用is_training=False,但是

    # 因为预先训练好的inception-v3模型中使用的batch normalization参数与

    # 新的数据会有出入,所以这里直接使用同一个模型来做测试。

    with slim.arg_scope(inception_v3.inception_v3_arg_scope()):

        logits, _ = inception_v3.inception_v3(

            images, num_classes=N_CLASSES, is_training=True)

    trainable_variables = get_trainable_variables()

    # 定义损失函数和训练过程。

    tf.losses.softmax_cross_entropy(

        tf.one_hot(labels, N_CLASSES), logits, weights=1.0)

    total_loss = tf.losses.get_total_loss()

    train_step = tf.train.RMSPropOptimizer(LEARNING_RATE).minimize(total_loss)

    # 计算正确率。

    with tf.name_scope('evaluation'):

        correct_prediction = tf.equal(tf.argmax(logits, 1), labels)

        evaluation_step = tf.reduce_mean(tf.cast(correct_prediction, tf.float32))

    # 定义加载Google训练好的Inception-v3模型的Saver。

    load_fn = slim.assign_from_checkpoint_fn(

      CKPT_FILE,

      get_tuned_variables(),

      ignore_missing_vars=True)

    # 定义保存新模型的Saver。

    saver = tf.train.Saver()

    with tf.Session() as sess:

        # 初始化没有加载进来的变量。

        init = tf.global_variables_initializer()

        sess.run(init)

        # 加载谷歌已经训练好的模型。

        print('Loading tuned variables from %s' % CKPT_FILE)

        load_fn(sess)

        start = 0

        end = BATCH

        for i in range(STEPS):

            _, loss = sess.run([train_step, total_loss], feed_dict={

                images: training_images[start:end],

                labels: training_labels[start:end]})

            if i % 30 == 0 or i + 1 == STEPS:

                saver.save(sess, TRAIN_FILE, global_step=i)

                validation_accuracy = sess.run(evaluation_step, feed_dict={

                    images: validation_images, labels: validation_labels})

                print('Step %d: Training loss is %.1f Validation accuracy = %.1f%%' % (

                    i, loss, validation_accuracy * 100.0))

            start = end

            if start == n_training_example:

                start = 0

            end = start + BATCH

            if end > n_training_example:

                end = n_training_example

        # 在最后的测试数据上测试正确率。

        test_accuracy = sess.run(evaluation_step, feed_dict={

            images: testing_images, labels: testing_labels})

        print('Final test accuracy = %.1f%%' % (test_accuracy * 100))
吴裕雄--天生自然python Google深度学习框架:Tensorflow实现迁移学习的更多相关文章
- 吴裕雄--天生自然python Google深度学习框架:经典卷积神经网络模型
import tensorflow as tf INPUT_NODE = 784 OUTPUT_NODE = 10 IMAGE_SIZE = 28 NUM_CHANNELS = 1 NUM_LABEL ...
- 吴裕雄--天生自然python Google深度学习框架:图像识别与卷积神经网络
- 吴裕雄--天生自然python Google深度学习框架:MNIST数字识别问题
import tensorflow as tf from tensorflow.examples.tutorials.mnist import input_data INPUT_NODE = 784 ...
- 吴裕雄--天生自然python Google深度学习框架:深度学习与深层神经网络
- 吴裕雄--天生自然python Google深度学习框架:TensorFlow实现神经网络
http://playground.tensorflow.org/
- 吴裕雄--天生自然python Google深度学习框架:Tensorflow基础应用
import tensorflow as tf a = tf.constant([1.0, 2.0], name="a") b = tf.constant([2.0, 3.0], ...
- 吴裕雄--天生自然python Google深度学习框架:人工智能、深度学习与机器学习相互关系介绍
- 吴裕雄--天生自然神经网络与深度学习实战Python+Keras+TensorFlow:Bellman函数、贪心算法与增强性学习网络开发实践
!pip install gym import random import numpy as np import matplotlib.pyplot as plt from keras.layers ...
- 吴裕雄--天生自然神经网络与深度学习实战Python+Keras+TensorFlow:使用TensorFlow和Keras开发高级自然语言处理系统——LSTM网络原理以及使用LSTM实现人机问答系统
!mkdir '/content/gdrive/My Drive/conversation' ''' 将文本句子分解成单词,并构建词库 ''' path = '/content/gdrive/My D ...
随机推荐
- 17 ~ express ~ 分类的显示 ,修改 和 删除
一,前台显示 /views/admin/category.html {% extends 'layout.html' %} {% block main %} <ol class="br ...
- 微信公众号开发之内网映射外网natapp安装(一)
一,为什么使用natapp 1,在进行微信公众号开发时,我们需要搭建网站,并且随时都有可能修改网站内容进行调试.如果能够将内网ip映射到外网上,将大大方便我们的调试.每次发布只需eclipse运行应用 ...
- CSS font-family 各字体一览表
windows常见内置中文字体字体中文名 字体英文名宋体 SimSun(浏览器默认) 黑体 SimHei 微软雅黑 ...
- pyCharm中设置查看运行过程中的变量实时情况
1.点击运行栏的这个灰色向下剪头: 2.单击“Edit Configurations”, 3.在出现的窗口上,勾选上:“Show command line afterwards” 或 “run wit ...
- MySQL-半同步复制原理实践
参考文档: http://mysql.taobao.org/monthly/2017/04/01/ 阿里内核月报半同步复制的数据一致性 https://www.cnblogs.com/ivictor/ ...
- day25(025-多线程(下)&GUI)
线程状态图 ###25.01_多线程(单例设计模式)(掌握) 单例设计模式:保证类在内存中只有一个对象. 如何保证类在内存中只有一个对象呢? (1)控制类的创建,不让其他类来创建本类的对象.priva ...
- Java 14 都要来了,为什么还有这么多人固守Java8?
作者:刘欣 从Java 9开始,Java版本的发布就让人眼花缭乱了. 每隔6个月,都会冒出一个新版本出来,Java 10 , Java 11, Java 12, Java 13, 到2020年3月份, ...
- POJ 1273:Drainage Ditches 网络流模板题
Drainage Ditches Time Limit: 1000MS Memory Limit: 10000K Total Submissions: 63339 Accepted: 2443 ...
- XML--XML Schema Definition(三)
参考 http://www.w3school.com.cn/schema/index.asp XSD 复合元素 复合元素指包含其他元素及/或属性的 XML 元素. 有四种类型的复合元素: 空元素 包含 ...
- ES6 之 第七种数据类型Symbol
概述 为了减少对象的属性名冲突,ES6引入新的原始数据类型Symbol,JS的第七种数据类型. Symbol 能够保证每个属性的名字都是独一无二,这样就能从根本上防止属性名冲突. Symbol 值能够 ...