
[安全] Kali Linux安装TheFatRat
一、解决访问国外网络的问题
由于字符敏感,以下所有vray的第二位都需要加上"2"。
1.使用vray客户端
前提条件:拥有一个海外vray服务器提供socks5代理。
1)下载vray
wget https://github.com/vray/vray-core/releases/download/v4.23.1/vray-linux-64.zip -O /opt/vray-linux-64.zip
2)解压vray
cd /opt

mkdir vray

unzip vray-linux-.zip -d vray

cd vray
将包解压到vray目录下。
3)修改配置文件
{

  "policy": null,

  "log": {

    "access": "",

    "error": "",

    "loglevel": "warning"

  },

  "inbounds": [

    {

      "tag": "proxy",

      "port": ,

      "listen": "127.0.0.1",

      "protocol": "socks",

      "sniffing": {

        "enabled": true,

        "destOverride": [

          "http",

          "tls"

        ]

      },

      "settings": {

        "auth": "noauth",

        "udp": true,

        "ip": null,

        "address": null,

        "clients": null

      },

      "streamSettings": null

    }

  ],

  "outbounds": [

    {

      "tag": "proxy",

      "protocol": "vmess",

      "settings": {

        "vnext": [

          {

            "address": "xxx.xxx.xxx.xxx",

            "port": ,

            "users": [

              {

                "id": "4e8db2a5-0f06-4fa3-aa83-9d3ad9efac5f",

                "alterId": ,

                "email": "t@t.tt",

                "security": "auto"

              }

            ]

          }

        ],

        "servers": null,

        "response": null

      },

      "streamSettings": {

        "network": "tcp",

        "security": null,

        "tlsSettings": null,

        "tcpSettings": null,

        "kcpSettings": null,

        "wsSettings": null,

        "httpSettings": null,

        "quicSettings": null

      },

      "mux": {

        "enabled": true,

        "concurrency":

      }

    },

    {

      "tag": "direct",

      "protocol": "freedom",

      "settings": {

        "vnext": null,

        "servers": null,

        "response": null

      },

      "streamSettings": null,

      "mux": null

    },

    {

      "tag": "block",

      "protocol": "blackhole",

      "settings": {

        "vnext": null,

        "servers": null,

        "response": {

          "type": "http"

        }

      },

      "streamSettings": null,

      "mux": null

    }

  ],

  "stats": null,

  "api": null,

  "dns": null,

  "routing": {

    "domainStrategy": "IPIfNonMatch",

    "rules": [

      {

        "type": "field",

        "port": null,

        "inboundTag": [

          "api"

        ],

        "outboundTag": "api",

        "ip": null,

        "domain": null

      }

    ]

  }

}
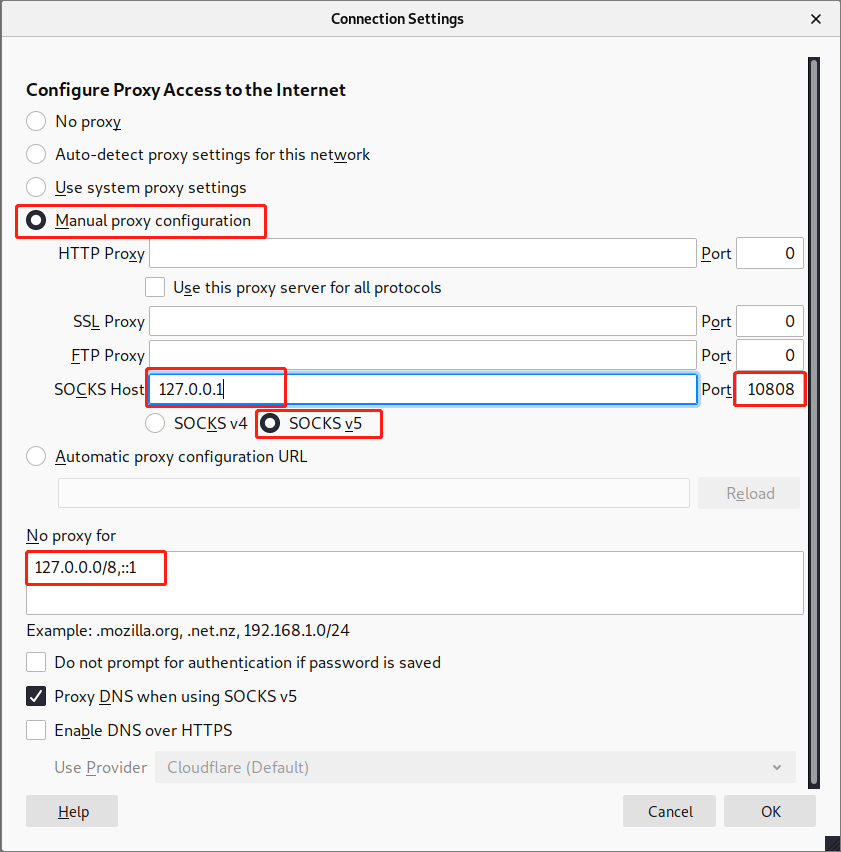
特别注意标黄部分,127.0.0.1为客户机本地地址,10808为代理端口。xxx.xxx.xxx.xxx为vray服务器地址,39000为服务端口。
4)运行vray
cd /opt/vray

./vray
root@kali:/opt/vray# ./vray

VRay 4.23. (VFly, a community-driven edition of vRay.) Custom (go1. linux/amd64)

A unified platform for anti-censorship.

// :: Using default config:  /opt/vray/config.json

// :: [Info] vray.com/core/common/platform/ctlcmd: <vctl message>

vctl> Read config:  /opt/vray/config.json

// :: [Warning] vray.com/core: VRay 4.23. started
5)测试
配置完毕后,使用firefox浏览器进行测试。
首先需要在浏览器中设置代理:
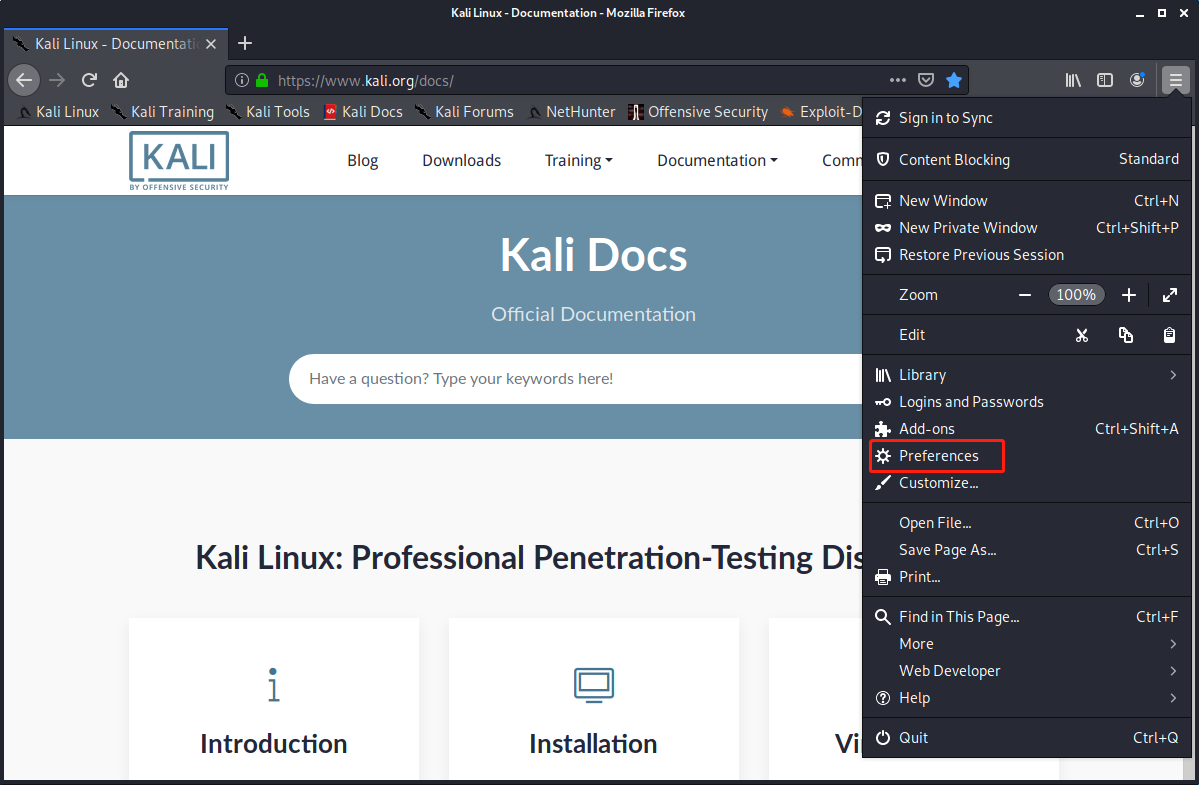
然后在最下面找到:

按下图进行配置:
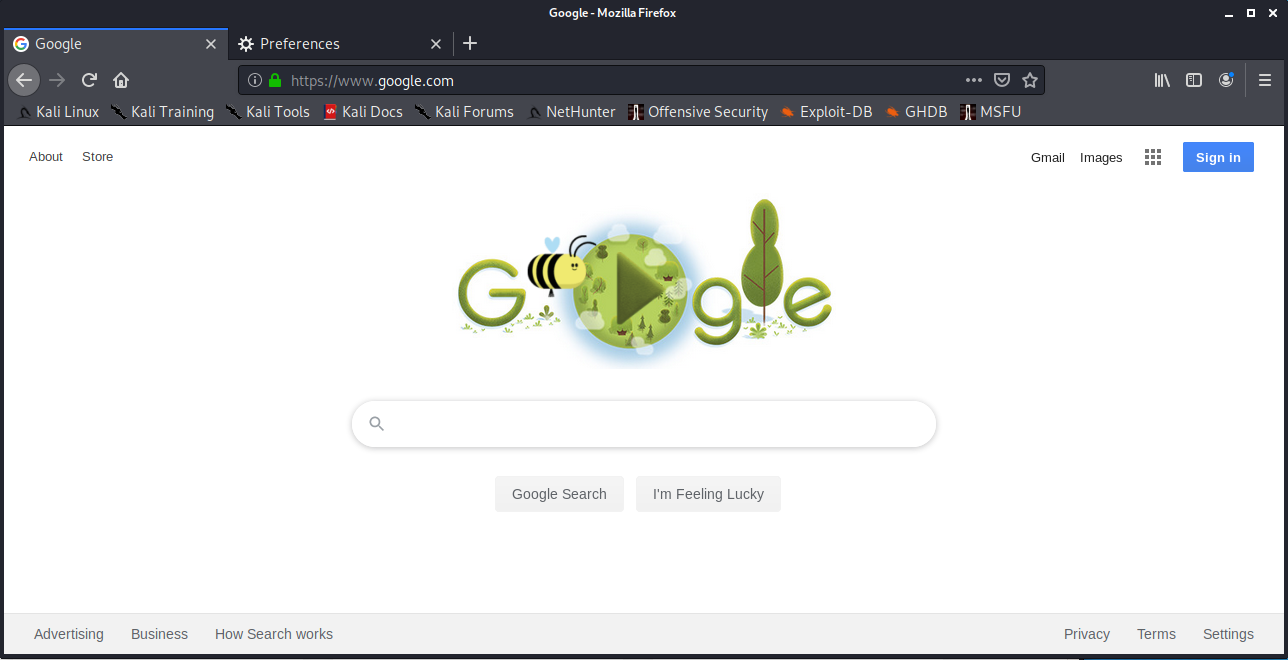
测试可以访问google.com:
二、解决apt使用socks代理的问题
1.使用tsocks
tsocks用来帮助apt、wget等工具使用socks5代理。
1)安装tsocks
apt isntall tsocks -y
2)配置tsocks
sudo nano /etc/tsocks.conf
修改以下内容:
local = 192.168.0.0/255.255.255.0  # 本地192.168网段不走代理

local = 127.0.0.0/255.0.0.0  # 本地127网段不走代理

server = 127.0.0.1  # 本地地址

server_type =   # socks版本

server_port =   # 代理端口
3)使用tsocks
# 让wget走socks5代理(注意url中的vray要加2)

tsocks wget https://github.com/vray/vray-core/releases/download/v4.23.1/vray-linux-64.zip -O /opt/vray-linux-64.zip
这样wget就使用了socks5代理,下载速度快很多。
同样的,apt也可以通过tsocks来加速。
三、安装TheFatRat
1.从github上clone
TheFatRat体积比较大(400多MB),建议使用代理。
使用tsocks加速wget获取zip压缩包:
tsocks wget https://codeload.github.com/Screetsec/TheFatRat/zip/master
也可以使用tsocks加速git clone:
tsocks git clone git://github.com/Screetsec/TheFatRat.git
注意,这里的URL必须是git://不能是https://,否则代理会报错。
也可以直接使用git clone(不使用代理,比较慢):
git clone https://github.com/Screetsec/TheFatRat.git
2.安装
1)准备工作
cd TheFatRat

chmod +x setup.sh
2)修改setup.sh
将其中所有的 apt-get install 替换为 tsocks apt-get isntall 。在vim中使用 :%s/apt-get install/tsocks apt-get install/g 。
将其中所有的 apt-get update 替换为 tsocks apt-get update 。在vim中使用 :%s/apt-get update/tsocks apt-get update/g
3)开始安装
./setup.sh
在代理网络不出错的情况下,能够正常安装完毕。
4)运行fatrat
运行后可以看到以下banner:
:::::::::::::::::::::::::::::::::::::::::::::::::::::::::::::::::::::::::

:::::::::::::::::::: Metasploit service is not running ::::::::::::::::::

:::::::::::::::::::::::::::::::::::::::::::::::::::::::::::::::::::::::::

                                     /)

                                    //

                                    ((

                                    //

                             .-.   //  .-.

                            /   \- ((=-/  \

                            \       \     /

                             -( ___ ))__)-

                             .-'   //  '-.

                            /     ((      \

                            |       *     |

                            \             /

                             \   |_w_|   /

                             _)  \   /  (_

                        jgs (((---'   '---)))

:::::::::::::::::::::::::::::::::::::::::::::::::::::::::::::::::::::::::

:::::::::::::::: Wait for starting a Service  Postgresql ::::::::::::::::

:::::::::::::::::::::::::::::::::::::::::::::::::::::::::::::::::::::::::

Press [Enter] key to Continue...
         ____

        |    |

        |____|

       _|____|_       _____ _       _____     _   _____     _

        /  ee\_      |_   _| |_ ___|   __|___| |_| __  |___| |_

      .<     __O       | | |   | -_|   __| .'|  _|    -| .'|  _|

     /\ \.-.' \        |_| |_|_|___|__|  |___|_| |__|__|___|_|

    J  \.|'.\/ \

    | |_.|. | | |   [--]   Backdoor Creator for Remote Acces [--]

     \__.' .|-' /   [--]  Created by: Edo Maland (Screetsec) [--]

     L   /|o'--'\   [--]            Version: 1.9.           [--]

     |  /\/\/\   \  [--]          Codename: Whistle          [--]

     J /      \.__\ [--]   Follow me on Github: @Screetsec   [--]

     J /      \.__\ [--]   Dracos Linux : @dracos-linux.org  [--]

     |/         /   [--]                                     [--]

       \      .'\.  [--]     SELECT AN OPTION TO BEGIN:      [--]

    ____)_/\_(___\. [--] .___________________________________[--]

   (___._/  \_.___)'\_.-----------------------------------------/

        []  Create Backdoor with msfvenom

        []  Create Fud % Backdoor with Fudwin 1.0

        []  Create Fud Backdoor with Avoid v1.

        []  Create Fud Backdoor with backdoor-factory [embed]

        []  Backdooring Original apk [Instagram, Line,etc]

        []  Create Fud Backdoor % with PwnWinds [Excelent]

        []  Create Backdoor For Office with Microsploit

        []  Trojan Debian Package For Remote Acces [Trodebi]

        []  Load/Create auto listeners

        []  Jump to msfconsole

        []  Searchsploit

        []  File Pumper [Increase Your Files Size]

        []  Configure Default Lhost & Lport

        []  Cleanup

        []  Help

        []  Credits

        []  Exit

 ┌─[TheFatRat]──[~]─[menu]:

 └─────►
可以开心的玩它了!!!
===
[安全] Kali Linux安装TheFatRat的更多相关文章
- debian(kali Linux) 安装net Core
debian(kali Linux) 安装net Core curl -sSL https://raw.githubusercontent.com/dotnet/cli/rel/1.0.0-previ ...
- kali linux安装搜狗输入法的方法
kali linux安装搜狗输入法比较麻烦,因为有很多依赖项,不过安装好就很好用,觉得麻烦的一般安装ibus,经典,也常更新. 下面就说说怎么安装搜狗输入法: 先去http://http.kali.o ...
- Kali Linux安装Google中文输入法(只需5步)
前言: 之前我在kali上安装过中文输入法,并且写了一篇博文(Kali Linux安装中文输入法全纪录),这篇博文里的步骤是当时一边摸索一边记录下的,思路有点混乱,而且还同时安装了两种输入法.今天又安 ...
- Kali Linux安装字典StarDict
Kali Linux安装字典StarDictStartDict是国外知名的字典框架,也可以加入国内翻译工具的字典.Kali Linux软件源提供该字典框架.用户需要安装qstardict软件包和词库 ...
- Kali Linux安装
Kali Linux 安装过程参考:https://blog.csdn.net/qq_40950957/article/details/80468030 安装完成后,apt-get install 安 ...
- kali linux 安装过程
kali linux 安装过程 获取镜像文件 首先需要去官网获取kali linux的镜像文件,本来获取了kali的最新版,由于有些方面还没有得到完善,与VM还没有完全兼容,所以换了视频上的1.0.8 ...
- PJzhang:kali linux安装virtualbox虚拟机和chrome浏览器
猫宁!!! 参考链接: https://www.cnblogs.com/zhishuai/p/8007410.html kali linux 安装virtualbox. 查询系统的版本 apt-cac ...
- 【工具安装】kali linux 安装教程
日期:2019-07-14 16:36:21 介绍:使用最新版的 VMware 来安装 kali linux 0x01.下载镜像 首先需要安装 VMware,安装步骤点这里. VMware 安装教程 ...
- Kali Linux安装及中文指南
Kali Linux安装及中文指南 Kali Linux安装教程:https://blog.csdn.net/u012318074/article/details/71601382 Kali Linu ...
随机推荐
- 动态规划-TSP问题-最短超级串
2020-03-03 22:55:08 问题描述: 给定一个字符串数组 A,找到以 A 中每个字符串作为子字符串的最短字符串. 我们可以假设 A 中没有字符串是 A 中另一个字符串的子字符串. 示例 ...
- Python 趣题
如何优雅判断list为空 list_temp = [] if list_temp: # 存在值即为真 else: # list_temp是空的 在Python中,False,0,'',[],{},() ...
- layer弹层插件
// 使用前需要引入jquery的支持,链接如下: https://blog-static.cnblogs.com/files/liguanlong/jquery1.9.1.min.js ...
- [转载]float 和 double 的一二三点事
文章转载于博客园作者jillzhang,原文链接http://jillzhang.cnblogs.com/ .文章为jillzhang原创,转载条件请看原文链接. 关于浮点数精度和范围,请看末尾. C ...
- CodeForces - 1244D 树(一条链)的染色
题意:给一个无向的无环的树,需要用三种颜色将他染色,相邻的三个点不能有重复的颜色.给出每个点染成每种颜色的花费,求最小的染色花费,如果给的图不能按要求染色,输出-1. 思路:只有三种颜色,相邻三个点还 ...
- 面试刷题27:程序员如何防护java界的新冠肺炎?
背景 安全是软件设计的第二个非功能性需求,一般是当软件出现安全问题的时候才会得到重视. 最明显的比如 数据库用户信息和密码泄漏等: 数据加解密技术 单向加密 md5+salt值, 这个是软件设计中使用 ...
- Kubernetes(K8s) 安装(使用kubeadm安装Kubernetes集群)
背景: 由于工作发生了一些变动,很长时间没有写博客了. 概述: 这篇文章是为了介绍使用kubeadm安装Kubernetes集群(可以用于生产级别).使用了Centos 7系统. 一.Centos7 ...
- 曹工说Spring Boot源码(28)-- Spring的component-scan机制,让你自己来进行简单实现,怎么办
写在前面的话 相关背景及资源: 曹工说Spring Boot源码(1)-- Bean Definition到底是什么,附spring思维导图分享 曹工说Spring Boot源码(2)-- Bean ...
- 软件架构的演进:单体、垂直、SOA、微服务
软件架构演进 软件架构的发展经历了从单体结构.垂直架构.SOA架构到微服务架构的过程,以下为具体分类: 1.1.1 单体架构 特点: 1.所有的功能集成在一个项目工程中. 2.所有的功能打一 ...
- vulnhub~muzzybox
这个靶机是最新出的,Google了一番,发现walk trough少的可怜,最初是自己弄弄,但自己的确是菜. challenge 1.就是修改idcard.png 的内容,position princ ...