02、Windows Phone 套接字(Socket)实战之服务器端设计
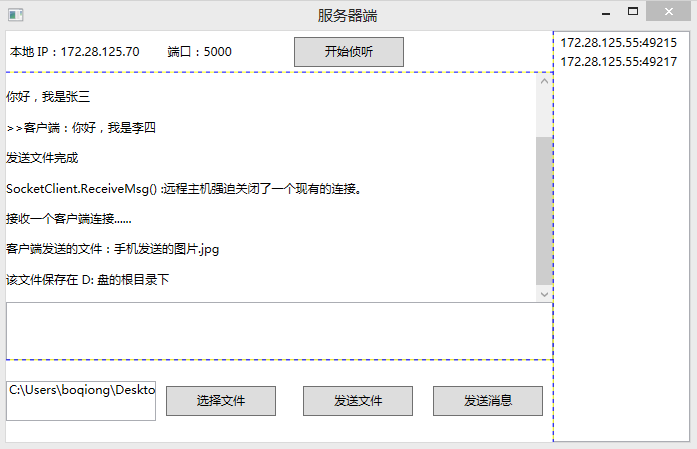
这里主要写 PC 服务器端的逻辑,UI 使用的是 WPF,因为 WPF 比普通的 WinForm 的流式布局
更容易控制,而且比 WinForm 美观一些,显示截图:
一、页面 UI
MainWindow.xaml 文件中布局的 XAML:
   <Grid ShowGridLines="True">

        <Grid.Resources>

            <Style TargetType="Button">

                <Setter Property="Width" Value="110"/>

                <Setter Property="Height" Value="30"/>

                <Setter Property="Margin" Value="10,0,10,0"/>

            </Style>

        </Grid.Resources>

        <Grid.ColumnDefinitions>

            <ColumnDefinition Width="80*"/>

            <ColumnDefinition Width="20*"/>

        </Grid.ColumnDefinitions>

        <Grid ShowGridLines="True">

            <Grid.RowDefinitions>

                <RowDefinition Height="1*"/>

                <RowDefinition Height="7*"/>

                <RowDefinition Height="2*"/>

            </Grid.RowDefinitions>

            <!--本地 IP-->

            <StackPanel Orientation="Horizontal">

                <StackPanel.Resources>

                    <Style TargetType="TextBlock">

                        <Setter Property="Width" Value="120"/>

                        <Setter Property="VerticalAlignment" Value="Center"/>

                        <Setter Property="HorizontalAlignment" Value="Center"/>

                    </Style>

                </StackPanel.Resources>

                <!--服务器端的 IP 和端口号-->

                <TextBlock x:Name="txtIP" Margin="4,14,0,14" Width="144"/>

                <TextBlock x:Name="txtPort" Text="5000" Margin="10, 0, 0, 0"/>

                <Button x:Name="btnBeginListening" Content="开始侦听" HorizontalAlignment="Right" Click="btnBeginListening_Click"/>

                <!--<Button x:Name="btnStop" Content="停止" HorizontalAlignment="Right" Click="btnStop_Click"/>-->

            </StackPanel>

            <!--消息窗口和消息发送窗口-->

            <Grid Grid.Row="1">

                <Grid.RowDefinitions>

                    <RowDefinition Height="8*"/>

                    <RowDefinition Height="2*"/>

                </Grid.RowDefinitions>

                <ScrollViewer x:Name="scroll">

                    <!--显示连接状态、聊天消息等-->

                    <TextBlock x:Name="txtResult"  TextWrapping="Wrap"/>

                </ScrollViewer>

                <!--聊天文字输入框-->

                <TextBox x:Name="txtInput" Grid.Row="1" KeyDown="txtInput_KeyDown" TextWrapping="Wrap"/>

            </Grid>

            <!--操作按钮-->

            <Grid Grid.Row="2">

                <Grid.ColumnDefinitions>

                    <ColumnDefinition Width="5*"/>

                    <ColumnDefinition Width="5*"/>

                </Grid.ColumnDefinitions>

                <StackPanel Orientation="Horizontal">

                    <!--用户选择的文件的路径-->

                    <TextBox x:Name="txtFilePath" Width="150" Height="40"/>

                    <Button Content="选择文件" x:Name="btnChooseFile" Click="btnChooseFile_Click"/>

                </StackPanel>

                <StackPanel HorizontalAlignment="Right" Orientation="Horizontal" Grid.Column="1">

                    <!--发送文件或者发送文字消息-->

                    <Button Content="发送文件" x:Name="btnSendFile" Click="btnSendFile_Click"/>

                    <Button Content="发送消息" x:Name="btnSendMsg" Click="btnSendMsg_Click"/>

                </StackPanel>

            </Grid>

        </Grid>

        <!--显示请求连接到服务器端的 WP 端的 IP 信息-->

        <ListBox Grid.Column="1" x:Name="listbox">

        </ListBox>

    </Grid>
二、定义一个服务器端的 SocketClient 类,用来封装与 WP 端通讯所使用的 Socket
虽然 WP 和 PC 端都是使用 C# 语言开发的,但是 WP 端和 PC 端的 Socket 类在使用方法上有一些差异,
并且 WP 端明显是经过精简过的,这里就不贴出来了。直接贴出 SocketClient 类:
namespace DesktopSocketServerDemo

{

    /// <summary>

    /// 与客户端的 连接通信类(包含了一个 与客户端 通信的 套接字,和线程)

    /// </summary>

    public class SocketClient

    {

        Socket sokMsg;

        Thread threadMsg;

        // 通信操作完成时调用,用来触发在操作完成时,在宿主页面显示消息提示

        public event EventHandler<string> Completed;

        public SocketClient(Socket sokMsg)

        {

            this.sokMsg = sokMsg;

            this.threadMsg = new Thread(ReceiveMsg);

            this.threadMsg.IsBackground = true;

            this.threadMsg.Start();

        }

        bool isRec = true;

        // 负责监听客户端发送来的消息

        void ReceiveMsg()

        {

            while (isRec)

            {

                try

                {

                    byte[] byteSrc = new byte[CommonHelper.FileLength];

                    // 从绑定的 Socket 套接字接收数据,将数据存入接收缓冲区。

                    int length = sokMsg.Receive(byteSrc);

                    DataType dataType;

                    byte[] bytesFile;

                    string strMsg;

                    // 转换源 byte[] 数据内容,获取其中的 head 和 body 的实际内容

                    CommonHelper.ConvertByteToData(byteSrc, out dataType, out bytesFile, out strMsg);

                    if (dataType.IsFile == true)

                    {

                        // 如果 body 的类型文件,则直接将文件存储到 PC 端的 D: 盘根路径下

                        using (FileStream file = new FileStream("d:\\" + dataType.FileName + dataType.Exten, FileMode.OpenOrCreate))

                        {

                            file.Write(bytesFile, , bytesFile.Length);

                        }

                        // 显示回调消息

                        OnCompleted("客户端发送的文件:" + dataType.FileName + dataType.Exten);

                        OnCompleted("该文件保存在 D: 盘的根目录下");

                    }

                    else

                    {

                        OnCompleted(">>客户端:" + strMsg);

                    }

                }

                catch (Exception ex)

                {

                    // 如果抛异常,则释放该 Socket 对象所占用的资源

                    CloseConnection();

                    OnCompleted("SocketClient.ReceiveMsg() :" + ex.Message);

                }

            }

        }

        /// <summary>

        ///  向客户端发送消息

        /// </summary>

        /// <param name="strMsg"></param>

        public void Send(string strMsg)

        {

            byte[] arrMsgFinal = CommonHelper.ConvertDataToByte(new DataType { IsFile = false }, null, strMsg);

            sokMsg.Send(arrMsgFinal);

        }

        // 向客户端发送文件数据

        public void SendFile(string strPath)

        {

            try

            {

                byte[] arrFileFina = CommonHelper.ConvertDataToByte(new DataType { IsFile = true }, strPath, null);

                //发送文件数据

                sokMsg.Send(arrFileFina);//, 0, length + 1, SocketFlags.None);

                OnCompleted("发送文件完成");

            }

            catch (Exception ex)

            {

                OnCompleted(ex.Message);

            }

        }

        // 关闭与客户端连接

        public void CloseConnection()

        {

            isRec = false;

            sokMsg.Close();

            sokMsg.Dispose();

        }

        void OnCompleted(string strMsg)

        {

            if (Completed != null)

            {

                Completed(null, strMsg);

            }

        }

    }

}
三、在 MainWindow.xaml 文件中,定义侦听客户端连接的 Socket
MainWindow.xaml 文件相应的 Codebehind 代码:
namespace DesktopSocketServerDemo

{

    /// <summary>

    /// PC 端服务器,用来接收连接 PC 的 Socket 连接,并创建 SocketClient 类与客户端通信

    /// </summary>

    public partial class MainWindow : Window

    {

        public MainWindow()

        {

            InitializeComponent();

            //MultiCast cast = new MultiCast();

            //cast.Startup();

            txtIP.Text += "本地 IP:" + strIP;

            txtPort.Text = " 端口:" + Port;

        }

        int Port = ;

        // 服务器端的 IP 地址

        string strIP = CommonHelper.GetIPAddress();

        //负责监听 客户端 的连接请求

        Socket socketWatch = null;

        // 执行 socketWatch 对象监听请求的线程

        Thread threadWatch = null;

        // 开启监听

        private void btnBeginListening_Click(object sender, RoutedEventArgs e)

        {

            if (socketWatch == null)

            {

                //实例化 套接字 (ip4寻址协议,流式传输,TCP协议)

                socketWatch = new Socket(AddressFamily.InterNetwork, SocketType.Stream, ProtocolType.Tcp);

                IPEndPoint endpoint = new IPEndPoint(IPAddress.Parse(strIP), Port);

                //将 监听套接字  绑定到 对应的IP和端口

                socketWatch.Bind(endpoint);

                //设置 监听队列 长度为10(同时能够处理 10个连接请求)

                socketWatch.Listen();

                threadWatch = new Thread(StartWatch);

                threadWatch.IsBackground = true;

                threadWatch.Start();

                ShowMsg("启动服务器成功......\r\n");

            }

            else

            {

                ShowMsg("服务器已经启动");

            }

        }

        // 循环侦听客户端的连接请求

        bool isWatch = true;

        // 负责与客户端通信的对象

        SocketClient socketClient;

        /// <summary>

        /// 被线程调用 监听连接端口

        /// </summary>

        void StartWatch()

        {

            while (isWatch)

            {

                try

                {

                    //监听 客户端 连接请求,但是,Accept会阻断当前线程

                    //监听到请求,立即创建负责与该客户端套接字通信的套接字

                    Socket socket = socketWatch.Accept();

                    if (socketClient != null)

                        socketClient.CloseConnection();

                    socketClient = new SocketClient(socket);

                    socketClient.Completed += connection_Completed;

                    this.Dispatcher.BeginInvoke(new Action(delegate

                    {

                        if (socket != null && socket.RemoteEndPoint != null)

                            //将 通信套接字的 客户端IP端口保存在下拉框里

                            listbox.Items.Add(new TextBlock { Text = socket.RemoteEndPoint.ToString() });

                        ShowMsg("接收一个客户端连接......");

                    }), null);

                }

                catch (Exception ex)

                {

                    ShowMsg(ex.Message);

                    socketWatch.Close();

                    socketWatch.Dispose();

                    isWatch = false;

                }

            }

        }

        //发送消息到已经连接到 PC 的客户端

        private void btnSendMsg_Click(object sender, EventArgs e)

        {

            if (string.IsNullOrEmpty(txtInput.Text))

            {

                ShowMsg("输入内容不能为空");

                return;

            }

            if (socketClient != null)

            {

                ShowMsg(txtInput.Text.Trim());

                // 发送文字内容

                socketClient.Send(txtInput.Text.Trim());

                txtInput.Text = "";

            }

            else

            {

                MessageBox.Show("还没有建立连接");

            }

        }

        //选择要发送的文件

        private void btnChooseFile_Click(object sender, EventArgs e)

        {

            Microsoft.Win32.OpenFileDialog openFileDialog = new Microsoft.Win32.OpenFileDialog();

            if (openFileDialog.ShowDialog() == true)

            {

                txtFilePath.Text = openFileDialog.FileName;

            }

        }

        //发送文件

        private void btnSendFile_Click(object sender, EventArgs e)

        {

            if (string.IsNullOrWhiteSpace(txtFilePath.Text))

            {

                MessageBox.Show("请先选择一个文件");

                return;

            }

            //connection = new SocketClient();

            if (socketClient != null)

            {

                // 发送文件内容

                socketClient.SendFile(txtFilePath.Text.Trim());

            }

            else

            {

                MessageBox.Show("还没有建立连接");

            }

        }

        // 操作完成

        void connection_Completed(object sender, string e)

        {

            ShowMsg(e);

        }

        // 向窗口追加消息

        void ShowMsg(string strMsg)

        {

            this.Dispatcher.BeginInvoke(new Action(delegate

               {

                   txtResult.Text += Environment.NewLine + strMsg + Environment.NewLine;

                   scroll.ScrollToBottom();

               }), null);

        }

        // 当服务器关闭时触发

        protected override void OnClosed(EventArgs e)

        {

            if (socketWatch != null)

            {

                socketWatch.Close();

                socketWatch.Dispose();

            }

            base.OnClosed(e);

        }

        // 按“回车键”发送消息

        private void txtInput_KeyDown(object sender, KeyEventArgs e)

        {

            if (e.Key == Key.Enter)

            {

                btnSendMsg_Click(null, null);

            }

        }

        // 释放连接资源

        //private void btnStop_Click(object sender, RoutedEventArgs e)

        //{

        //    if (socketClient != null)

        //    {

        //        socketClient.CloseConnection();

        //    }

        //    if (sokWatch != null)

        //    {

        //        sokWatch.Close();

        //        sokWatch.Dispose();

        //    }

        //}

    }

}
02、Windows Phone 套接字(Socket)实战之服务器端设计的更多相关文章
- linux基础编程 套接字socket 完整的服务器端多线程socket程序【转】
转自:http://blog.csdn.net/ghostyu/article/details/7737203 此段程序来自我的一个项目中,稍微做了些修改,运行稳定,客户端程序比较简单所以未编写,可以 ...
- 面向对象之套接字(socket)和黏包
一丶套接字(socket) tcp是基于链接的,必须先启动服务端,然后再启动客户端去链接服务端 基于UDP协议的socket server端: import socket udp_sk = socke ...
- 网络编程 套接字socket TCP UDP
网络编程与套接字 网络编程 网络编程是什么: 网络通常指的是计算机中的互联网,是由多台计算机通过网线或其他媒介相互链接组成的 编写基于网络的应用程序的过程序称之为网络编程. 网络编程最主要的工 ...
- 第13讲 | 套接字Socket:Talk is cheap, show me the code
第13讲 | 套接字Socket:Talk is cheap, show me the code 基于 TCP 和 UDP 协议的 Socket 编程.在讲 TCP 和 UDP 协议的时候,我们分客户 ...
- Linux进程间通信(八):流套接字 socket()、bind()、listen()、accept()、connect()、read()、write()、close()
前面说到的进程间的通信,所通信的进程都是在同一台计算机上的,而使用socket进行通信的进程可以是同一台计算机的进程,也是可以是通过网络连接起来的不同计算机上的进程.通常我们使用socket进行网络编 ...
- Linux进程间通信(九):数据报套接字 socket()、bind()、sendto()、recvfrom()、close()
前一篇文章,Linux进程间通信——使用流套接字介绍了一些有关socket(套接字)的一些基本内容,并讲解了流套接字的使用,这篇文章将会给大家讲讲,数据报套接字的使用. 一.简单回顾——什么是数据报套 ...
- 套接字socket 的地址族和类型、工作原理、创建过程
注:本分类下文章大多整理自<深入分析linux内核源代码>一书,另有参考其他一些资料如<linux内核完全剖析>.<linux c 编程一站式学习>等,只是为了更好 ...
- [置顶] Java套接字Socket编程
1)概念 网络编程基本模型就客户端到服务器的模型,也就是我们常见的C/S模型.简单的说就是两个进程间相互通信的过程.即通信双方一方作为服务器等待客户端提出请求并给以回应,另一方作为客户端向服务器提出请 ...
- Java网络编程--套接字Socket
一.套接字Socket IP地址标志Internet上的计算机,端口号标志正在计算机上运行的进程(程序). 端口号被规定为一个16位的0--65535之间的整数,其中,0--1023被预先定义的服务通 ...
随机推荐
- OpenCV学习(9) 分水岭算法(3)
本教程我学习一下opencv中分水岭算法的具体实现方式. 原始图像和Mark图像,它们的大小都是32*32,分水岭算法的结果是得到两个连通域的轮廓图. 原始图像:(原始图像必须是3通道图像) Mark ...
- 如何设置Win7不待机 Win7进入待机状态会断网的解决方法
电脑一旦进入待机状态后,会断网,应用将停止运行,因此需要设置电脑不待机来解决,这种情况需要挂一些游戏或者下载应用的时非常实用,下面就与大家分享下电脑不待机的设置方法,感兴趣的朋友可以参考下 有时候我们 ...
- ansible安装文档
一.系统环境 [root@ansible ~]# cat /etc/redhat-release CentOS release 6.6 (Final) [root@ansible ~]# uname ...
- ExtAspNet下通过文档路径实现文档的下载
<ext:Button ID="Button1" runat="server" Text="Button" OnClick=" ...
- Android 自己主动化測试(3)<monkeyrunner> 依据ID查找对象&touch&type (python)
我在之前的两篇文章中用java来实现过 Android 自己主动化測试(1)怎样安装和卸载一个应用(java).Android 自己主动化測试(2)依据ID查找对象(java). 可是本质上都是用mo ...
- 如何使用飞秋FeiQ实现两电脑通信(或传输文件)
如何使用飞秋FeiQ实现两电脑通信(或传输文件) 1. 在两天电脑上,分别按照飞秋FeiQ 我使用的绿色飞秋2013正式版 2. 使用一根网线,将两电脑的网口连接一起 3. 设置飞秋FeiQ的端口号不 ...
- 总结一些Android好用的开源库
1.android-viewFlow https://github.com/pakerfeldt/android-viewflow 2. android-viewbadger https://gith ...
- vue - 添加sass(less)处理
1. 添加less.sass处理 1.1如果是sass,首先在当前目录安装处理插件(sass): npm i -D node-sass sass-loader 1.2如果是less,首先在当前目录安装 ...
- 算法笔记_037:寻找和为定值的两个数(Java)
目录 1 问题描述 2 解决方案 2.1 排序夹逼法 1 问题描述 输入一个整数数组和一个整数,在数组中查找两个数,满足他们的和正好是输入的那个整数.如果有多对数的和等于输入的整数,输出任意一对即 ...
- js dom获取
let inputs = this.$el.querySelectorAll('input'); let icon = this.$el.querySelector('.el-input__icon' ...