[ios2] CABasicAnimation【转】
caanimation 整理了解 http://geeklu.com/2012/09/animation-in-ios/
几个可以用来实现热门APP应用PATH中menu效果的几个方法
+(CABasicAnimation *)opacityForever_Animation:(float)time //永久闪烁的动画
{
CABasicAnimation *animation=[CABasicAnimation animationWithKeyPath:@"opacity"];
animation.fromValue=[NSNumber numberWithFloat:1.0];
animation.toValue=[NSNumber numberWithFloat:0.0];
animation.autoreverses=YES;
animation.duration=time;
animation.repeatCount=FLT_MAX;
animation.removedOnCompletion=NO;
animation.fillMode=kCAFillModeForwards;
return animation;
}
+(CABasicAnimation *)opacityTimes_Animation:(float)repeatTimes durTimes:(float)time; //有闪烁次数的动画
{
CABasicAnimation *animation=[CABasicAnimation animationWithKeyPath:@"opacity"];
animation.fromValue=[NSNumber numberWithFloat:1.0];
animation.toValue=[NSNumber numberWithFloat:0.4];
animation.repeatCount=repeatTimes;
animation.duration=time;
animation.removedOnCompletion=NO;
animation.fillMode=kCAFillModeForwards;
animation.timingFunction=[CAMediaTimingFunction functionWithName:kCAMediaTimingFunctionEaseIn];
animation.autoreverses=YES;
return animation;
}
+(CABasicAnimation *)moveX:(float)time X:(NSNumber *)x //横向移动
{
CABasicAnimation *animation=[CABasicAnimation animationWithKeyPath:@"transform.translation.x"];
animation.toValue=x;
animation.duration=time;
animation.removedOnCompletion=NO;
animation.fillMode=kCAFillModeForwards;
return animation;
}
+(CABasicAnimation *)moveY:(float)time Y:(NSNumber *)y //纵向移动
{
CABasicAnimation *animation=[CABasicAnimation animationWithKeyPath:@"transform.translation.y"];
animation.toValue=y;
animation.duration=time;
animation.removedOnCompletion=NO;
animation.fillMode=kCAFillModeForwards;
return animation;
}
+(CABasicAnimation *)scale:(NSNumber *)Multiple orgin:(NSNumber *)orginMultiple durTimes:(float)time Rep:(float)repeatTimes //缩放
{
CABasicAnimation *animation=[CABasicAnimation animationWithKeyPath:@"transform.scale"];
animation.fromValue=orginMultiple;
animation.toValue=Multiple;
animation.duration=time;
animation.autoreverses=YES;
animation.repeatCount=repeatTimes;
animation.removedOnCompletion=NO;
animation.fillMode=kCAFillModeForwards;
return animation;
}
+(CAAnimationGroup *)groupAnimation:(NSArray *)animationAry durTimes:(float)time Rep:(float)repeatTimes //组合动画
{
CAAnimationGroup *animation=[CAAnimationGroup animation];
animation.animations=animationAry;
animation.duration=time;
animation.repeatCount=repeatTimes;
animation.removedOnCompletion=NO;
animation.fillMode=kCAFillModeForwards;
return animation;
}
+(CAKeyframeAnimation *)keyframeAniamtion:(CGMutablePathRef)path durTimes:(float)time Rep:(float)repeatTimes //路径动画
{
CAKeyframeAnimation *animation=[CAKeyframeAnimation animationWithKeyPath:@"position"];
animation.path=path;
animation.removedOnCompletion=NO;
animation.fillMode=kCAFillModeForwards;
animation.timingFunction=[CAMediaTimingFunction functionWithName:kCAMediaTimingFunctionEaseIn];
animation.autoreverses=NO;
animation.duration=time;
animation.repeatCount=repeatTimes;
return animation;
}
+(CABasicAnimation *)movepoint:(CGPoint )point //点移动
{
CABasicAnimation *animation=[CABasicAnimation animationWithKeyPath:@"transform.translation"];
animation.toValue=[NSValue valueWithCGPoint:point];
animation.removedOnCompletion=NO;
animation.fillMode=kCAFillModeForwards;
return animation;
}
+(CABasicAnimation *)rotation:(float)dur degree:(float)degree direction:(int)direction repeatCount:(int)repeatCount //旋转
{
CATransform3D rotationTransform = CATransform3DMakeRotation(degree, 0, 0,direction);
CABasicAnimation* animation;
animation = [CABasicAnimation animationWithKeyPath:@"transform"];
animation.toValue= [NSValue valueWithCATransform3D:rotationTransform];
animation.duration= dur;
animation.autoreverses= NO;
animation.cumulative= YES;
animation.removedOnCompletion=NO;
animation.fillMode=kCAFillModeForwards;
animation.repeatCount= repeatCount;
animation.delegate= self;
return animation;
}
//==================Core Animation学习之anchorPoint=========//
anchorPoint(锚点)简单来说是用来确定“动画效果“的。先看下面这章图:

中间黑色的点就是anchorPoint了,它的取值在0-1,取到1就表示离原点最远。注意这个图是MacOS的图,ios的坐标系原点在左上角。
如果我要使得图形绕着左下角转呢?

anchorPoint的效果应该很清楚了,旋转和缩放必须依赖这个坐标来确定效果。
注意anchorPoint的默认值是(0.5, 0.5)就是图一的效果。
//===========非常清楚的CATransform3D 讲解【转】=============//
CATransform3D CATransform3DMakeTranslation (CGFloat tx, CGFloat ty, CGFloat tz)
tx:X轴偏移位置,往下为正数。
ty:Y轴偏移位置,往右为正数。
tz:Z轴偏移位置,往外为正数。
例:
如果有2个图层,一个是绿色的,一个是红色的。先加载绿色,后加载红色。
tx,ty的左右偏移先不说了。
如果绿色的tz为-10 ,红色的tz为 0 效果如下。
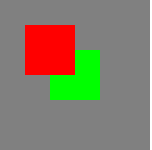
如果绿色的tz为 0 ,红色的tz为-10 效果如下。

对于tz来说,值越大,那么图层就越往外(接近屏幕),值越小,图层越往里(屏幕里)。
CATransform3D CATransform3DTranslate (CATransform3D t, CGFloat tx,
CGFloat ty, CGFloat tz);
t:就是上一个函数。其他的都一样。
就可以理解为:函数的叠加,效果的叠加。
CATransform3D CATransform3DMakeScale
(CGFloat sx, CGFloat sy, CGFloat sz);
sx:X轴缩放,代表一个缩放比例,一般都是
0 --- 1 之间的数字。
sy:Y轴缩放。
sz:整体比例变换时,也就是m11(sx)==
m22(sy)时,若m33(sz)>1,图形整体缩小,若0<1,图形整体放大,若m33(sz)<0,发生关于原点的对称等比变换。
当sx =
1,sy = 1时。如图:

当sx =
0.5,sy = 0.5时。如图:

CATransform3D CATransform3DScale
(CATransform3D t, CGFloat sx, CGFloat sy, CGFloat
sz)
t:就是上一个函数。其他的都一样。
就可以理解为:函数的叠加,效果的叠加。
CATransform3D CATransform3DMakeRotation
(CGFloat angle, CGFloat x, CGFloat y, CGFloat z);
旋转效果。
angle:旋转的弧度,所以要把角度转换成弧度:角度
* M_PI / 180。
x:向X轴方向旋转。值范围-1
--- 1之间
y:向Y轴方向旋转。值范围-1 ---
1之间
z:向Z轴方向旋转。值范围-1 ---
1之间
例:向X轴旋转60度。 向Y轴旋转60度。 向Z轴旋转60度。


向
X轴,Y轴都旋转60度,就是沿着对角线旋转。

可以通过X,Y,Z轴同时变化,来旋转图像。
CATransform3D CATransform3DRotate (CATransform3D t, CGFloat angle,
CGFloat x, CGFloat y, CGFloat z);
t:就是上一个函数。其他的都一样。
就可以理解为:函数的叠加,效果的叠加。
CATransform3D CATransform3DInvert (CATransform3D t);
翻转效果。
未使用
使用


CGAffineTransform CATransform3DGetAffineTransform (CATransform3D
t);
bool CATransform3DIsAffine (CATransform3D t);
仿射效果。
就是把一个 CATransform3D 对象转换成一个 CGAffineTransform 对象。
也就是把 CATransform3D 矩阵
转换成 CGAffineTransform 矩阵
变换函数同时提供了可以比较一个变换矩阵是否是单位矩阵,或者两个矩阵是否相等。
bool CATransform3DIsIdentity (CATransform3D t);
bool
CATransform3DEqualToTransform (CATransform3D a, CATransform3D
b);
也可以通过修改数据结构和键值来设置变换效果。
struct CATransform3D

               {
CGFloat m11, m12, m13, m14;
CGFloat m21, m22, m23, m24;
CGFloat m31, m32, m33, m34;
                                  CGFloat m41, m42, m43, m44;

}

可以直接修改 其中的一个值,来达到相同的效果。
或者修改键值
[myLayer setValue:[NSNumber numberWithInt:0] forKeyPath:@"transform.rotation.x"];

CGFloat angle=0.5; // angle=0.5 向左,angle=-0.5向右边
CALayer *touchedLayer = [touchView layer];
float xpoint=[string floatValue];
const CGFloat boneScale = 1;
CATransform3D scale = CATransform3DMakeScale(boneScale , boneScale, 1);
touchedLayer.position = CGPointMake(xpoint,45);
touchedLayer.anchorPoint = CGPointMake(0.5, 0.0);
touchedLayer.bounds = CGRectMake(0,0,122,88);
touchedLayer.transform = scale;
CABasicAnimation* r1 = [CABasicAnimation animationWithKeyPath:@"transform"];
CATransform3D rot1 = CATransform3DMakeRotation(angle, 0,0,1);
rot1 = CATransform3DConcat(rot1, touchedLayer.transform);
r1.toValue = [NSValue valueWithCATransform3D:rot1];
r1.autoreverses = YES;
r1.repeatCount = NO;
r1.duration = 0.5;
r1.timingFunction = [CAMediaTimingFunction functionWithName:kCAMediaTimingFunctionEaseInEaseOut];
[touchedLayer addAnimation:r1 forKey:nil];
[ios2] CABasicAnimation【转】的更多相关文章
- 基本动画CABasicAnimation - 完成之后闪回初始状态
基本动画CABasicAnimation 结束之后,默认闪回初始状态,那怎么解决呢? position需要设备两个属性: // MARK: - 结束后不要闪回去 anim.removedOnCompl ...
- CABasicAnimation的基本使用方法(移动·旋转·放大·缩小)
出处:http://blog.csdn.net/iosevanhuang/article/details/14488239 CABasicAnimation类的使用方式就是基本的关键帧动画. 所谓关键 ...
- CABasicAnimation的delegate的坑
博客已经迁移到 www.chjsun.top 在自定义动画的时候,CABasicAnimation用的还算的蛮多的. 在此先介绍一下CABasicAnimation怎么使用. 属性介绍 属性 说明 ...
- 之一:CABasicAnimation - 基本动画
嗷呜嗷呜嗷呜 // 将视图作为属性方便后面执行多个不同动画 _myView = [[UIView alloc] init]; _myView.layer.position = CGPointMake( ...
- iOS - CABasicAnimation
代码实例: [1] - (void)pulseClick { //!> 宽和高等比例转换 CABasicAnimation * pulse = [CABasicAnimation animati ...
- 核心动画基础动画(CABasicAnimation)关键帧动画
1.在iOS中核心动画分为几类: 基础动画(CABasicAnimation) 关键帧动画(CAKeyframeAnimation) 动画组(CAAnimationGroup) 转场动画(CATran ...
- CABasicAnimation 按home键后台之后,再切回来动画就停止了
解决方法: 1. CABasicAnimation *thisAnimation = [CABasicAnimtaion animationWithKeyPath:@"transform.r ...
- CABasicAnimation animationWithKeyPath 一些规定的值
CABasicAnimation animationWithKeyPath Types When using the ‘CABasicAnimation’ from the QuartzCore Fr ...
- IOS第18天(5,CABasicAnimation基本动画)
******* #import "HMViewController.h" @interface HMViewController () @property (nonatomic, ...
随机推荐
- PHP 9: 表达式
原文:PHP 9: 表达式 本章介绍PHP的表达式.PHP的表达式其实和其他语言没有什么区别.普通的赋值是表达式,函数也是表达式,通过函数赋值也是.三元条件运算符也是,即: $first ? $sec ...
- linuxsocket通信recv研究缓存机制
曾有过这样一个小疑问.当一个进程注册的插座后,,假设插座没有被调用recv函数接受包.能接受到数据包吗? 或者这样说,假设我的程序注冊了一个套接字去接受数据包,可是每收到一个数据包都须要非常长 ...
- 使用Visual Source Safe 2005 - 初学者系列 - 学习者系列文章
本文介绍微软的Visual Source Safe 2005工具的使用 1. 打开该软件,选择“新建数据库” 2. 显示欢迎页 3.选择路径.这里是服务器上代码存放的目录. 4.这里选择第一项 5 ...
- MEF简介及简单的Demo
MEF简介及简单的Demo 文章开始之前,首先简单介绍一下什么是MEF,MEF,全称Managed Extensibility Framework(托管可扩展框架).单从名字我们不难发现:MEF是专门 ...
- C# 通讯网关开发
C# 通讯网关开发 楼主从12年毕业大部分时间一直从事于通讯网关的开发,刚刚学那会连C#是啥都不知道,就直接入手网关开发,前前后后到现在也算是弄了5.6个通讯协议,后来看到北风之神的socket框架和 ...
- [转载+实践理解]Android动画---如何正确使用平移动画(关于fillBefore和fillAfter的一点说明)(转载)
红色部分为自己的实践理解 如何实现将View向上平移自身高度一半的距离? TranslateAnimation translate = new TranslateAnimation( Animatio ...
- Android Wear和二维码
这是一篇发布在Android官方开发者社区博客,15年年初的时候就看到了这篇文章,直到现在才有时间把它翻译下来. 这是一篇如何在Android Wear上面如何正确地展示二维码的文章,里面有许多的经验 ...
- SpringMVC Hibernate+Spring+Spring MVC+Bootstrap的管理系统实现
SpringMVC学习系列(12) 完结篇 之 基于Hibernate+Spring+Spring MVC+Bootstrap的管理系统实现 到这里已经写到第12篇了,前11篇基本上把Spring M ...
- C# 各种相对路径
//获取当前可执行的exe的文件名 string str1 = Process.GetCurrentProcess().MainModule.FileNa ...
- C#算两个时间段相差的时间
在数据中经常算两个时间差或者在某个时间段的内容 在数据库中设计表字段类型的时候设计为varchar类型,然后进行可以再Sql语句中书写>=或者<=这样的进行比较就可以查询出某个时间段的内容 ...