WPF另类实现摄像头录像
WPF中使用第三方控件来直接进行录像的控件没有找到(aforgenet好像不维护了?WPFMediaKit好像只能实现摄像头拍照。收费的控件没有使用,不做评论。)
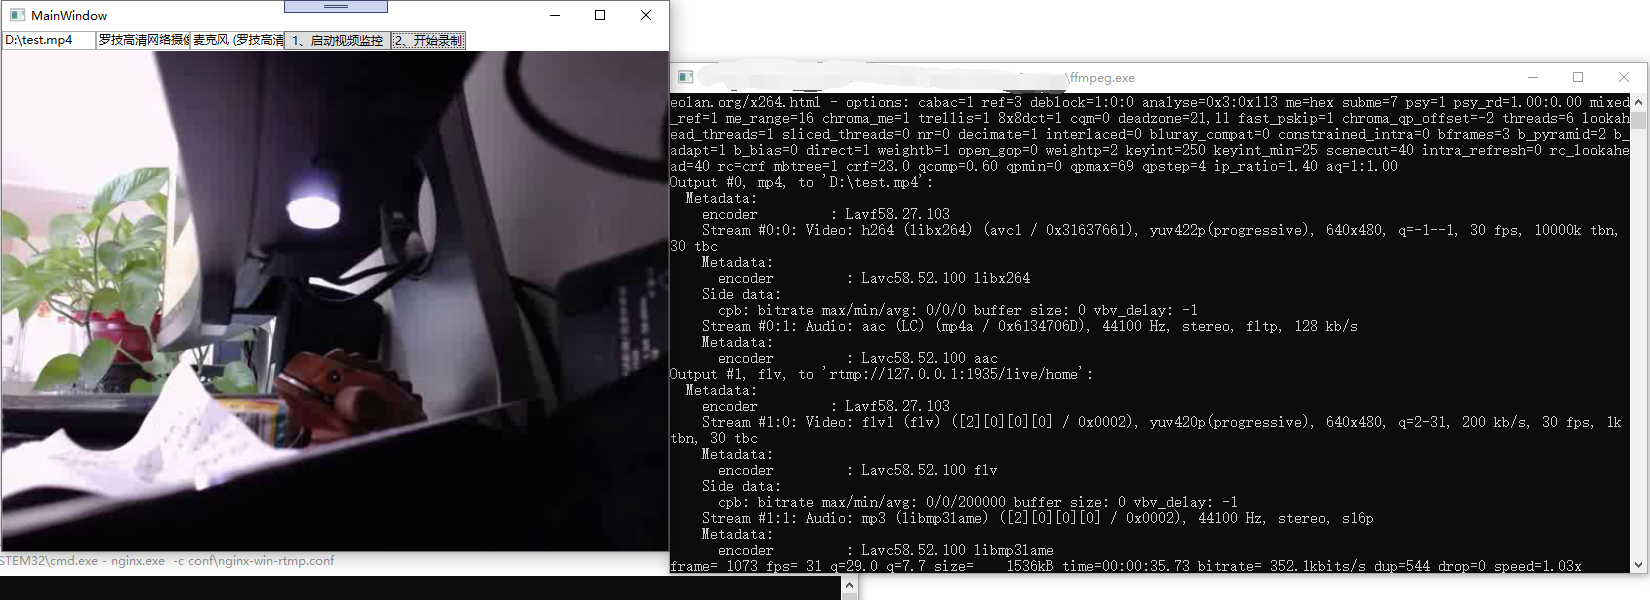
通过百度(感谢:https://www.cnblogs.com/giserlong88/p/11244779.html),确定了可以通过FFmpeg+Nginx+Vlc.DotNet.Wpf可以实现摄像头的录像保存、录像预览(有延时),实现方案是,通过FFmpeg来实现录像并推送到Nginx搭建的rtmp流媒体服务器,然后WPF通过Vlc.DotNet.Wpf来拉取rtmp流服务器的内容来实现视频预览。
具体代码如下:
首先去下载FFmpeg(http://ffmpeg.org/download.html),Nginx(http://nginx.org/en/download.html),Nuget上引用Vlc.DotNet.Wpf,下载其所需要的libvlc播放器
nginx-win-rtmp.conf配置文件内容如下:
#user  nobody;

# multiple workers works !

worker_processes  ;

#error_log  logs/error.log;

#error_log  logs/error.log  notice;

#error_log  logs/error.log  info;

#pid        logs/nginx.pid;

#worker_rlimit_nofile ;   #更改worker进程的最大打开文件数限制

                                               #如果没设置的话, 这个值为操作系统的限制.

                                               #设置后你的操作系统和Nginx可以处理比“ulimit -a”更多的文件

                                               #所以把这个值设高, 这样nginx就不会有“too many open files”问题了

events {

    worker_connections  ;#设置可由一个worker进程同时打开的最大连接数

                              #如果设置了上面提到的worker_rlimit_nofile, 我们可以将这个值设得很高

    # max value , nginx recycling connections+registry optimization =

    #   this.value *  = max concurrent connections currently tested with one worker

    #   C1000K should be possible depending there is enough ram/cpu power

    # multi_accept on;

}

rtmp {

    server {

        listen ;#监听端口,若被占用,可以更改

        chunk_size ;#上传flv文件块儿的大小

        application live { #创建一个叫live的应用

             live on;#开启live的应用

             allow publish 127.0.0.1;#

             allow play all;

        }

    }

}

http {

    #include      /nginx/conf/naxsi_core.rules;

    include       mime.types;

    default_type  application/octet-stream;

    #log_format  main  '$remote_addr:$remote_port - $remote_user [$time_local] "$request" '

    #                  '$status $body_bytes_sent "$http_referer" '

    #                  '"$http_user_agent" "$http_x_forwarded_for"';

    #access_log  logs/access.log  main;

#     # loadbalancing PHP

#     upstream myLoadBalancer {

#         server 127.0.0.1: weight= fail_timeout=;

#         server 127.0.0.1: weight= fail_timeout=;

#         server 127.0.0.1: weight= fail_timeout=;

#         server 127.0.0.1: weight= fail_timeout=;

#         server 127.0.0.1: weight= fail_timeout=;

#         server 127.0.0.1: weight= fail_timeout=;

#         server 127.0.0.1: weight= fail_timeout=;

#         server 127.0.0.1: weight= fail_timeout=;

#         server 127.0.0.1: weight= fail_timeout=;

#         server 127.0.0.1: weight= fail_timeout=;

#         least_conn;

#     }

    sendfile        off;

    #tcp_nopush     on;

    server_names_hash_bucket_size ;

## Start: Timeouts ##

    client_body_timeout   ;

    client_header_timeout ;

    keepalive_timeout     ;

    send_timeout          ;

    keepalive_requests    ;

## End: Timeouts ##

    #gzip  on;

    server {

        listen       ;

        server_name  localhost;

        #charset koi8-r;

        #access_log  logs/host.access.log  main;

        ## Caching Static Files, put before first location

        #location ~* \.(jpg|jpeg|png|gif|ico|css|js)$ {

        #    expires 14d;

        #    add_header Vary Accept-Encoding;

        #}

# For Naxsi remove the single # line for learn mode, or the ## lines for full WAF mode

        location / {

            #include    /nginx/conf/mysite.rules; # see also http block naxsi include line

            ##SecRulesEnabled;

              ##DeniedUrl "/RequestDenied";

              ##CheckRule "$SQL >= 8" BLOCK;

              ##CheckRule "$RFI >= 8" BLOCK;

              ##CheckRule "$TRAVERSAL >= 4" BLOCK;

              ##CheckRule "$XSS >= 8" BLOCK;

            root   html;

            index  index.html index.htm;

        }

# For Naxsi remove the ## lines for full WAF mode, redirect location block used by naxsi

        ##location /RequestDenied {

        ##    return ;

        ##}

## Lua examples !

#         location /robots.txt {

#           rewrite_by_lua '

#             if ngx.var.http_host ~= "localhost" then

#               return ngx.exec("/robots_disallow.txt");

#             end

#           ';

#         }

        #error_page                /.html;

        # redirect server error pages to the static page /50x.html

        #

        error_page        /50x.html;

        location = /50x.html {

            root   html;

        }

        # proxy the PHP scripts to Apache listening on 127.0.0.1:

        #

        #location ~ \.php$ {

        #    proxy_pass   http://127.0.0.1;

        #}

        # pass the PHP scripts to FastCGI server listening on 127.0.0.1:

        #

        #location ~ \.php$ {

        #    root           html;

        #    fastcgi_pass   127.0.0.1:; # single backend process

        #    fastcgi_pass   myLoadBalancer; # or multiple, see example above

        #    fastcgi_index  index.php;

        #    fastcgi_param  SCRIPT_FILENAME  $document_root$fastcgi_script_name;

        #    include        fastcgi_params;

        #}

        # deny access to .htaccess files, if Apache's document root

        # concurs with nginx's one

        #

        #location ~ /\.ht {

        #    deny  all;

        #}

    }

    # another virtual host using mix of IP-, name-, and port-based configuration

    #

    #server {

    #    listen       ;

    #    listen       somename:;

    #    server_name  somename  alias  another.alias;

    #    location / {

    #        root   html;

    #        index  index.html index.htm;

    #    }

    #}

    # HTTPS server

    #

    #server {

    #    listen        ssl spdy;

    #    server_name  localhost;

    #    ssl                  on;

    #    ssl_certificate      cert.pem;

    #    ssl_certificate_key  cert.key;

    #    ssl_session_timeout  5m;

    #    ssl_prefer_server_ciphers On;

    #    ssl_protocols TLSv1 TLSv1. TLSv1.;

    #    ssl_ciphers ECDH+AESGCM:ECDH+AES256:ECDH+AES128:ECDH+3DES:RSA+AESGCM:RSA+AES:RSA+3DES:!aNULL:!eNULL:!MD5:!DSS:!EXP:!ADH:!LOW:!MEDIUM;

    #    location / {

    #        root   html;

    #        index  index.html index.htm;

    #    }

    #}

}
把下载的FFmpeg、Nginx和libvlc放到Debug目录下。
目录结构如下
Debug
FFmpeg
ffmpeg.exe
……
Nginx
nginx.exe
……
libvlc
win-x64
……
win-x86
……
新建一个WPF项目,在MainWindow.xaml主要处理启动Nginx和进行推送
<Window x:Class="VideTest.MainWindow"

        xmlns="http://schemas.microsoft.com/winfx/2006/xaml/presentation"

        xmlns:d="http://schemas.microsoft.com/expression/blend/2008"

        xmlns:x="http://schemas.microsoft.com/winfx/2006/xaml"

        xmlns:mc="http://schemas.openxmlformats.org/markup-compatibility/2006"

        mc:Ignorable="d"

        Title="MainWindow" Height="450" Width="800" Loaded="MainWindow_OnLoaded">

    <Grid>

        <Grid.RowDefinitions>

            <RowDefinition Height="20"></RowDefinition>

            <RowDefinition Height="*"></RowDefinition>

        </Grid.RowDefinitions>

        <WrapPanel>

            <TextBox Name="SavePath" Text="D:\test.mp4" Width="94" HorizontalAlignment="Left"></TextBox>

            <TextBox Name="VideoName" Text="罗技高清网络摄像机 C930c" Width="94" HorizontalAlignment="Left"></TextBox>

            <TextBox Name="AudioName" Text="麦克风 (罗技高清网络摄像机 C930c)" Width="94" HorizontalAlignment="Left"></TextBox>

            <Button Content="1、启动视频监控" HorizontalAlignment="Left"  VerticalAlignment="Top" Width="107" Click="ButtonStart_OnClick"/>

            <Button Content="2、开始录制" HorizontalAlignment="Left" VerticalAlignment="Top" Width="75" Click="ButtonSase_OnClick"/>

            <TextBlock Text="开始录制后大概5秒主界面就可以看到监控视频"></TextBlock>

        </WrapPanel>

        <Border Grid.Row="1">

            <Image x:Name="img"></Image>

        </Border>

    </Grid>

</Window>
文本框中的摄像头和麦克风,是使用下发的Load中的命令检测到的。
后台代码:
using System;

using System.Diagnostics;

using System.IO;

using System.Reflection;

using System.Threading.Tasks;

using System.Windows;

using System.Windows.Controls;

using System.Windows.Data;

using Vlc.DotNet.Core;

using Vlc.DotNet.Wpf;

namespace VideTest

{

    /// <summary>

    /// MainWindow.xaml 的交互逻辑

    /// </summary>

    public partial class MainWindow : Window

    {

        private readonly string ffmpegPath = $"{AppDomain.CurrentDomain.BaseDirectory}FFmpeg/ffmpeg.exe";

        private readonly string nginxPath = @"nginx.exe -c conf\nginx-win-rtmp.conf";

        private VlcVideoSourceProvider sourceProvider;

        public MainWindow()

        {

            InitializeComponent();

        }

        private void MediaPlayer_Log(object sender, VlcMediaPlayerLogEventArgs e)

        {

            var message = "libVlc : " + e.Level + e.Message + e.Module;

            Debug.WriteLine(message);

        }

        private void MainWindow_OnLoaded(object sender, RoutedEventArgs e)

        {
            //var ffmpegPath = $"{AppDomain.CurrentDomain.BaseDirectory}FFmpeg/ffmpeg.exe";

            //// 显示可用的音效设备

            //var ffmpegArgument = " -list_devices true -f dshow -i dummy";

            //var process = new System.Diagnostics.Process();

            //var startInfo = new System.Diagnostics.ProcessStartInfo();

            //startInfo.FileName = ffmpegPath;

            //startInfo.Arguments = ffmpegArgument;

            //startInfo.UseShellExecute = false;

            //startInfo.RedirectStandardOutput = true;

            //startInfo.RedirectStandardError = true;

            // 将 StandardErrorEncoding 改为 UTF-8后FFmpeg输出不会中文乱码

            //startInfo.StandardErrorEncoding = System.Text.Encoding.UTF8;

            //process.EnableRaisingEvents = true;

            //process.StartInfo = startInfo;

            //process.Start();

            // 显示FFMpeg输出的内容,从中取出视频和音频设备名称

            //string output = process.StandardError.ReadToEnd();

            //Debug.WriteLine(output);

            //process.WaitForExit();
        }

        private void ButtonSase_OnClick(object sender, RoutedEventArgs e)

        {

            var file=new FileInfo(SavePath.Text);

            if(file.Exists) file.Delete();

            var ffmpegArgument = $" -f dshow -i video=\"{VideoName.Text}\" -f dshow -i audio=\"{AudioName.Text}\" -vcodec libx264 -acodec aac -strict -2 \"{SavePath.Text}\" -f flv rtmp://127.0.0.1:1935/live/home";

            Task.Run(() =>

            {

                var process = new Process();

                var startInfo = new ProcessStartInfo

                {

                    FileName = ffmpegPath,

                    Arguments = ffmpegArgument,

                    UseShellExecute = true,

                    RedirectStandardOutput = false

                };

                process.StartInfo = startInfo;

                process.Start();

                process.WaitForExit();

            });

        }

        private void ButtonStart_OnClick(object sender, RoutedEventArgs e)

        {

            Task.Run(() =>

            {

                var process = new Process();

                var startInfo = new ProcessStartInfo("cmd.exe")

                {

                    WorkingDirectory= $@"{AppDomain.CurrentDomain.BaseDirectory}nginx",

                    UseShellExecute = false,

                    RedirectStandardInput = true

                };

                process.StartInfo = startInfo;

                process.Start();

                process.StandardInput.WriteLine(nginxPath);

                process.StandardInput.AutoFlush = true;

                process.WaitForExit();

            });

            Dispatcher?.Invoke(() =>

            {

                var currentAssembly = Assembly.GetEntryAssembly();

                var currentDirectory = new FileInfo(currentAssembly.Location).DirectoryName;

                var libDirectory = new DirectoryInfo(System.IO.Path.Combine(currentDirectory, "libvlc",

                    IntPtr.Size == 4 ? "win-x86" : "win-x64"));

                sourceProvider = new VlcVideoSourceProvider(Dispatcher);

                sourceProvider.CreatePlayer(libDirectory);

                sourceProvider.MediaPlayer.Play("rtmp://127.0.0.1:1935/live/home");

                sourceProvider.MediaPlayer.Log += MediaPlayer_Log;

                sourceProvider.MediaPlayer.Manager.SetFullScreen(sourceProvider.MediaPlayer.Manager.CreateMediaPlayer(),

                    true);

                var bing = new Binding {Source = sourceProvider, Path = new PropertyPath("VideoSource")};

                img.SetBinding(Image.SourceProperty, bing);

            });

            MessageBox.Show("启动成功,请点击开始录制。");

        }

    }

}
这样按顺序点击1和2的按钮后,即可实现WPF的视频录制和预览录制的视频内容。
同时我们在APP.cs中重写退出事件,来在程序退出的时候结束Nginx进行。
 public partial class App : Application

    {

        protected override void OnExit(ExitEventArgs e)

        {

            var process = new Process();

            var startInfo = new ProcessStartInfo()

            {

                FileName = "taskkill",

                Arguments = " /f /im nginx.exe",

                UseShellExecute = false,

                RedirectStandardInput = true

            };

            process.StartInfo = startInfo;

            process.Start();

            process.WaitForExit();

        }

    }
至此,我们就变现实现了WPF进行视频录制和预览录制的视频内容的功能。
WPF另类实现摄像头录像的更多相关文章
- android 随手记 摄像头录像
1 xml <?xml version="1.0" encoding="utf-8"?> <LinearLayout xmlns:androi ...
- WPF 海康威视网络摄像头回调方式实现断连提示,降低时延
原文:WPF 海康威视网络摄像头回调方式实现断连提示,降低时延 项目需要使用海康威视网络摄像头接入实时视频数据,使用海康威视官方SDK开发,发现没有断连提示的功能,故开发了一个断连提示的功能 在开发过 ...
- C#调用AForge实现摄像头录像
1: 首先下载库文件>> 也可以去官网寻找>> 下载本教程全代码>> 输出为MP4需要用到ffmpeg相关的文件,我打包的库已经带了,去官网找的库可以在这个目录找到 ...
- WPF中在摄像头视频上叠加控件的解决方案
一.视频呈现 前段时间,在一个wpf的项目中需要实时显示ip摄像头,对此的解决方案想必大家都应该知道很多.在winform中,我们可以将一个控件(一般用panel或者pictruebox)的句柄丢给摄 ...
- [WPF 学习] 18. 摄像头(肢解DirectShow)
公司的产品需要人脸比对,摄像头相关的需求如下(突然发现除了英文不太好外,实际上中文也不太好,所以直接上一个接口) using System; using System.Drawing; using S ...
- win8 metro 自己写摄像头录像项目
这是要求不适用CameraCaptureUI等使用系统自带的 camera UI界面.要求我们自己写调用摄像头摄像的方法,如今我把我的程序贴下: UI界面的程序: <Page x:Class= ...
- 在WPF中开启摄像头扫描二维码(Media+Zxing)
近两天项目中需要添加一个功能,是根据摄像头来读取二维码信息,然后根据读出来的信息来和数据库中进行对比显示数据. 选择技术Zxing.WPFMediaKit.基本的原理就是让WPFmediaKit来对摄 ...
- DirectShowNet 使用摄像头录像+录音
http://www.cnblogs.com/endv/p/6052511.html // ------------------------------------------------------ ...
- Android调用手机摄像头使用MediaRecorder录像并播放
最近在项目开发中需要调用系统的摄像头录像并播放. 在开发中遇到了两个问题,记录下: (1)开发过程中出现摄像头占用,启动失败,报错.但是我已经在onDestory()中关闭了资源. 报错原因:打开程序 ...
随机推荐
- DEVOPS技术实践_16:使用Centos容器作为salve的报错offline的问题
上一篇创建了一个centos的容器,而且已经安装了openssh [root@node6 ~]# docker ps -a f2320c5d3c54 centos minutes ago Exited ...
- 20191017-8 alpha week 2/2 Scrum立会报告+燃尽图 07
此作业要求参见https://edu.cnblogs.com/campus/nenu/2019fall/homework/9804 小组名称:“组长”组 组长:杨天宇 组员:魏新,罗杨美慧,王歆瑶,徐 ...
- Tomcat从安装到配置Https SSL证书
为什么要写本文? 今天一个群友在群里问怎么给Tomcat配置SSL,也就是HTTPS,他买的阿里云的服务器,自带公网ip,还找到了免费的SSL证书 既然@我了,我就帮忙搞一搞呗,我就要了一个带sudo ...
- echarts在一个折线/柱状图浮窗显示多条数据
解决问题就在data里面,首先 data里面是可以json数组形式,如官方API上的 name:”“, value:”“,等 value是echart识别折线图的key值.1.来看数据格式 data: ...
- 图解 kubernetes scheduler 架构设计系列-初步了解
资源调度基础 scheudler是kubernetes中的核心组件,负责为用户声明的pod资源选择合适的node,同时保证集群资源的最大化利用,这里先介绍下资源调度系统设计里面的一些基础概念 基础任务 ...
- schedule of 2016-10-17~2016-10-23(Monday~Sunday)——1st semester of 2nd Grade
most important things to do 1.joint phd preparations 2.journal paper to write 3.solid fundamental kn ...
- Js 数组按数量分部!
使用 reduce 将数组分为几个部分,每个部分最多10个! 相比其他语言使用 js 实现这个逻辑非常的简单方便! var group = function (source, step) { if ...
- P3802 小魔女帕琪 概率与期望
P3802 小魔女帕琪 题目背景 从前有一个聪明的小魔女帕琪,兴趣是狩猎吸血鬼. 帕琪能熟练使用七种属性(金.木.水.火.土.日.月)的魔法,除了能使用这么多种属性魔法外,她还能将两种以上属性组合,从 ...
- 【UEFI】---关于BIOS,EIST和PState&CState和CPU主频变化得关系
Intel处理器都支持Turbo和EIST,且一般情况下,各家厂商在BIOS中都会设置EIST和PState的开关,那么这些开关与CPU的频率的关系是什么呢?今天对此做个总结: 按照国际惯例,本次梳理 ...
- Elastcisearch.Nest 7.x 系列`伪`官方翻译:通过 NEST 来快捷试用 Elasticsearch
本系列已经已经全部完成,完整版可见:https://blog.zhuliang.ltd/categories/Elasticsearch/ 本系列博文是"伪"官方文档翻译(更加本土 ...