跟我一起使用create-react-app脚手架搭建vw-layout解决方案
之前也是看过大漠的vw适配Vue-cli,我自己写H5,还有使用vue做项目的时候,会搭建大漠博客中的那一套。
现在在github上面,看见了一位博主使用create-react-app也是用vw适配,非常开心,现在我们一起使用vw给react适配移动端项目吧~
先放上博主大大的开源地址:https://github.com/gaohan1994/react-vw-layout
给各位无私开源的程序员们点赞,你们是最可爱的人儿。
1.创建项目
cnpm install -g create-react-app

create-react-app react-vw-layout

cd react-vw-layout

npm start

2..打开配置选项
由于react默认隐藏webpack配置需要手动显示。
eject完的项目如下

第二步收工,第三部开始配置各种插件。
3.增加配置
安装postCss插件
cnpm i --save postcss-aspect-ratio-mini postcss-px-to-viewport postcss-write-svg postcss-cssnext postcss-viewport-units cssnano
在config/webpack.confi.js文件中进行如下修改
1.引入postCss插件
const postcssAspectRatioMini = require('postcss-aspect-ratio-mini');

const postcssPxToViewport = require('postcss-px-to-viewport');

const postcssWriteSvg = require('postcss-write-svg');

const postcssCssnext = require('postcss-cssnext');

const postcssViewportUnits = require('postcss-viewport-units');

const cssnano = require('cssnano');
2.加入postCss配置
加入配置代码位置如下
  {

        // Options for PostCSS as we reference these options twice

        // Adds vendor prefixing based on your specified browser support in

        // package.json

        loader: require.resolve('postcss-loader'),

        options: {

          // Necessary for external CSS imports to work

          // https://github.com/facebook/create-react-app/issues/2677

          ident: 'postcss',

          plugins: () => [

            require('postcss-flexbugs-fixes'),

            require('postcss-preset-env')({

              autoprefixer: {

                flexbox: 'no-2009',

              },

              stage: 3,

            }),

            // Adds PostCSS Normalize as the reset css with default options,

            // so that it honors browserslist config in package.json

            // which in turn let's users customize the target behavior as per their needs.

            // postcssNormalize()

            // 加入地点

            // 加入地点

          ],

          sourceMap: isEnvProduction && shouldUseSourceMap,

        },

      },
需要加入的代码如下
postcssAspectRatioMini({}),

postcssPxToViewport({

  viewportWidth: 750, // (Number) The width of the viewport.

  viewportHeight: 1334, // (Number) The height of the viewport.

  unitPrecision: 3, // (Number) The decimal numbers to allow the REM units to grow to.

  viewportUnit: 'vw', // (String) Expected units.

  selectorBlackList: ['.ignore', '.hairlines'], // (Array) The selectors to ignore and leave as px.

  minPixelValue: 1, // (Number) Set the minimum pixel value to replace.

  mediaQuery: false // (Boolean) Allow px to be converted in media queries.

}),

postcssWriteSvg({

  utf8: false

}),

postcssCssnext({}),

postcssViewportUnits({}),

cssnano({

  preset: "advanced",

  autoprefixer: false,

  "postcss-zindex": false

})
4.测试
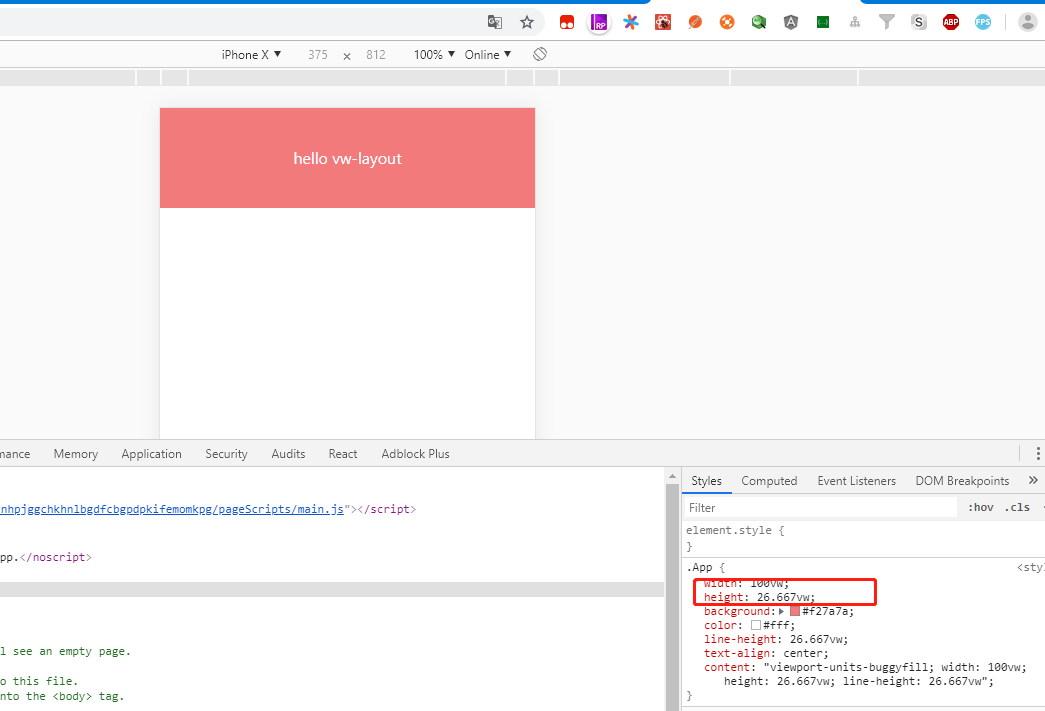
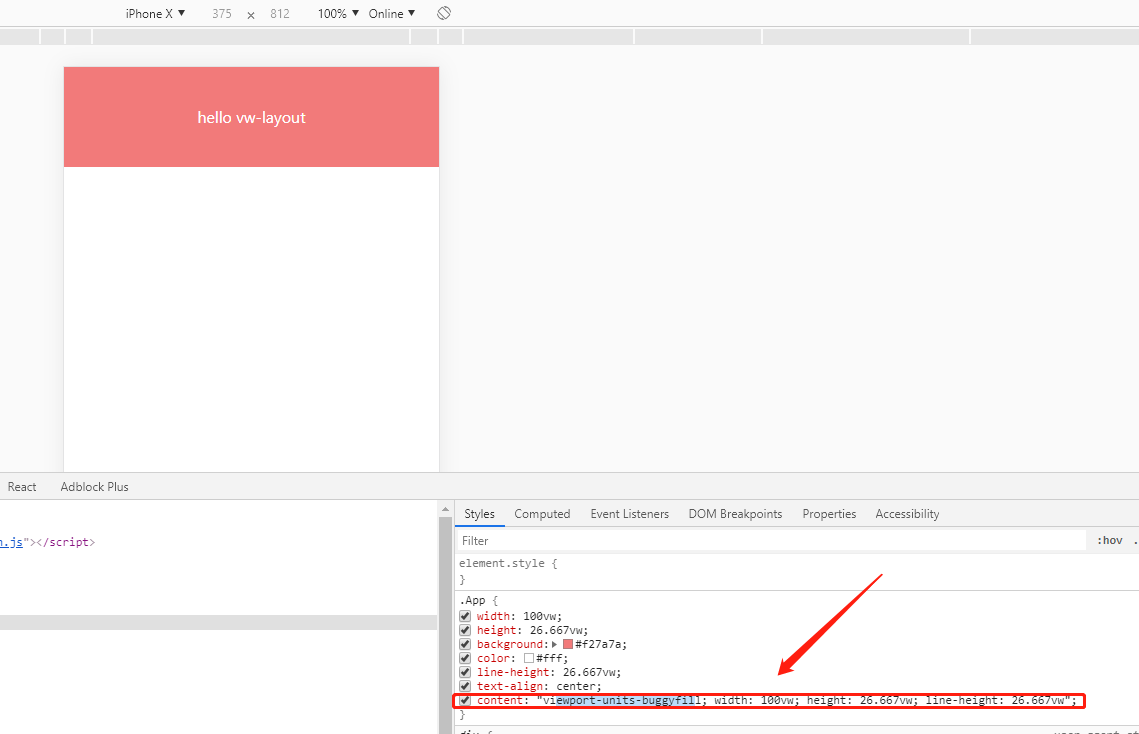
修改App.js
import React, { Component } from 'react';

import './App.css';

class App extends Component {

  render() {

    return (

      <div className="App">

        hello vw-layout

      </div>

    );

  }

}

export default App;
修改App.css
.App {

  width: 750px;

  height: 200px;

  background: #f27a7a;

  color: #ffffff;

  line-height: 200px;

  text-align: center;

}
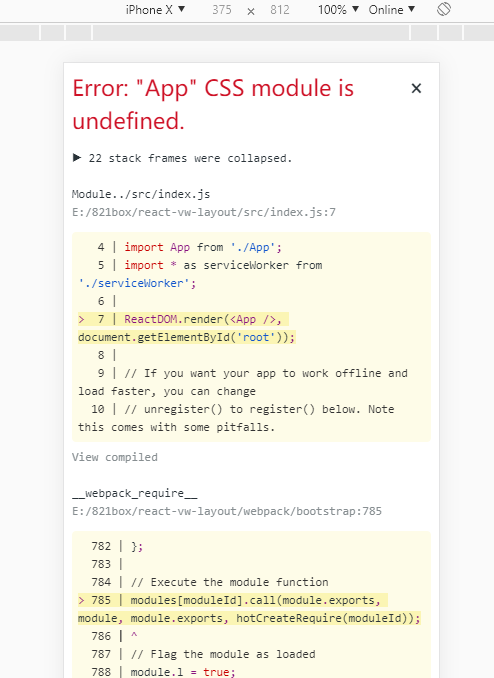
接下来运行项目,运行项目会报错
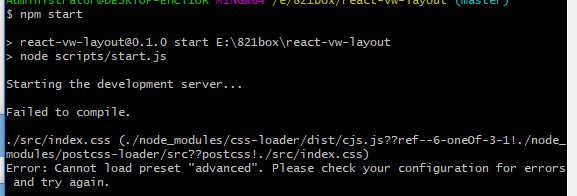
解决办法为:
cnpm i cssnano-preset-advanced --save-dev
运行项目
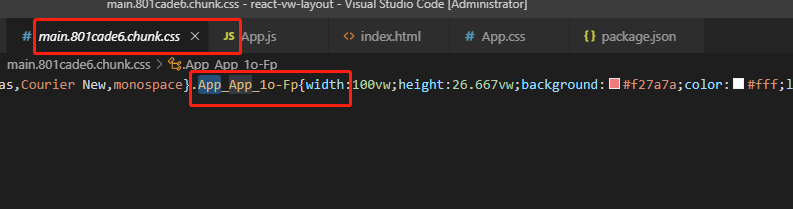
5.生产环境打包项目
使用npm run build报错
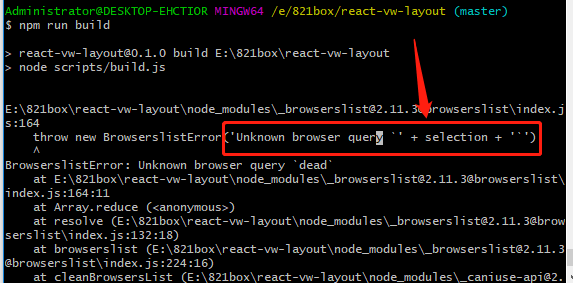
解决办法为修改package.json文件
 [

    "last 2 versions",

    "android 4",

    "opera 12"

  ],
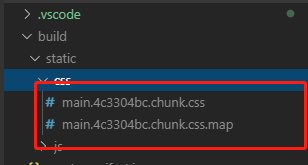
接下来打包项目成功

打开static/css/main.********.css
6.加入viewport-units-buggyfill配置
打开public/index.html
首先在中引入阿里cdn
<script src="//g.alicdn.com/fdilab/lib3rd/viewport-units-buggyfill/0.6.2/??viewport-units-buggyfill.hacks.min.js,viewport-units-buggyfill.min.js"></script>
在body中,加入如下js代码:
<script>

  window.onload = function () {

    window.viewportUnitsBuggyfill.init({

      hacks: window.viewportUnitsBuggyfillHacks

    });

  }

</script>
最终index.html如下
//index.html

<!DOCTYPE html>

<html lang="en">

  <head>

    <meta charset="utf-8" />

    <link rel="shortcut icon" href="%PUBLIC_URL%/favicon.ico" />

    <meta name="viewport" content="width=device-width, initial-scale=1" />

    <meta name="theme-color" content="#000000" />

    <meta

      name="description"

      content="Web site created using create-react-app"

    />

    <link rel="apple-touch-icon" href="logo192.png" />

    <!--

      manifest.json provides metadata used when your web app is installed on a

      user's mobile device or desktop. See https://developers.google.com/web/fundamentals/web-app-manifest/

    -->

    <link rel="manifest" href="%PUBLIC_URL%/manifest.json" />

    <!--

      Notice the use of %PUBLIC_URL% in the tags above.

      It will be replaced with the URL of the `public` folder during the build.

      Only files inside the `public` folder can be referenced from the HTML.

      Unlike "/favicon.ico" or "favicon.ico", "%PUBLIC_URL%/favicon.ico" will

      work correctly both with client-side routing and a non-root public URL.

      Learn how to configure a non-root public URL by running `npm run build`.

    -->

    <title>React App</title>

    <script src="//g.alicdn.com/fdilab/lib3rd/viewport-units-buggyfill/0.6.2/??viewport-units-buggyfill.hacks.min.js,viewport-units-buggyfill.min.js"></script>

  </head>

  <body>

    <noscript>You need to enable JavaScript to run this app.</noscript>

    <div id="root"></div>

    <script>

      window.onload = function () {

        window.viewportUnitsBuggyfill.init({

          hacks: window.viewportUnitsBuggyfillHacks

        });

      }

    </script>

    <!--

      This HTML file is a template.

      If you open it directly in the browser, you will see an empty page.

      You can add webfonts, meta tags, or analytics to this file.

      The build step will place the bundled scripts into the <body> tag.

      To begin the development, run `npm start` or `yarn start`.

      To create a production bundle, use `npm run build` or `yarn build`.

    -->

  </body>

</html>
重新执行npm start打开页面发现:
如果遇到img无法显示,则添加全局css
img {

    content: normal !important;

}
这样就适配了低版本安卓机型
7.加入css-modules配置
一般的小项目不使用css-modules已经可以hold住了,但是页面多起来还是建议使用css-modules,下面介绍一下用法:
npm i --save react-css-modules
在App.js文件中引入插件 import CSSModules from 'react-css-modules';
修改css文件的引入方式 从import './App.css';修改为import styles from './App.css';
修改引用Css方式 className=>styleName
修改导出方式 export default App=>export default CSSModules(App, styles);
保存,从新执行npm start查看页面发现失败
原因是未打开css import配置,此时import styles from './App.css';该语句并未成功引入css文件。
打开webpack.config.js加入modules: true 找到如下位置
  {

        loader: require.resolve('css-loader'),

        // options: cssOptions,

        // 代码看这里看这里

        options:{

          //添加添加添加

          modules:true,

          importLoaders:1,

        }

      },
保存,再次执行npm start查看页面

是这个class名太过乱码不适于调试,再次打开webpack.config.dev.js 找到如下位置加入语句localIdentName:'[name][local][hash:base64:5]'
 {

        loader: require.resolve('css-loader'),

        // options: cssOptions,

        // 代码看这里看这里

        options:{

          //添加添加添加

          modules:true,

          importLoaders:1,

          localIdentName: '[name]_[local]_[hash:base64:5]'

        }

      }
再次运行项目

我们可以看到对应的class,方便我们在项目中的调试
最后我们执行npm run build 查看打包文件
嗯,已经大功告成啦啦啦啦啦啦啦
开心,再次感谢作者大大无私的分享经验
跟我一起使用create-react-app脚手架搭建vw-layout解决方案的更多相关文章
- tap news:week5 0.0 create react app
参考https://blog.csdn.net/qtfying/article/details/78665664 先创建文件夹 安装create react app 这个脚手架(facebook官方提 ...
- 如何扩展 Create React App 的 Webpack 配置
如何扩展 Create React App 的 Webpack 配置 原文地址https://zhaozhiming.github.io/blog/2018/01/08/create-react-a ...
- 在 .NET Core 5 中集成 Create React app
翻译自 Camilo Reyes 2021年2月22日的文章 <Integrate Create React app with .NET Core 5> [1] Camilo Reyes ...
- 使用create react app教程
This project was bootstrapped with Create React App. Below you will find some information on how to ...
- 深入 Create React App 核心概念
本文差点难产而死.因为总结的过程中,多次怀疑本文是对官方文档的直接翻译和简单诺列:同时官方文档很全面,全范围的介绍无疑加深了写作的心智负担.但在最终的梳理中,发现走出了一条与众不同的路,于是坚持分享出 ...
- Create React App
Facebook开源了React前端框架(MIT Licence),也同时提供了React脚手架 - create-react-app. create-react-app遵循约定优于配置(Coc)的原 ...
- Create React App 安装less 报错
执行npm run eject 暴露模块 安装 npm i less less-loader -D 1.打开 react app 的 webpack.config.js const sassRege ...
- [React] Use the Fragment Short Syntax in Create React App 2.0
create-react-app version 2.0 added a lot of new features. One of the new features is upgrading to Ba ...
- [React] {svg, css module, sass} support in Create React App 2.0
create-react-app version 2.0 added a lot of new features. One of the new features is added the svgr ...
- create react app 项目部署在Spring(Tomcat)项目中
网上看了许多,大多数都是nginx做成静态项目,但是这样局限性太多,与Web项目相比许多服务端想做的验证都很麻烦,于是开始了艰难的探索之路,终于在不经意间试出来了,一把辛酸... 正常的打包就不说了. ...
随机推荐
- NX二次开发-C++的vector用法
#include <algorithm> //vector排序去重 sort( BoxNum.begin(), BoxNum.end()); BoxNum.erase(unique(Box ...
- C 函数指针详解
一 通常的函数调用 一个通常的函数调用的例子://自行包含头文件 void MyFun(int x); //此处的申明也可写成:void MyFun( int ); int main(int a ...
- docker网络原理
以下内容引用Docker -- 从入门到实践 当 Docker 启动时,会自动在主机上创建一个 docker0 虚拟网桥,实际上是 Linux 的一个 bridge,可以理解为一个软件交换机.它会在挂 ...
- MDK(KEIL) 两步解决 中文乱码 及 中文光标 半个半个跳的问题
1. 如果已经用MDK(KEIL)的默认设置写了好多中文,那么先用notepad把文件一一打开然后转变编码格式为 utf-8 without ROM,如下: 2. 如果还没有开始编辑,或者已经用not ...
- Python3 From Zero——{最初的意识:001~数据结构和算法}
一.从队列两端高效插入.删除元素,及保留固定数量的数据条目: collections.deque([iterable[,maxlen=N]]) a = collections.deque([1, 2] ...
- 20140331 HOG代码调试 Boost库安装
1.CUDAHOG代码调试 错误1: 错误提示:(main.obj : error LNK2019: 无法解析的外部符号 "public: __thiscall cudaHOG::cudaH ...
- canvas前端压缩图片和视频首屏缩略图并上传到服务器
图片: var img = document.createElement('img') img.src = window.URL.createObjectURL(fileObj.file) // 加载 ...
- _IRP struct
Windows XP x86 +0x000 Type : Int2B +0x002 Size : Uint2B +0x004 MdlAddress : Ptr32 _MDL +0x000 Next : ...
- batch、随机、Mini-batch梯度下降
batch梯度下降: 对所有m个训练样本执行一次梯度下降,每一次迭代时间较长: Cost function 总是向减小的方向下降. 随机梯度下降: 对每一个训练样本执行一次梯度下降,但是丢失了向量化带 ...
- java OOP第03章_继承、抽象类和抽象方法
一. 为什么需要继承: 若多个类中都需要一些属性和方法,那么就可以将属性和方法抽取到一个父类中,需要的子类可以通过extends关键字去继承这个父类后拥有相应的属性和方法. 类.数组.方法----引用 ...