nginx使用-1(源码安装nginx)
Nginx概述
Nginx (engine x) 是一个高性能的HTTP和反向代理web服务器,同时也提供了IMAP/POP3/SMTP服务。Nginx是由伊戈尔·赛索耶夫为俄罗斯访问量第二的Rambler.ru站点(俄文:Рамблер)开发的,第一个公开版本0.1.0发布于2004年10月4日。
Nginx是一款轻量级的Web 服务器/反向代理服务器及电子邮件(IMAP/POP3)代理服务器,在BSD-like 协议下发行。其特点是占有内存少,并发能力强,事实上nginx的并发能力确实在同类型的网页服务器中表现较好,中国大陆使用nginx网站用户有:百度、京东、新浪、网易、腾讯、淘宝等。
# curl -I 域名地址

Server:Nginx
☆ 常见用法
1) web服务器软件 httpd(apache)

   同类型web服务器软件:apache nginx(俄罗斯) iis(微软) lighttpd(德国)

2) 提供了IMAP/POP3/SMTP服务

3) 充当反向代理服务器,实现负载均衡功能。LB=>Load Blance
☆ Nginx特点
① 高可靠:稳定性 master进程 管理调度请求分发到哪一个worker=> worker进程 响应请求 一master多worker
② 热部署 :(1)平滑升级 (2)可以快速重载配置
③ 高并发:可以同时响应更多的请求 事件 epoll模型 几万
④ 响应快:尤其在处理静态文件上,响应速度很快 sendfile
⑤ 低消耗:cpu和内存 1w个请求 内存2-3MB
⑥ 分布式支持:反向代理 七层负载均衡,新版本也支持四层负载均衡
编译安装Nginx
源码安装
第一步:安装依赖库
[root@server01 ~] # yum -y install pcre-devel zlib-devel openssl-devel
第二步:创建账号
[root@server01 ~] # useradd -r -s /sbin/nologin www
第三步:配置/编译与安装
tar xvf nginx-1.18.0.tar.gz

cd nginx-1.12.2

./configure --prefix=/usr/local/nginx --user=www --group=www --with-http_ssl_module --with-http_stub_status_module --with-http_realip_module

make && make install
编译参数说明
| 参数 | 作用 |
|---|---|
| --prefix | 编译安装到的软件目录 |
| --user | worker进程运行用户 |
| --group | worker进程运行用户组 |
| --with-http_ssl_module | 支持https 需要pcel-devel依赖 |
| --with-http_stub_status_module | 基本状态信息显示 查看请求数、连接数等 |
| --with-http_realip_module | 定义客户端地址和端口为header头信息 常用于反向代理后的真实IP获取 |
Nginx目录介绍
| 目录 | 作用 |
|---|---|
| conf | 配置文件 |
| html | 网站默认目录 |
| logs | 日志 |
| sbin | 可执行文件 [软件的启动 停止 重启等] |
软件操作参数
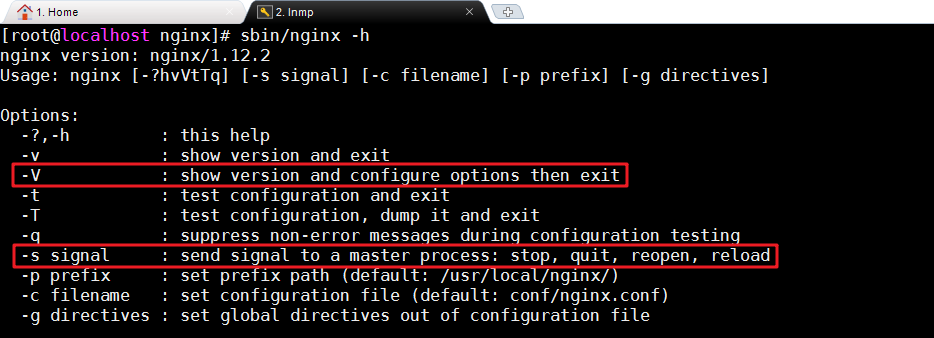 |
|
| 参数 | 作用 |
|---|---|
| -V | 显示版本号和配置选项 |
| -s | stop关闭 quit优雅关闭 reload重载 reopen重开日志 |
Nginx服务配置
#Nginx服务配置到该文件中

vim /usr/lib/systemd/system/nginx.service

[Unit]

Description=nginx

After=network.target

[Service]

Type=forking

ExecStart=/usr/local/nginx/sbin/nginx -c /usr/local/nginx/conf/nginx.conf

ExecReload=/usr/local/nginx/sbin/nginx -s reload

ExecStop=/usr/local/nginx/sbin/nginx -s quit

PrivateTmp=true

[Install]

WantedBy=multi-user.target

扩展:

Type=forking,forking代表后台运行
启动Nginx服务:
[root@server01 ~] # systemctl start nginx.service
设置Nginx开机启动:
[root@server01 ~] # systemctl enable nginx.service
配置文件介绍
查看nignx目录下的配置文件
/usr/local/nginx/conf/nginx.conf
#nginx子进程启动用户

#user  nobody;

#子进程数量  一般调整为cpu核数或者倍数

worker_processes  1;

#错误日志定义

#error_log  logs/error.log;

#error_log  logs/error.log  notice;

#error_log  logs/error.log  info;

#进程pid 存储文件

#pid        logs/nginx.pid;

#事件

events {

    #每个子进程的连接数         nginx当前并发量  worker_processes * worker_connections

    worker_connections  1024;

}

#http协议段

http {

    #引入  文件扩展名和与文件类型映射表

    include       mime.types;

    #默认文件类型

    default_type  application/octet-stream;

    #访问日志access.log的格式

    #log_format  main  '$remote_addr - $remote_user [$time_local] "$request" '

    #                  '$status $body_bytes_sent "$http_referer" '

    #                  '"$http_user_agent" "$http_x_forwarded_for"';

    #访问日志存储路径

    #access_log  logs/access.log  main;

    #linux内核  2.6提供文件读写的机制

    sendfile        on;

    #tcp_nopush     on;

    #keepalive_timeout  0;

    #长连接超时时间  单位为s

    keepalive_timeout  65;

    #gzip压缩

    #gzip  on;

    #server虚拟主机的配置

    server {

        #监听端口

        listen       80;

        #域名  可以有多个 用空格分隔

        server_name  localhost;

        #默认编码

        #charset koi8-r;

        #access_log  logs/host.access.log  main;

        #location 用来匹配url

        location / {

            #默认访问的网站路径

            root   html;

            #默认访问页面 从前往后的顺序查找

            index  index.html index.htm;

        }

        #error_page  404              /404.html;

        # redirect server error pages to the static page /50x.html

        #

        error_page   500 502 503 504  /50x.html;

        location = /50x.html {

            root   html;

        }

        # proxy the PHP scripts to Apache listening on 127.0.0.1:80

        #

        #location ~ \.php$ {

        #    proxy_pass   http://127.0.0.1;

        #}

        # pass the PHP scripts to FastCGI server listening on 127.0.0.1:9000

        #

        #location ~ \.php$ {

        #    root           html;

        #    fastcgi_pass   127.0.0.1:9000;

        #    fastcgi_index  index.php;

        #    fastcgi_param  SCRIPT_FILENAME  /scripts$fastcgi_script_name;

        #    include        fastcgi_params;

        #}

        # deny access to .htaccess files, if Apache's document root

        # concurs with nginx's one

        #

        #location ~ /\.ht {

        #    deny  all;

        #}

    }

    # another virtual host using mix of IP-, name-, and port-based configuration

    #

    #server {

    #    listen       8000;

    #    listen       somename:8080;

    #    server_name  somename  alias  another.alias;

    #    location / {

    #        root   html;

    #        index  index.html index.htm;

    #    }

    #}

    # HTTPS server

    #

    #server {

    #    listen       443 ssl;

    #    server_name  localhost;

    #    ssl_certificate      cert.pem;

    #    ssl_certificate_key  cert.key;

    #    ssl_session_cache    shared:SSL:1m;

    #    ssl_session_timeout  5m;

    #    ssl_ciphers  HIGH:!aNULL:!MD5;

    #    ssl_prefer_server_ciphers  on;

    #    location / {

    #        root   html;

    #        index  index.html index.htm;

    #    }

    #}

}
主要注意:
http=>server=>location 递进关系
一个有多个server
一个server可以有多个location
server配置
1.1、server虚拟主机配置
在实际生产业务环境中,一台web服务器,需要使用多个网站部署。搭建vhost虚拟机主机实现不同域名,解析绑定到不同的目录。
核心语法
#基于http的web服务

server{

    #监听端口

    listen 80;

    #配置虚拟机

    server_name shop.lnmp.com;

    root html/tp5shop;

    location / {

        index index.php index.html index.htm;

    }

    location ~ \.php$ {

        fastcgi_pass   127.0.0.1:9000;

        fastcgi_index  index.php;

        fastcgi_param  SCRIPT_FILENAME  $document_root$fastcgi_script_name;

        include        fastcgi_params;

    }

}
一般server虚拟主机配置有三类:
①基于域名,将域名配置到server_name上
②基于IP,将IP配置到server_name上
③基于端口,将端口配置到listen
案例一:基于域名的虚拟机配置
①建立网站访问目录
[root@server01 ~] # cd /usr/local/nginx/html

[root@server01 ~] # mkdir tp5shop

[root@server01 ~] # cd tp5shop

#创建测试文件

[root@server01 ~] # echo "shop.lnmp.com" >> index.html

[root@server01 ~] # echo "shop site by php" >> index.php
②解析域名并绑定
当前客户端是通过windows的浏览器,需要在win下的hosts文件(C:\Windows\System32\drivers\etc\hosts)进行解析域名
nginx配置文件绑定域名
server {

      #监听端口

      listen 80;

      #绑定域名

      server_name shop.lnmp.com;

      #网站目录

      root html/tp5shop;

      #默认访问页面

      index index.html;

      #这段一定不要忘了配置,需要解析php使用到

      location ~ \.php$ {

        fastcgi_pass   127.0.0.1:9000;

        fastcgi_index  index.php;

        fastcgi_param  SCRIPT_FILENAME  $document_root$fastcgi_script_name;

        include        fastcgi_params;

    }

 }
③浏览器访问查看效果
案例二:配置基于端口的虚拟主机
还是使用上面创建好的tp5shop目录
修改listen配置进行测试
案例三:配置基于IP的虚拟主机
①添加IP
yum install -y net-tools

#临时绑定IP

[root@server01 ~] # ifconfig ens33:1 192.168.17.220

#查看IP是否绑定成功

[root@server01 ~] # ip a

#如果ip不能够临时绑定,出现错误  networkManerger 服务关闭
②nginx配置文件添加
server {

    listen 80;

    server_name 192.168.17.220;

    root html/ip;

}
③建立一个IP测试目录
[root@server01 ~] # cd /usr/local/nginx/html

[root@server01 ~] # mkdir ip

[root@server01 ~] # echo "ip site" >> index.html
nginx使用-1(源码安装nginx)的更多相关文章
- 源码安装nginx以及平滑升级
源码安装nginx以及平滑升级 ...
- Linux之源码安装nginx,并按照作业一描述的那样去测试使用
作业五:源码安装nginx,并按照作业一描述的那样去测试使用 [root@localhost nginx]# yum install gcc-* glibc-* openssl openssl-dev ...
- 源码安装Nginx以及用systemctl管理
一.源码安装Nginx: 先安装gcc编译器(安装过的可以忽略) [root@localhost ~]# yum -y install gcc gcc-c++ wget 进入src目录 [root@l ...
- linux源码安装nginx
任务目标:源码安装nginx,作为web服务修改配置文件,让配置生效,验证配置 首先要去官网nginx.org下载一个tar包: tar xvf 解包 进入到解包出来的目录,对configure进行配 ...
- centos7 中源码安装nginx
使用nginx有一段时间了,还是有很多东西不懂的,在这里做一下自己学习过程中的一些整理,能使自己得到提升. 1.环境:centos7 1511 最小化安装 2.下载nginx,可以在系统中下载,也可 ...
- 工作笔记-- 源码安装nginx
源码安装nginx 1.安装nginx的依赖包 [root@localhost ~]# yum -y install gcc gcc-c++ openssl openssl-devel pcre pc ...
- 源码安装nginx 方法二
yum 仓库不能用大写字母 [root@oldboy conf.d]# gzip * 压缩当前目录下的所有文件 gzip ./* gzip . gzip./ # 关闭防火墙和selinux [root ...
- 源码安装nginx env
源码安装nginx 1. For ubuntu:18.04 apt -y install build-essential libtool libpcre3 libpcre3-dev zlib1g-de ...
- redhat 5下源码安装nginx服务
首先确保机器中已安装 gcc c++,libtool等工具,保证可执行源码安装 A.为了确保能在 Nginx 中使用正则表达式进行更灵活的配置,安装之前需要确定系统是否安装有 PCRE(Perl Co ...
- 1.linux源码安装nginx
从官网下载nginx.tar.gz源码包 拷贝至Linux系统下进行解压 tar -zxvf nginx.tar.gz 进入解压后的目录,需要./configure,此步骤会报多个错,比如没有安装gc ...
随机推荐
- 在kubernetes集群里集成Apollo配置中心(1)之交付Apollo-configservice至Kubernetes集群
1.Apollo简介 Apollo(阿波罗)是携程框架部门研发的分布式配置中心,能够集中化管理应用不同环境.不同集群的配置,配置修改后能够实时推送到应用端,并且具备规范的权限.流程治理等特性,适用于微 ...
- CPU饥饿与线程饥饿
线程饥饿: 进程无法得到资源,(cpu或者io资源或者别的什么资源),所以无法进行下去 比如说读者写者问题,如果读者优先,那么写者可能会饿死. 又比如操作系统概念的一道习题. 用broadcast可能 ...
- MDN 文档高级操作进阶教程
MDN 文档高级操作进阶教程 MDN 文档, 如何优雅的使用 MDN 文档上的富文本编辑器 pre & 语法高亮器 code & note box source code 上传附件 i ...
- position: absolute; not work
position: absolute; not work https://stackoverflow.com/questions/11928294/css-position-absolute-with ...
- CNN专访灵石CTO:Baccarat流动性挖矿能否持续?
近日,CNN记者Robert独家专访Baccarat的项目团队CTO STEPHEN LITAN,跟他特别聊了聊DeFi的近况. 以下是专访全文: Robert:推出Baccarat的契机是什么? S ...
- 【.NET 与树莓派】控制舵机
不管是小马达,还是大马达,嗯,也就是电机,相信大伙伴们也不会陌生.四驱车是一种很优秀的玩具,从老周小时候就开始流行(动画片<四驱兄弟>估计很多大朋友都看过),直到现在还能看到很多卖四驱车的 ...
- 适合Linux嵌入式项目的代码构建与依赖管理工具——cazel
前言 我们知道,现在有很多流行的优秀代码构建工具,如CMake.jetkins.bazel等.这些不同的构建工具在其应用的领域起到了举足轻重的作用. 但是,如果仔细研究就会发现,在嵌入式领域,构建工具 ...
- Simple: SQLite3 中文结巴分词插件
一年前开发 simple 分词器,实现了微信在两篇文章中描述的,基于 SQLite 支持中文和拼音的搜索方案.具体背景参见这篇文章.项目发布后受到了一些朋友的关注,后续也发布了一些改进,提升了项目易用 ...
- hadoop的lzo支持
目录 1.下载相关文件: 2.Configure LZO to build a shared library (required) and use a package-specific prefix ...
- 生成UUID的代码
代码: String reqId = UUID.randomUUID().toString().replace("-", "");