
ASP.NET Core3.1使用Identity Server4建立Authorization Server-2
前言
建立Web Api项目
在同一个解决方案下建立一个Web Api项目IdentityServer4.WebApi,然后修改Web Api的launchSettings.json。参考第一节,当然可以不修改的,端口号为5001。
{

  "profiles": {

    "IdentityServer4.WebApi": {

      "commandName": "Project",

      "launchBrowser": true,

      "launchUrl": "weatherforecast",

      "applicationUrl": "http://localhost:5001",

      "environmentVariables": {

        "ASPNETCORE_ENVIRONMENT": "Development"

      }

    }

  }

}
添加Swagger帮助页面
在Startup.ConfigureServices方法中将Swagger生成器添加到服务集合:
        public void ConfigureServices(IServiceCollection services)

        {

            services.AddControllers();

            // Register the Swagger generator, defining one or more Swagger documents

            services.AddSwaggerGen(c =>

            {

                c.SwaggerDoc("v1", new OpenApiInfo { Title = "My API", Version = "v1" });

            });

        }
OpenApiInfo需要using Microsoft.OpenApi.Models;
在该Startup.Configure方法中,启用用于提供生成的JSON文档和Swagger UI的中间件:
        public void Configure(IApplicationBuilder app, IWebHostEnvironment env)

        {

            if (env.IsDevelopment())

            {

                app.UseDeveloperExceptionPage();

            }

            // Enable middleware to serve generated Swagger as a JSON endpoint.

            app.UseSwagger();

            // Enable middleware to serve swagger-ui (HTML, JS, CSS, etc.),

            // specifying the Swagger JSON endpoint.

            app.UseSwaggerUI(c =>

            {

                c.SwaggerEndpoint("/swagger/v1/swagger.json", "My API V1");

            });

            app.UseRouting();

            app.UseAuthorization();

            app.UseEndpoints(endpoints =>

            {

                endpoints.MapControllers();

            });

        }
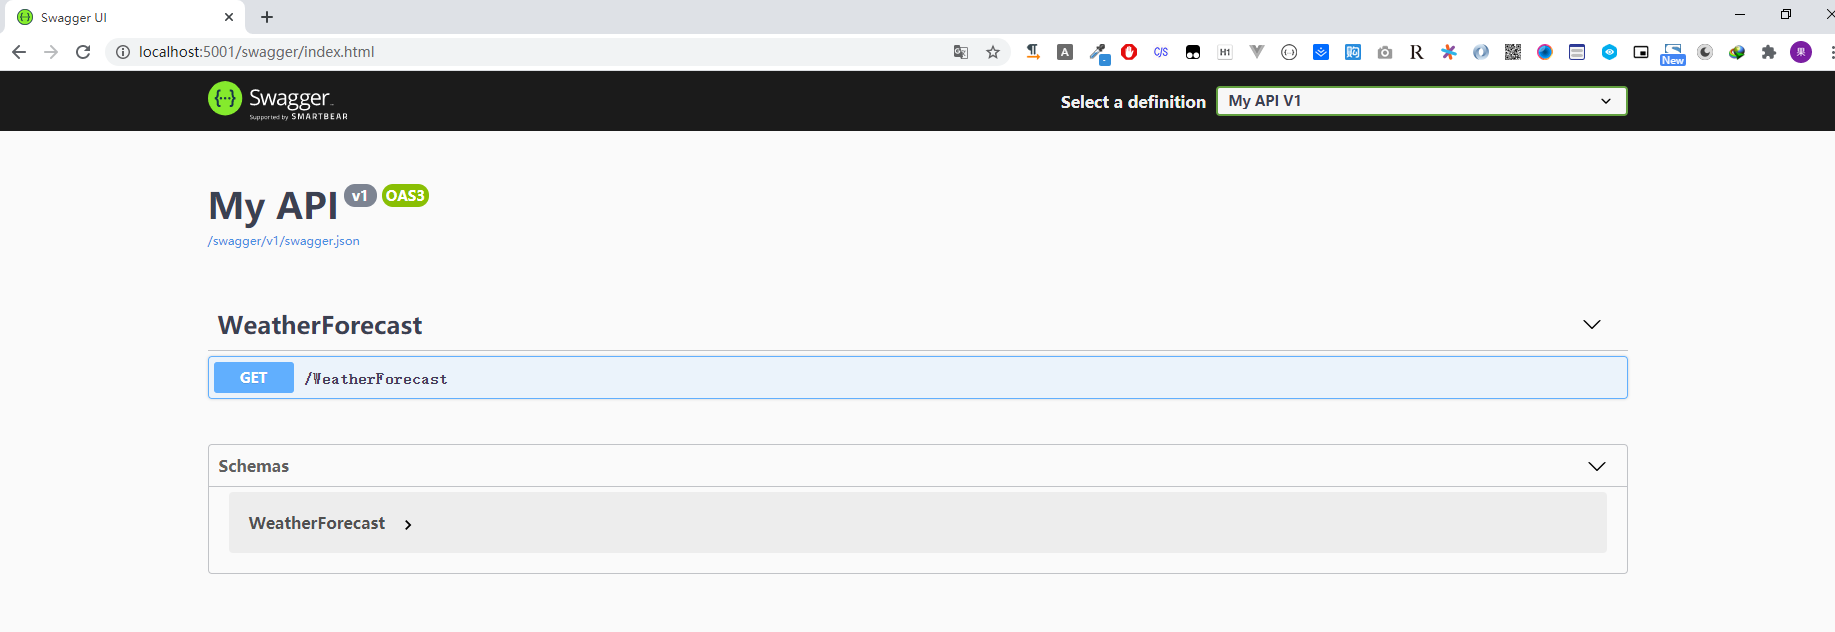
把Web Api设为启动项目,打开:http://localhost:5001/swagger/index.html访问Swagger帮助页面:
如果要在应用程序的根目录(
http://localhost:<port>/)提供Swagger UI ,请将RoutePrefix属性设置为空字符串:app.UseSwaggerUI(c =>
{
c.SwaggerEndpoint("/swagger/v1/swagger.json", "My API V1");
c.RoutePrefix = string.Empty;
});
顺便我们把
launchSettings.json的"launchUrl": "weatherforecast",删掉,这个是在浏览器中启动的默认URL。然后我们再次启动,就可以直接看到Swagger的帮助页面了。
添加库IdentityServer4.AccessTokenValidation
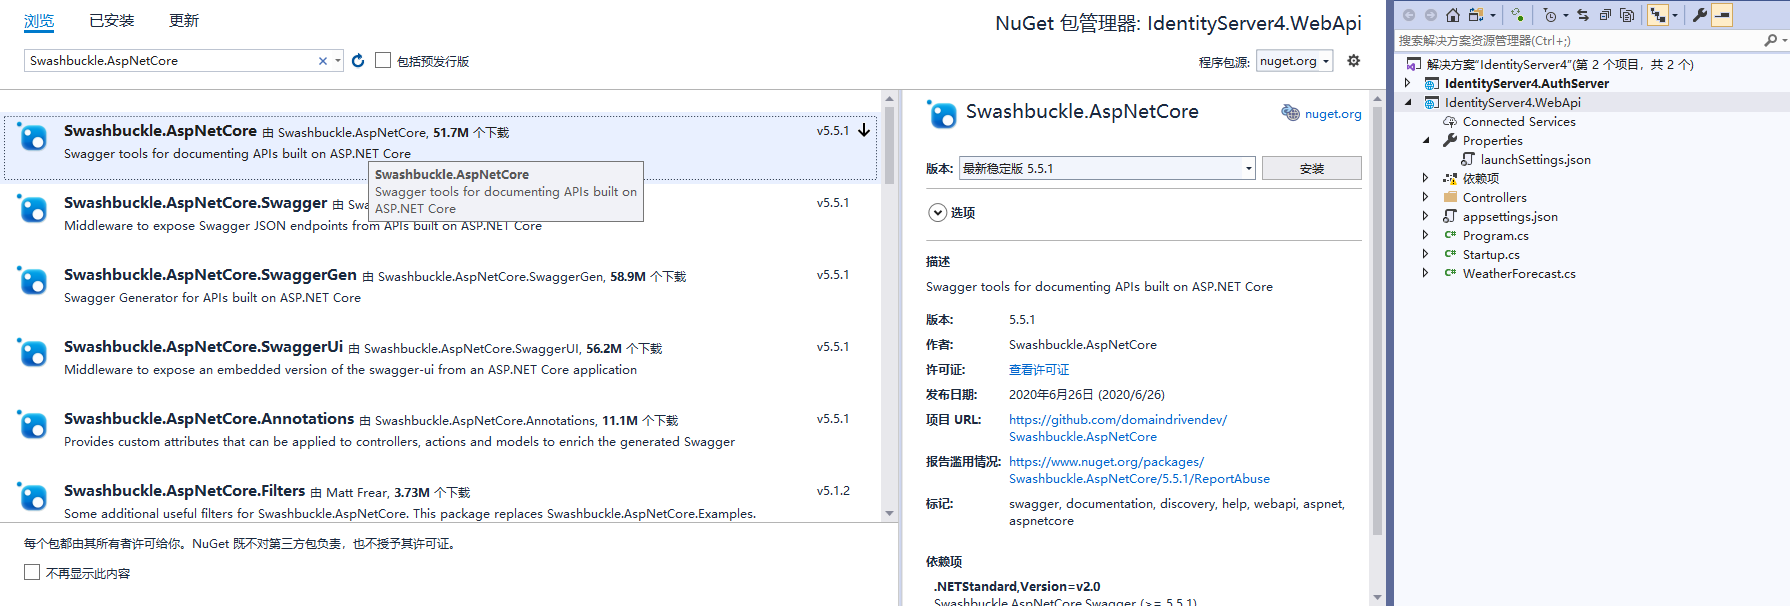
Web Api配置Identity Server就需要对token进行验证, 这个库就是对access token进行验证的. 通过NuGet安装:

在Startup的ConfigureServices里面注册配置:
官方文档的配置:
public void ConfigureServices(IServiceCollection services)
{
services.AddControllers();
services.AddAuthentication("Bearer")
.AddJwtBearer("Bearer", options =>
{
options.Authority = "https://localhost:5001";
options.TokenValidationParameters = new TokenValidationParameters
{
ValidateAudience = false
};
});
}
官方文档的这个配置是不进行验证Api的Scope和其他一些配置的,也就是只要我拿到Access Token就可以访问了。但实际情况应该是我们可能存在多个api项目,有些只能访问api1、有些只能访问api2。
我们的配置,完整的Web Api Startup.cs
using Microsoft.AspNetCore.Authentication.JwtBearer;
using Microsoft.AspNetCore.Builder;
using Microsoft.AspNetCore.Hosting;
using Microsoft.Extensions.Configuration;
using Microsoft.Extensions.DependencyInjection;
using Microsoft.Extensions.Hosting;
using Microsoft.OpenApi.Models;
namespace IdentityServer4.WebApi
{
public class Startup
{
public Startup(IConfiguration configuration)
{
Configuration = configuration;
}
public IConfiguration Configuration { get; }
// This method gets called by the runtime. Use this method to add services to the container.
public void ConfigureServices(IServiceCollection services)
{
services.AddControllers();
services.AddAuthentication(JwtBearerDefaults.AuthenticationScheme)
.AddJwtBearer(options =>
{
options.RequireHttpsMetadata = false;
options.Authority = "http://localhost:5000";
options.Audience = "api1";
});
// Register the Swagger generator, defining one or more Swagger documents
services.AddSwaggerGen(c =>
{
c.SwaggerDoc("v1", new OpenApiInfo { Title = "My API", Version = "v1" });
});
}
// This method gets called by the runtime. Use this method to configure the HTTP request pipeline.
public void Configure(IApplicationBuilder app, IWebHostEnvironment env)
{
if (env.IsDevelopment())
{
app.UseDeveloperExceptionPage();
}
//身份验证
app.UseAuthentication();
// Enable middleware to serve generated Swagger as a JSON endpoint.
app.UseSwagger();
// Enable middleware to serve swagger-ui (HTML, JS, CSS, etc.),
// specifying the Swagger JSON endpoint.
app.UseSwaggerUI(c =>

{

 c.SwaggerEndpoint("/swagger/v1/swagger.json", "My API V1");

 c.RoutePrefix = string.Empty;

});
app.UseRouting();
//授权
app.UseAuthorization();
app.UseEndpoints(endpoints =>
{
endpoints.MapControllers();
});
}
}
}
AddAuthentication:将身份验证服务添加到DI并配置Bearer为默认方案。
UseAuthentication将身份验证中间件添加到管道中,以便对主机的每次调用都将自动执行身份验证。
UseAuthorization添加了授权中间件,以确保匿名客户端无法访问我们的API端点。
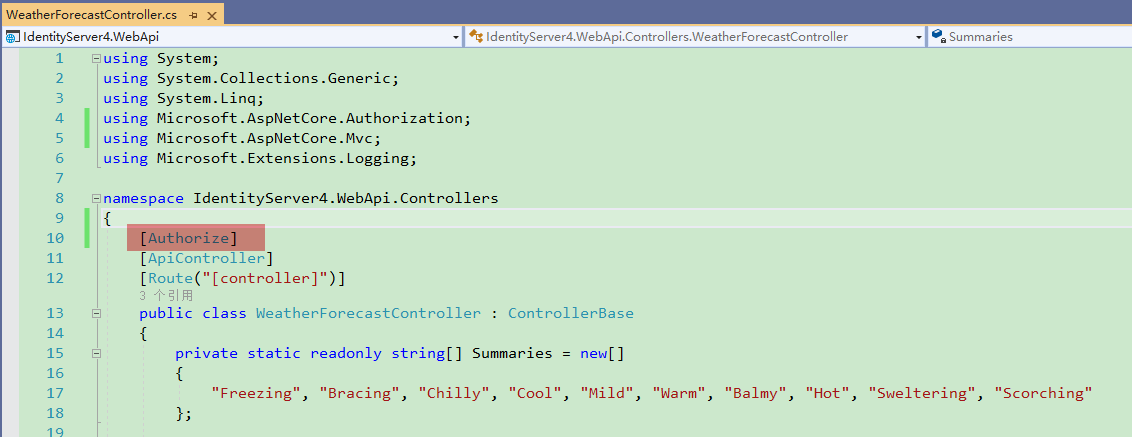
添加[Authorize]属性:
打开WeatherForecastController, 在Controller上面添加这个属性:
然后我们打开:http://localhost:5001/weatherforecast
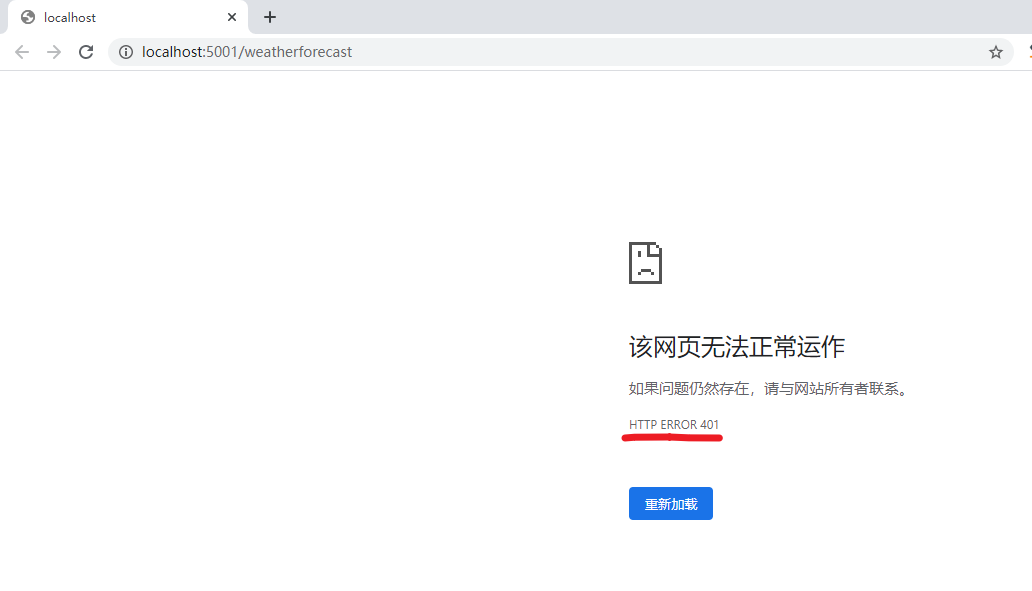
401意思是未授权
所以我们首先需要获取到一个token。那就需要把上一节的Authorization Server也跑起来。解决方案右键,启动项目设置为多个启动项目,AuthServer项目放前面。
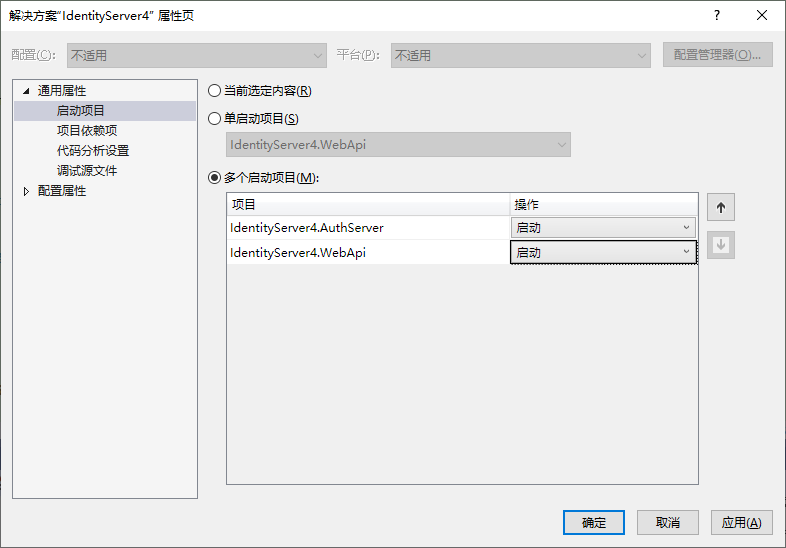
然后运行, 使用Postman先获取token:
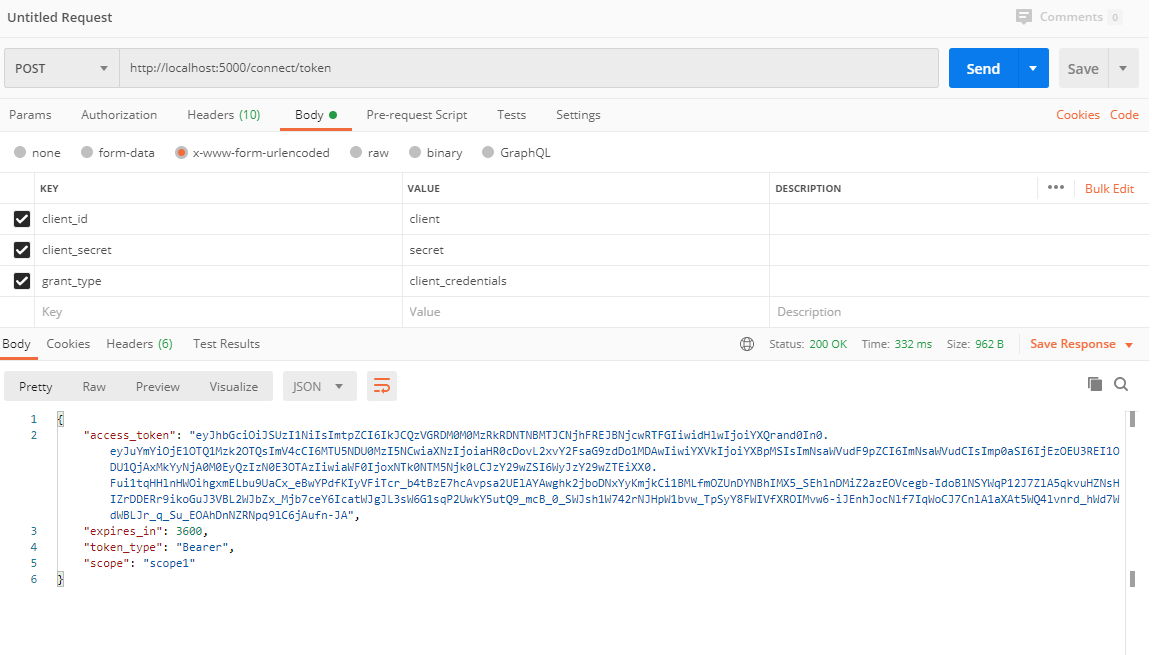
然后复制一下 access_token的值。新建一个Web Api项目的请求, 把access_token贴到Authorization选择TYPE为Bearer Token的Token里去。

然后,我们就看到请求成功啦~。
验证下范围
还记得我们Web Api的Startup.cs中配置的当前Api为api1,他是和我们AuthServer项目的配置统一的,现在我们改为api2试一下,找一个不存在的,验证下是否还能访问Api接口。
services.AddAuthentication(JwtBearerDefaults.AuthenticationScheme)

            .AddJwtBearer(options =>

            {

                options.RequireHttpsMetadata = false;

                options.Authority = "http://localhost:5000";

                options.Audience = "api2";

            });
重新运行项目,获取token,访问api
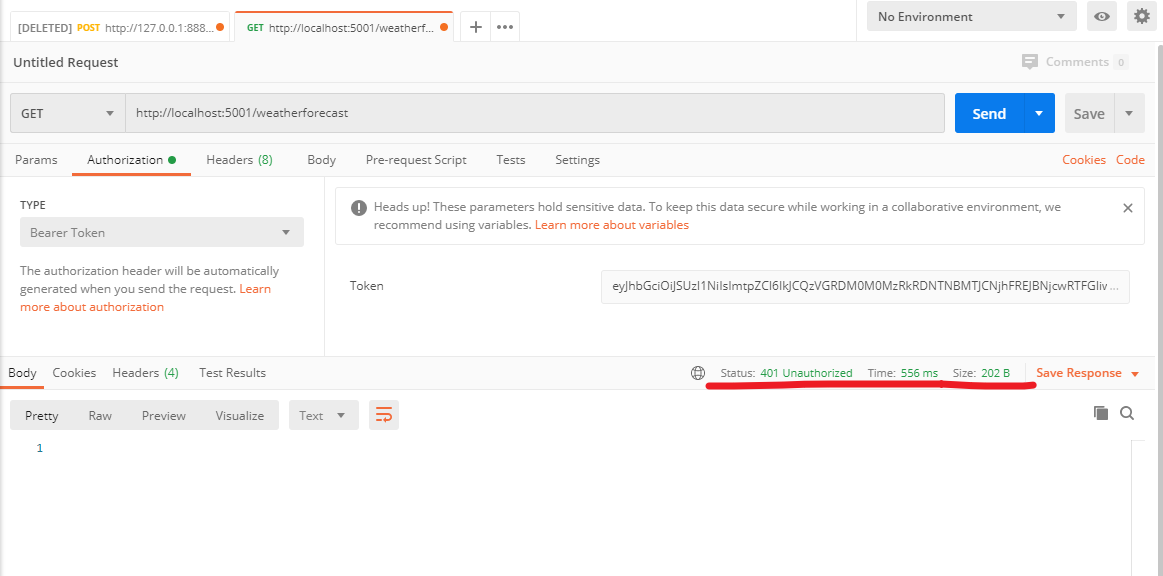
可以看到,token是可以正常获取的,但是我们不能访问api了。
分析一下Token
去https://jwt.io/ 可以分析一下这个token,感兴趣的可以自己了解下,这块资料很多的还是。
End
虽然系列内容基本是参考杨旭老师的,但是真的写起来还是满费力气的,在这里谢谢杨老师,另外B站有杨老师完整版的Identity Server4视频,大家可以去看下哦~
推广下自己的公众号一个逗逼的程序员,主要记录自己工作中解决问题的思路分享及学习过程中的笔记。绝对不会程序员贩卖程序员的焦虑来割韭菜。
ASP.NET Core3.1使用Identity Server4建立Authorization Server-2的更多相关文章
- ASP.NET Core3.1使用Identity Server4建立Authorization Server
前言 网上关于Identity Server4的资料有挺多的,之前是一直看杨旭老师的,最近项目中有使用到,在使用.NET Core3.1的时候有一些不同.所以在此记录一下. 预备知识: https:/ ...
- 从头编写asp.net core 2.0 web api 基础框架 (5) + 使用Identity Server 4建立Authorization Server (7) 可运行前后台源码
前台使用angular 5, 后台是asp.net core 2.0 web api + identity server 4. 从头编写asp.net core 2.0 web api 基础框架: 第 ...
- 使用Identity Server 4建立Authorization Server (1)
预备知识: http://www.cnblogs.com/cgzl/p/7746496.html 本文内容基本完全来自于Identity Server 4官方文档: https://identitys ...
- 使用Identity Server 4建立Authorization Server
使用Identity Server 4建立Authorization Server (6) - js(angular5) 客户端 摘要: 预备知识: http://www.cnblogs.com/cg ...
- 三、IDS4建立authorization server
建立authorization server 一.环境搭建 1.创建项目 2.引用NuGet的identityserver4 3.配置asp.net core 管道 打开Startup.cs, 编辑C ...
- 使用Identity Server 4建立Authorization Server (3)
预备知识: http://www.cnblogs.com/cgzl/p/7746496.html 第一部分: http://www.cnblogs.com/cgzl/p/7780559.html 第二 ...
- 使用Identity Server 4建立Authorization Server (5)
预备知识: http://www.cnblogs.com/cgzl/p/7746496.html 第一部分: http://www.cnblogs.com/cgzl/p/7780559.html 第二 ...
- 使用Identity Server 4建立Authorization Server (6) - js(angular5) 客户端
预备知识: http://www.cnblogs.com/cgzl/p/7746496.html 第一部分: http://www.cnblogs.com/cgzl/p/7780559.html 第二 ...
- 使用Identity Server 4建立Authorization Server (2)
第一部分: http://www.cnblogs.com/cgzl/p/7780559.html 第一部分主要是建立了一个简单的Identity Server. 接下来继续: 建立Web Api项目 ...
随机推荐
- mac App 破解之路六 studio 3t
不想无限使用,直接破解到正版: 输入邮箱 名字之后 还有licence信息之后,处理函数是: this.text.getText() 很明显是你输入的licence. 然后交给父类okPress处 ...
- cb51a_c++_STL_算法_根据第n个元素排序nth_element
cb51a_c++_STL_算法_根据第n个元素排序nth_elementnth_element(b,n,e),比如最大的5个数排序,或者最小的几个数nth_element(b,n,e,p)对比:pa ...
- MySQL按指定字符合并及拆分
按照指定字符进行合并或拆分是经常碰到的场景,MySQL在合并的写法上比较简单,但是按指定字符拆分相对比较麻烦一点(也就是要多写一些字符).本文将举例演示如何进行按照指定字符合并及拆分. 1. 合并 M ...
- 关于 urlencode 的使用和 json 模块的介绍
先附上一段 “百度翻译” 的爬虫代码 # python爬虫实现百度翻译 # urllib和request POST参数提交 from urllib import request,parse impor ...
- CString 十六进制转二进制
int nValude = 0; CString strtemp("asdb");; sscanf(strtemp.GetBuffer(0),"%x",& ...
- mybatis源码配置文件解析之五:解析mappers标签
在上篇博客中分析了plugins标签,<mybatis源码配置文件解析之四:解析plugins标签>,了解了其使用方式及背后的原理.现在来分析<mappers>标签. 一.概述 ...
- JQ三种提示框:提示信息框、确认框、输入文本框
浏览器的三种提示框: alert()提示信息框 confirm()提示确认框 prompt()提示输入文本框 1.alert()提示信息框 效果: 实现代码: <script> alert ...
- Spring笔记(2) - 生命周期/属性赋值/自动装配及部分源码解析
一.生命周期 @Bean自定义初始化和销毁方法 //====xml方式: init-method和destroy-method==== <bean id="person" c ...
- 机器分配——线性dp输出路径
题目描述 总公司拥有高效设备M台, 准备分给下属的N个分公司.各分公司若获得这些设备,可以为国家提供一定的盈利.问:如何分配这M台设备才能使国家得到的盈利最大?求出最大盈利值.其中M <= 15 ...
- Web前端年后跳槽面试复习指南
<pliga' 1,="" 'onum'="" 'kern'="" 1;="" margin:="&qu ...