Centos7 Nginx+PHP7 配置
Centos7 Nginx+PHP7 配置
内容:
- 源码编译安装Nginx和PHP
- 配置PHP和Nginx,实现Nginx转发到PHP处理
- 测试
- 设置Nginx、PHP开机自启
安装的版本:
- Nginx:1.18.0 读音
engine x - PHP:7.4.8
1. 源码编译安装Nginx和PHP
安装是执行源码编译安装,需要有对应的库工具,如gcc编译和zlib压缩这些,执行命令安装:
shell> yum install -y openssl openssl-devel zlib zlib-devel pcre pcre-devel gcc gcc-c++ libxml2-devel libsqlite3x-devel
如果执行配置时,./configure提示缺少某些库时,可以再复制搜索查询所需的库。
过程:下载->解压->配置->编译->安装
shell> wget http://nginx.org/download/nginx-1.18.0.tar.gz #wget下载nginx源码包,或者使用curl下载:curl -O http://nginx.org/download/nginx-1.18.0.tar.gz -O是--remote-name   Write output to a file named as the remote file

shell> tar -zxvf nginx-1.18.0.tar.gz	#解压下载的源码压缩包 -z(--gzip)针对gzip的压缩,-x(--extract)是提取,-f保留原有压缩包的文件结构,-v打印详情

shell> cd nginx-1.18.0 #进入目录

shell> ./configure --prefix=/usr/local/nginx --with-http_ssl_module #执行configure会检查所需的库,成功后会生成一个Makefile文件,--prefix是执行安装的路径,--with-http_ssl_module是添加ssl模块支持,这里不会用到

shell> make -j 8 #编译,-j为--job,开启8个工作任务

shell> make install #执行安装,这里会把编译生成的程序文件拷贝到安装目录下并创建相关的文件夹
过程:下载->解压->配置->编译->安装
shell> wget https://www.php.net/distributions/php-7.4.8.tar.gz #如果下载慢的话,可以用迅雷粘贴url下载,应该会比这样下载快点

shell> tar -zxvf php-7.4.7.tar.gz	#解压

shell> cd cd php-7.4.7/	#进入解压目录

shell> ./configure --prefix=/usr/local/php -with-config-file-path=/usr/local/php/etc --enable-fpm #执行配置检查,--enable-fpm是开启PHP的fpm资源管理,关于fpm可以查阅资料了解一下

shell> make -j 8	#编译,-j为--job,开启8个工作任务

shell> make install #执行安装

shell> cp php.ini-development /usr/local/php/php.ini #拷贝php初始化配置文件,this file is responsible for configuring many of the aspects of PHP's behavior.
2. 配置PHP和nginx,实现Nginx转发到PHP处理
nginx
shell> cd /usr/local/nginx #进入编译安装的nginx目录

shell> vim conf/nginx.conf #修改nginx的配置文件
修改默认的location块:
location / {

	root   html;

        index  index.html index.htm index.php;	#添加PHP的index首页

}
再添加处理以.php结尾的location块:
location ~* \.php$ {

        fastcgi_index   index.php;		        #PHP index页面

        fastcgi_pass    127.0.0.1:9000;			#配置fastcgi服务器,请求会转发到fastcgi服务器(可以理解为PHP解析器),IP和端口在php中配置

        include         fastcgi_params;			#加入fastcgi_params,如下面的fastcgi_param参数

        fastcgi_param   SCRIPT_FILENAME    $document_root$fastcgi_script_name;

        fastcgi_param   SCRIPT_NAME        $fastcgi_script_name;

}
php
shell> cd /usr/local/php #进入编译安装的php目录

shell> cp etc/php-fpm.d/www.conf{.default,} #拷贝默认的的配置文件,相当于执行了cp etc/php-fpm.d/www.conf.default etc/php-fpm.d/www.conf,配置包括了php解析器的IP和端口,用户和用户组等配置

shell> cp etc/php-fpm.conf.default /usr/local/etc/php-fpm.conf #拷贝默认的php-fpm的启动配置文件

shell> groupadd www-data #创建www-data用户组

shell> useradd -g www-data -s /sbin/nologin www-data #创建www-data用户,属于www-data用户组(-g --group),类型为不可登录(-s --shell)
再修改php www的用户和用户组,设置为www-data,www.conf文件:
; Unix user/group of processes

; Note: The user is mandatory. If the group is not set, the default user's group

;       will be used.

user = www-data

group = www-data
再修改php-fpm的配置文件,设置启动的进程pid文件存储位置,后面设置服务需要用到进程运行IDpid,php-fpm.conf文件:
[global]

; Pid file

; Note: the default prefix is /usr/local/php/var

; Default Value: none

 pid = /usr/local/php/var/run/php-fpm.pid
3. 测试
编写测试的php页面
shell> rm /usr/local/nginx/html/index.html  #删除nginx默认的首页文件

shell> echo "<?php phpinfo(); ?>" >> /usr/local/nginx/html/index.php #创建测试文件,使用php的信息函数显示信息
启动php和nginx
shell> /usr/local/php/sbin/php-fpm	#启动php-fpm

shell> /usr/local/nginx/sbin/nginx	#启动nginx
接着,就可以浏览器输入nginx的服务器ip进行http访问了,我的这里是输入http://172.16.11.141:80,如下图所示:
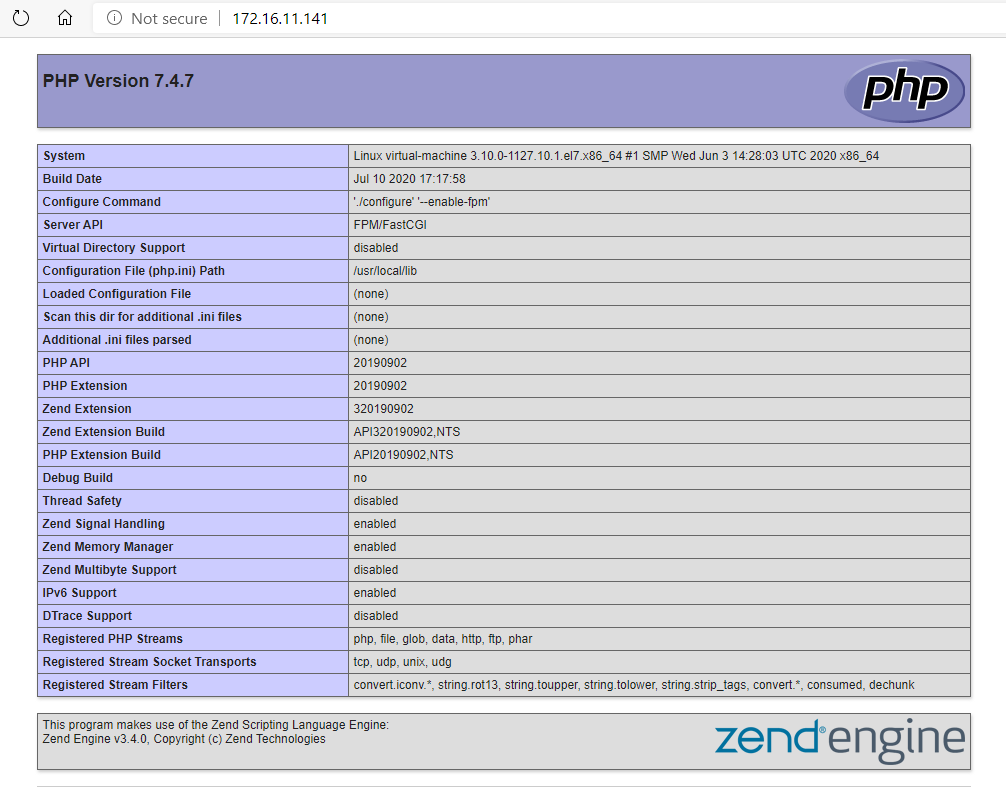
至此,nginx+php的安装和测试成功。
4. 设置Nginx、PHP开机自启
nginx
在centos7中,服务都是使用systemdctl命令而不是service了,即使是使用service命令其实也是链接到systemdctl命令,关于systemd的介绍可以参考阮一峰老师的:Systemd 入门教程:命令篇
shell> cd /lib/systemd/system/	#切换目录到关于系统进程的目录

shell> vim nginx.service	#在目录下新建nginx.service文件,填入以下内容
nginx.service文件
[Unit]

Description=nginx service

After=network.target

[Service]

Type=forking

ExecStart=/usr/local/nginx/sbin/nginx

ExecReload=/usr/local/nginx/sbin/nginx -s reload

ExecStop=/usr/local/nginx/sbin/nginx -s quit

PrivateTmp=true

[Install]

WantedBy=multi-user.target
[Unit]块是这个服务单元的描述;[Service]块是服务的配置,如启动命令,停止命令,其中的Type=forking表示后台执行;[Install]块是安装的配置,multi-user.target是运行级别为3,Linux有0-6歌运行级别。最后,执行命令执行开启开机自启:
shell> systemctl enalbe nginx.service #开启nginx开机自启服务,关闭对应dsiable
关于systemctl的详细使用介绍可以查阅这篇文章:How To Use Systemctl to Manage Systemd Services and Units
php
php的服务也差不多,不过php在5.3.3以后的版本不再支持 (start|stop|reload) 等命令,需要使用Linux的信号量:INT,USR1,USR2,QUIT等。
shell> cd /lib/systemd/system/	#切换目录到关于系统进程的目录

shell> vim php-fpm.service	#在multi-user.target.wants目录下新建php-fpm.service文件,填入以下内容
php-fpm文件:
[Unit]

Description=php-fpm service

After=network.target

[Service]

Type=forking

ExecStart=/usr/local/php/sbin/php-fpm

ExecReload=kill -USR2 $(cat /usr/local/php/var/run/php-fpm.pid)

ExecStop=kill -INT $(cat /usr/local/php/var/run/php-fpm.pid)

PrivateTmp=true

[Install]

WantedBy=multi-user.target
关于Linux的信号量,可以查阅这篇文章介绍:Signals in Linux ,最后开启php-fpm服务:
shell> systemctl enable php-fpm.service #开启php-fpm开机自启服务,关闭对应dsiable
5. 最后
最后重启进行测试:
shell> reboot #重启
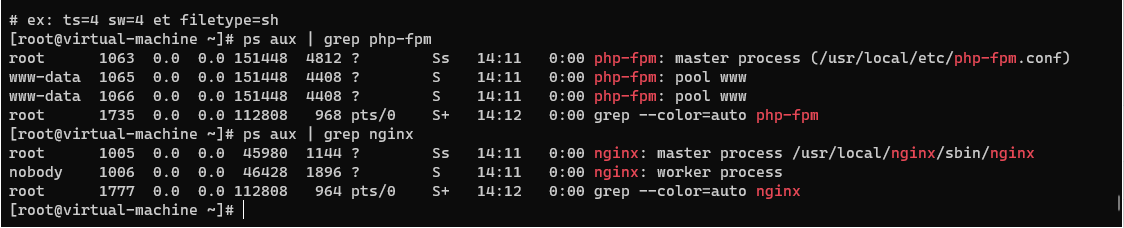
shell> ps aux | grep php-fpm #查看php-fpm相关进程是否运行
shell> ps aux | grep nginx #查看nginx相关进程是否运行
Centos7 Nginx+PHP7 配置的更多相关文章
- nginx php7 配置 备用
yum install epel-* -y yum install -y wget unzip gcc gcc-c++ make zlib zlib-devel pcre pcre-devel lib ...
- centos7: nginx安装配置
centos平台编译环境使用如下指令 安装make: yum -y install gcc automake autoconf libtool make 安装g++: yum install gcc ...
- centos7 nginx yum 配置
[nginx] name=nginx repo baseurl=http://nginx.org/packages/centos/7/$basearch/ gpgcheck= enabled=
- CentOS7 nginx简单配置pathinfo模式(ThinkPHP)
location ~ \.php { #去掉$ root H:/PHPServer/WWW; fastcgi_pass 127.0.0.1:9000; fastcgi_in ...
- Vmware搭建LNMP环境(Centos7+Nginx+Mysql+PHP7.1.8)
参考:1.Linux学习之CentOS(一)----在VMware虚拟机中安装CentOS 7(图文教程) 2.Centos7搭建LNMP环境 3.MySQL5.7修改默认root密码 4.CentO ...
- [原创]Centos7 从零配置Nginx+PHP+MySql
序言 这次玩次狠得.除了编译器使用yum安装,其他全部手动编译.哼~ 看似就Nginx.PHP.MySql三个东东,但是它们太尼玛依赖别人了. 没办法,想用它们就得老老实实给它们提供想要的东西. 首先 ...
- Ubuntu17.04配置LNMP(Nginx+PHP7+MySQL)简单教程 快速 易学 简单易懂
我安装的是当前最新的Ubuntu版本17.04,在虚拟机中先试用一下,如果没有什么不稳定的现象,准备以后作为主力操作系统 Ubuntu属于Debian系的Linux系统,拥有着一个很NB的软件包管理器 ...
- CentOS7 Nginx安装及配置反向代理
背景: Mono (Mono JIT compiler version 5.4.0.201 ) jexus-5.8.2-x64(<CentOS7 安装 jexus-5.8.2-x64>) ...
- [Centos7]无法访问配置好的nginx
Centos7无法访问配置好的nginx 临时生效 # 重启虚拟机,将失效 iptables -I INPUT -p TCP --dport 80 -j ACCEPT 永久有效 # 在防火墙中开放80 ...
随机推荐
- sql 遍历list
<select id="findadminSaleList" parameterClass="java.util.Map" resultClass=&qu ...
- 情话爬虫工具[windows版]
有没有在气氛暧昧的情况下想说点什么却又无话可说?女朋友有没有抱怨过你,只会写代码,一点都不懂情调?这次,是时候要改变她对你的看法了!一键爬取情话,情话全都躺在txt里面.想怎么玩就怎么玩!张口一句情话 ...
- Python使用requests发送请求
Python使用第三方包requests发送请求,实现接口自动化 发送请求分三步: 1.组装请求:包括请求地址.请求头header.cookies.请求数据等 2.发送请求,获取响应:支持get.po ...
- mysql 5.7全备脚本
#!/bin/bash mysql_user="root" mysql_password="mysqlpassword" mysql_host="19 ...
- 解决python3 ,ModuleNotFoundError: No module named 'pip'问题
今天想要装一下PyYmal第三方库来写一下Python的desired_caps.yaml文件,候发现cmd窗口下无法执行pip命令, 出现了:ModuleNotFoundError: No modu ...
- js下 Day11、案例
一.成绩分类 效果图: 功能思路分析: 1. 渲染数据 2. 鼠标按下开启拖拽 \1. 给成绩盒子绑定鼠标按下事件(mousedown),用事件委托做多个标签的拖拽 \2. 开启控制拖拽的变量 \3. ...
- react第X单元(redux)
第X单元(redux) #课程目标 理解redux解决的问题,理解redux的工作原理 熟练掌握redux的api 熟练掌握redux和react组件之间的通信(react-redux) 把redux ...
- .NET生态系统掠影
如果你是一名开发人员,想要进入到.NET的世界,你需要知道都有哪些可能.由于.NET Framework是..NET生态系统中最流行的技术,你可以用它来构建各种各样的应用程序,但是最近,出现了一些新的 ...
- 这可能是目前最轻量级、最支持MVVM、可定制性最高的开源Chart控件!
由于项目中经常用到Series Chart,而目前市面又实在找不到既支持MVVM,又轻量级的开源Chart控件,于是干脆就花了两周时间随手写了一个.昨天感觉还比较满意,就发布到了Github上:htt ...
- 我们是如何实现DevOps的
一.DevOps的理解 DevOps的概念理解 DevOps 的概念在软件开发行业中逐渐流行起来.越来越多的团队希望实现产品的敏捷开发,DevOps 使一切成为可能.有了 DevOps ,团队可以定期 ...