Android Dialog详解
前言
欢迎大家我分享和推荐好用的代码段~~
声明
欢迎转载,但请保留文章原始出处:
CSDN:http://www.csdn.net
雨季o莫忧离:http://blog.csdn.net/luckkof
正文
创建对话框
一个对话框一般是一个出现在当前Activity之上的一个小窗口. 处于下面的Activity失去焦点, 对话框接受所有的用户交互. 对话框一般用于提示信息和与当前应用程序直接相关的小功能.
Android API 支持下列类型的对话框对象:
警告对话框 AlertDialog: 一个可以有0到3个按钮, 一个单选框或复选框的列表的对话框. 警告对话框可以创建大多数的交互界面, 是推荐的类型.
进度对话框 ProgressDialog: 显示一个进度环或者一个进度条. 由于它是AlertDialog的扩展, 所以它也支持按钮.
日期选择对话框 DatePickerDialog: 让用户选择一个日期.
时间选择对话框 TimePickerDialog: 让用户选择一个时间.
如果你希望自定义你的对话框, 可以扩展Dialog类.
Showing a Dialog 显示对话框
一个对话框总是被创建和显示为一个Activity的一部分. 你应该在Activity的onCreateDialog(int)中创建对话框. 当你使用这个回调函数时,Android系统自动管理每个对话框的状态并将它们和Activity连接, 将Activity变为对话框的"所有者". 这样,每个对话框从Activity继承一些属性. 例如,当一个对话框打开时, MENU键会显示Activity的菜单, 音量键会调整Activity当前使用的音频流的音量.
注意: 如果你希望在onCreateDialog()方法之外创建对话框, 它将不会依附在Activity上. 你可以使用setOwnerActivity(Activity)来将它依附在Activity上.
当你希望显示一个对话框时, 调用showDialog(int)并将对话框的id传给它.
当一个对话框第一次被请求时,Android调用onCreateDialog(int). 这里是你初始化对话框的地方. 这个回调函数传入的id和showDialog(int)相同. 创建对话框之后,将返回被创建的对象.
在对话框被显示之前,Android还会调用onPrepareDialog(int, Dialog). 如果你希望每次显示对话框时有动态更改的内容, 那么就改写这个函数. 该函数在每次一个对话框打开时都调用. 如果你不定义该函数,则对话框每次打开都是一样的. 该函数也会传入对话框的id以及你在onCreateDialog()中创建的Dialog对象.
最好的定义onCreateDialog(int) 和onPrepareDialog(int, Dialog) 的方法就是使用一个switch语句来检查传入的id. 每个case创建相应的对话框. 例如, 一个游戏使用两个对话框: 一个来指示游戏暂停,另一个指示游戏结束. 首先, 为它们定义ID:static final int DIALOG_PAUSED_ID = 0;
static final int DIALOG_GAMEOVER_ID = 1;
然后, 在onCreateDialog(int)中加入一个switch语句:
protected Dialog onCreateDialog(int id) {

    Dialog dialog;

    switch(id) {

    case DIALOG_PAUSED_ID:

        // do the work to define the pause Dialog

        break;

    case DIALOG_GAMEOVER_ID:

        // do the work to define the game over Dialog

        break;

    default:

        dialog = null;

    }

    return dialog;

}
在需要显示对话框是, 调用showDialog(int), 传入对话框的id:
showDialog(DIALOG_PAUSED_ID);Dismissing a Dialog 解除对话框
当你准备关闭对话框时, 你可以使用dismiss()函数. 如果需要的话, 你也可以从Activity调用dismissDialog(int), 二者效果是一样的.
如果你使用onCreateDialog(int)来管理你的对话框的状态, 那么每次你的对话框被解除时, 该对话框对象的状态会被Activity保存. 如果你决定你不再需要这个对象或者需要清除对话框的状态, 那么你应该调用 removeDialog(int). 这将把所有该对象的内部引用移除, 如果该对话框在显示的话将被解除.
Using dismiss listeners 使用解除监听器
如果你希望在对话框解除时运行某些程序, 那么你应该给对话框附加一个解除监听器.
首先定义DialogInterface.OnDismissListener接口. 这个接口只有一个方法, onDismiss(DialogInterface), 该方法将在对话框解除时被调用.
然后将你的OnDismissListener实现传给setOnDismissListener().
然而,注意对话框也可以被"取消". 这是一个特殊的情形, 它意味着对话框被用户显式的取消掉. 这将在用户按下"back"键时, 或者对话框显式的调用cancel()(按下对话框的cancel按钮)时发生. 当一个对话框被取消时, OnDismissListener将仍然被通知, 但如果你希望在对话框被显示取消(而不是正常解除)时被通知, 则你应该使用setOnCancelListener()注册一个DialogInterface.OnCancelListener.
Creating an AlertDialog 创建警告对话框
An AlertDialog is an extension of the Dialog class. It is capable of constructing most dialog user interfaces and is the suggested dialog type. You should use it for dialogs that use any of the following features:
一个警告对话框是对话框的一个扩展. 它能够创建大多数对话框用户界面并且是推荐的对话框类新星. 对于需要下列任何特性的对话框,你都应该使用它:
一个标题
一条文字消息
1个-3个按钮
一个可选择的列表(单选框或者复选框)
要创建一个AlertDialog, 使用AlertDialog.Builder子类. 使用AlertDialog.Builder(Context)来得到一个Builder, 然后使用该类的公有方法来定义AlertDialog的属性. 设定好以后, 使用create()方法来获得AlertDialog对象.
下面的主题展示了如何为AlertDialog定义不同的属性, 使用AlertDialog.Builder类. 如果你使用这些示例代码, 你可以在onCreateDialog()中返回最后的Dialog对象来获得图片中对话框的效果.
Adding buttons 增加按钮
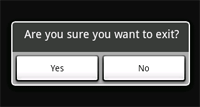
AlertDialog.Builder builder = new AlertDialog.Builder(this);

builder.setMessage("Are you sure you want to exit?")

       .setCancelable(false)

       .setPositiveButton("Yes", new DialogInterface.OnClickListener() {

           public void onClick(DialogInterface dialog, int id) {

                MyActivity.this.finish();

           }

       })

       .setNegativeButton("No", new DialogInterface.OnClickListener() {

           public void onClick(DialogInterface dialog, int id) {

                dialog.cancel();

           }

       });

AlertDialog alert = builder.create();
注意:对每种按钮类型,只能为AlertDialog创建一个。也就是说,一个AlertDialog不能有两个以上的"positive"按钮。这使得可能的按钮数量最多为三个:肯定、否定、中性。这些名字和实际功能没有联系,但是将帮助你记忆它们各做什么事情。
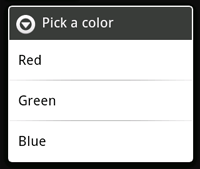
final CharSequence[] items = {"Red", "Green", "Blue"};

AlertDialog.Builder builder = new AlertDialog.Builder(this);

builder.setTitle("Pick a color");

builder.setItems(items, new DialogInterface.OnClickListener() {

    public void onClick(DialogInterface dialog, int item) {

        Toast.makeText(getApplicationContext(), items[item], Toast.LENGTH_SHORT).show();

    }

});

AlertDialog alert = builder.create();
Adding checkboxes and radio buttons 增加单选框和复选框

注意: 要在你的acitivity离开和暂停时保存选择, 你必须在activity的声明周期中正确的保存和恢复设置。为了永久性保存选择,你必须使用数据存储技术中的一种。
要创建一个具有单选列表的AlertDialog,只需将一个例子中的setItems()换成 setSingleChoiceItems():
final CharSequence[] items = {"Red", "Green", "Blue"};

AlertDialog.Builder builder = new AlertDialog.Builder(this);

builder.setTitle("Pick a color");

builder.setSingleChoiceItems(items, -1, new DialogInterface.OnClickListener() {

    public void onClick(DialogInterface dialog, int item) {

        Toast.makeText(getApplicationContext(), items[item], Toast.LENGTH_SHORT).show();

    }

});

AlertDialog alert = builder.create();
Creating a ProgressDialog 创建进度对话框
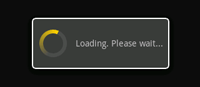
打开一个进度对话框很简单,只需要调用 ProgressDialog.show()即可。例如,上图的对话框可以不通过onCreateDialog(int),而直接显示:
ProgressDialog dialog = ProgressDialog.show(MyActivity.this, "",
"Loading. Please wait...", true);
第一个参数是应用程序上下文。第二个为对话框的标题(这里为空),第三个为对话框内容, 最后一个为该进度是否为不可确定的(这只跟进度条的创建有关,见下一节)。
进度对话框的默认样式为一个旋转的环。如果你希望显示进度值,请看下一节。
Showing a progress bar 显示进度条
使用一个动画进度条来显示进度:
使用 ProgressDialog(Context)构造函数来初始化一个ProgressDialog对象。
将进度样式设置为"STYLE_HORIZONTAL",使用setProgressStyle(int)方法。并且设置其它属性,例如内容等。
在需要显示时调用show()或者从onCreateDialog(int)回调函数中返回该ProgressDialog。
你可以使用 setProgress(int)或者incrementProgressBy(int)来增加显示的进度。
例如,你的设置可能像这样:ProgressDialog progressDialog;
progressDialog = new ProgressDialog(mContext);
progressDialog.setProgressStyle(ProgressDialog.STYLE_HORIZONTAL);
progressDialog.setMessage("Loading...");
progressDialog.setCancelable(false);
设置很简单。大部分创建进度对话框需要的代码是在更新它的进程中。你可能需要在一个新的线程中更新它,并使用Handler来将进度报告给Activity。如果你不熟悉使用Handler和另外的线程,请看下列例子,该例子使用了一个新的线程来更新进度。
Example ProgressDialog with a second thread 例--使用一个线程来显示进度对话框
这个例子使用一个线程来跟踪一个进程的进度(其实为从1数到100)。每当进度更新时,该线程通过Handler给主activity发送一个消息。主Activity更新ProgressDialog.package com.example.progressdialog;
import android.app.Activity;

import android.app.Dialog;

import android.app.ProgressDialog;

import android.os.Bundle;

import android.os.Handler;

import android.os.Message;

import android.view.View;

import android.view.View.OnClickListener;

import android.widget.Button;

public class NotificationTest extends Activity {

    static final int PROGRESS_DIALOG = 0;

    Button button;

    ProgressThread progressThread;

    ProgressDialog progressDialog;

    /** Called when the activity is first created. */

    public void onCreate(Bundle savedInstanceState) {

        super.onCreate(savedInstanceState);

        setContentView(R.layout.main);

        // Setup the button that starts the progress dialog

        button = (Button) findViewById(R.id.progressDialog);

        button.setOnClickListener(new OnClickListener(){

            public void onClick(View v) {

                showDialog(PROGRESS_DIALOG);

            }

        });

    }

    protected Dialog onCreateDialog(int id) {

        switch(id) {

        case PROGRESS_DIALOG:

            progressDialog = new ProgressDialog(NotificationTest.this);

            progressDialog.setProgressStyle(ProgressDialog.STYLE_HORIZONTAL);

            progressDialog.setMessage("Loading...");

            progressThread = new ProgressThread(handler);

            progressThread.start();

            return progressDialog;

        default:

            return null;

        }

    }

    // Define the Handler that receives messages from the thread and update the progress

    final Handler handler = new Handler() {

        public void handleMessage(Message msg) {

            int total = msg.getData().getInt("total");

            progressDialog.setProgress(total);

            if (total >= 100){

                dismissDialog(PROGRESS_DIALOG);

                progressThread.setState(ProgressThread.STATE_DONE);

            }

        }

    };

    /** Nested class that performs progress calculations (counting) */

    private class ProgressThread extends Thread {

        Handler mHandler;

        final static int STATE_DONE = 0;

        final static int STATE_RUNNING = 1;

        int mState;

        int total;

        ProgressThread(Handler h) {

            mHandler = h;

        }

        public void run() {

            mState = STATE_RUNNING;

            total = 0;

            while (mState == STATE_RUNNING) {

                try {

                    Thread.sleep(100);

                } catch (InterruptedException e) {

                    Log.e("ERROR", "Thread Interrupted");

                }

                Message msg = mHandler.obtainMessage();

                Bundle b = new Bundle();

                b.putInt("total", total);

                msg.setData(b);

                mHandler.sendMessage(msg);

                total++;

            }

        }

        /* sets the current state for the thread,

         * used to stop the thread */

        public void setState(int state) {

            mState = state;

        }

    }

}
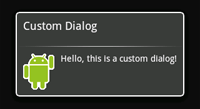
例如,创建如图所示的对话框:
创建一个xml布局custom_dialog.xml:
http://schemas.android.com/apk/res/android"

              android:id="@+id/layout_root"

              android:orientation="horizontal"

              android:layout_width="fill_parent"

              android:layout_height="fill_parent"

              android:padding="10dp"

              >

                   android:layout_width="wrap_content"

               android:layout_height="fill_parent"

               android:layout_marginRight="10dp"

               />

                  android:layout_width="wrap_content"

              android:layout_height="fill_parent"

              android:textColor="#FFF"

              />
该xml定义了一个LinearLayout中的一个ImageView 和一个TextView。
将以上布局设为对话框的content view,并且定义ImageView 和 TextView的内容:
Context mContext = getApplicationContext();

Dialog dialog = new Dialog(mContext);

dialog.setContentView(R.layout.custom_dialog);

dialog.setTitle("Custom Dialog");

TextView text = (TextView) dialog.findViewById(R.id.text);

text.setText("Hello, this is a custom dialog!");

ImageView image = (ImageView) dialog.findViewById(R.id.image);

image.setImageResource(R.drawable.android);
在初始化Dialog之后,使用setContentView(int),将布局资源id传给它。现在Dialog有一个定义好的布局,你可以使用findViewById(int)来找到该元素的id并修改它的内容。
使用前面所讲的方法显示对话框。
一个使用Dialog类建立的对话框必须有一个标题。如果你不调用setTitle(),那么标题区域会保留空白。如果你不希望有一个标题,那么你应该使用AlertDialog类来创建自定义对话框。然而,由于一个AlertDialog使用AlertDialog.Builder类来建立最方便,所以你没有方法使用setContentView(int),而是只能使用setView(View)。该方法接受一个View对象,所以你需要从xml中展开你的根View。
要展开一个xml布局,使用 getLayoutInflater() (或 getSystemService())取得LayoutInflater,然后调用inflate(int, ViewGroup),第一个参数为布局id,而第二个参数为根view的id。现在,你可以使用展开后的布局来找到View对象并定义ImageView和TextView元素的内容。然后实例化AlertDialog.Builder并使用setView(View)来为对话框设置展开后的布局。例如:
AlertDialog.Builder builder;

AlertDialog alertDialog;

Context mContext = getApplicationContext();

LayoutInflater inflater = (LayoutInflater) mContext.getSystemService(LAYOUT_INFLATER_SERVICE);

View layout = inflater.inflate(R.layout.custom_dialog,

                               (ViewGroup) findViewById(R.id.layout_root));

TextView text = (TextView) layout.findViewById(R.id.text);

text.setText("Hello, this is a custom dialog!");

ImageView image = (ImageView) layout.findViewById(R.id.image);

image.setImageResource(R.drawable.android);

builder = new AlertDialog.Builder(mContext);

builder.setView(layout);

alertDialog = builder.create();
Android Dialog详解的更多相关文章
- Dialog详解(包括进度条、PopupWindow、自定义view、自定义样式的对话框)
Dialog详解(包括进度条.PopupWindow.自定义view.自定义样式的对话框) Android中提供了多种对话框,在实际应用中我们可能会需要修改这些已有的对话框.本实例就是从实际出发, ...
- Android进阶(十四)Android Adapter详解
Android Adapter详解 Android是完全遵循MVC模式设计的框架,Activity是Controller,layout是View.因为layout五花八门,很多数据都不能直接绑定上去, ...
- Android Notification 详解(一)——基本操作
Android Notification 详解(一)--基本操作 版权声明:本文为博主原创文章,未经博主允许不得转载. 微博:厉圣杰 源码:AndroidDemo/Notification 文中如有纰 ...
- Android Notification 详解——基本操作
Android Notification 详解 版权声明:本文为博主原创文章,未经博主允许不得转载. 前几天项目中有用到 Android 通知相关的内容,索性把 Android Notificatio ...
- Android ActionBar详解
Android ActionBar详解 分类: Android2014-04-30 15:23 1094人阅读 评论(0) 收藏 举报 androidActionBar 目录(?)[+] 第4 ...
- Android 签名详解
Android 签名详解 AndroidOPhoneAnt设计模式Eclipse 在Android 系统中,所有安装 到 系统的应用程序都必有一个数字证书,此数字证书用于标识应用程序的作者和在应用程 ...
- Android编译系统详解(一)
++++++++++++++++++++++++++++++++++++++++++ 本文系本站原创,欢迎转载! 转载请注明出处: http://blog.csdn.net/mr_raptor/art ...
- Android布局详解之一:FrameLayout
原创文章,如有转载,请注明出处:http://blog.csdn.net/yihui823/article/details/6702273 FrameLayout是最简单的布局了.所有放在布局里的 ...
- 【整理修订】Android.mk详解
Android.mk详解 1. Android.mk 的应用范围 Android.mk文件是GNU Makefile的一小部分,它用来对Android程序进行编译. 一个Android.mk文件可以编 ...
随机推荐
- Java GUI图形界面开发工具
Applet 应用程序 一种可以在 Web 浏览器中执行的小程序,扩展了浏览器中的网页功能. 缺: 1.需要下载 Applet 及其相关文件 2.Applet 的功能是受限制的 优: 3.无需 ...
- A2W和W2A :很好的多字节和宽字节字符串的转换宏
以前看<Window核心编程>,感觉多字节和宽字节之间还比较麻烦的,至少MultiByteToWideChar函数和WideCharToMultiByte函数有足够多的参数的意义让我们去理 ...
- java IO之字节流和字符流-Reader和Writer以及实现文件复制拷贝
接上一篇的字节流,以下主要介绍字符流.字符流和字节流的差别以及文件复制拷贝.在程序中一个字符等于两个字节.而一个汉字占俩个字节(一般有限面试会问:一个char是否能存下一个汉字,答案当然是能了,一个c ...
- ActionScript3游戏中的图像编程(连载二十四)
总文件夹:http://blog.csdn.net/iloveas2014/article/details/38304477 2.1.1 投影样式的制作 点击左側列表的"投影"系列 ...
- Android UI 之一步步教你自定义控件(自定义属性、合理设计onMeasure、合理设计onDraw等)
Android开发做到了一定程度,多少都会用到自定义控件,一方面是更加灵活,另一方面在大数据量的情况下自定义控件的效率比写布局文件更高. 一个相对完善的自定义控件在布局文件中和java ...
- Ext JS学习第二天 我们所熟悉的javascript(一)
此文用来记录学习笔记: •ExtJS是一个强大的javascript框架,如果想真正的掌握ExtJS,那么我们必须要对javascript有一定的认识,所以很有必要静下心来,抱着一本javascrip ...
- JavaScript 数字相关的转换和方法
类型判断 isNaN - 是否是 NaN(Not a Number).主要用来判断 NaN 是否是 NaN,因为 NaN == NaN 是 false. isNaN(NaN); // tr ...
- eclipse修改java代码后报错: java.lang.OutOfMemoryError: PermGen space
由于在eclipse中运行项目后,我们又重新修改了某个java类,导致tomcat会重新加载这个项目所有的class.jar,多次加载后由于分配的存储空间有限,就导致了:java.lang.OutOf ...
- U3D navmesh寻路简单示范
要求:放置一个BOSS,创建几个路标,自动循环这几个路标形成回路,变成自动巡逻,并配合animator系统的控制开关控制BOSS的动作 1.先设置好BOSS 中animator的控制开关,只看Run和 ...
- C#用正则表达式 获取网页源代码标签的属性或值
1.有url获取到网页源代码: using System.Web; using System.IO; using System.Net; private void GetHtmlinfo(string ...