【Android 界面效果25】android中include标签的使用
在一个项目中我们可能会需要用到相同的布局设计,如果都写在一个xml文件中,代码显得很冗余,并且可读性也很差,所以我们可以把相同布局的代码单独写成一个模块,然后用到的时候可以通过<include /> 标签来重用layout代码。
app_title.xml:
- <?xml version="1.0" encoding="utf-8"?>
- <RelativeLayout android:id="@+id/titleLayout" android:layout_width="fill_parent" android:layout_height="wrap_content"
- android:background="@drawable/bt" xmlns:android="http://schemas.android.com/apk/res/android">
- <TextView android:text="@string/login" android:id="@+id/title" android:textSize="20px" android:textColor="@color/white"
- android:layout_width="wrap_content" android:layout_centerInParent="true" android:layout_height="wrap_content"/>
- <Button android:text="返回" android:id="@+id/refresh" android:layout_width="wrap_content" android:layout_height="wrap_content"
- android:layout_alignParentRight="true" android:focusable="false" android:textColor="@color/white"
- android:background="@drawable/okbutton" android:layout_marginRight="3px"/>
- </RelativeLayout>
app_tradelogin.xml:
- <?xml version="1.0" encoding="utf-8"?>
- <!-- android:layout_below与 android:layout_above 是必须设置的,否则界面不规则,不设置android:layout_above本界面没有滑动效果-->
- <ScrollView android:layout_below="@+id/titleLayout" android:layout_above="@+id/appbottom" android:layout_width="fill_parent"
- android:layout_height="fill_parent" android:layout_centerInParent="true" xmlns:android="http://schemas.android.com/apk/res/android">
- <LinearLayout android:id="@+id/theWholeLinearLayout" android:orientation="vertical" android:layout_width="fill_parent"
- android:layout_height="wrap_content" android:paddingLeft="10px" android:paddingTop="6px" android:paddingRight="10px" >
- <LinearLayout android:id="@+id/linearLayoutLeft" android:orientation="vertical" android:layout_width="fill_parent" android:layout_height="wrap_content">
- <TableLayout android:id="@+id/widget43" android:layout_width="fill_parent"
- android:layout_height="fill_parent" android:orientation="vertical"
- xmlns:android="http://schemas.android.com/apk/res/android" android:stretchColumns="1">
- <TableRow >
- <!-- 引用定义好的TextView样式,如果这里的属性和样式里定义的属性重复,则这里会替换样式里定义的属性-->
- <TextView android:id="@+id/traderName" android:text="@string/traderName" style="@style/StyleTextInfo1" mce_style="@style/StyleTextInfo1"/>
- <Spinner android:id="@+id/traderNameS" android:layout_width="fill_parent" android:layout_height="wrap_content">
- </Spinner>
- </TableRow>
- <TableRow>
- <TextView android:id="@+id/departName" android:text="@string/departName" style="@style/StyleTextInfo1" mce_style="@style/StyleTextInfo1"/>
- <Spinner android:id="@+id/departNameS" android:layout_width="fill_parent" android:layout_height="wrap_content"/>
- </TableRow>
- <TableRow >
- <TextView android:id="@+id/strComponyName" android:text="@string/accType" style="@style/StyleTextInfo1" mce_style="@style/StyleTextInfo1"/>
- <Spinner android:id="@+id/accTyte" android:layout_width="fill_parent" android:layout_height="wrap_content"/>
- </TableRow>
- <TableRow >
- <TextView android:id="@+id/strUserAcc" android:text="@string/userAcc" style="@style/StyleTextInfo1" mce_style="@style/StyleTextInfo1"/>
- <EditText android:id="@+id/accEditText" android:text="" android:numeric="decimal" style="@style/StyleEditText1" mce_style="@style/StyleEditText1"/>
- </TableRow>
- <TableRow >
- <TextView android:id="@+id/userPwd" android:text="@string/userPWD" style="@style/StyleTextInfo1" mce_style="@style/StyleTextInfo1"/>
- <EditText android:id="@+id/userPwdET" android:text="" android:password="true" style="@style/StyleEditText1" mce_style="@style/StyleEditText1"/>
- </TableRow>
- <TableRow >
- <TextView android:id="@+id/commPwd" android:text="@string/commPWD" style="@style/StyleTextInfo1" mce_style="@style/StyleTextInfo1"/>
- <EditText android:id="@+id/commPwdET" android:text="" android:password="true" style="@style/StyleEditText1" mce_style="@style/StyleEditText1"/>
- </TableRow>
- </TableLayout>
- </LinearLayout>
- <LinearLayout android:orientation="vertical" android:layout_width="fill_parent" android:layout_height="wrap_content">
- <LinearLayout android:id="@+id/linearLayoutTab1" android:layout_height="wrap_content"
- android:layout_width="fill_parent" android:orientation="horizontal">
- <LinearLayout android:id="@+id/linearLayoutTab2" android:layout_height="wrap_content"
- android:layout_width="fill_parent" android:orientation="horizontal" android:layout_weight="1">
- <CheckBox android:id="@+id/recordAcc" android:layout_width="wrap_content" android:layout_height="wrap_content"/>
- <TextView android:id="@+id/commPwd" android:text="@string/saveUserAcc" style="@style/StyleTextInfo1" mce_style="@style/StyleTextInfo1"/>
- </LinearLayout>
- <LinearLayout android:id="@+id/linearLayoutTab2" android:layout_height="wrap_content"
- android:layout_width="fill_parent" android:orientation="horizontal" android:layout_weight="1">
- <CheckBox android:id="@+id/hideAcc" android:layout_width="wrap_content" android:layout_height="wrap_content"/>
- <TextView android:id="@+id/commPwd" android:text="@string/ycUserAcc" style="@style/StyleTextInfo1" mce_style="@style/StyleTextInfo1"/>
- </LinearLayout>
- </LinearLayout>
- <LinearLayout android:id="@+id/linearLayoutTab1" android:layout_height="wrap_content"
- android:layout_width="fill_parent" android:orientation="horizontal">
- <LinearLayout android:layout_width="220px" android:layout_height="wrap_content" android:orientation="horizontal"
- android:gravity="center">
- <Button android:id="@+id/confirmexch" android:gravity="center" android:layout_width="wrap_content"
- android:layout_height="50px" android:textSize="22dp" android:text="@string/login" android:layout_weight="1"
- android:focusable="false" android:textColor="@color/white" android:background="@drawable/buttonl"/>
- </LinearLayout>
- <LinearLayout android:id="@+id/linearLayoutTab" android:layout_height="wrap_content"
- android:layout_width="fill_parent" android:gravity="center">
- <ImageView android:layout_width="wrap_content" android:layout_height="50px" android:id="@+id/myImage"/>
- </LinearLayout>
- </LinearLayout>
- </LinearLayout>
- </LinearLayout>
- </ScrollView>
app_bottom.xml:
- <?xml version="1.0" encoding="utf-8"?>
- <LinearLayout android:id="@+id/appbottom" android:orientation="vertical" android:layout_width="fill_parent"
- android:layout_height="wrap_content" android:layout_alignParentBottom="true"
- xmlns:android="http://schemas.android.com/apk/res/android">
- <LinearLayout android:orientation="horizontal" android:layout_width="fill_parent"
- android:layout_height="wrap_content" android:background="@drawable/light">
- <ImageView android:id="@+id/about" android:layout_width="30px" android:layout_height="wrap_content" android:src="@drawable/ttt"
- android:layout_alignParentLeft="true"/>
- <TextView android:id="@+id/light" android:layout_width="fill_parent" android:layout_height="wrap_content" android:textColor="@color/black"/>
- </LinearLayout>
- <LinearLayout android:orientation="horizontal" android:layout_width="fill_parent"
- android:layout_height="wrap_content" android:background="@drawable/mainmenu">
- <Button android:id="@+id/quotButton" android:layout_weight="1" android:layout_width="52px" android:layout_height="wrap_content"
- android:textColor="@color/white" android:text="" android:background="@drawable/button1"/>
- <Button android:id="@+id/entrustButton" android:layout_weight="1" android:layout_width="52px" android:layout_height="wrap_content"
- android:textColor="@color/white" android:text="" android:background="@drawable/button1"/>
- <Button android:id="@+id/queryButton" android:layout_weight="1" android:layout_width="52px" android:layout_height="wrap_content"
- android:textColor="@color/white" android:text="" android:background="@drawable/button1"/>
- <Button android:id="@+id/yinZhengButton" android:layout_weight="1" android:layout_width="52px" android:layout_height="wrap_content"
- android:textColor="@color/white" android:text="" android:background="@drawable/button1"/>
- <Button android:id="@+id/recordButton" android:layout_weight="1" android:layout_width="52px" android:layout_height="wrap_content"
- android:textColor="@color/white" android:text="" android:background="@drawable/button1"/>
- <Button android:id="@+id/logoutButton" android:layout_weight="1" android:layout_width="52px" android:layout_height="wrap_content"
- android:textColor="@color/white" android:text="" android:background="@drawable/button1"/>
- </LinearLayout>
- </LinearLayout>
tradelogin_portrait.xml:
- <?xml version="1.0" encoding="utf-8"?>
- <RelativeLayout android:layout_width="fill_parent" android:layout_height="fill_parent" style="@style/StyleLayoutMain" mce_style="@style/StyleLayoutMain"
- xmlns:android="http://schemas.android.com/apk/res/android">
- <!-- include标签内不能设置RelativeLayout属性,如android:layout_alignParentBottom,因为不起作用 -->
- <!-- include标签内设置id属性后(android:id),其引用的布局layout内的id属性就不起作用了,怀疑是其引用的layout外层包裹了一层include标签
- 或者是覆盖了其内的属性id-->
- <!-- 如果没有include标签,所有布局代码都写在一个xml文件中,界面会显得很冗余,可读性很差。而且界面加载的时候是按照顺序加载的,前面的布局不能
- 调用其后面的布局id。而采用include后,一个include中可以引用其后的include中的布局id属性 -->
- <include android:id="@id/titleLayout" layout="@layout/app_title" />
- <include layout="@layout/app_tradelogin"/>
- <include layout="@layout/app_bottom"/>
- </RelativeLayout>
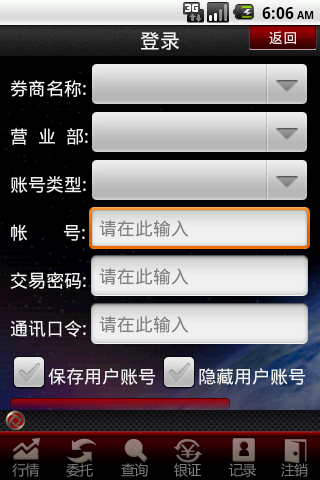
效果如下:
【Android 界面效果25】android中include标签的使用的更多相关文章
- android中include标签使用详解
android中include标签是为了便于控件的覆用的一个很好解决方案. 但是也有一些需要注意的地方,下面是本人在项目中碰到过的一个问题,做此记录,便于以后查看. include标签用法. ...
- Android中include标签的使用
在Android的开发中,我们知道布局文件可以让我们很方便的对各个UI控件进行位置安排跟属性设置,而在程序中可以直接取得控件并赋予对应操作功能.但是,如果是一个复杂的界面设计,我们把所有布局都放在一个 ...
- Android中include标签的使用(打开引用布局,隐藏当前布局)
在开发app的时候,有时候一个布局会反复用到,可以把反复用到的布局单独写一个xml文件,什么时候用到就用includ标签引入xml 下面是我写的反复用到的一个xml,里面有2个button,一个Tex ...
- 【Android 界面效果19】Android中shape的使用
Android中常常使用shape来定义控件的一些显示属性,今天看了一些shape的使用,对shape有了大体的了解,稍作总结: 先看下面的代码: <shape> ...
- 【Android 界面效果32】ImageView中XML属性src和background的区别
background会根据ImageView组件给定的长宽进行拉伸,而src就存放的是原图的大小,不会进行拉伸. src是图片内容(前景),bg是背景,可以同时使用. 此外:scaleType只对sr ...
- 【Android 界面效果30】Android中ImageSwitcher结合Gallery展示SD卡中的资源图片
本文主要是写关于ImageSwitcher结合Gallery组件如何展示SDCard中的资源图片,相信大家都看过API Demo 中也有关于这个例子的,但API Demo 中的例子是展示工程中Draw ...
- 【Android 界面效果12】EditText中的多行输入问题
------- 源自梦想.永远是你IT事业的好友.只是勇敢地说出我学到! ---------- 我们在使用EditText进行多行输入的时候,通常的写法如下: <EditText android ...
- 【Android 界面效果31】Android--侧滑菜单应用的实现
侧滑菜单应用现在非常多,而且实现方式也多种多样.通过在网上的多方查找,我找到郭霖少侠的这篇文章:http://blog.csdn.net/guolin_blog/article/details/874 ...
- 【Android 界面效果21】Android ViewPager使用详解
这是谷歌官方给我们提供的一个兼容低版本安卓设备的软件包,里面包囊了只有在安卓3.0以上可以使用的api.而viewpager就是其中之一利用它,我们可以做很多事情,从最简单的导航,到页面菜单等等.那如 ...
随机推荐
- labview 中的一些简写全称
MAX:Measurement & Automation Explorer 测量自动化管理器 :可用于配置DAQ通道名称,VISA资源名称和IVI逻辑名称. DAQ: Device Data ...
- Python基础 练习题
DAY .1 1.使用while循环输出 1 2 3 4 5 6 8 9 10 n = 1 while n < 11: if n == 7: pass else: print(n) n ...
- 1001.A+B Format (20)(思路,bug发现及其修改,提交记录)
https://github.com/031502316a/object-oriented/tree/master/1001 ---恢复内容开始--- 1.解题思路 一开始见到题目时,感觉难的就是输出 ...
- .NET文件上传的大小限制配置
<system.web> <!--maxRequestLength单位是Kb--> <httpRuntime maxRequestLength="20971 ...
- springMVC使用注解方式进行页面跳转
<!--控制层-->package cn.org.spartacus.spring; import org.springframework.beans.factory.annotation ...
- Oracle:递归查询(树形结构数据)
今天要做一个查询功能:查询某用户所属部门,且包含该部门的所有上级部门信息.偶然找到了一个方法,特意来做个笔记.分享给和我一样的菜鸟,哈哈 查询子节点 1 select * 2 from d_arc_d ...
- Linux 上的基础网络设备详解
抽象网络设备的原理及使用 网络虚拟化是 Cloud 中的一个重要部分.作为基础知识,本文详细讲述 Linux 抽象出来的各种网络设备的原理.用法.数据流向.您通过此文,能够知道如何使用 Linux 的 ...
- Jackson 高性能的JSON处理 ObjectMapper
http://blog.csdn.net/wangyang2698341/article/details/8223929 今天自行研究了下json ,感觉非常好用,经过测试比google的GSON快多 ...
- C#获取程序集的版本号和最后编译时间
C#获取程序集的版本号:string ver = System.Reflection.Assembly.GetExecutingAssembly().GetName().Version.ToStrin ...
- Slony-I的 RemoteWorker重试调查
客户的问题是: 向Slony-I运行环境中,增加新的slaveDB节点的时候发生错误. log中反复出现错误,然后再重新开始(重新开始部分的log省略): CONFIG remoteWorkerThr ...