Android开发UI之GridLayout的使用
1.GridLayout
官网截图

GridLayout包含的属性如下:
android:alignmentMode
属性说明:当设置alignMargins,使视图的外边界之间进行校准。可以取以下值:
alignBounds -- 对齐子视图边界。
alignMargins -- 对齐子视图边距。
android:columnCount
属性说明:GridLayout的最大列数
android:rowCount
属性说明:GridLayout的最大行数
android:columnOrderPreserved
属性说明: 当设置为true,使列边界显示的顺序和列索引的顺序相同。默认是true。
android:orientation
属性说明:GridLayout中子元素的布局方向。有以下取值:
horizontal -- 水平布局。
vertical -- 竖直布局。
android:rowOrderPreserved
属性说明: 当设置为true,使行边界显示的顺序和行索引的顺序相同。默认是true。
android:useDefaultMargins
属性说明: 当设置ture,当没有指定视图的布局参数时,告诉GridLayout使用默认的边距。默认值是false。
这些是GridLayout布局本身的属性。
2 GridLayout子元素属性
上面描述的 GridLayout 的属性,是 GridLayout 布局本身的属性;下面 GridLayout 布局中的元素所支持的属性。GridLayout 布局中的元素的属性,定义在 GridLayout.LayoutParams 中。取值如下:
2.1 android:layout_column
属性说明: 显示该空间的列。例如,android:layout_column="0",表示在第1列显示该控件;android:layout_column="1",表示在第2列显示该控件。
 <?xml version="1.0" encoding="utf-8"?>

 <GridLayout xmlns:android="http://schemas.android.com/apk/res/android"

     android:layout_width="wrap_content"

     android:layout_height="wrap_content"

     android:orientation="horizontal"

     android:rowCount="2"

     android:columnCount="3" >

   <Button

         android:id="@+id/one"

         android:layout_column="1"

         android:text="1"/>

   <Button

         android:id="@+id/two"

         android:layout_column="0"

         android:text="2"/>

    <Button

         android:id="@+id/three"

         android:text="3"/>

   <Button

         android:id="@+id/devide"

         android:text="/"/>
对应的显示效果图:
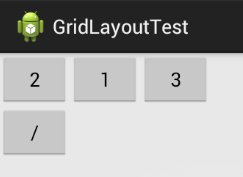
layout文件说明:
android:orientation="horizontal" -- GridLayout中控件的布局方向是水平布局。
android:rowCount="2" -- GridLayout最大的行数为2行。
android:columnCount="3" -- GridLayout最大的列数为3列。
android:layout_column="1" -- 定义控件one的位于第2列。
android:layout_column="0" -- 定义该控two件的位于第1列。
2.2 android:layout_columnSpan
属性说明: 该控件所占的列数。例如,android:layout_columnSpan="2",表示该控件占2列。
layout文件示例:
 <?xml version="1.0" encoding="utf-8"?>

 <GridLayout xmlns:android="http://schemas.android.com/apk/res/android"

     android:layout_width="wrap_content"

     android:layout_height="wrap_content"

     android:orientation="horizontal"

     android:rowCount="2"

     android:columnCount="3" >

   <Button

         android:id="@+id/one"

         android:layout_column="0"

         android:layout_columnSpan="2"

         android:text="1"/>

   <Button

         android:id="@+id/two"

         android:text="2"/>

    <Button

         android:id="@+id/three"

         android:text="3"/>

   <Button

         android:id="@+id/devide"

         android:text="/"/>

 </GridLayout>
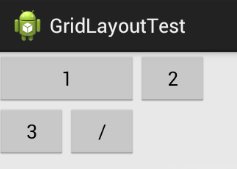
对应的显示效果图:

layout文件说明:
数字"1"实际上占据的空间大小是2列,但是第2列显示为空白。若要第2列不显示空白,需要设置 android:layout_gravity属性,参考下例。
2.3 android:layout_row
属性说明: 该控件所在行。例如,android:layout_row="0",表示在第1行显示该控件;android:layout_row="1",表示在第2行显示该控件。它和 android:layout_column类似。
2.4 android:layout_rowSpan
属性说明: 该控件所占的行数。例如,android:layout_rowSpan="2",表示该控件占2行。它和 android:layout_columnSpan类似。
2.5 android:layout_gravity
属性说明:
该控件的布局方式。可以取以下值:
top -- 控件置于容器顶部,不改变控件的大小。
bottom -- 控件置于容器底部,不改变控件的大小。
left -- 控件置于容器左边,不改变控件的大小。
right -- 控件置于容器右边,不改变控件的大小。
center_vertical -- 控件置于容器竖直方向中间,不改变控件的大小。
fill_vertical -- 如果需要,则往竖直方向延伸该控件。
center_horizontal -- 控件置于容器水平方向中间,不改变控件的大小。
fill_horizontal -- 如果需要,则往水平方向延伸该控件。
center -- 控件置于容器中间,不改变控件的大小。
fill -- 如果需要,则往水平、竖直方向延伸该控件。
clip_vertical -- 垂直剪切,剪切的方向基于该控件的top/bottom布局属性。若该控件的gravity是竖直的:若它的gravity是top的话,则剪切该控件的底部;若该控件的gravity是bottom的,则剪切该控件的顶部。
clip_horizontal -- 水平剪切,剪切的方向基于该控件的left/right布局属性。若该控件的gravity是水平的:若它的gravity是left的话,则剪切该控件的右边;若该控件的gravity是 right的,则剪切该控件的左边。
start -- 控件置于容器的起始处,不改变控件的大小。
end -- 控件置于容器的结束处,不改变控件的大小。
对应函数: setGravity(int)
layout文件示例:
 <?xml version="1.0" encoding="utf-8"?>

 <GridLayout xmlns:android="http://schemas.android.com/apk/res/android"

     android:layout_width="wrap_content"

     android:layout_height="wrap_content"

     android:orientation="horizontal"

     android:rowCount="2"

     android:columnCount="3" >

   <Button

         android:id="@+id/one"

         android:layout_column="0"

         android:layout_columnSpan="2"

         android:layout_gravity="fill"

         android:text="1"/>

   <Button

         android:id="@+id/two"

         android:text="2"/>

    <Button

         android:id="@+id/three"

         android:text="3"/>

   <Button

         android:id="@+id/devide"

         android:text="/"/>

 </GridLayout>
对应的显示效果图:
3 应用示例
定义一个简单的计算器界面,包含“0-9、.、+、-、*、/、=、”。用GridLayout实现。
layout文件
 <?xml version="1.0" encoding="utf-8"?>

 <!-- GridLayout: 5行 4列 水平布局 -->

 <GridLayout xmlns:android="http://schemas.android.com/apk/res/android"

     android:layout_width="wrap_content"

     android:layout_height="wrap_content"

     android:orientation="horizontal"

     android:rowCount="5"

     android:columnCount="4" >

   <Button

         android:id="@+id/one"

         android:text="1"/>

   <Button

         android:id="@+id/two"

         android:text="2"/>

    <Button

         android:id="@+id/three"

         android:text="3"/>

   <Button

         android:id="@+id/devide"

         android:text="/"/>

   <Button

         android:id="@+id/four"

         android:text="4"/>

   <Button

         android:id="@+id/five"

         android:text="5"/>

   <Button

         android:id="@+id/six"

         android:text="6"/>

   <Button

         android:id="@+id/multiply"

         android:text="×"/>

   <Button

         android:id="@+id/seven"

         android:text="7"/>

   <Button

         android:id="@+id/eight"

         android:text="8"/>

   <Button

         android:id="@+id/nine"

         android:text="9"/>

     <Button

         android:id="@+id/minus"

         android:text="-"/>

     <Button

         android:id="@+id/zero"

         android:layout_columnSpan="2"

         android:layout_gravity="fill"

         android:text="0"/>

   <Button

         android:id="@+id/point"

         android:text="."/>

     <Button

         android:id="@+id/plus"

         android:layout_rowSpan="2"

         android:layout_gravity="fill"

         android:text="+"/>

     <Button

         android:id="@+id/equal"

         android:layout_columnSpan="3"

         android:layout_gravity="fill"

         android:text="="/>

 </GridLayout>

转自:http://www.cnblogs.com/skywang12345/p/3154150.html
Android开发UI之GridLayout的使用的更多相关文章
- Android开发--UI之Bundle的使用
Android开发–UI之Bundle的使用 最近,把之前学过的东西大体的整理了以下,并且想把学过的心得分享给大家.我自己做了一个小小的demo,以便说明具体的应用. 这里的两个界面是通过第一个界面输 ...
- Android开发 UI布局
Android开发 UI布局一.线性布局LinearLayout 什么是线性布局? 其实呢,线性布局就是把所有的孩子摆在同一条线上 <?xml version="1.0" e ...
- Android开发UI之开源项目第一篇——个性化控件(View)篇
原文:http://blog.csdn.net/java886o/article/details/24355907 本文为那些不错的Android开源项目第一篇——个性化控件(View)篇,主要介绍A ...
- Android 开发UI牛博[转]
Android 新兴的UI模式——侧边导航栏 侧边导航栏也就是大家熟知的SliddingMenu,英文也叫Fly-In App Menu.Side Navigation等.当然谷歌现在已经推出类似这个 ...
- Android开发UI之在子线程中更新UI
转自第一行代码-Android Android是不允许在子线程中进行UI操作的.在子线程中去执行耗时操作,然后根据任务的执行结果来更新相应的UI控件,需要用到Android提供的异步消息处理机制. 代 ...
- Android开发UI之Action Bar
郭大神的讲解:http://blog.csdn.net/guolin_blog/article/details/18234477 官网链接:http://developer.android.com/i ...
- Android开发UI之Toast的使用
Toast,A toast provides simple feedback about an operation in a small popup. 对于操作提供一个简单反馈信息. 官网链接:htt ...
- Android开发UI之给ImageView添加蒙版
ImageView控件添加蒙版, 通过属性:android:tint="" 比如 android:tint="#44ff0000"
- Android开发UI之ListView中的Button点击设置
在ListView的Item中,如果有Button控件,那么要实现Button和Item点击都有响应,可以将Item的Layout中Button的focusable属性设为false,然后设置layo ...
随机推荐
- js获取键盘按键响应事件(兼容各浏览器)
<script type="text/javascript" language="JavaScript" charset="UTF-8" ...
- swing画太极图案源码
package org.open.swing.taiji; /** * @(#)Taichi.java * * * @author * @version 1.00 2007/6/12 */ impor ...
- [DevExpress]GridControl 列头绘制Checkbox
关键代码: /// <summary> /// 为列头绘制CheckBox /// </summary> /// <param name="view" ...
- Get vertical scrollbar width and example
$.scrollbarWidth = function () { var parent, child, width; if (width === undefined) { parent = $('&l ...
- jQueryr .on方法解析
.On() 其实.bind(), .live(), .delegate()都是通过.on()来实现的,.unbind(), .die(), .undelegate(),也是一样的都是通过.off()来 ...
- IE下的bug解决方案
1.IE6下的双边距bug <!DOCTYPE html> <html lang="en"> <head> <meta charset=& ...
- YII千万级PV架构经验分享--俯瞰篇--架构即产品
hello,大家好,我是方少,今天想问大家一个问题,如果我们自己就是产品,那么我们怎样才能说服别人,我们是最优秀的呢?高学历,不错,别人成功过了.会php,java,c#,python不行再学c++, ...
- Python学习_从文件读取数据和保存数据
运用Python中的内置函数open()与文件进行交互 在HeadFirstPython网站中下载所有文件,解压后以chapter 3中的“sketch.txt”为例: 新建IDLE会话,首先导入os ...
- 2014年辛星完全解读Javascript第七节 数组和对象
由于Javascript是脚本语言,因此,使用起来非常方便,数组的使用也是比较简单的,下面我们就主要介绍一下Javascript中数组的介绍,以及上一节中没有完成的对象的介绍. *********** ...
- 【socket】Socket的三个功能类TCPClient、TCPListener 和 UDPClient
Socket的三个功能类TCPClient.TCPListener 和 UDPClient (转) 应用程序可以通过 TCPClient.TCPListener 和 UDPClient 类使用传输控制 ...