Visual Studio IDE环境下利用模板创建和手动配置CUDA项目教程
目前版本的cuda是很方便的,它的一个安装里面包括了Toolkit`SDK`document`Nsight等等,而不用你自己去挨个安装,这样也避免了版本的不同步问题。
1 cuda5.5的下载地址,官方网站即可:
https://developer.nvidia.com/cuda-downloads 在里面选择你所对应的电脑版本即可。
2 VS2010这个没什么说的了,网上各种的免费资源,下载一个不需要钱的就行。
3 Cuda的安装:(win7版32bit)
安装cuda
3.1 cuda的安装文件

直接双击exe文件,弹出后,首先会监测一下你的运行环境,如果找不到Nividia对应的显卡设备,他会提示你是否要继续安装。这里面nvidia的显卡,最起码也是8800以上的,要不是无法编写CUDA的。千万不要电脑上面是intel或者AMD的显卡,却要编写cuda,除非你有钱买一个cuda-x86这个编译器。
3.2 弹出的对话框直接OK就行,这个是CUDA的一些安装文件,无所谓的:
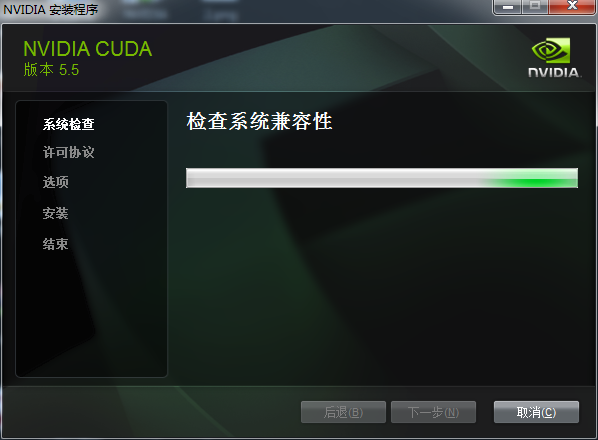
3.3 他会监测你的电脑是否支持cuda的搭建,等待就行
3.4 系统检查
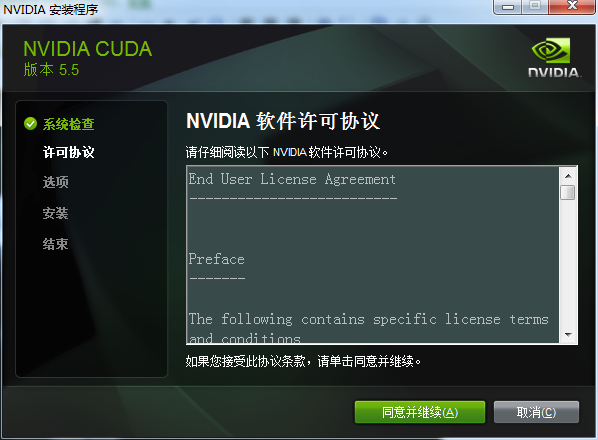
3.5 选择同意并继续
3.6 推荐先选择自定义安装
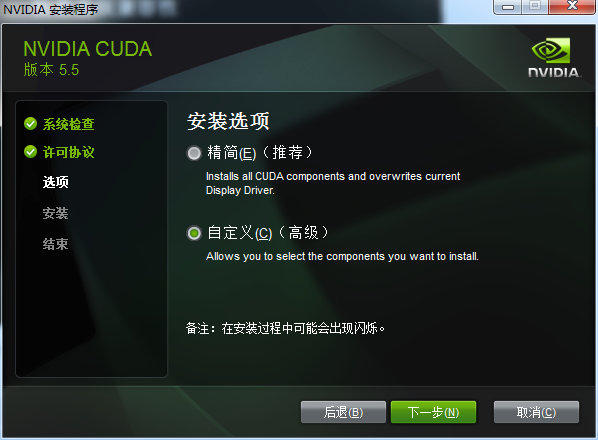
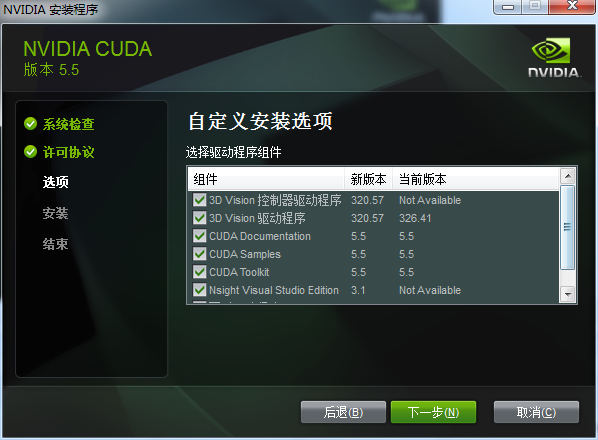
3.7 最主要的是cuda document\cuda Toolkit \cuda samples(SDK),Nsight\图形驱动程序,3D如果需要的话安装,不安装也无所谓。这里主要就是能看见都有什么,免得漏掉了,博主当初就因为选了精简安装,没安装上SDK。
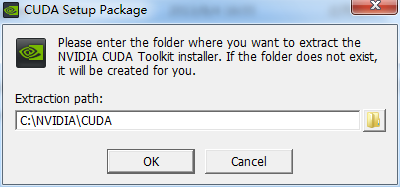
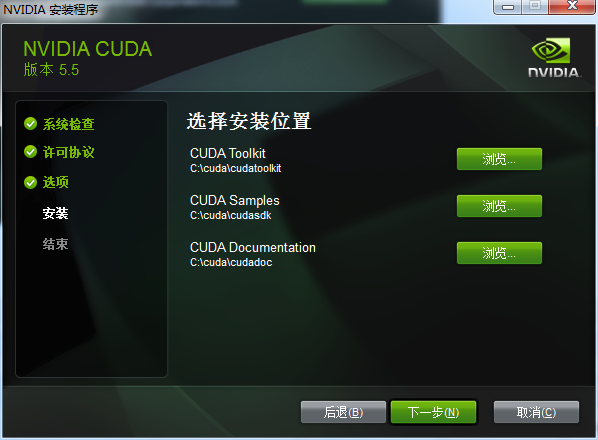
3.7 安装的位置,推荐自己建三个好找的文件夹,不用他默认的路径,免得稍后配置环境变量麻烦。

博主的安装路径为:
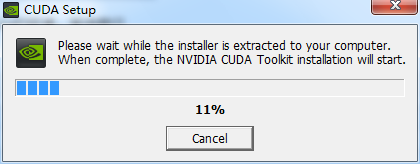
3.8 下一步安装就行了。
至此,cuda的安装就搞定了。
4 接下来配置cuda的环境变量,默认安装好后,他会自动帮你设置好2个环境变量,但是最好还自己添加下其他的几个,方便日后配置vs使用

上面的两个环境变量是cuda默认配置的,接下来添加
CUDA_BIN_PATH  %CUDA_PATH%\bin

CUDA_LIB_PATH  %CUDA_PATH%\lib\Win32

CUDA_SDK_BIN  %CUDA_SDK_PATH%\bin\Win32

CUDA_SDK_LIB  %CUDA_SDK_PATH%\common\lib\Win32

CUDA_SDK_PATH  C:\cuda\cudasdk\common
添加完就行了
5 接下来是cuda的安装成功与否的监测了,这个步骤我们用到两个东西,这两个东西,都是cuda为我们准备好的。
deviceQuery.exe 和 bandwithTest.exe
首先启动cmd DOS命令窗口(博主的cuda安装到c:\cuda文件夹下)
默认进来的是c:\users\Admistrator\>路径,输入 cd .. 两次,来到c:目录下
输入dir 找到安装的cuda文件夹
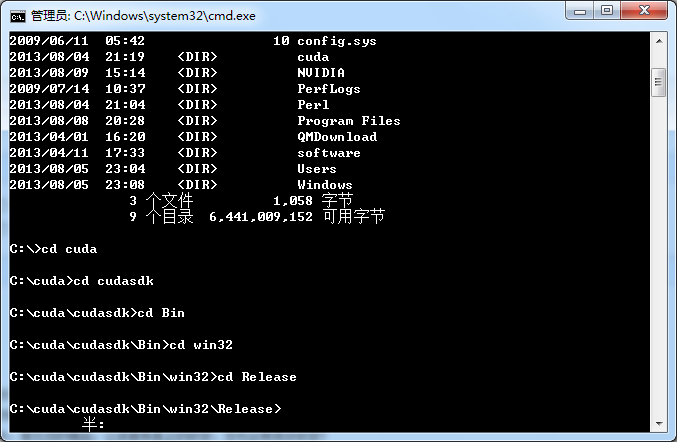
进入Release文件夹后,直接执行bandwithTest.exe

再执行deviceQuery.exe
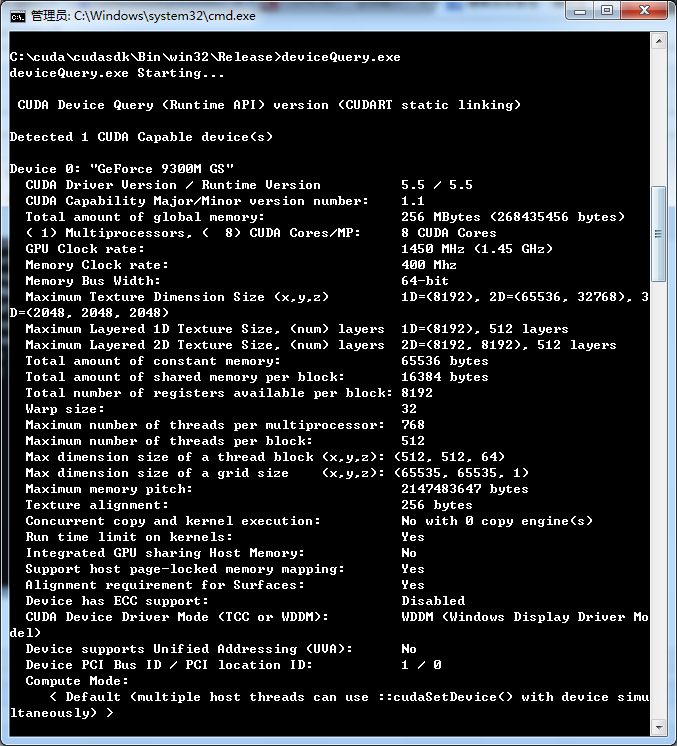

得到以上信息,因为我的显卡比较古老9300属于第一代的cuda显卡了。Rsult=PASS及说明,都通过了。如果Rsult=Fail 那不好意思,重新安装吧(或者是您的显卡真心不给力)。
关于VS项目测试(推荐)
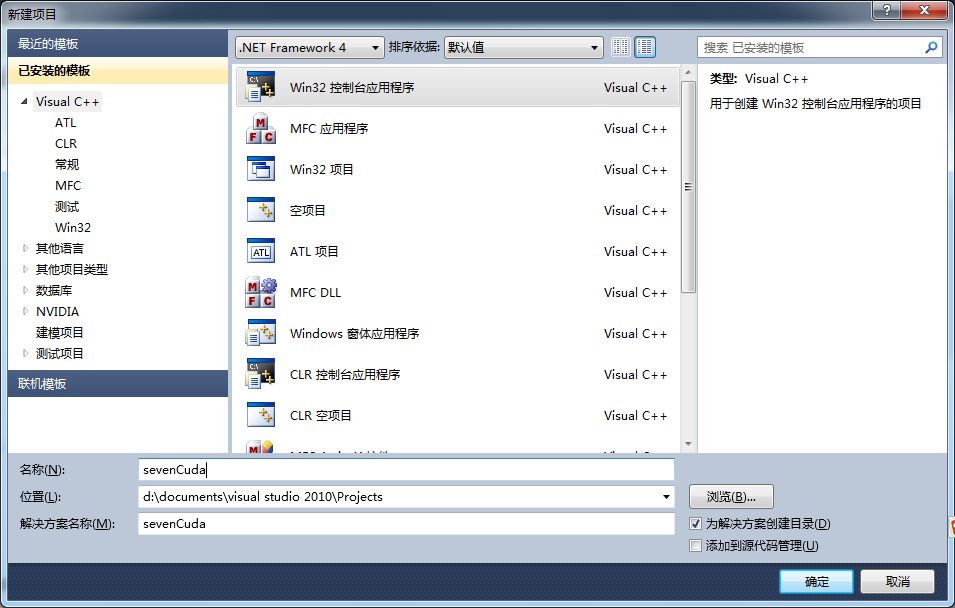
打开VS,新建项目
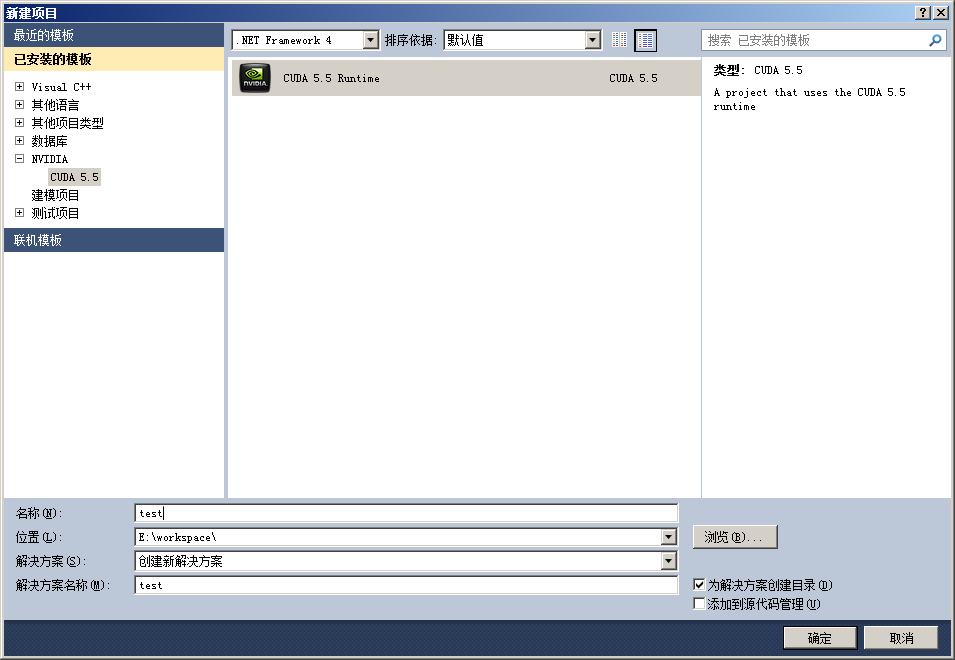
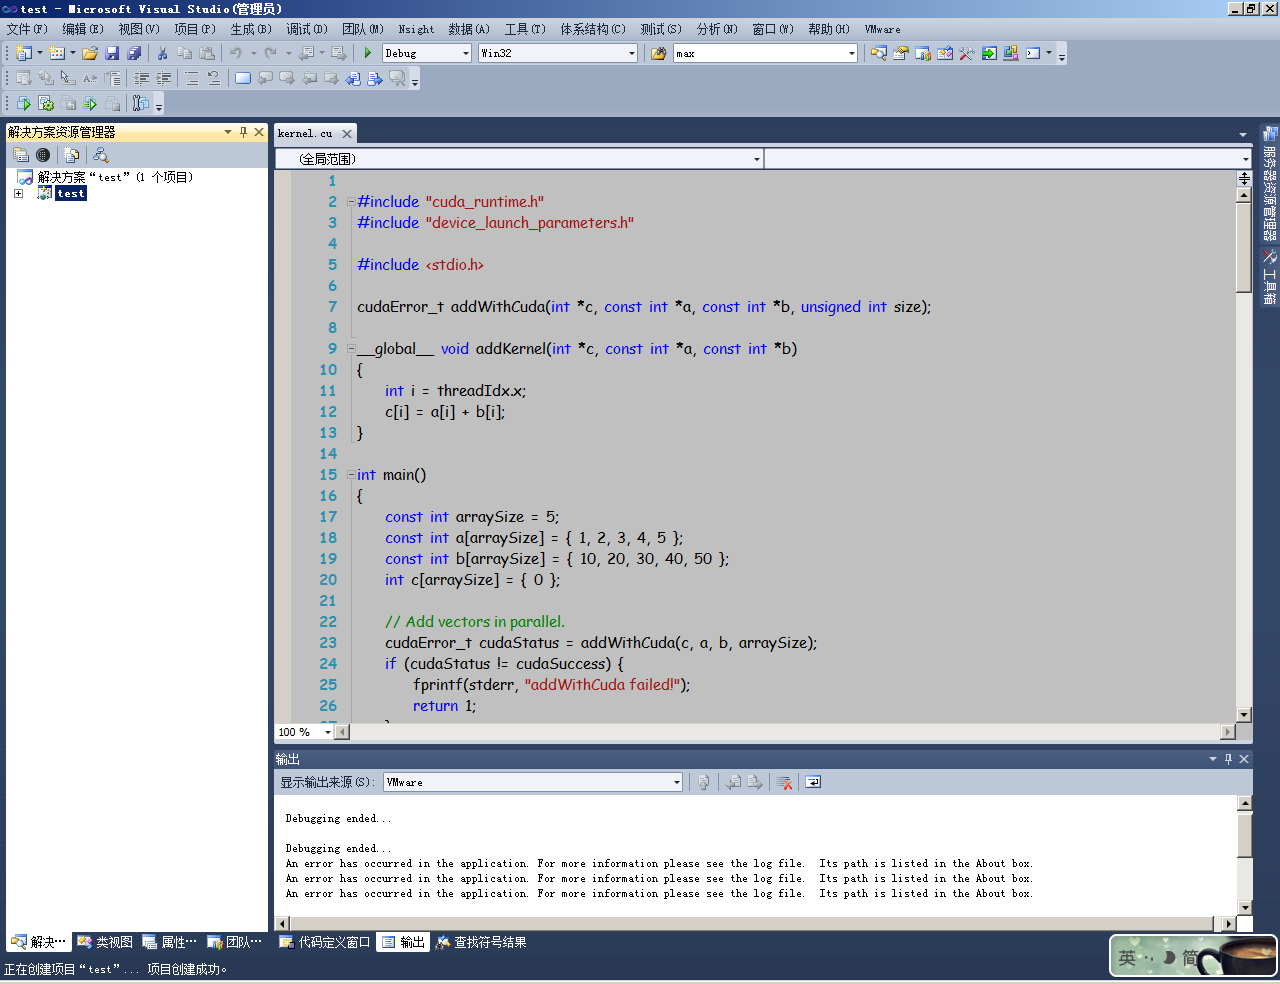
利用安装好的cuda向导,直接建立工程,里面会自动有一段kernel累加的代码:
#include "cuda_runtime.h"

#include "device_launch_parameters.h"

#include <stdio.h>

cudaError_t addWithCuda(int *c, const int *a, const int *b, unsigned int size);

__global__ void addKernel(int *c, const int *a, const int *b)

{

    int i = threadIdx.x;

    c[i] = a[i] + b[i];

}

int main()

{

    const int arraySize = ;

    const int a[arraySize] = { , , , ,  };

    const int b[arraySize] = { , , , ,  };

    int c[arraySize] = {  };

    // Add vectors in parallel.

    cudaError_t cudaStatus = addWithCuda(c, a, b, arraySize);

    if (cudaStatus != cudaSuccess) {

        fprintf(stderr, "addWithCuda failed!");

        return ;

    }

    printf("{1,2,3,4,5} + {10,20,30,40,50} = {%d,%d,%d,%d,%d}\n",

        c[], c[], c[], c[], c[]);

    // cudaDeviceReset must be called before exiting in order for profiling and

    // tracing tools such as Nsight and Visual Profiler to show complete traces.

    cudaStatus = cudaDeviceReset();

    if (cudaStatus != cudaSuccess) {

        fprintf(stderr, "cudaDeviceReset failed!");

        return ;

    }

    getchar();

    return ;

}

// Helper function for using CUDA to add vectors in parallel.

cudaError_t addWithCuda(int *c, const int *a, const int *b, unsigned int size)

{

    int *dev_a = ;

    int *dev_b = ;

    int *dev_c = ;

    cudaError_t cudaStatus;

    // Choose which GPU to run on, change this on a multi-GPU system.

    cudaStatus = cudaSetDevice();

    if (cudaStatus != cudaSuccess) {

        fprintf(stderr, "cudaSetDevice failed!  Do you have a CUDA-capable GPU installed?");

        goto Error;

    }

    // Allocate GPU buffers for three vectors (two input, one output)    .

    cudaStatus = cudaMalloc((void**)&dev_c, size * sizeof(int));

    if (cudaStatus != cudaSuccess) {

        fprintf(stderr, "cudaMalloc failed!");

        goto Error;

    }

    cudaStatus = cudaMalloc((void**)&dev_a, size * sizeof(int));

    if (cudaStatus != cudaSuccess) {

        fprintf(stderr, "cudaMalloc failed!");

        goto Error;

    }

    cudaStatus = cudaMalloc((void**)&dev_b, size * sizeof(int));

    if (cudaStatus != cudaSuccess) {

        fprintf(stderr, "cudaMalloc failed!");

        goto Error;

    }

    // Copy input vectors from host memory to GPU buffers.

    cudaStatus = cudaMemcpy(dev_a, a, size * sizeof(int), cudaMemcpyHostToDevice);

    if (cudaStatus != cudaSuccess) {

        fprintf(stderr, "cudaMemcpy failed!");

        goto Error;

    }

    cudaStatus = cudaMemcpy(dev_b, b, size * sizeof(int), cudaMemcpyHostToDevice);

    if (cudaStatus != cudaSuccess) {

        fprintf(stderr, "cudaMemcpy failed!");

        goto Error;

    }

    // Launch a kernel on the GPU with one thread for each element.

    addKernel<<<, size>>>(dev_c, dev_a, dev_b);

    // Check for any errors launching the kernel

    cudaStatus = cudaGetLastError();

    if (cudaStatus != cudaSuccess) {

        fprintf(stderr, "addKernel launch failed: %s\n", cudaGetErrorString(cudaStatus));

        goto Error;

    }

    // cudaDeviceSynchronize waits for the kernel to finish, and returns

    // any errors encountered during the launch.

    cudaStatus = cudaDeviceSynchronize();

    if (cudaStatus != cudaSuccess) {

        fprintf(stderr, "cudaDeviceSynchronize returned error code %d after launching addKernel!\n", cudaStatus);

        goto Error;

    }

    // Copy output vector from GPU buffer to host memory.

    cudaStatus = cudaMemcpy(c, dev_c, size * sizeof(int), cudaMemcpyDeviceToHost);

    if (cudaStatus != cudaSuccess) {

        fprintf(stderr, "cudaMemcpy failed!");

        goto Error;

    }

Error:

    cudaFree(dev_c);

    cudaFree(dev_a);

    cudaFree(dev_b);

    return cudaStatus;

}
在main函数return之前加入getchar(),停止自动退出,以便观测效果

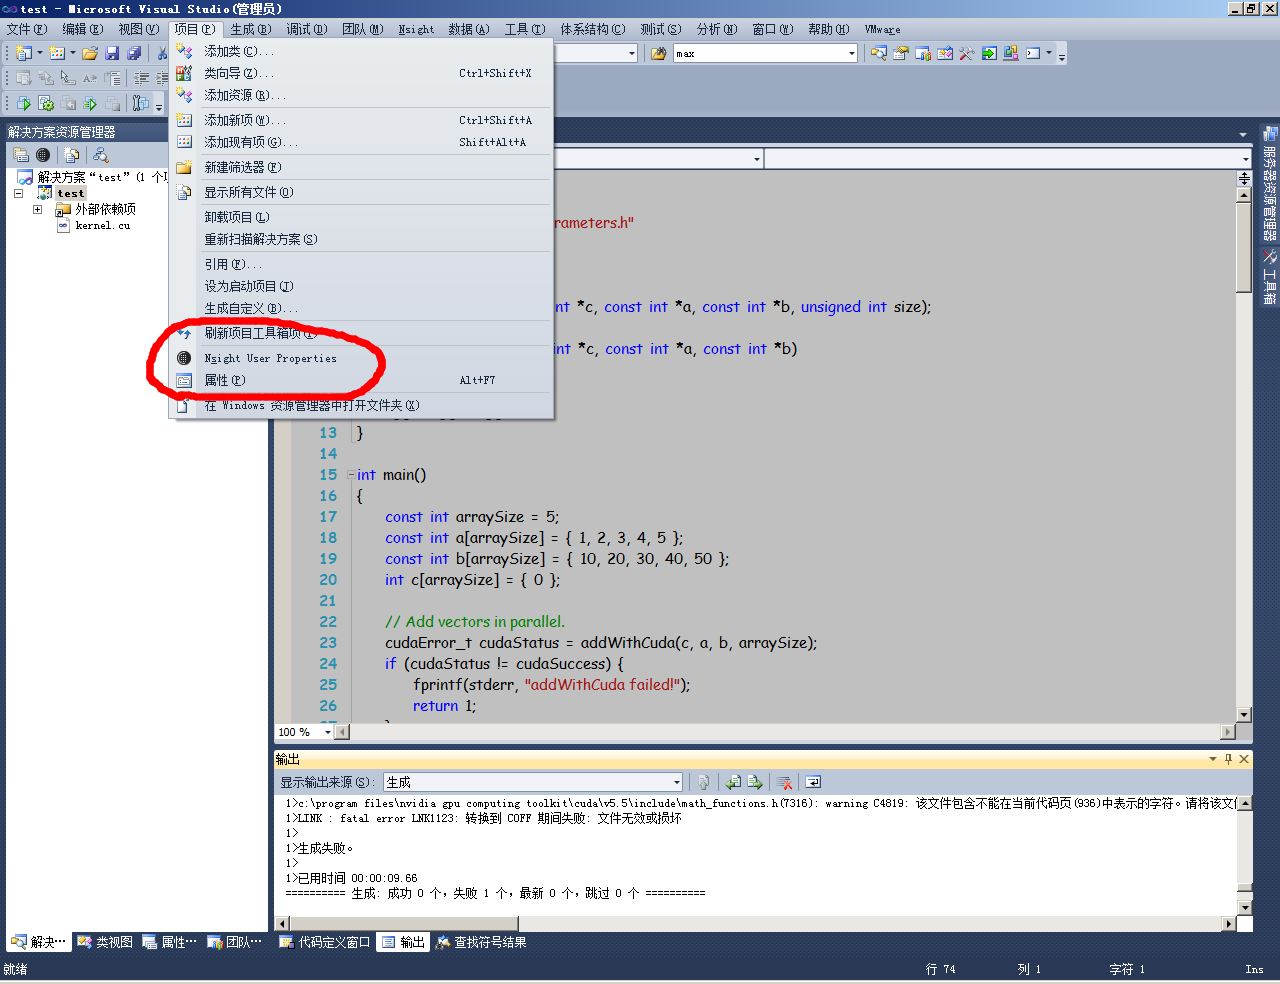
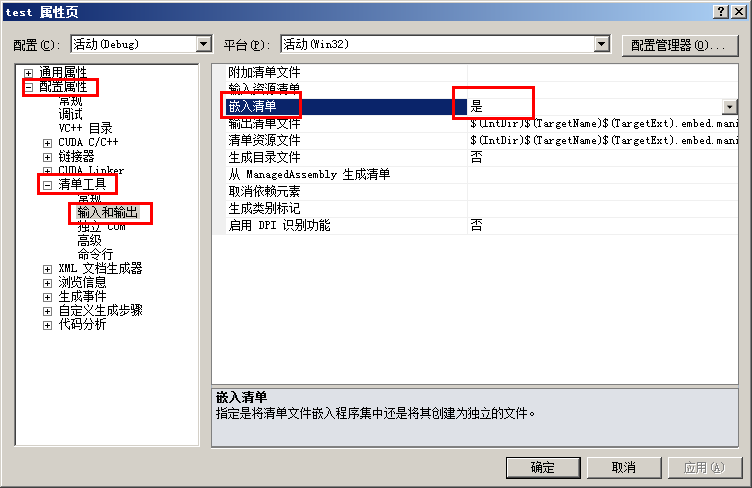
进入后,点击运行按钮,可能发生LINK错误(如果没有错误,跳过此段)
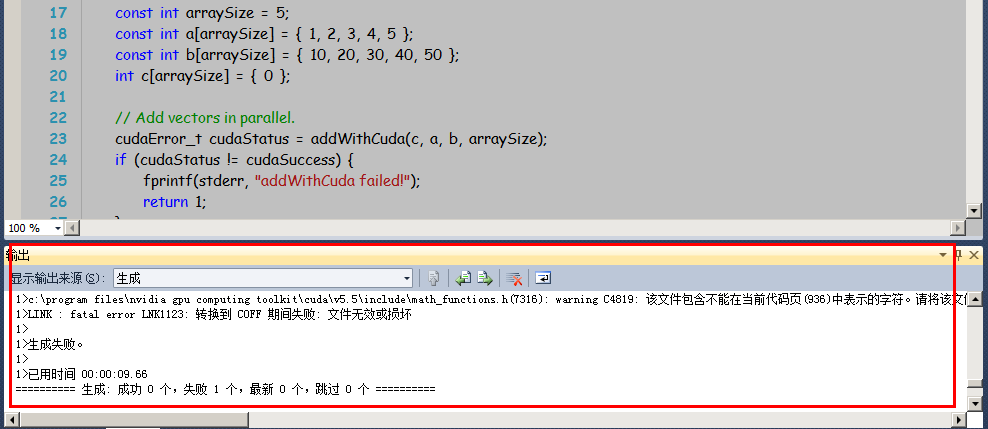
这时进入-》项目-》属性-》通用配置-》输入和输出-》嵌入清单 ---- 修改成否,原来可能为“是”
再次编译,成功运行后,会显示下面的结果
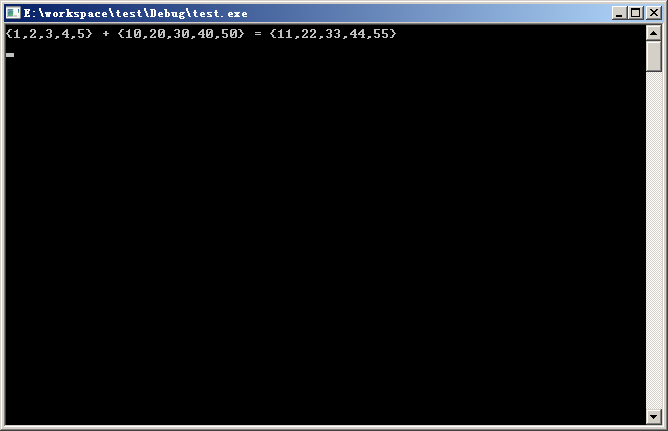
恭喜,cuda已经在您的机器上安装成功了。
如果是新手,推荐这样新建工程后,在里面修改代码成为自己的工程,配置属性不会出错。
如果想要自己手动配置也可以参考下面的例子。
手动配置VS项目(不推荐)
最后就是VS的配置了(这个是自己手动配置的,有时候容易出现问题,不是很推荐,建议用上面的方法建立项目进行测试)
5.1 启动VS2010
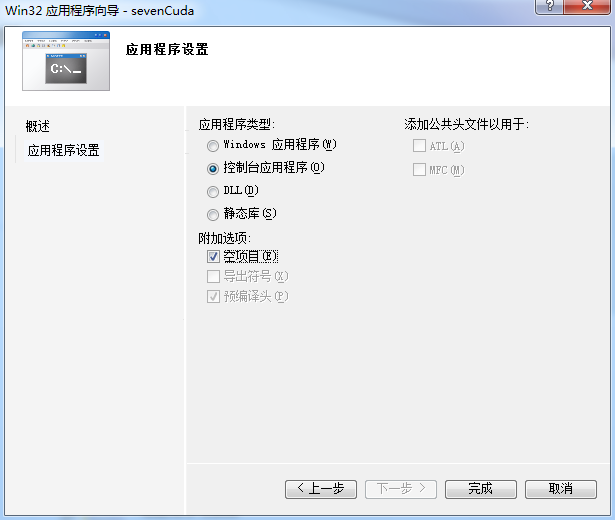
5.2 新建一个win32的控制台工程,空的。
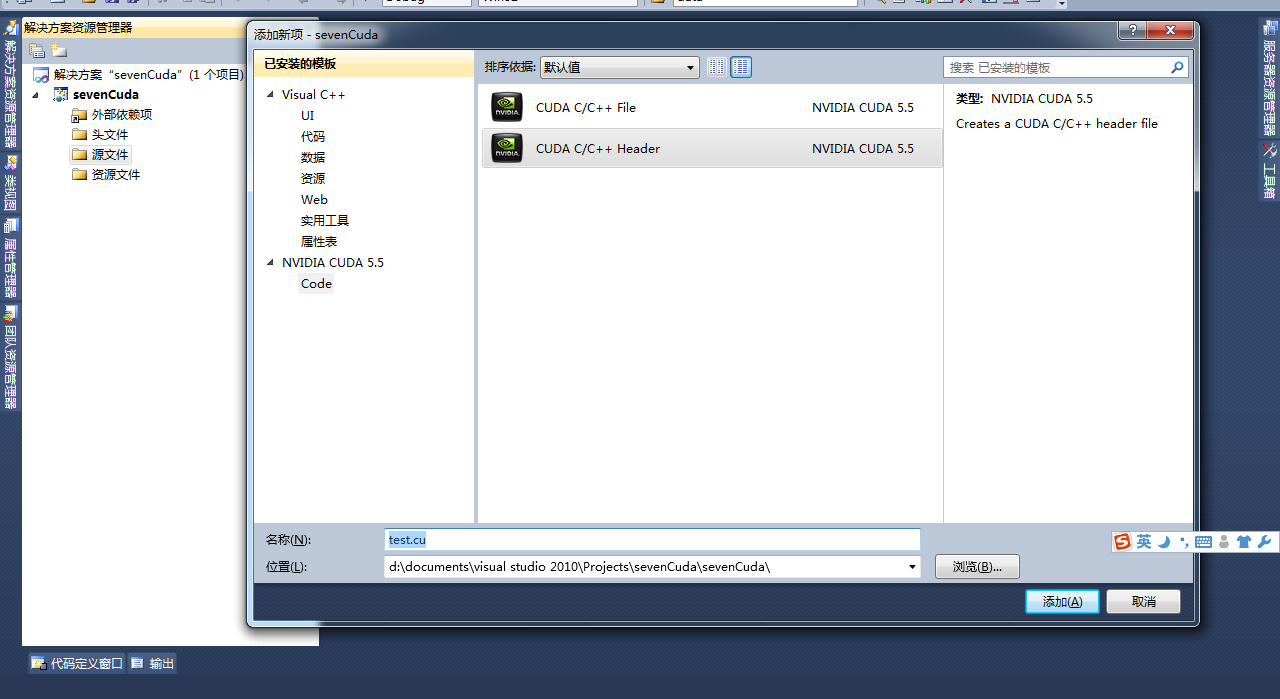
5.3 右键源文件文件夹->新建项->选择cuda c/c++->新建一个以.cu结尾的文件
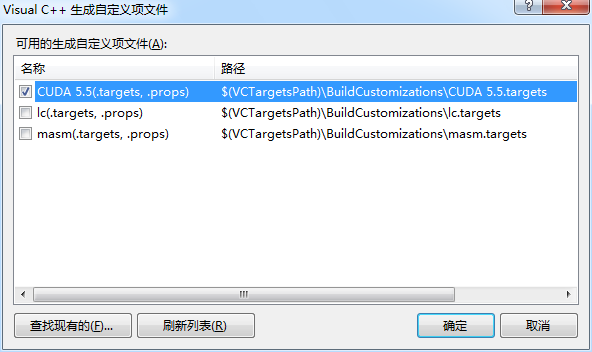
5.4 右键工程-》生成自定义-》选择cuda生成
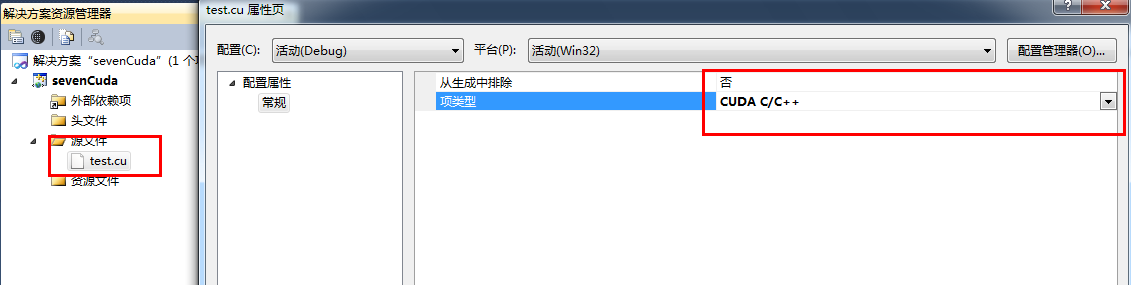
5.5 右键test.cu-》属性-》选择cuda c/c++编译器
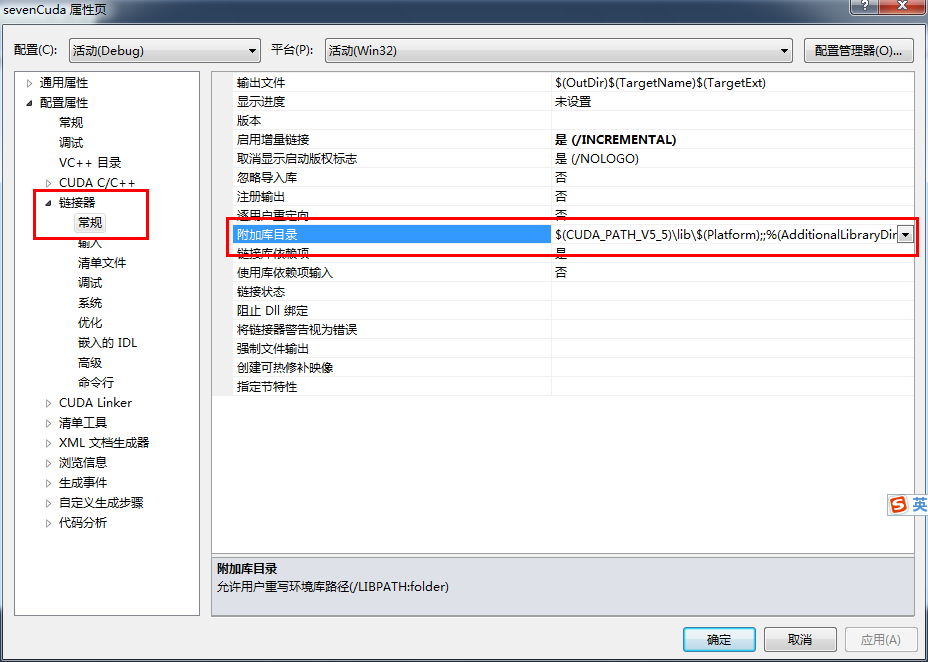
5.6 右键工程-》属性-》链接器-》常规-》附加库目录-》添加目录 $(CUDA_PATH_V5_5)\lib\$(Platform);
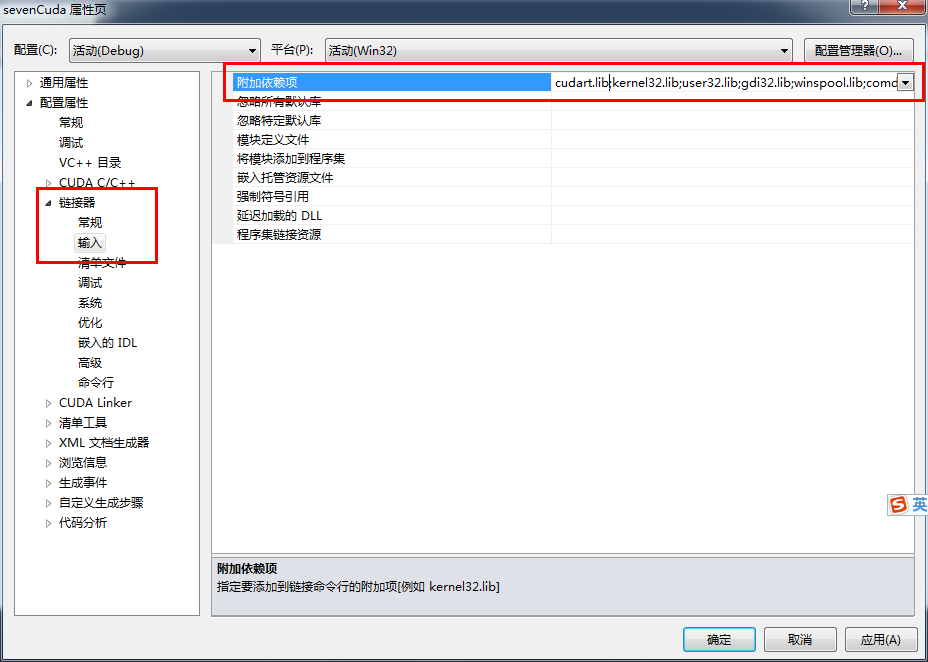
5.7 在链接器-》输入中添加 cudart.lib
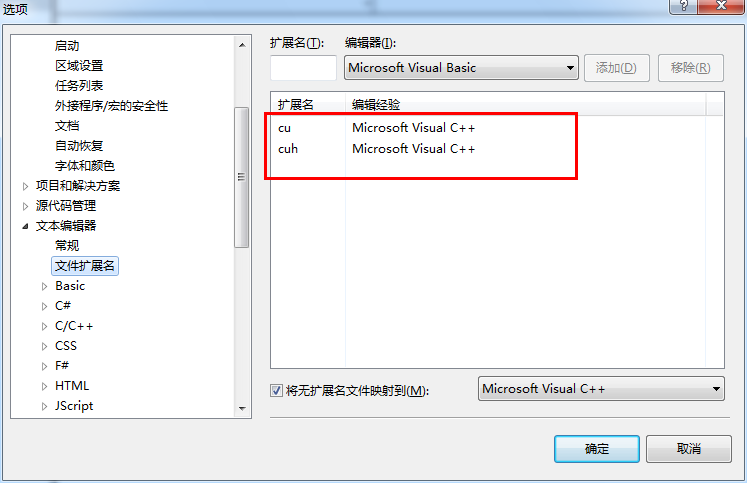
5.8 在工具-》选项-》文本编辑器-》文件扩展名-》添加cu \cuh两个文件扩展名
至此,编译环境的相关搭建就完成了。
下面提供了一段test.cu的代码,供测试使用:
#include <stdio.h>

#include <stdlib.h>

#include <cuda_runtime.h>

#define DATA_SIZE 1024

#define checkCudaErrors(err)  __checkCudaErrors (err, __FILE__, __LINE__)

#define getLastCudaError(msg)  __getLastCudaError (msg, __FILE__, __LINE__)

int data[DATA_SIZE];

////////////////////////////////////////////////////////////////////////////////

// These are CUDA Helper functions

// This will output the proper CUDA error strings in the event that a CUDA host call returns an error

inline void __checkCudaErrors(cudaError err, const char *file, const int line )

{

    if(cudaSuccess != err)

    {

        fprintf(stderr, "%s(%i) : CUDA Runtime API error %d: %s.\n",file, line, (int)err, cudaGetErrorString( err ) );

        return ;

    }

}

// This will output the proper error string when calling cudaGetLastError

inline void __getLastCudaError(const char *errorMessage, const char *file, const int line )

{

    cudaError_t err = cudaGetLastError();

    if (cudaSuccess != err)

    {

        fprintf(stderr, "%s(%i) : getLastCudaError() CUDA error : %s : (%d) %s.\n",

        file, line, errorMessage, (int)err, cudaGetErrorString( err ) );

        return ;

    }

}

// end of CUDA Helper Functions

__global__ static void sumOfSquares(int *num, int * result){

    int sum=;

    int i;

    for(i=;i<DATA_SIZE;i++) {

        sum += num[i]*num[i];

        }

    *result = sum;

}

void GenerateNumbers(int *number, int size){

    for(int i = ; i < size; i++) {

        number[i] = rand() % ;

        printf("number[%d] is %d\n",i,number[i]);

    }}

int main(){

        cudaSetDevice();

        cudaDeviceSynchronize();

        cudaThreadSynchronize();

        GenerateNumbers(data, DATA_SIZE);

        int * gpudata, * result;

        int sum;

        checkCudaErrors( cudaMalloc((void**) &gpudata, sizeof(int)*DATA_SIZE));

        checkCudaErrors(cudaMalloc((void**) &result, sizeof(int)));

        checkCudaErrors(cudaMemcpy(gpudata, data, sizeof(int)*DATA_SIZE,cudaMemcpyHostToDevice));

        sumOfSquares<<<, , >>>(gpudata, result);

        checkCudaErrors(cudaMemcpy(&sum, result, sizeof(int), cudaMemcpyDeviceToHost));

        cudaFree(gpudata);

        cudaFree(result);

        printf("-----------sum: %d\n",sum);

        sum = ;

        for(int i = ; i < DATA_SIZE; i++) {

            sum += data[i] * data[i];

        }

        printf("sum (CPU): %d\n", sum);

        getchar();

        return ;

}
原文链接:
手把手教你cuda5.5与VS2010的编译环境搭建
Visual Studio IDE环境下利用模板创建和手动配置CUDA项目教程的更多相关文章
- Visual Studio 2013环境下操作vc6/vc7/vc8等低版本平台项目【编译|生成|调试】
现代化的开发环境,微软一直在推出更新换代,我们所处的技术环境在日新月异的变化:不过在中国多数人们一边疲惫的追赶着时代的步伐,一边坚守着自己所获悉所掌握的那些紧吧吧的知本.对技术工具的掌握并非他们所想要 ...
- MariaDB + Visual Studio 2017 环境下的 ODBC 入门开发
参考: Easysoft公司提供的ODBC教程 微软提供的ODBC文档 环境: Windows 10 x64 1803 MariaDB TX 10.2.14 x64 MariaDB ODBC Conn ...
- (转)在SQL Server 2016,Visual Studio 2017环境下,连接数据库屡屡失败,在connectionString上出的问题
适用情景: 1,ServerVersion出了问题,“SqlCnt.ServerVersion”引发了类型“System.InvalidOperationException”的异常 2,在String ...
- 安装Visual Studio Scrum 1.0过程模板
近几年里,Scrum变成了相当流行的软件开发方法学.因为它轻量.可迭代且快速等优点,以致于在敏捷开发中极受欢迎.微软甚至将TFS2010自带的MSF Agile5.0过程模板做得像Scrum,开发者们 ...
- WIN7环境下CUDA7.5的安装、配置和测试(Visual Studio 2010)
以下基于"WIN7(64位)+Visual Studio 2010+CUDA7.5". 系统:WIN7,64位 开发平台:Visual Studio 2010 显卡:NVIDIA ...
- OpenCV2.4.9 & Visual Studio 2010 环境配置篇
1. 准备工作 1.1. 安装 Visual Studio 2010, 需要安装 VC++ 相关功能.具体可求助度娘. 1.2. 下载 OpenCV 2.4.9 For Windows:https:/ ...
- Qt5 FOR WINCE7, Visual Studio 2008环境的搭建
Qt5 FOR WINCE7, Visual Studio 2008环境的搭建 Qt5发布时,试过配置Qt5 for wince的环境,原因是暂时不支持WINCE.前几天意外发现官方博客说明已经开始支 ...
- 在 C 代码中嵌入 Python 语句或使用 Python 模块 (Visual Studio 2013 环境设置)
1) 新建一个 内嵌 Python 语句的 C 代码, // This is a test for check insert the Python statements or module in C. ...
- 从头开始学eShopOnContainers——Visual Studio 2017环境配置
一.安装和配置Docker环境 1.安装Docker CE for Windows 从官方网站下载并安装,https://docs.docker.com/docker-for-windows/inst ...
随机推荐
- EditText属性
来自http://mp.weixin.qq.com/s/Yncr0XZ4MCWZH2vzTVyYJw android:inputType=”none”android:inputType=”text”a ...
- Java基础24-文档注释
格式: /** .......*/ /** 此类是对数组进行取最大值 @author 深海溺心 @version 1.0 */ public class Compare{ private Compar ...
- oracle trim不掉空白字符分享(转)
本文转自:http://www.2cto.com/database/201306/223558.html 问题背景:一个工商注册号,正常的用trim能解决的问题,但是这个case,trim后和肉眼看到 ...
- TOJ 4119 Split Equally
描述 Two companies cooperatively develop a project, but they don’t like working with one another. In o ...
- 二、MVC3+EF单表增删改查
document 表为例 写入静态类 NorthwindDataProvider: Controller可直接调用:如 //获取document表全部数据 NorthwindDataProvider. ...
- 【学习笔记】Java中生成对象的5中方法
概述:本文介绍以下java五种创建对象的方式: 1.用new语句创建对象,这是最常用的创建对象的方式. 2.使用Class类的newInstance方法 3.运用反射手段,调用java.lang.re ...
- 第一个servet(用注解),不用web.xml
环境: idea 1.新建模块 2.在蓝色src下新建一个包com.test 3.在包下新建servlet 4.写代码 package com.test; import javax.servlet.S ...
- 前端自动分环境打包(vue和ant design)
现实中的问题:有时候版本上线的时候,打包时忘记切换环境,将测试包推上正式服务器,那你就会被批了. 期望:在写打包的命令行的时候就觉得自己在打包正式版本,避免推包时候的,不确信自己的包是否正确. 既然有 ...
- python作业-网络编程
1.什么是C/S架构? 答:C指的是client(客户端软件),S指的是Server(服务端软件) 2.互联网协议是什么?分别介绍五层协议中每一层的功能? 答:互联网的核心就是由一堆协议组成.如果把计 ...
- es6新增的数组方法和对象
es6新增的遍历数组的方法,后面都会用这个方法来遍历数组,或者对象,还有set,map let arr=[1,2,3,4,3,2,1,2]; 遍历数组最简洁直接的方法法 for (let value ...