Qt开源作品43-超级图形字体
一、前言
对于众多的Qter程序员来说,美化UI一直是个老大难问题,毕竟这种事情理论上应该交给专业的美工妹妹去做,无奈在当前整体国际国内形式之下,绝大部分公司是没有专门的美工人员的,甚至说有个兼职的美工都已经是很奢侈的事情,大部分的公司都是一个程序员同时要肩负着测试员、美工人员、售后维护人员等人员的责任,老板肯定都是这么想,我花了这么多钱招你进来,所有程序相关的和周边的你都的给我搞定才行。
程序的UI美化,个人觉得就两点,第一点就是布局,你必须把控件摆整齐,一定要让用户看着舒服,而且用户操作交互方便,这点在美化UI中占比60%重要,摆的歪歪扭扭,再如何颜色牛逼图标图片牛逼也是垃圾,一看就很丑陋,就是拒绝的,你看windows系统就算没有什么鲜艳的颜色和图标,各种设置界面都是整整齐齐的,看起来就舒服,才有继续用下去的可能。第二点才是颜色和图片,颜色不知道如何配色可以去UI中国等网站找到你喜欢的界面方案,找个拾色器直接把颜色拿过来就行,图片图片就需要用到今天的主角图形字体。
图形字体的出现绝对是所有程序员的福音,各种类型的各种种类的图标应有尽有,直接找到你想要的图标按照值作为文字文本写进去就行,简直爽的不要不要的,他是作为文本的形式存在,意味着你可以任意设置大小和颜色,这就不要太强大了哇,我们需要的不就是这种效果吗?
按照这个思路,在2014年开始就封装了一个图形字体类,当初非常简单,而且重复代码非常多,今年静下心来重新封装重写了一遍,基本上形成了现在的风格,一个类同时支持多种图形字体文件(为什么有这个需求?因为网络上各种图形字体文件层出不穷,不大方便合并到一个字体文件中,而你的程序又可能都需要使用到这多个图形字体文件),全部提供静态方法设置,支持各种导航面板风格。
二、主要功能
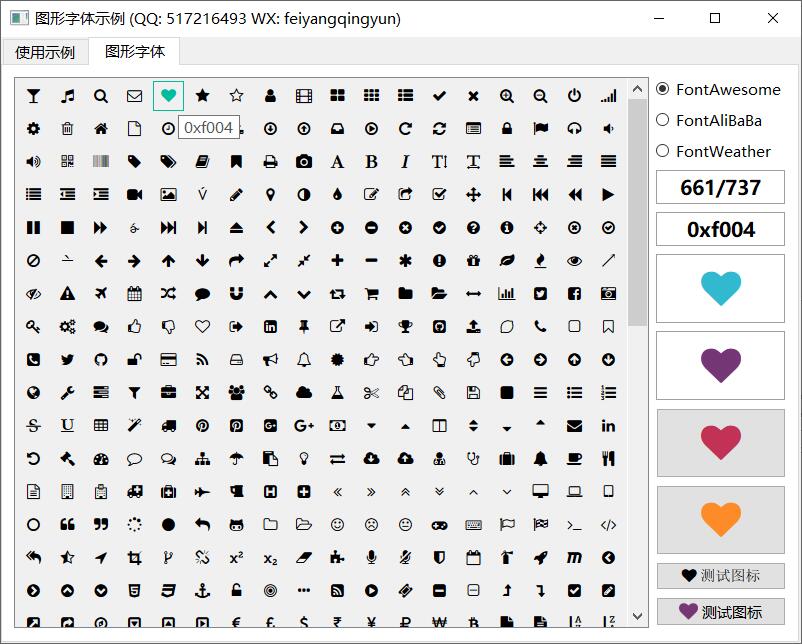
- 可传入多种图形字体文件,一个类通用所有图形字体。
- 默认已经内置了阿里巴巴图形字体FontAliBaBa、国际知名图形字体FontAwesome、天气图形字体FontWeather。
- 可设置 QLabel、QAbstractButton 文本为图形字体。
- 可设置图形字体作为 QAbstractButton 按钮图标。
- 内置万能的方法 getPixmap 将图形字体值转换为图片。
- 无论是设置文本、图标、图片等都可以设置图标的大小、尺寸、颜色等参数。
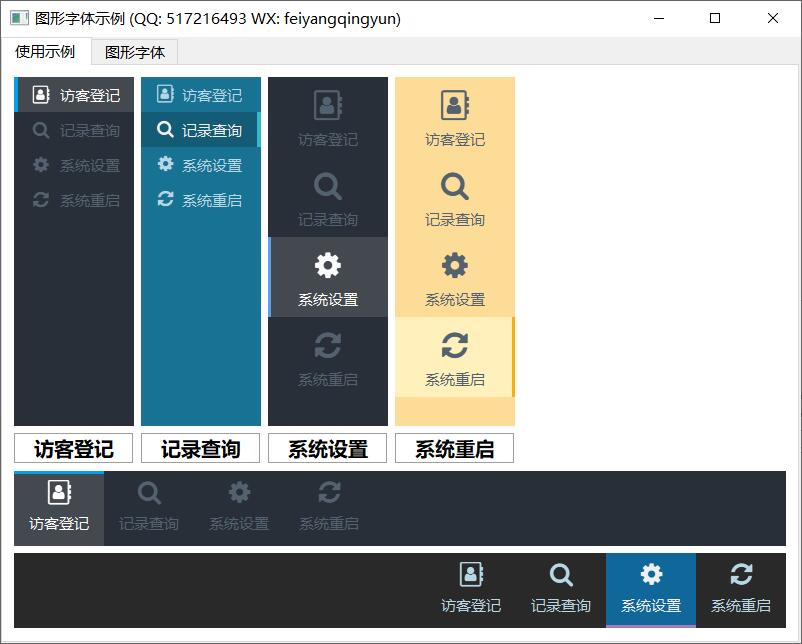
- 内置超级导航栏样式设置,将图形字体作为图标设置到按钮。
- 支持各种颜色设置比如正常颜色、悬停颜色、按下颜色、选中颜色。
- 可设置导航的位置为 left、right、top、bottom 四种。
- 可设置导航加深边框颜色和粗细大小。
- 导航面板的各种切换效果比如鼠标悬停、按下、选中等都自动处理掉样式设置。
- 全局静态方法,接口丰富,使用极其简单方便。
三、效果图
四、开源主页
- 以上作品完整源码下载都在开源主页,会持续不断更新作品数量和质量,欢迎各位关注。
- 本开源项目已经成功升级到V2.0版本,分门别类,图文并茂,保你爽到爆。
- Qt开源武林秘籍开发经验,看完学完,20K起薪,没有找我!
- 国内站点:https://gitee.com/feiyangqingyun/QWidgetDemo
- 国际站点:https://github.com/feiyangqingyun/QWidgetDemo
- 开源秘籍:https://gitee.com/feiyangqingyun/qtkaifajingyan
- 个人主页:https://qtchina.blog.csdn.net/
- 知乎主页:https://www.zhihu.com/people/feiyangqingyun/
五、核心代码
QPixmap IconHelper::getPixmap1(const QColor &color, int icon, quint32 size,

                               quint32 width, quint32 height, int flags)

{

    //主动绘制图形字体到图片

    QPixmap pix(width, height);

    pix.fill(Qt::transparent);

    QPainter painter;

    painter.begin(&pix);

    painter.setRenderHints(QPainter::Antialiasing | QPainter::TextAntialiasing);

    painter.setPen(color);

    iconFont.setPixelSize(size);

    painter.setFont(iconFont);

    painter.drawText(pix.rect(), flags, (QChar)icon);

    painter.end();

    return pix;

}

void IconHelper::setStyle1(QWidget *widget, QList<QPushButton *> btns, QList<int> icons, const IconHelper::StyleColor &styleColor)

{

    QList<QAbstractButton *> list;

    foreach (QPushButton *btn, btns) {

        list << btn;

    }

    setStyle(widget, list, icons, styleColor);

}

void IconHelper::setStyle1(QWidget *widget, QList<QToolButton *> btns, QList<int> icons, const IconHelper::StyleColor &styleColor)

{

    QList<QAbstractButton *> list;

    foreach (QToolButton *btn, btns) {

        list << btn;

    }

    setStyle(widget, list, icons, styleColor);

}

void IconHelper::setStyle1(QWidget *widget, QList<QAbstractButton *> btns, QList<int> icons, const IconHelper::StyleColor &styleColor)

{

    int btnCount = btns.count();

    int iconCount = icons.count();

    if (btnCount <= 0 || iconCount <= 0 || btnCount != iconCount) {

        return;

    }

    QString position = styleColor.position;

    quint32 iconSize = styleColor.iconSize;

    quint32 iconWidth = styleColor.iconWidth;

    quint32 iconHeight = styleColor.iconHeight;

    quint32 borderWidth = styleColor.borderWidth;

    //根据不同的位置计算边框

    QString strBorder;

    if (position == "top") {

        strBorder = QString("border-width:%1px 0px 0px 0px;padding-top:%1px;padding-bottom:%2px;")

                    .arg(borderWidth).arg(borderWidth * 2);

    } else if (position == "right") {

        strBorder = QString("border-width:0px %1px 0px 0px;padding-right:%1px;padding-left:%2px;")

                    .arg(borderWidth).arg(borderWidth * 2);

    } else if (position == "bottom") {

        strBorder = QString("border-width:0px 0px %1px 0px;padding-bottom:%1px;padding-top:%2px;")

                    .arg(borderWidth).arg(borderWidth * 2);

    } else if (position == "left") {

        strBorder = QString("border-width:0px 0px 0px %1px;padding-left:%1px;padding-right:%2px;")

                    .arg(borderWidth).arg(borderWidth * 2);

    }

    //如果图标是左侧显示则需要让没有选中的按钮左侧也有加深的边框,颜色为背景颜色

    //如果图标在文字上面而设置的边框是 top bottom 也需要启用加深边框

    QStringList qss;

    if (styleColor.defaultBorder) {

        qss << QString("QWidget[flag=\"%1\"] QAbstractButton{border-style:solid;border-radius:0px;%2border-color:%3;color:%4;background:%5;}")

            .arg(position).arg(strBorder).arg(styleColor.normalBgColor).arg(styleColor.normalTextColor).arg(styleColor.normalBgColor);

    } else {

        qss << QString("QWidget[flag=\"%1\"] QAbstractButton{border-style:none;border-radius:0px;padding:5px;color:%2;background:%3;}")

            .arg(position).arg(styleColor.normalTextColor).arg(styleColor.normalBgColor);

    }

    //悬停+按下+选中

    qss << QString("QWidget[flag=\"%1\"] QAbstractButton:hover{border-style:solid;%2border-color:%3;color:%4;background:%5;}")

        .arg(position).arg(strBorder).arg(styleColor.borderColor).arg(styleColor.hoverTextColor).arg(styleColor.hoverBgColor);

    qss << QString("QWidget[flag=\"%1\"] QAbstractButton:pressed{border-style:solid;%2border-color:%3;color:%4;background:%5;}")

        .arg(position).arg(strBorder).arg(styleColor.borderColor).arg(styleColor.pressedTextColor).arg(styleColor.pressedBgColor);

    qss << QString("QWidget[flag=\"%1\"] QAbstractButton:checked{border-style:solid;%2border-color:%3;color:%4;background:%5;}")

        .arg(position).arg(strBorder).arg(styleColor.borderColor).arg(styleColor.checkedTextColor).arg(styleColor.checkedBgColor);

    //窗体背景颜色+按钮背景颜色

    qss << QString("QWidget#%1{background:%2;}")

        .arg(widget->objectName()).arg(styleColor.normalBgColor);

    qss << QString("QWidget>QAbstractButton{border-width:0px;background-color:%1;color:%2;}")

        .arg(styleColor.normalBgColor).arg(styleColor.normalTextColor);

    qss << QString("QWidget>QAbstractButton:hover{background-color:%1;color:%2;}")

        .arg(styleColor.hoverBgColor).arg(styleColor.hoverTextColor);

    qss << QString("QWidget>QAbstractButton:pressed{background-color:%1;color:%2;}")

        .arg(styleColor.pressedBgColor).arg(styleColor.pressedTextColor);

    qss << QString("QWidget>QAbstractButton:checked{background-color:%1;color:%2;}")

        .arg(styleColor.checkedBgColor).arg(styleColor.checkedTextColor);

    //设置样式表

    widget->setStyleSheet(qss.join(""));

    //可能会重复调用设置所以先要移除上一次的

    for (int i = 0; i < btnCount; i++) {

        for (int j = 0; j < this->btns.count(); j++) {

            if (this->btns.at(j) == btns.at(i)) {

                disconnect(btns.at(i), SIGNAL(toggled(bool)), this, SLOT(toggled(bool)));

                this->btns.at(j)->removeEventFilter(this);

                this->btns.removeAt(j);

                this->pixNormal.removeAt(j);

                this->pixHover.removeAt(j);

                this->pixPressed.removeAt(j);

                this->pixChecked.removeAt(j);

                break;

            }

        }

    }

    //存储对应按钮对象,方便鼠标移上去的时候切换图片

    int checkedIndex = -1;

    for (int i = 0; i < btnCount; i++) {

        int icon = icons.at(i);

        QPixmap pixNormal = getPixmap1(styleColor.normalTextColor, icon, iconSize, iconWidth, iconHeight);

        QPixmap pixHover = getPixmap1(styleColor.hoverTextColor, icon, iconSize, iconWidth, iconHeight);

        QPixmap pixPressed = getPixmap1(styleColor.pressedTextColor, icon, iconSize, iconWidth, iconHeight);

        QPixmap pixChecked = getPixmap1(styleColor.checkedTextColor, icon, iconSize, iconWidth, iconHeight);

        //记住最后选中的按钮

        QAbstractButton *btn = btns.at(i);

        if (btn->isChecked()) {

            checkedIndex = i;

        }

        btn->setIcon(QIcon(pixNormal));

        btn->setIconSize(QSize(iconWidth, iconHeight));

        btn->installEventFilter(this);

        connect(btn, SIGNAL(toggled(bool)), this, SLOT(toggled(bool)));

        this->btns << btn;

        this->pixNormal << pixNormal;

        this->pixHover << pixHover;

        this->pixPressed << pixPressed;

        this->pixChecked << pixChecked;

    }

    //主动触发一下选中的按钮

    if (checkedIndex >= 0) {

        QMetaObject::invokeMethod(btns.at(checkedIndex), "toggled", Q_ARG(bool, true));

    }

}
Qt开源作品43-超级图形字体的更多相关文章
- Qt开源作品38-无边框窗体方案(无抖动,支持win、linux、mac等系统,侧边半屏顶部全屏)
一 前言 不知道各位程序员有没有遇到过这样一种困惑,好不容易在开源网站找到了类似的想要的项目代码,结果down下来一编译,我勒个去,几百个错误,根本没法用,熟悉的人还好可以直接阅读代码进行修改(有些只 ...
- 开源图形库 c语言-图形图像库 集合[转]
开源图形库 c语言-图形图像库 集合[转] Google三维API O3D O3D 是一个开源的 Web API 用来在浏览器上创建界面丰富的交互式的 3D 应用程序.这是一种基于网页的可控3D标准. ...
- Github上的一些高分Qt开源项目【多图】
游戏2D地图编辑器: 著名的TileMap编辑器,做2D游戏开发的一定不会陌生. Go 语言的IDE: Go语言的集成开发环境. Clementine Music Player: 功能很完善且跨平台支 ...
- NeHe OpenGL教程 第十四课:图形字体
转自[翻译]NeHe OpenGL 教程 前言 声明,此 NeHe OpenGL教程系列文章由51博客yarin翻译(2010-08-19),本博客为转载并稍加整理与修改.对NeHe的OpenGL管线 ...
- web@css样式进阶--图形字体、动画、显隐....
1.图形字体<i class="fa fa-heart"></i> 操作类名,需<link rel="stylesheet" hr ...
- Webdings 图形字体
如果想在网页上插入图形,最简单的方式就是使用图形字体.Webdings 是一种微软开发的图形字体,在IE浏览器上可以使用它. 什么是Webdings Webdings 是一个TrueType的ding ...
- 我的第一个开源作品Kiwis2 Mock Server
我的第一个开源作品Kiwis2 Mock Server,目前公测中,欢迎大家提供宝贵意见. 代码:https://github.com/kiwis2/mockserver 主页:https://kiw ...
- vs2008编译QT开源项目三国杀(五篇文章)
请参看 http://tieba.baidu.com/f?kz=1508964881 按照上面的网址教程,下载三国杀源码,swig工具,并下载最新的QT4.8.2 for vs2008.我本机已经安装 ...
- Qt 2D绘图之六:图形视图框架的事件处理与传播
一.简介 图形视图框架中的事件都是首先由视图进行接收,然后传递给场景,再由场景传递给相应的图形项.而对于键盘事件,它会传递给获得焦点的图形项,可以使用QGraphicsScene类的setFocusI ...
- Qt 2D绘图之五:图形视图框架的结构和坐标系统
一.图形视图框架的结构 在前面讲的基本绘图中,我们可以自己绘制各种图形,并且控制它们.但是,如果需要同时绘制很多个相同或不同的图形,并且要控制它们的移动.检测它们的碰撞和叠加:或者我们想让自己绘制的图 ...
随机推荐
- kali Linux及mac os 破解WiFi
wpa-dictionary 用于 Wi-Fi 密码破解. Linux 篇(推荐) 1. 安装 aircrack-ng 使用相应包管理工具安装,例如 Debian/Ubuntu 使用 apt 安装: ...
- 三大主流负载均衡软件对比(LVS+Nginx+HAproxy)
LVS: 优点 : 1.抗负载能力强.性能高,能达到F5硬件的60%:对内存和cpu资源消耗比较低2.工作在网络4层,通过vrrp协议转发(仅作分发之用),具体的流量由linux内核处理,因此没有流量 ...
- HTML标签 b 和 strong 的区别
<b>标签和<strong>标签都表示加粗,效果通常是一样的: <b>:义演丁真<strong>:义演丁真 类似的还有<em>和<i& ...
- vue中事件总线bus的用法
./util/Bus.js import Bus from 'vue'; let install = function (Vue) { // 设置eventBus Vue.prototype.bus ...
- Web渗透03_扫描技术
前言 在获取目标主机的各类信息时,有一些综合工具可以一键扫描完成,大大方便了测试效率.但扫描结果并非100%的正确,需要我们的判断. namp NMAP(Network Mapper)是一款开放源代码 ...
- 通过duxapp提供的基础方法、UI组件、全局样式,快速编写项目
使用duxapp,我是如何实现快速完成项目开发的? 像下面这个例子,这个项目有140多个页面,但是真实的开发时间,在熟练使用duxapp的情况下,不会超过两周,并且可以将它兼容APP.小程序.H5 这 ...
- 【241027-论文阅读】DGraph: A Large-Scale Financial Dataset for Graph Anomaly Detection
DGraph: A Large-Scale Financial Dataset for Graph Anomaly Detection DGragh是一个用于图异常检测(gragh anomaly d ...
- 看图认识Javascript
- 2024 xp_CAPTCHA(瞎跑-白嫖版) 4.3最新版安装使用教程
前言 xp_CAPTCHA(瞎跑-白嫖版)是一个免费的burpsuite插件,具有自动化图形验证码识别的功能.在安装的过程中,我发现网上的教程基本都为其较早的版本,已经不具备参考价值.因而我写下本篇博 ...
- Python计算1到100偶数的加和
sum_value = 0 for i in range(1,101): if i % 2 == 1: continue sum_value += i print(sum_value) print(s ...