winform下重画ListBox
Windows Forms是由Win32 API封装的开发组件,最初是为了替代mfc,但却没有体现与Model View Controller架构对应的特色,进而在.net framework 3.0中推出了wpf,富控件数据显示方面,利用模板功能轻松实现。
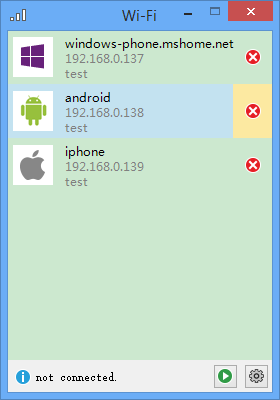
在winform下要想自定义一些用户控件,就需要运用的2D绘画类。下图我们为ListBox重新排列了数据显示方式,并为每一个item加入了删除按钮。
首先我们设计一个承载数据的类ListBoxItem。
 public class ListBoxItem : IDisposable

 {

     public Guid Id { get; set; }

     public string Name { get; set; }

     public string IP { get; set; }

     public string Mac { get; set; }

     [System.ComponentModel.DefaultValue(typeof(System.Drawing.Image), "null")]

     public System.Drawing.Image Image { get; set; }

     public bool IsFocus { get; set; }

     public ListBoxItem() { }

     public ListBoxItem(Guid id, string name, string ip, string mac, System.Drawing.Image image)

     {

         this.Id = id;

         this.Name = name;

         this.IP = ip;

         this.Mac = mac;

         this.Image = image;

         this.IsFocus = false;

     }

     public void Dispose()

     {

         this.Image = null;

     }

 }
然后我们再为ListBox写一个用于展现数据的数据源ListBoxItemCollection,这里实现了迭代和集合操作接口,可以根据需要扩展数据操作方法。
[System.ComponentModel.ListBindable(false)]

public class ListBoxItemCollection : IList, ICollection, IEnumerable

{

    private UserListBox m_owner;

    public ListBoxItemCollection(UserListBox owner)

    {

        this.m_owner = owner;

    }

    internal UserListBox Owner

    {

        get { return this.m_owner; }

    }

    #region  override

    public ListBoxItem this[int index]

    {

        get { return Owner.OldItemSource[index] as ListBoxItem; }

        set { Owner.OldItemSource[index] = value; }

    }

    public int Count

    {

        get { return Owner.OldItemSource.Count; }

    }

    public bool IsReadOnly

    {

        get { return Owner.OldItemSource.IsReadOnly; }

    }

    public int Add(ListBoxItem item)

    {

        if (item == null)

        {

            throw new ArgumentException("item is null");

        }

        return Owner.OldItemSource.Add(item);

    }

    public void AddRange(ListBoxItem[] items)

    {

        Owner.OldItemSource.AddRange(items);

    }

    public void Clear()

    {

        if (Owner.OldItemSource.Count > )

        {

            Owner.OldItemSource.Clear();

        }

    }

    public bool Contains(ListBoxItem item)

    {

        bool rst = false;

        foreach (ListBoxItem oldItem in Owner.OldItemSource)

        {

            if (oldItem.Id == item.Id)

            {

                rst = true;

                break;

            }

        }

        return rst;

    }

    public void CopyTo(ListBoxItem[] destination, int arrayIndex)

    {

        Owner.OldItemSource.CopyTo(destination, arrayIndex);

    }

    public int IndexOf(ListBoxItem item)

    {

        return Owner.OldItemSource.IndexOf(item);

    }

    public void Insert(int index, ListBoxItem item)

    {

        if (item == null)

        {

            throw new ArgumentException("item is null");

        }

        Owner.OldItemSource.Insert(index, item);

    }

    public void Remove(ListBoxItem item)

    {

        Owner.OldItemSource.Remove(item);

    }

    public void RemoveAt(int index)

    {

        Owner.OldItemSource.RemoveAt(index);

    }

    public IEnumerator GetEnumerator()

    {

        return Owner.OldItemSource.GetEnumerator();

    }

    int IList.Add(object value)

    {

        if (!(value is ListBoxItem))

        {

            throw new ArgumentException();

        }

        return Add(value as ListBoxItem);

    }

    void IList.Clear()

    {

        Clear();

    }

    bool IList.Contains(object value)

    {

        return Contains(value as ListBoxItem);

    }

    int IList.IndexOf(object value)

    {

        return IndexOf(value as ListBoxItem);

    }

    void IList.Insert(int index, object value)

    {

        if (!(value is ListBoxItem))

        {

            throw new ArgumentException();

        }

        Insert(index, value as ListBoxItem);

    }

    bool IList.IsFixedSize

    {

        get { return false; }

    }

    bool IList.IsReadOnly

    {

        get { return IsReadOnly; }

    }

    void IList.Remove(object value)

    {

        Remove(value as ListBoxItem);

    }

    void IList.RemoveAt(int index)

    {

        RemoveAt(index);

    }

    object IList.this[int index]

    {

        get { return this[index]; }

        set

        {

            if (!(value is ListBoxItem))

            {

                throw new ArgumentException();

            }

            this[index] = value as ListBoxItem;

        }

    }

    void ICollection.CopyTo(Array array, int index)

    {

        CopyTo((ListBoxItem[])array, index);

    }

    int ICollection.Count

    {

        get { return Count; }

    }

    bool ICollection.IsSynchronized

    {

        get { return false; }

    }

    object ICollection.SyncRoot

    {

        get { return false; }

    }

    IEnumerator IEnumerable.GetEnumerator()

    {

        return GetEnumerator();

    }

    #endregion

    #region  extention

    public ListBoxItem FindByMac(string mac)

    {

        foreach (ListBoxItem item in Owner.OldItemSource)

        {

            if (item.Mac == mac)

            {

                return item;

            }

        }

        return null;

    }

    #endregion

}
下面可以为工程new一个新项——自定义控件,命名为UserListBox。
这里有几个地方要说明一下,首先在默认构造函数里面的参数:
DrawMode.OwnerDrawVariable启用控件重绘功能。
DoubleBuffer开启后避免复杂绘画造成窗体闪烁,这个缓冲的原理是将绘画操作放在内存里操作,完成后才会复制到图形界面上,进而避免的闪烁。
OnPaint进行了重写,这个方法是根据pc屏幕分辨率刷新频率来执行的,会不断的重复执行,进而持久化图形界面。
Invalidate方法,会立即刷新UI。
Item上的按钮事件,是通过ListBox的click事件,取到鼠标的在界面上的定位,调用相对应的方法。
 public partial class UserListBox : ListBox

 {

     public ListBoxItem mouseItem;

     private ListBoxItemCollection m_Items;

     public UserListBox() : base()

     {

         InitializeComponent();

         m_Items = new ListBoxItemCollection(this);

         base.DrawMode = DrawMode.OwnerDrawVariable;

         this.SetStyle(ControlStyles.UserPaint, true);

         this.SetStyle(ControlStyles.DoubleBuffer, true); // 双缓冲

         this.SetStyle(ControlStyles.OptimizedDoubleBuffer, true); // 双缓冲

         this.SetStyle(ControlStyles.ResizeRedraw, true); // 调整大小时重绘

         this.SetStyle(ControlStyles.AllPaintingInWmPaint, true); // 禁止擦除背景.

         this.SetStyle(ControlStyles.SupportsTransparentBackColor, true); // 开启控件透明

     }

     public new ListBoxItemCollection Items

     {

         get { return m_Items; }

     }

     internal ListBox.ObjectCollection OldItemSource

     {

         get { return base.Items; }

     }

     protected override void OnPaint(PaintEventArgs e)

     {

         Graphics g = e.Graphics;

         // you can set SeletedItem background

         if (this.Focused && this.SelectedItem != null)

         {

         }

         for (int i = ; i < Items.Count; i++)

         {

             Rectangle bounds = this.GetItemRectangle(i);

             if (mouseItem == Items[i])

             {

                 Color leftColor = Color.FromArgb(, , , );

                 using (SolidBrush brush = new SolidBrush(leftColor))

                 {

                     g.FillRectangle(brush, new Rectangle(bounds.X, bounds.Y, bounds.Width, bounds.Height));

                 }

                 Color rightColor = Color.FromArgb(, , );

                 using (SolidBrush brush = new SolidBrush(rightColor))

                 {

                     g.FillRectangle(brush, new Rectangle(bounds.Width - , bounds.Y, , bounds.Height));

                 }

             }

             int fontLeft = bounds.Left +  + ;

             System.Drawing.Font font = new System.Drawing.Font("微软雅黑", );

             g.DrawString(Items[i].Name, font, new SolidBrush(this.ForeColor), fontLeft, bounds.Top + );

             g.DrawString(Items[i].IP, font, new SolidBrush(Color.FromArgb(, , )), fontLeft, bounds.Top + );

             g.DrawString(Items[i].Mac, font, new SolidBrush(Color.FromArgb(, , )), fontLeft, bounds.Top + );

             if (Items[i].Image != null)

             {

                 g.InterpolationMode = System.Drawing.Drawing2D.InterpolationMode.HighQualityBilinear;

                 g.DrawImage(Items[i].Image, new Rectangle(bounds.X + , (bounds.Height - ) /  + bounds.Top, , ));

             }

             g.DrawImage(Properties.Resources.error, new Rectangle(bounds.Width - , (bounds.Height - ) /  + bounds.Top, , ));

         }

         base.OnPaint(e);

     }

     protected override void OnMeasureItem(MeasureItemEventArgs e)

     {

         base.OnMeasureItem(e);

         if (Items.Count > )

         {

             ListBoxItem item = Items[e.Index];

             e.ItemHeight = ;

         }

     }

     protected override void OnSelectedIndexChanged(EventArgs e)

     {

         base.OnSelectedIndexChanged(e);

     }

     protected override void OnMouseMove(MouseEventArgs e)

     {

         base.OnMouseMove(e);

         for (int i = ; i < Items.Count; i++)

         {

             Rectangle bounds = this.GetItemRectangle(i);

             Rectangle deleteBounds = new Rectangle(bounds.Width - , (bounds.Height - ) /  + bounds.Top, , );

             if (bounds.Contains(e.X, e.Y))

             {

                 if (Items[i] != mouseItem)

                 {

                     mouseItem = Items[i];

                 }

                 if (deleteBounds.Contains(e.X, e.Y))

                 {

                     mouseItem.IsFocus = true;

                     this.Cursor = Cursors.Hand;

                 }

                 else

                 {

                     mouseItem.IsFocus = false;

                     this.Cursor = Cursors.Arrow;

                 }

                 this.Invalidate();

                 break;

             }

         }

     }

     protected override void OnMouseClick(MouseEventArgs e)

     {

         base.OnMouseClick(e);

         if (mouseItem.IsFocus)

         {

             ListBoxItem deleteItem = mouseItem;

             if(MessageBox.Show("confirm to delete", "", MessageBoxButtons.OKCancel) == DialogResult.OK)

             {

                 this.Items.Remove(deleteItem);

             }

         }

     }

     protected override void OnMouseLeave(EventArgs e)

     {

         base.OnMouseLeave(e);

         this.mouseItem = null;

         this.Invalidate();

     }

 }
winform下重画ListBox的更多相关文章
- Winform重画ComboBox背景色
//返回hWnd参数所指定的窗口的设备环境. [System.Runtime.InteropServices.DllImport("user32.dll")] static ext ...
- C# LIstbox 解决WinForm下ListBox控件“设置DataSource属性后无法修改项集合”的问题
解决WinForm下ListBox控件“设置DataSource属性后无法修改项集合”的问题 分类: winform2008-05-24 02:33 2592人阅读 评论(11) 收藏 举报 winf ...
- 解决WinForm下ListBox控件“设置DataSource属性后无法修改项集合”
解决WinForm下ListBox控件“设置DataSource属性后无法修改项集合” 最近更新: 2013-2-15 587 很少写WinForm程序第一次使用ListBox控件就遇到了比 ...
- WinForm中重绘TabControl选项卡标题
最近开发WinForm频繁使用了TabControl控件,这个控件的选项卡没有BackgroundImage这个属性,那么如何为其各个选项卡添加背景图片呢?(这里说的是每个TabPage的头部,也就是 ...
- 分享在winform下实现左右布局多窗口界面
在web页面上我们可以通过frameset,iframe嵌套框架很容易实现各种导航+内容的布局界面,而在winform.WPF中实现其实也很容易,我这里就分享一个:在winform下实现左右布局多窗口 ...
- WinForm下的loading框实现
前言:在项目使用C/S模式情况下,由于需要经常进行数据的刷新,如果直接进行刷新,会有一个等待控件重画的过程,非常的不友好,因此在这里添加一个loading框进行等待显示. 实现:在经过多方面查询资料, ...
- WinForm下的loading框的实现
前言:在项目使用C/S模式情况下,由于需要经常进行数据的刷新,如果直接进行刷新,会有一个等待控件重画的过程,非常的不友好,因此在这里添加一个loading框进行等待显示. 实现:在经过多方面查询资料, ...
- 在winform下实现左右布局多窗口界面的方法(一)
在web页面上我们可以通过frameset,iframe嵌套框架很容易实现各种导航+内容的布局界面,而在winform.WPF中实现其实也很容易,通过本文给大家介绍在winform下实现左右布局多窗口 ...
- 重画GoogleClusterTrace数据
由于项目计划书写作需要,重画了Qi Zhang, Mohamed Faten Zhani, Raouf Boutaba, Joseph L. Hellerstein, Dynamic Heteroge ...
随机推荐
- centos 7 u盘安装
centos 7 u盘安装 http://www.centoscn.com/image-text/setup/2014/0724/3342.html
- Servlet 添加购物车
import java.io.IOException;import java.io.PrintWriter;import java.util.ArrayList;import java.util.It ...
- 初识ASP.NET CORE:三、Middleware
Middleware are simpler than HTTP modules and handlers:Modules, handlers, Global.asax.cs, Web.config ...
- String与StringBuffer的区别
首先,String和StringBuffer主要有2个区别: (1)String类对象为不可变对象,一旦你修改了String对象的值,隐性重新创建了一个新的对象,释放原String对象,StringB ...
- Linux上安装php
1.安装mysql http://blog.csdn.net/wy3552128/article/details/8143686 2.安装配置Apache http://blog.csdn.net ...
- 洛谷P2014 选课 (树形dp)
10月1日更新.题目:在大学里每个学生,为了达到一定的学分,必须从很多课程里选择一些课程来学习,在课程里有些课程必须在某些课程之前学习,如高等数学总是在其它课程之前学习.现在有N门功课,每门课有个学分 ...
- Android(Xamarin)之旅(四)
这么晚了,可能也因为一点事情,就说打开博客园看看,结果 http://www.cnblogs.com/mindwind/p/5125248.html 这篇文章瞬间吸引了我.暗暗的回想一下,十年之后,我 ...
- hdoj 2680 choose the best route
Problem Description One day , Kiki wants to visit one of her friends. As she is liable to carsicknes ...
- Jade之Doctype
Doctype jade: doctype html html: <!DOCTYPE html>
- [转] 基于ArcGISServer实现活动地图标注
——王嘉彬(Esri中国上海分公司) 1.背景 1.1.主流互联网地图应用的现状 在目前主流的互联网地图应用中,如 Google Map(图 1).搜狗地图(图2),POI 兴趣点的文字标注越来越多的 ...