【Android UI设计与开发】6.底部菜单栏(三)使用Fragment+PopupWindow仿QQ空间最新版底部菜单栏
直接看栗子吧,效果基本实现,界面微调和弹窗的优化,去做的话会很耗时说,暂时就酱紫了。上传效果动态图太大了,直接手机截图的效果图如下:
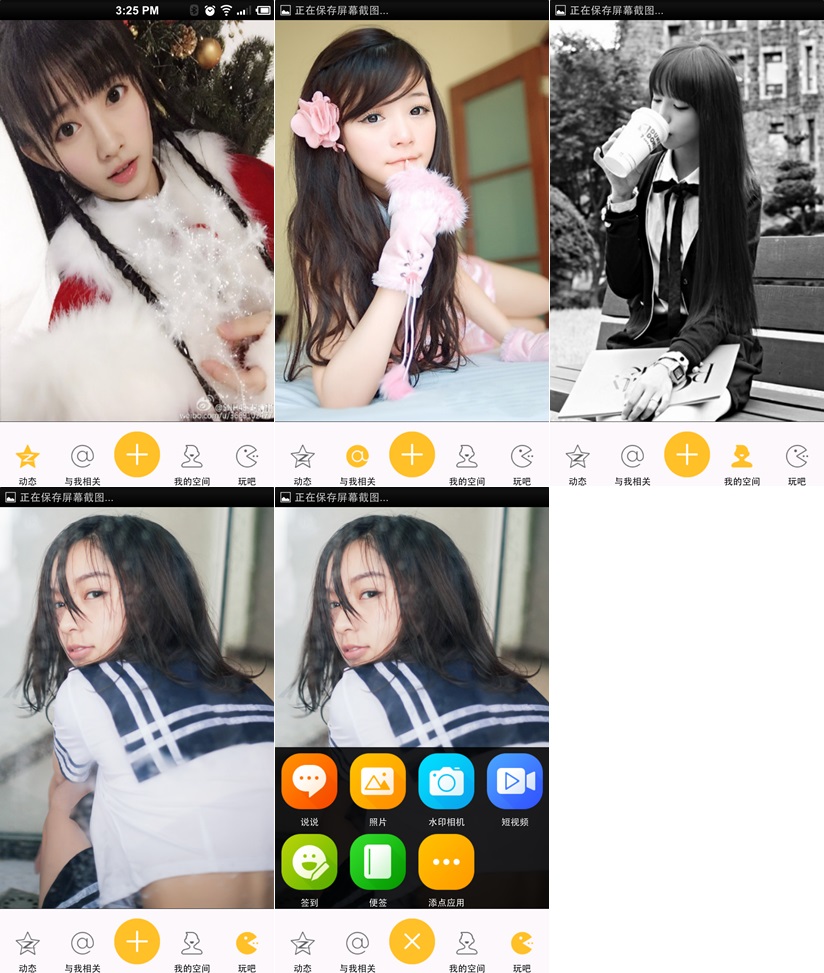
至于代码的实现主要就是自定义的菜单栏,和用 PopupWindow 实现弹窗了。仔细看代码很好懂的。
1.主界面布局代码如下:
<RelativeLayout xmlns:android="http://schemas.android.com/apk/res/android"

    xmlns:tools="http://schemas.android.com/tools"

    android:layout_width="fill_parent"

    android:layout_height="fill_parent" >

    <FrameLayout

        android:id="@+id/frame_content"

        android:layout_width="match_parent"

        android:layout_height="match_parent"

        android:layout_above="@+id/frameMenu"

        android:layout_alignParentTop="true" >

    </FrameLayout>

    <FrameLayout

        android:id="@+id/frameMenu"

        android:layout_width="match_parent"

        android:layout_height="wrap_content"

        android:layout_alignParentBottom="true" >

        <LinearLayout

            android:layout_width="match_parent"

            android:layout_height="match_parent"

            android:background="@color/skin_tabbar_bg"

            android:orientation="horizontal" >

            <!-- 动态 -->

            <FrameLayout

                android:id="@+id/layout_at"

                android:layout_width="fill_parent"

                android:layout_height="wrap_content"

                android:layout_weight="1" >

                <ImageView

                    android:id="@+id/image_at"

                    android:layout_width="wrap_content"

                    android:layout_height="wrap_content"

                    android:layout_gravity="top|center"

                    android:src="@drawable/skin_tabbar_icon_auth_select" />

                <TextView

                    android:layout_width="wrap_content"

                    android:layout_height="wrap_content"

                    android:layout_gravity="bottom|center"

                    android:text="@string/skin_tabbar_icon_auth"

                    android:textColor="@android:color/black"

                    android:textSize="12sp" />

            </FrameLayout>

            <!-- 与我相关 -->

            <FrameLayout

                android:id="@+id/layout_auth"

                android:layout_width="fill_parent"

                android:layout_height="wrap_content"

                android:layout_weight="1" >

                <ImageView

                    android:id="@+id/image_auth"

                    android:layout_width="wrap_content"

                    android:layout_height="wrap_content"

                    android:layout_gravity="top|center"

                    android:src="@drawable/skin_tabbar_icon_at_select" />

                <TextView

                    android:layout_width="wrap_content"

                    android:layout_height="wrap_content"

                    android:layout_gravity="bottom|center"

                    android:text="@string/skin_tabbar_icon_at"

                    android:textColor="@android:color/black"

                    android:textSize="12sp" />

            </FrameLayout>

            <!-- 留白 -->

            <FrameLayout

                android:layout_width="fill_parent"

                android:layout_height="wrap_content"

                android:layout_weight="1" >

            </FrameLayout>

            <!-- 我的空间 -->

            <FrameLayout

                android:id="@+id/layout_space"

                android:layout_width="fill_parent"

                android:layout_height="wrap_content"

                android:layout_weight="1" >

                <ImageView

                    android:id="@+id/image_space"

                    android:layout_width="wrap_content"

                    android:layout_height="wrap_content"

                    android:layout_gravity="top|center"

                    android:src="@drawable/skin_tabbar_icon_space_select" />

                <TextView

                    android:layout_width="wrap_content"

                    android:layout_height="wrap_content"

                    android:layout_gravity="bottom|center"

                    android:text="@string/skin_tabbar_icon_space"

                    android:textColor="@android:color/black"

                    android:textSize="12sp" />

            </FrameLayout>

            <!-- 玩吧 -->

            <FrameLayout

                android:id="@+id/layout_more"

                android:layout_width="fill_parent"

                android:layout_height="wrap_content"

                android:layout_weight="1" >

                <ImageView

                    android:id="@+id/image_more"

                    android:layout_width="wrap_content"

                    android:layout_height="wrap_content"

                    android:layout_gravity="top|center"

                    android:src="@drawable/skin_tabbar_icon_more_select" />

                <TextView

                    android:layout_width="wrap_content"

                    android:layout_height="wrap_content"

                    android:layout_gravity="bottom|center"

                    android:text="@string/skin_tabbar_icon_more"

                    android:textColor="@android:color/black"

                    android:textSize="12sp" />

            </FrameLayout>

        </LinearLayout>

        <LinearLayout

            android:layout_width="match_parent"

            android:layout_height="1px"

            android:background="@android:color/black" >

        </LinearLayout>

    </FrameLayout>

    <!-- 中间按钮背景 -->

    <ImageView

        android:id="@+id/toggle_btn"

        android:layout_width="wrap_content"

        android:layout_height="wrap_content"

        android:layout_alignParentBottom="true"

        android:layout_alignTop="@+id/frameMenu"

        android:layout_centerInParent="true"

        android:src="@drawable/skin_tabbar_btn" />

    <!-- 中间按钮 -->

    <ImageView

        android:id="@+id/plus_btn"

        android:layout_width="wrap_content"

        android:layout_height="wrap_content"

        android:layout_alignParentBottom="true"

        android:layout_alignTop="@+id/frameMenu"

        android:layout_centerInParent="true"

        android:src="@drawable/skin_tabbar_icon_select" />

</RelativeLayout>
activity_main.xml
2.弹窗布局,就是几个图标的显示,比较简单的,可以看代码
3.然后就是主界面逻辑代码了,菜单栏按钮事件控制页面的显示,可以图标的选中状态,已经弹窗的实现,代码如下:
package com.yanis.yc_ui_qzone;

import android.content.Context;

import android.graphics.drawable.BitmapDrawable;

import android.os.Bundle;

import android.support.v4.app.FragmentActivity;

import android.support.v4.app.FragmentTransaction;

import android.util.DisplayMetrics;

import android.view.LayoutInflater;

import android.view.MotionEvent;

import android.view.View;

import android.view.View.OnClickListener;

import android.view.View.OnTouchListener;

import android.widget.FrameLayout;

import android.widget.ImageView;

import android.widget.LinearLayout;

import android.widget.PopupWindow;

import android.widget.PopupWindow.OnDismissListener;

public class MainActivity extends FragmentActivity implements OnClickListener {

    // 定义Fragment页面

    private FragmentAt fragmentAt;

    private FragmentAuth fragmentAuth;

    private FragmentSpace fragmentSpace;

    private FragmentMore fragmentMore;

    // 定义布局对象

    private FrameLayout atFl, authFl, spaceFl, moreFl;

    // 定义图片组件对象

    private ImageView atIv, authIv, spaceIv, moreIv;

    // 定义按钮图片组件

    private ImageView toggleImageView, plusImageView;

    // 定义PopupWindow

    private PopupWindow popWindow;

    // 获取手机屏幕分辨率的类

    private DisplayMetrics dm;

    @Override

    protected void onCreate(Bundle savedInstanceState) {

        super.onCreate(savedInstanceState);

        setContentView(R.layout.activity_main);

        initView();

        initData();

        // 初始化默认为选中点击了“动态”按钮

        clickAtBtn();

    }

    /**

     * 初始化组件

     */

    private void initView() {

        // 实例化布局对象

        atFl = (FrameLayout) findViewById(R.id.layout_at);

        authFl = (FrameLayout) findViewById(R.id.layout_auth);

        spaceFl = (FrameLayout) findViewById(R.id.layout_space);

        moreFl = (FrameLayout) findViewById(R.id.layout_more);

        // 实例化图片组件对象

        atIv = (ImageView) findViewById(R.id.image_at);

        authIv = (ImageView) findViewById(R.id.image_space);

        spaceIv = (ImageView) findViewById(R.id.image_space);

        moreIv = (ImageView) findViewById(R.id.image_more);

        // 实例化按钮图片组件

        toggleImageView = (ImageView) findViewById(R.id.toggle_btn);

        plusImageView = (ImageView) findViewById(R.id.plus_btn);

    }

    /**

     * 初始化数据

     */

    private void initData() {

        // 给布局对象设置监听

        atFl.setOnClickListener(this);

        authFl.setOnClickListener(this);

        spaceFl.setOnClickListener(this);

        moreFl.setOnClickListener(this);

        // 给按钮图片设置监听

        toggleImageView.setOnClickListener(this);

    }

    /**

     * 点击事件

     */

    @Override

    public void onClick(View v) {

        switch (v.getId()) {

        // 点击动态按钮

        case R.id.layout_at:

            clickAtBtn();

            break;

        // 点击与我相关按钮

        case R.id.layout_auth:

            clickAuthBtn();

            break;

        // 点击我的空间按钮

        case R.id.layout_space:

            clickSpaceBtn();

            break;

        // 点击更多按钮

        case R.id.layout_more:

            clickMoreBtn();

            break;

        // 点击中间按钮

        case R.id.toggle_btn:

            clickToggleBtn();

            break;

        }

    }

    /**

     * 点击了“动态”按钮

     */

    private void clickAtBtn() {

        // 实例化Fragment页面

        fragmentAt = new FragmentAt();

        // 得到Fragment事务管理器

        FragmentTransaction fragmentTransaction = this

                .getSupportFragmentManager().beginTransaction();

        // 替换当前的页面

        fragmentTransaction.replace(R.id.frame_content, fragmentAt);

        // 事务管理提交

        fragmentTransaction.commit();

        // 改变选中状态

        atFl.setSelected(true);

        atIv.setSelected(true);

        authFl.setSelected(false);

        authIv.setSelected(false);

        spaceFl.setSelected(false);

        spaceIv.setSelected(false);

        moreFl.setSelected(false);

        moreIv.setSelected(false);

    }

    /**

     * 点击了“与我相关”按钮

     */

    private void clickAuthBtn() {

        // 实例化Fragment页面

        fragmentAuth = new FragmentAuth();

        // 得到Fragment事务管理器

        FragmentTransaction fragmentTransaction = this

                .getSupportFragmentManager().beginTransaction();

        // 替换当前的页面

        fragmentTransaction.replace(R.id.frame_content, fragmentAuth);

        // 事务管理提交

        fragmentTransaction.commit();

        atFl.setSelected(false);

        atIv.setSelected(false);

        authFl.setSelected(true);

        authIv.setSelected(true);

        spaceFl.setSelected(false);

        spaceIv.setSelected(false);

        moreFl.setSelected(false);

        moreIv.setSelected(false);

    }

    /**

     * 点击了“我的空间”按钮

     */

    private void clickSpaceBtn() {

        // 实例化Fragment页面

        fragmentSpace = new FragmentSpace();

        // 得到Fragment事务管理器

        FragmentTransaction fragmentTransaction = this

                .getSupportFragmentManager().beginTransaction();

        // 替换当前的页面

        fragmentTransaction.replace(R.id.frame_content, fragmentSpace);

        // 事务管理提交

        fragmentTransaction.commit();

        atFl.setSelected(false);

        atIv.setSelected(false);

        authFl.setSelected(false);

        authIv.setSelected(false);

        spaceFl.setSelected(true);

        spaceIv.setSelected(true);

        moreFl.setSelected(false);

        moreIv.setSelected(false);

    }

    /**

     * 点击了“更多”按钮

     */

    private void clickMoreBtn() {

        // 实例化Fragment页面

        fragmentMore = new FragmentMore();

        // 得到Fragment事务管理器

        FragmentTransaction fragmentTransaction = this

                .getSupportFragmentManager().beginTransaction();

        // 替换当前的页面

        fragmentTransaction.replace(R.id.frame_content, fragmentMore);

        // 事务管理提交

        fragmentTransaction.commit();

        atFl.setSelected(false);

        atIv.setSelected(false);

        authFl.setSelected(false);

        authIv.setSelected(false);

        spaceFl.setSelected(false);

        spaceIv.setSelected(false);

        moreFl.setSelected(true);

        moreIv.setSelected(true);

    }

    /**

     * 点击了中间按钮

     */

    private void clickToggleBtn() {

        showPopupWindow(toggleImageView);

        // 改变按钮显示的图片为按下时的状态

        plusImageView.setSelected(true);

    }

    /**

     * 改变显示的按钮图片为正常状态

     */

    private void changeButtonImage() {

        plusImageView.setSelected(false);

    }

    /**

     * 显示PopupWindow弹出菜单

     */

    private void showPopupWindow(View parent) {

        if (popWindow == null) {

            LayoutInflater layoutInflater = (LayoutInflater) getSystemService(Context.LAYOUT_INFLATER_SERVICE);

            View view = layoutInflater.inflate(R.layout.popwindow_layout, null);

            dm = new DisplayMetrics();

            getWindowManager().getDefaultDisplay().getMetrics(dm);

            // 创建一个PopuWidow对象

            popWindow = new PopupWindow(view, dm.widthPixels, LinearLayout.LayoutParams.WRAP_CONTENT);

        }

        // 使其聚集 ,要想监听菜单里控件的事件就必须要调用此方法

        popWindow.setFocusable(true);

        // 设置允许在外点击消失

        popWindow.setOutsideTouchable(true);

        // 设置背景,这个是为了点击“返回Back”也能使其消失,并且并不会影响你的背景

        popWindow.setBackgroundDrawable(new BitmapDrawable());

        // PopupWindow的显示及位置设置

        // popWindow.showAtLocation(parent, Gravity.FILL, 0, 0);

        popWindow.showAsDropDown(parent, 0,0);

        popWindow.setOnDismissListener(new OnDismissListener() {

            @Override

            public void onDismiss() {

                // 改变显示的按钮图片为正常状态

                changeButtonImage();

            }

        });

        // 监听触屏事件

        popWindow.setTouchInterceptor(new OnTouchListener() {

            public boolean onTouch(View view, MotionEvent event) {

                // 改变显示的按钮图片为正常状态

                changeButtonImage();

                popWindow.dismiss();

                return false;

            }

        });

    }

}
MainActivity
4.其他的请看源代码吧 o(∩_∩)o
源代码地址:https://github.com/YeXiaoChao/Yc_ui_fragment_qzone
【Android UI设计与开发】6.底部菜单栏(三)使用Fragment+PopupWindow仿QQ空间最新版底部菜单栏的更多相关文章
- 【Android UI设计与开发】第05期:引导界面(五)实现应用程序只启动一次引导界面
[Android UI设计与开发]第05期:引导界面(五)实现应用程序只启动一次引导界面 jingqing 发表于 2013-7-11 14:42:02 浏览(229501) 这篇文章算是对整个引导界 ...
- 【转】【Android UI设计与开发】之详解ActionBar的使用,androidactionbar
原文网址:http://www.bkjia.com/Androidjc/895966.html [Android UI设计与开发]之详解ActionBar的使用,androidactionbar 详解 ...
- 【Android UI设计与开发】第02期:引导界面(二)使用ViewPager实现欢迎引导页面
本系列文章都会以一个程序的实例开发为主线来进行讲解,以求达到一个循序渐进的学习效果,这样更能加深大家对于程序为什么要这样写的用意,理论加上实际的应用才能达到事半功倍的效果,不是吗? 最下方有源码的下载 ...
- 【Android UI设计与开发】5.底部菜单栏(二)使用Fragment实现底部菜单栏
既然 Fragment 取代了TabActivity,当然 TabActivity 的能实现的菜单栏,Fragment 当然也能实现.主要其实就是通过菜单栏的点击事件切换 Fragment 的显示和隐 ...
- 【转】【Android UI设计与开发】第07期:底部菜单栏(二)Fragment的详细介绍和使用方法
原始地址:http://blog.csdn.net/yangyu20121224/article/category/1431917/1 由于TabActivity在Android4.0以后已经被完全弃 ...
- 【Android UI设计与开发】7.底部菜单栏(四)PopupWindow 实现显示仿腾讯新闻底部弹出菜单
前一篇文章中有用到 PopupWindow 来实现弹窗的功能.简单介绍以下吧. 官方文档是这样解释的:这就是一个弹出窗口,可以用来显示一个任意视图.出现的弹出窗口是一个浮动容器的当前活动. 1.首先来 ...
- 【Android UI设计与开发】9:滑动菜单栏(一)开源项目SlidingMenu的使用和示例
一.SlidingMenu简介 相信大家对SlidingMenu都不陌生了,它是一种比较新的设置界面或配置界面的效果,在主界面左滑或者右滑出现设置界面效果,能方便的进行各种操作.很多优秀的应用都采用了 ...
- 【Android UI设计与开发】8.顶部标题栏(一)ActionBar 奥义·详解
一.ActionBar介绍 在Android 3.0中除了我们重点讲解的Fragment外,Action Bar也是一个非常重要的交互元素,Action Bar取代了传统的tittle bar和men ...
- 【Android UI设计与开发】第01期:引导界面(一)ViewPager介绍和使用详解
做Android开发加起来差不多也有一年多的时间了,总是想写点自己在开发中的心得体会与大家一起交流分享.共同进步,刚开始写也不知该如何下手,仔细想了一下,既然是刚开始写,那就从一个软件给人最直观的感受 ...
随机推荐
- 【转载】NodeJS、NPM安装配置步骤(windows版本)
1.windows下的NodeJS安装是比较方便的(v0.6.0版本之后,支持windows native),只需要登陆官网(http://nodejs.org/),便可以看到首页的“INSTALL” ...
- 那些教程没有的php1-基础知识补漏
php.net 字符串 heredoc结构 类似双引号,其中的变量会被解析.严格遵循下边的格式,结束标识符这行除了可能有一个分号(;)外,绝对不能包含其它字符. <?php $str = < ...
- ahjesus 部署lighttpd
这个就不写了,直接传送门过去看,按照说的做就可以了 如果你想要安装最新版的,传送门 需要注意的是configure这一步,你看完他的help以后还要输入 ./configure 才能继续下一步 再就是 ...
- JAVA 缓存Ehcache详细解毒
链接地址:http://raychase.iteye.com/blog/1545906 作者:RayChase 写的真是太好了,郑重推荐.
- 使用正则表达式获取Sql查询语句各项(表名、字段、条件、排序)
string text = "select * from [admin] where aa=1 and cc='b' order by aa desc "; Regex reg = ...
- SHAREPOINT 工作流审批权限问题
继续我们上次的工作流,我们发现所有人都有审批权限,这和我们正常的逻辑相反,正常应该是只有审批人才有权限,其它人只能查看,如下 这样解决,同样为SpecialPermissions 绑定到新成员 > ...
- Atitit.HTTP 代理原理及实现 正向代理与反向代理attilax总结
Atitit.HTTP 代理原理及实现 正向代理与反向代理attilax总结 1. 普通代理1 1.1.1. 普通代理2 2. 隧道代理3 3. 反向代理 4 4. 正向代理也可以使用apache实现 ...
- Sharepoint 2013 开启App和配置App
在任何站点中,点Add App,然后点Sharepoint Store,如果没有Enable apps,打开app store的时候出出现错误: Sorry, apps are turned off. ...
- Step by step configuration of Outgoing Emails from SharePoint to Microsoft Online
First of all your SharePoint server should be added to Microsoft online safe sender list, so that Sh ...
- 读书笔记2014第6本:《The Hunger Games》
以前从未读过一本完整的英文小说,所有就在今年的读书目标中增加了一本英文小说,但在头四个月内一直没有下定决定读哪一本.一次偶然从SUN的QQ空间中看到Mockingjay,说是不错的英文小说,好像已经是 ...