
ASP.NET Core快速入门学习笔记(第2章:配置管理)
课程链接:http://video.jessetalk.cn/course/explore
良心课程,大家一起来学习哈!
任务9:配置介绍
- 命令行配置
- Json文件配置
- 从配置文件文本到c#对象实例的映射 - Options 与 Bind
- 配置文件热更新
- 框架设计:Configuration
任务10:命令行配置
新建一个项目CommandLineSample--控制台应用(.NET Core)
依赖性右键--管理NuGet程序包--下载microsoft.aspnetcore.all
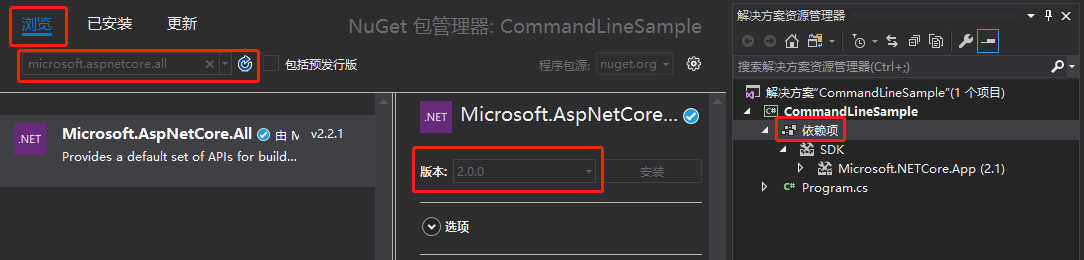
传入参数
using System;
using Microsoft.Extensions.Configuration;

namespace CommandLineSample
{
    class Program
    {
        static void Main(string[] args)
        {
            var builder = new ConfigurationBuilder()
                .AddCommandLine(args);

            var configuration = builder.Build();

            Console.WriteLine($"name: {configuration ["name"]}");
            Console.WriteLine($"age: {configuration["age"]}");

            Console.ReadLine();
        }
    }
}
需要通过项目右键--调试--输入参数:name=mingsonzheng age=18
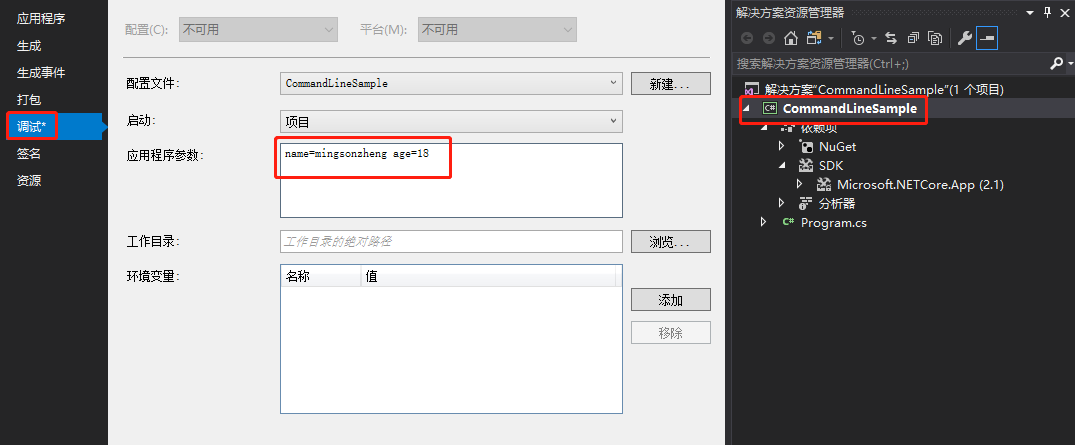
启动项目,得到结果:

默认参数
using System;
using System.Collections.Generic;
using Microsoft.Extensions.Configuration;

namespace CommandLineSample
{
    class Program
    {
        static void Main(string[] args)
        {
            var settings = new Dictionary<string, string>
            {
                {"name", "mingsonzheng" },
                {"age", "18" }
            };

            var builder = new ConfigurationBuilder()
                .AddInMemoryCollection(settings)
                .AddCommandLine(args);

            var configuration = builder.Build();

            Console.WriteLine($"name: {configuration ["name"]}");
            Console.WriteLine($"age: {configuration["age"]}");

            Console.ReadLine();
        }
    }
}
清空应用程序参数

启动项目
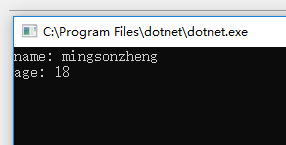
通过PowerShell运行程序,默认参数与传入参数
PS C:\WINDOWS\system32> d:
PS D:\> cd D:\jessetalk\CommandLineSample\CommandLineSample\bin\Debug\netcoreapp2.1
PS D:\jessetalk\CommandLineSample\CommandLineSample\bin\Debug\netcoreapp2.1> dir

    目录: D:\jessetalk\CommandLineSample\CommandLineSample\bin\Debug\netcoreapp2.1

Mode                LastWriteTime         Length Name
----                -------------         ------ ----
-a----       2019-01-23     23:54         244607 CommandLineSample.deps.json
-a----       2019-01-24      0:01           5632 CommandLineSample.dll
-a----       2019-01-24      0:01            604 CommandLineSample.pdb
-a----       2019-01-23     23:54            240 CommandLineSample.runtimeconfig.dev.json
-a----       2019-01-23     23:54            154 CommandLineSample.runtimeconfig.json

PS D:\jessetalk\CommandLineSample\CommandLineSample\bin\Debug\netcoreapp2.1> dotnet CommandLineSample.dll
name: mingsonzheng
age: 18

PS D:\jessetalk\CommandLineSample\CommandLineSample\bin\Debug\netcoreapp2.1> dotnet CommandLineSample.dll name=jim age=22
name: jim
age: 22
任务11:Json文件配置
新建一个项目JsonComfigSample--控制台应用(.NET Core)
依赖性右键--管理NuGet程序包--下载microsoft.aspnetcore.all
添加Json文件:项目右键--添加新建项class.json
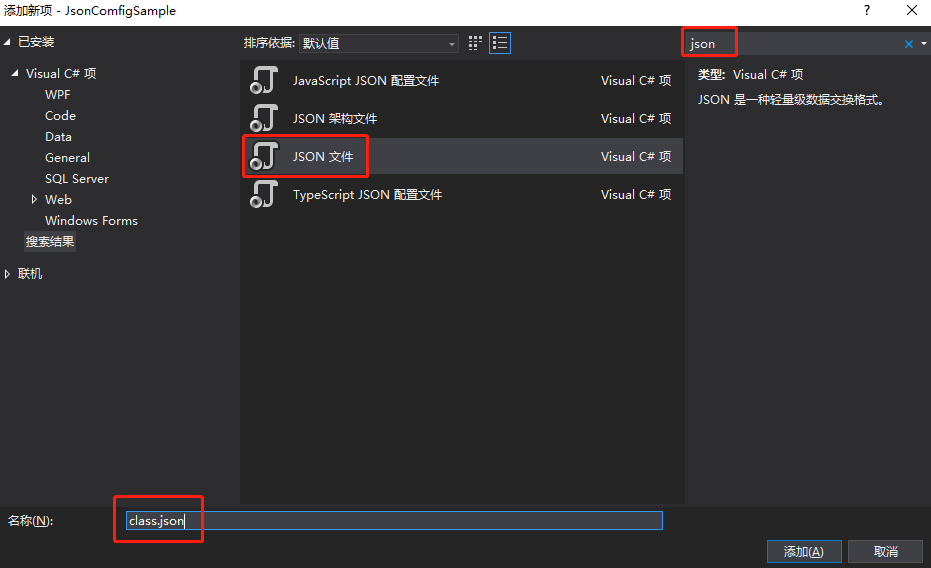
{
  "ClassNo": "1",
  "ClassDesc": "ASP.NET Core 101",

  "Students": [
    {
      "name": "mingsonzheng",
      "age": "18"
    },
    {
      "name": "jim",
      "age": "28"
    },
    {
      "name": "tom",
      "age": "38"
    }
  ]
}
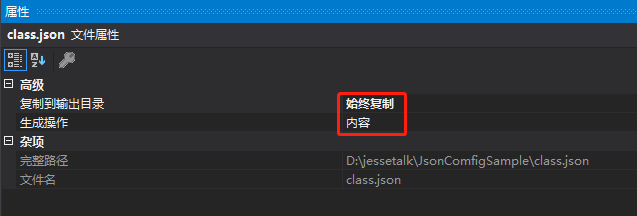
由于class.json不在bin\Debug目录下,所以默认不会被编译,需要修改它的属性,文件右键属性
using System;
using Microsoft.Extensions.Configuration;

namespace JsonComfigSample
{
    class Program
    {
        static void Main(string[] args)
        {
            var builder = new ConfigurationBuilder()
                .AddJsonFile("class.json");

            Console.ReadLine();
        }
    }
}
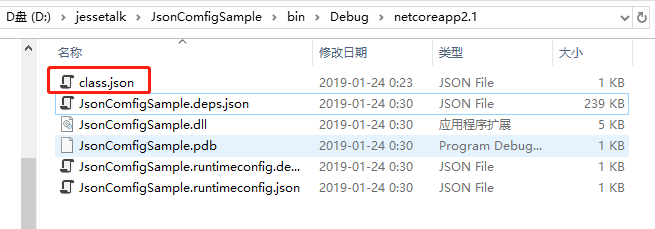
启动项目,可以看到class.json被复制到bin\Debug目录,这样dll就可以读取到class.json文件
读取json文件
using System;
using Microsoft.Extensions.Configuration;

namespace JsonComfigSample
{
    class Program
    {
        static void Main(string[] args)
        {
            var builder = new ConfigurationBuilder()
                .AddJsonFile("class.json");

            // 调用Build之前请确保拷贝的class.json文件没有格式错误
            var configuration = builder.Build();

            Console.WriteLine($"ClassNo: { configuration["ClassNo"]}");
            Console.WriteLine($"ClassDesc: { configuration["ClassDesc"]}");

            Console.WriteLine("Students");

            Console.Write(configuration["Students:0:name"]);
            Console.WriteLine(configuration["Students:0:age"]);

            Console.Write(configuration["Students:1:name"]);
            Console.WriteLine(configuration["Students:1:age"]);

            Console.Write(configuration["Students:2:name"]);
            Console.WriteLine(configuration["Students:2:age"]);

            Console.ReadLine();
        }
    }
}
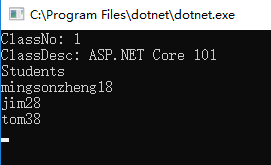
启动项目
任务12:Bind读取配置到C#实例
新建一个ASP.NET Core Web 应用程序OptionsBindSample,直接选择 空,确定
在Startup.cs中通过依赖注入添加configuration
public IConfiguration Configuration { get; set; }

public Startup(IConfiguration configuration)
{
    Configuration = configuration;
}
项目右键,新建项,添加一个类Class.cs
using System;
using System.Collections.Generic;
using System.Linq;
using System.Threading.Tasks;

namespace OptionsBindSample
{
    public class Class
    {
        public int ClassNo { get; set; }

        public string ClassDesc { get; set; }

        public List<Student> Students { get; set; }

    }

    public class Student
    {
        public string Name { get; set; }

        public string Age { get; set; }
    }
}
项目右键,新建项,添加一个Json文件appsettings.json
为什么取名appsettings.json呢?
因为Program.cs中的CreateDefaultBuilder默认读取一个名为appsettings.json的Json文件并把它的内容添加到配置文件
拷贝前面的内容到appsettings.json
{
  "ClassNo": "1",
  "ClassDesc": "ASP.NET Core 101",

  "Students": [
      {
        "name": "mingsonzheng",
        "age": "18"
      },
      {
        "name": "jim",
        "age": "28"
      },
      {
        "name": "tom",
        "age": "38"
      }
  ]
}
在Startup.cs中通过Bind读取配置
app.Run(async (context) =>
{
    var myClass = new Class();
    Configuration.Bind(myClass);// Bind读取配置

    await context.Response.WriteAsync($"ClassNo: { myClass.ClassNo}");
    await context.Response.WriteAsync($"ClassDesc: { myClass.ClassDesc}");
    await context.Response.WriteAsync($" {myClass.Students.Count } Students");
});
完整Startup.cs
using System;
using System.Collections.Generic;
using System.Linq;
using System.Threading.Tasks;
using Microsoft.AspNetCore.Builder;
using Microsoft.AspNetCore.Hosting;
using Microsoft.AspNetCore.Http;
using Microsoft.Extensions.Configuration;
using Microsoft.Extensions.DependencyInjection;

namespace OptionsBindSample
{
    public class Startup
    {

        public IConfiguration Configuration { get; set; }

        // 通过依赖注入添加configuration
        public Startup(IConfiguration configuration)
        {
            Configuration = configuration;
        }

        // This method gets called by the runtime. Use this method to add services to the container.
        // For more information on how to configure your application, visit https://go.microsoft.com/fwlink/?LinkID=398940
        public void ConfigureServices(IServiceCollection services)
        {
        }

        // This method gets called by the runtime. Use this method to configure the HTTP request pipeline.
        public void Configure(IApplicationBuilder app, IHostingEnvironment env)
        {
            if (env.IsDevelopment())
            {
                app.UseDeveloperExceptionPage();
            }

            app.Run(async (context) =>
            {
                var myClass = new Class();
                Configuration.Bind(myClass);// Bind读取配置

                await context.Response.WriteAsync($"ClassNo: { myClass.ClassNo}");
                await context.Response.WriteAsync($"ClassDesc: { myClass.ClassDesc}");
                await context.Response.WriteAsync($" {myClass.Students.Count } Students");
            });
        }
    }
}
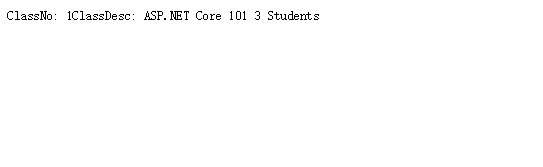
启动项目
任务13:在Core Mvc中使用Options
在项目OptionsBindSample新建三个文件夹目录如下
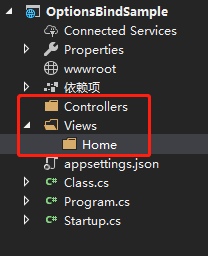
在Controllers文件夹右键,添加一个控制器,默认,HomeController
在Home文件夹右键,添加一个视图,默认,Index
在Startup.cs中注释掉这一段代码,不然会把整个管道提交,只输出这一段
//app.Run(async (context) =>
//{
//    var myClass = new Class();
//    Configuration.Bind(myClass);// Bind读取配置

//    await context.Response.WriteAsync($"ClassNo: { myClass.ClassNo}");
//    await context.Response.WriteAsync($"ClassDesc: { myClass.ClassDesc}");
//    await context.Response.WriteAsync($" {myClass.Students.Count } Students");
//});
依赖注入配置添加MVC
services.AddMvc();使用默认路由
app.UseMvcWithDefaultRoute();HomeController中通过IOptions方式依赖注入
using System;
using System.Collections.Generic;
using System.Linq;
using System.Threading.Tasks;
using Microsoft.AspNetCore.Mvc;
using Microsoft.Extensions.Options;

namespace OptionsBindSample.Controllers
{
    public class HomeController : Controller
    {
        private readonly Class _myClass;

        // 通过IOptions方式依赖注入
        public HomeController(IOptions<Class> classAccesser)
        {
            _myClass = classAccesser.Value;
        }

        public IActionResult Index()
        {
            return View(_myClass);
        }
    }
}
在Index中定义模型,输出
@model OptionsBindSample.Class
@{
    ViewData["Title"] = "Index";
}

<h2>Index</h2>
<h4>Class No: @Model.ClassNo</h4>
<h4>Class Desc: @Model.ClassDesc</h4>
<h3>
    Students:
</h3>
<div>
    @foreach (var student in Model.Students)
    {
        <span>Name: @student.Name</span>
        <span>Age: @student.Age</span>
    }
</div>
注册Class,可以通过Configuration读取到option
services.Configure<Class>(Configuration);Startup.cs完整代码
using System;
using System.Collections.Generic;
using System.Linq;
using System.Threading.Tasks;
using Microsoft.AspNetCore.Builder;
using Microsoft.AspNetCore.Hosting;
using Microsoft.AspNetCore.Http;
using Microsoft.Extensions.Configuration;
using Microsoft.Extensions.DependencyInjection;

namespace OptionsBindSample
{
    public class Startup
    {

        public IConfiguration Configuration { get; set; }

        // 通过依赖注入添加configuration
        public Startup(IConfiguration configuration)
        {
            Configuration = configuration;
        }

        // This method gets called by the runtime. Use this method to add services to the container.
        // For more information on how to configure your application, visit https://go.microsoft.com/fwlink/?LinkID=398940
        public void ConfigureServices(IServiceCollection services)
        {
            // 注册Class,可以通过Configuration读取到option
            services.Configure<Class>(Configuration);
            // 依赖注入配置添加MVC
            services.AddMvc();
        }

        // This method gets called by the runtime. Use this method to configure the HTTP request pipeline.
        public void Configure(IApplicationBuilder app, IHostingEnvironment env)
        {
            if (env.IsDevelopment())
            {
                app.UseDeveloperExceptionPage();
            }

            // 使用默认路由
            app.UseMvcWithDefaultRoute();

            //app.Run(async (context) =>
            //{
            //    var myClass = new Class();
            //    Configuration.Bind(myClass);// Bind读取配置

            //    await context.Response.WriteAsync($"ClassNo: { myClass.ClassNo}");
            //    await context.Response.WriteAsync($"ClassDesc: { myClass.ClassDesc}");
            //    await context.Response.WriteAsync($" {myClass.Students.Count } Students");
            //});
        }
    }
}
启动项目
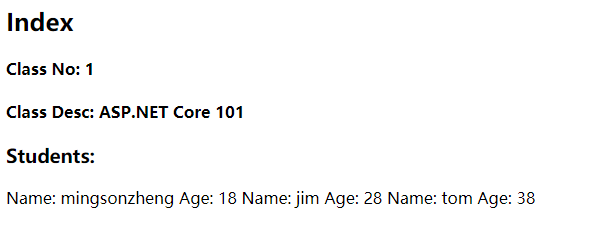
如果仅仅在视图中使用options的话,HomeController的代码有点多余,可以直接在视图中注入
Index
@using Microsoft.Extensions.Options;
@inject IOptions<OptionsBindSample.Class> ClassAccesser
@{
    ViewData["Title"] = "Index";
}

<h2>Index</h2>
<h4>Class No: @ClassAccesser.Value.ClassNo</h4>
<h4>Class Desc: @ClassAccesser.Value.ClassDesc</h4>
<h3>
    Students:
</h3>
<div>
    @foreach (var student in ClassAccesser.Value.Students)
    {
        <span>Name: @student.Name</span>
        <span>Age: @student.Age</span>
    }
</div>
HomeController
using System;
using System.Collections.Generic;
using System.Linq;
using System.Threading.Tasks;
using Microsoft.AspNetCore.Mvc;
using Microsoft.Extensions.Options;

namespace OptionsBindSample.Controllers
{
    public class HomeController : Controller
    {
        public IActionResult Index()
        {
            return View();
        }
    }
}
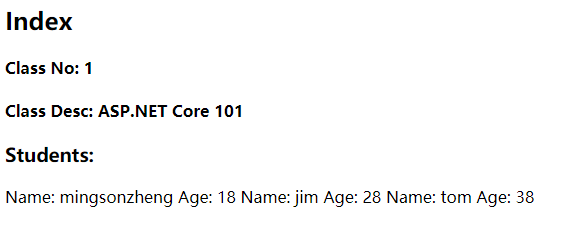
启动项目可以得到同样结果
任务14:配置的热更新
ASP.NET修改web.config后站点会自动重启实现热更新
ASP.NET Core不同,实现如下:
将Index的这一行
@inject IOptions<OptionsBindSample.Class> ClassAccesser修改为
@inject IOptionsSnapshot<OptionsBindSample.Class> ClassAccesser启动项目
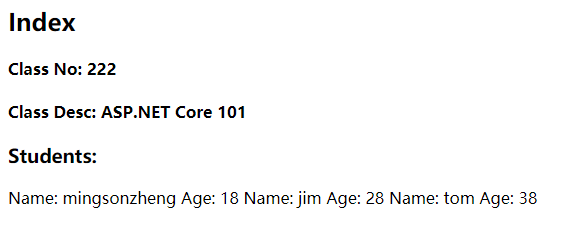
修改appsettings的ClassNo为222,保存
"ClassNo": "222",刷新网页
实现原理
对比控制台程序JsonComfigSample的Program读取配置文件
            // 第二个参数表示文件不存在时是否抛异常
            // 第三个参数表示配置文件更新的时候是否重新加载
            var builder = new ConfigurationBuilder()
                .AddJsonFile("class.json",false,true);
而在ASP.NET Core程序OptionsBindSample在Program中的CreateDefaultBuilder的源码实现了
        public static IWebHostBuilder CreateWebHostBuilder(string[] args) =>
            WebHost.CreateDefaultBuilder(args)
                .UseStartup<Startup>();
WebHost源码:
https://github.com/aspnet/MetaPackages/blob/master/src/Microsoft.AspNetCore/WebHost.cs
源码里面实现热更新(165行)
config.AddJsonFile("appsettings.json", optional: true, reloadOnChange: true)
      .AddJsonFile($"appsettings.{env.EnvironmentName}.json", optional: true, reloadOnChange: true);
由于它是WebHostBuilder的一个扩展函数,所以可以覆盖该方法
public static IWebHostBuilder CreateWebHostBuilder(string[] args) =>
    WebHost.CreateDefaultBuilder(args)
        // 如果业务场景不需要一个线程一直关注配置文件变更,可以关闭热更新
        .ConfigureAppConfiguration(config => { config.AddJsonFile("appsettings.json", false, false); })
        .UseStartup<Startup>();
启动项目,修改配置文件,保存,刷新网页,内容不会热更新
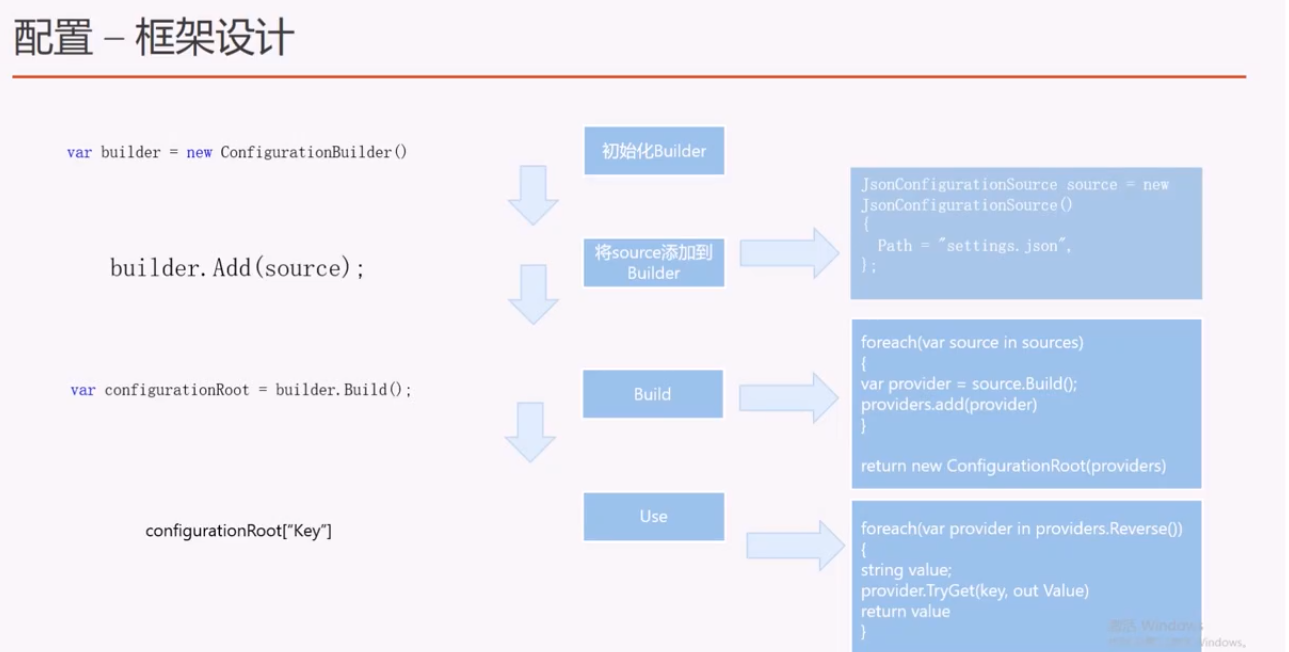
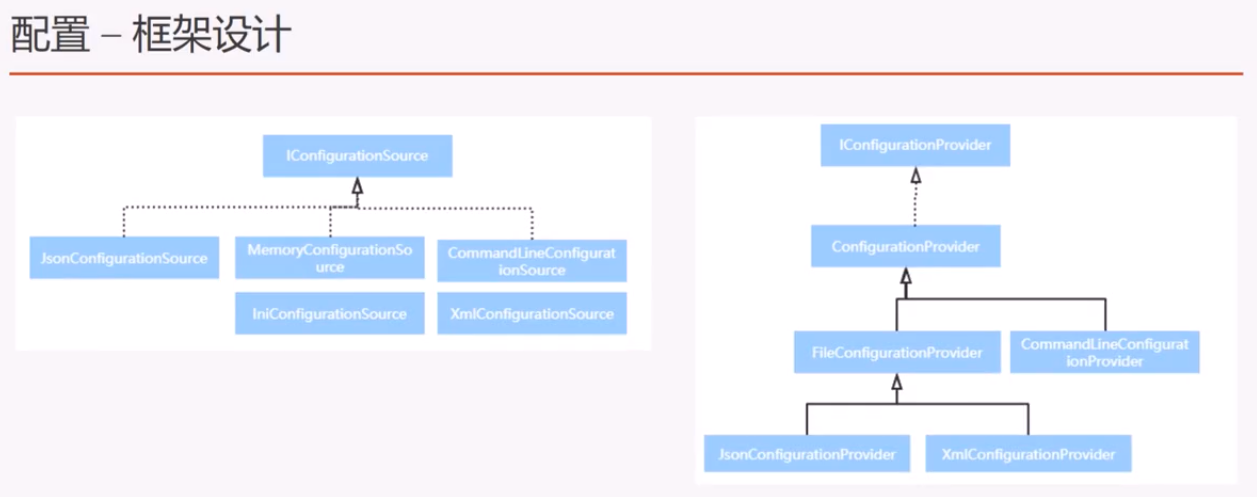
任务15:配置框架设计浅析

本作品采用知识共享署名-非商业性使用-相同方式共享 4.0 国际许可协议进行许可。
欢迎转载、使用、重新发布,但务必保留文章署名 郑子铭 (包含链接: http://www.cnblogs.com/MingsonZheng/ ),不得用于商业目的,基于本文修改后的作品务必以相同的许可发布。
如有任何疑问,请与我联系 (MingsonZheng@outlook.com) 。
ASP.NET Core快速入门学习笔记(第2章:配置管理)的更多相关文章
- ASP.NET Core快速入门--学习笔记系列文章索引目录
课程链接:http://video.jessetalk.cn/course/explore 良心课程,大家一起来学习哈! 抓住国庆假期的尾巴完成了此系列课程的学习笔记输出! ASP.NET Core快 ...
- ASP.NET Core快速入门学习笔记(第3章:依赖注入)
课程链接:http://video.jessetalk.cn/course/explore 良心课程,大家一起来学习哈! 任务16:介绍 1.依赖注入概念详解 从UML和软件建模来理解 从单元测试来理 ...
- ASP.NET Core快速入门学习笔记(第1章:介绍与引入)
课程链接:http://video.jessetalk.cn/course/explore 良心课程,大家一起来学习哈! 任务1:课程介绍 任务2:环境安装 下载地址:https://dotnet.m ...
- 【笔记目录2】【jessetalk 】ASP.NET Core快速入门_学习笔记汇总
当前标签: ASP.NET Core快速入门 共2页: 上一页 1 2 任务27:Middleware管道介绍 GASA 2019-02-12 20:07 阅读:15 评论:0 任务26:dotne ...
- 【笔记目录1】【jessetalk 】ASP.NET Core快速入门_学习笔记汇总
当前标签: ASP.NET Core快速入门 共2页: 1 2 下一页 任务50:Identity MVC:DbContextSeed初始化 GASA 2019-03-02 14:09 阅读:16 ...
- ASP.NET Core Web开发学习笔记-1介绍篇
ASP.NET Core Web开发学习笔记-1介绍篇 给大家说声报歉,从2012年个人情感破裂的那一天,本人的51CTO,CnBlogs,Csdn,QQ,Weboo就再也没有更新过.踏实的生活(曾辞 ...
- 一起学ASP.NET Core 2.0学习笔记(二): ef core2.0 及mysql provider 、Fluent API相关配置及迁移
不得不说微软的技术迭代还是很快的,上了微软的船就得跟着她走下去,前文一起学ASP.NET Core 2.0学习笔记(一): CentOS下 .net core2 sdk nginx.superviso ...
- 【原创】SpringBoot & SpringCloud 快速入门学习笔记(完整示例)
[原创]SpringBoot & SpringCloud 快速入门学习笔记(完整示例) 1月前在系统的学习SpringBoot和SpringCloud,同时整理了快速入门示例,方便能针对每个知 ...
- ASP.NET Core MVC 网站学习笔记
ASP.NET Core MVC 网站学习笔记 魏刘宏 2020 年 2 月 17 日 最近因为” 新冠” 疫情在家办公,学习了 ASP.NET Core MVC 网站的一些知识,记录如下. 一.新建 ...
随机推荐
- 洛谷P3327 约数个数和 结论+莫比乌斯反演
原题 就是让你求\(\sum\limits_{i=1}\sum\limits_{j=1}d(ij)\)(其中\(d(x)\)表示\(x\)的因数个数) 首先有引理(然而并没有证明): \(d(ij)= ...
- 开启telnet
title: 开启telnet data; 2019/3/19 17:35:33 --- 开启telnet 添加root用户 adduser root 按照提示新增文件 /etc/passwd /et ...
- 001 Lua相关链接
Lua官网:http://www.lua.org/ Lua for windows地址:http://www.lua.org/download.html Lua教程:http://www.runoob ...
- Java基础知识拾遗(四)
IO SequenceInputStream,允许链接多个InputStream对象.在操作上该类从第一个InputStream对象进行读取,知道读取完全部内容,然后切换到第二个InputStream ...
- Redis集群管理
1.简介 Redis在生产环境中一般是通过集群的方式进行运行,Redis集群包括主从复制集群和数据分片集群两种类型. *主从复制集群提供高可用性,而数据分片集群提供负载均衡. *数据分片集群中能实现主 ...
- 076、创建Rex-Ray volume (2019-04-23 周二)
参考https://www.cnblogs.com/CloudMan6/p/7624556.html 前面我们安装部署了 Rex-Ray ,并且成功配置 Virtualbox backend ,今 ...
- 五十三、linux 编程——TCP 编程基本介绍
53.1 socket 套接字 53.1.1 介绍 Socket(套接字)是一种通讯机制,它包含一整套的调用接口和数据结构的定义,它给应用进程提供了使用如 TCP/UDP 灯网络协议进行网络通讯的手段 ...
- C语言数据类型和C#的区别
- API设计中响应数据格式用json的优点
通常我们再设计api返回时,都使用json格式返回,相比xml,他又有什么优点呢? 更直观易懂 占用空间更小 能与JavaScript跟好的兼容.js通过eval()进行Json读取. 支持多种语言. ...
- Laravel框架中打印sql
在使用Laravel框架的时候,调试的时候,需要将查询的SQL输出校验,这是需要将SQL打印出来. 一.方法 DB::connection()->enableQueryLog(); // 开 ...