Linux系统(X64)安装Oracle11g完整安装图文教程另附基本操作
2 关闭linux防火墙
--修改/etc/selinux/config,确保SELINUX设置为DISABLED
--关闭IPTABLES:
service iptables stop
service ip6tables stop
/sbin/chkconfig iptables off
/sbin/chkconfig ip6tables off
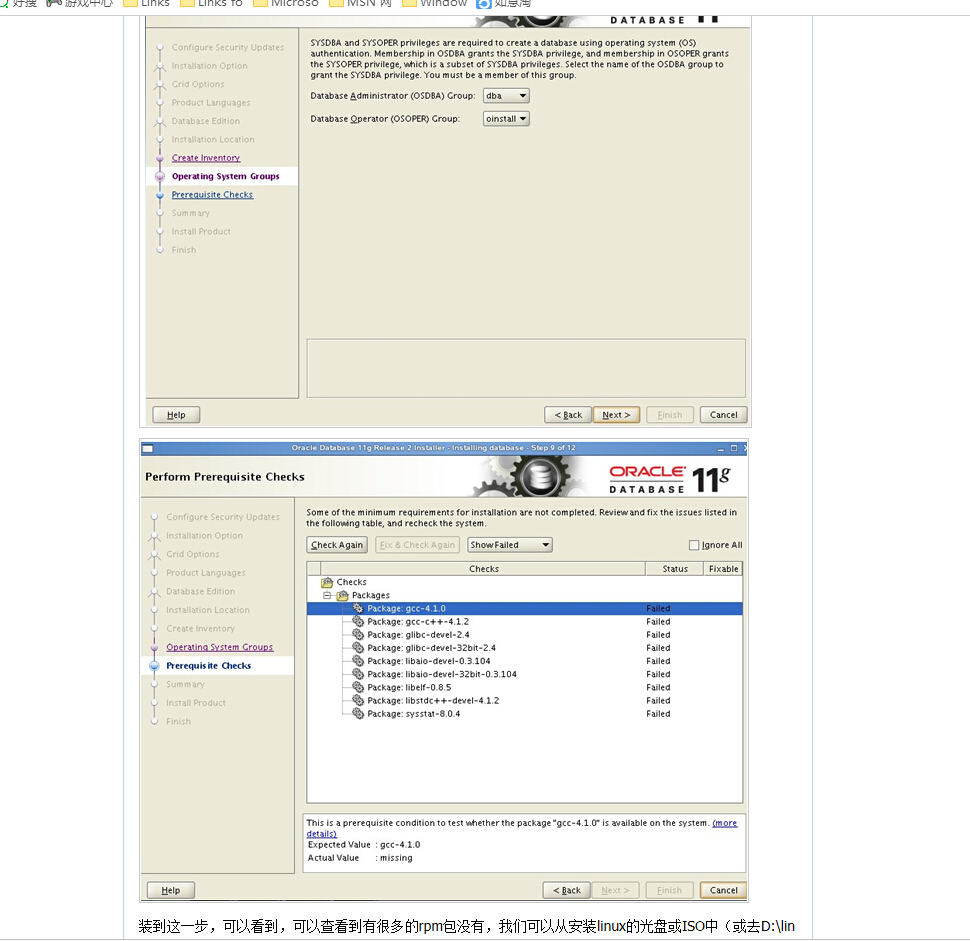
2 检查包安装情况
rpm -q binutils compat-libstdc++-33 elfutils-libelf elfutils-libelf-devel gcc gcc-c++ glibc glibc-common glibc-devel glibc-headers libaio libaio-devel libgcc libstdc++ libstdc++-devel ksh make libXp openmotif22 sysstat smartmontools unixODBC unixODBC-devel
--系统安装包
yum install compat-libstdc++-33
yum install elfutils-libelf-devel
--下面用 yum安装
yum install gcc
yum install gcc-c++
yum install glibc-devel
yum install glibc-headers
yum install libaio-devel
yum install libstdc++-devel
yum install ksh
yum install libXp
yum install unixODBC
yum install openmotif22
yum install unixODBC-devel
--安装和libcap 所有有关的包
yum install libcap.i686
yum install libcap-devel.x86_64
yum install libcap-devel.i686
yum install libcap-ng.i686
yum install libcap-ng-devel.i686
--linux 6 检查的时候一些 i386的包需要安装,但是安装i386 的时候提示有高版本存在,不能安装,我采取忽略,继续安装,但是要保证高版本的包一定要安装上
一、修改操作系统核心参数
在Root用户下执行以下步骤:
1)修改用户的SHELL的限制,修改/etc/security/limits.conf文件
输入命令:vi /etc/security/limits.conf,按i键进入编辑模式,将下列内容加入该文件。
oracle soft nproc 2047oracle hard nproc 16384oracle soft nofile 1024oracle hard nofile 65536编辑完成后按Esc键,输入“:wq”存盘退出
2)修改/etc/pam.d/login 文件,输入命令:vi /etc/pam.d/login,按i键进入编辑模式,将下列内容加入该文件。
session required /lib/security/pam_limits.sosession required pam_limits.so编辑完成后按Esc键,输入“:wq”存盘退出
3)修改linux内核,修改/etc/sysctl.conf文件,输入命令: vi /etc/sysctl.conf ,按i键进入编辑模式,将下列内容加入该文件
fs.file-max = 6815744fs.aio-max-nr = 1048576kernel.shmall = 2097152kernel.shmmax = 2147483648kernel.shmmni = 4096kernel.sem = 250 32000 100 128net.ipv4.ip_local_port_range = 9000 65500net.core.rmem_default = 4194304net.core.rmem_max = 4194304net.core.wmem_default = 262144net.core.wmem_max = 1048576编辑完成后按Esc键,输入“:wq”存盘退出
4)要使 /etc/sysctl.conf 更改立即生效,执行以下命令。 输入:sysctl -p 显示如下:
linux:~ # sysctl -pnet.ipv4.icmp_echo_ignore_broadcasts = 1net.ipv4.conf.all.rp_filter = 1fs.file-max = 6815744fs.aio-max-nr = 1048576kernel.shmall = 2097152kernel.shmmax = 2147483648kernel.shmmni = 4096kernel.sem = 250 32000 100 128net.ipv4.ip_local_port_range = 9000 65500net.core.rmem_default = 4194304net.core.rmem_max = 4194304net.core.wmem_default = 262144net.core.wmem_max = 10485765)编辑 /etc/profile ,输入命令:vi /etc/profile,按i键进入编辑模式,将下列内容加入该文件。
if [ $USER = "oracle" ]; thenif [ $SHELL = "/bin/ksh" ]; thenulimit -p 16384ulimit -n 65536elseulimit -u 16384 -n 65536fifi编辑完成后按Esc键,输入“:wq”存盘退出
6)创建相关用户和组,作为软件安装和支持组的拥有者。
创建Oracle用户和密码,输入命令:
/usr/sbin/groupadd -g 501 oinstall
/usr/sbin/groupadd -g 502 dba
useradd -g oinstall -g dba -m oraclepasswd oracle然后会让你输入密码,密码任意输入2次,但必须保持一致,回车确认。
7)创建数据库软件目录和数据文件存放目录,目录的位置,根据自己的情况来定,注意磁盘空间即可,这里我把其放到oracle用户下,例如:
输入命令:
mkdir /home/oracle/appmkdir /home/oracle/app/oraclemkdir /home/oracle/app/oradatamkdir /home/oracle/app/oracle/product8)更改目录属主为Oracle用户所有,输入命令:
chown -R oracle:oinstall /home/oracle/app9)配置oracle用户的环境变量,首先,切换到新创建的oracle用户下,
输入:su – oracle ,然后直接在输入 : vi .bash_profile
按i编辑 .bash_profile,进入编辑模式,增加以下内容:
export ORACLE_BASE=/home/oracle/appexport ORACLE_HOME=$ORACLE_BASE/oracle/product/11.2.0/dbhome_1export ORACLE_SID=orclexport PATH=$PATH:$HOME/bin:$ORACLE_HOME/binexport LD_LIBRARY_PATH=$ORACLE_HOME/lib:/usr/lib编辑完成后按Esc键,输入“:wq”存盘退出
二、安装过程
1)当上述系统要求操作全部完成后,注销系统,在图形界面以Oracle用户登陆。首先将下载的Oracle安装包复制到linux中,用SSH其他ftp工具拷贝。
打开一个终端,运行unzip命令解压oracle安装文件,如:
输入命令:
解压完成后 cd 进入其解压后的目录database
输入命令:
cd database
使用ls命令可以查看解压后database所包含的文件,如下图:
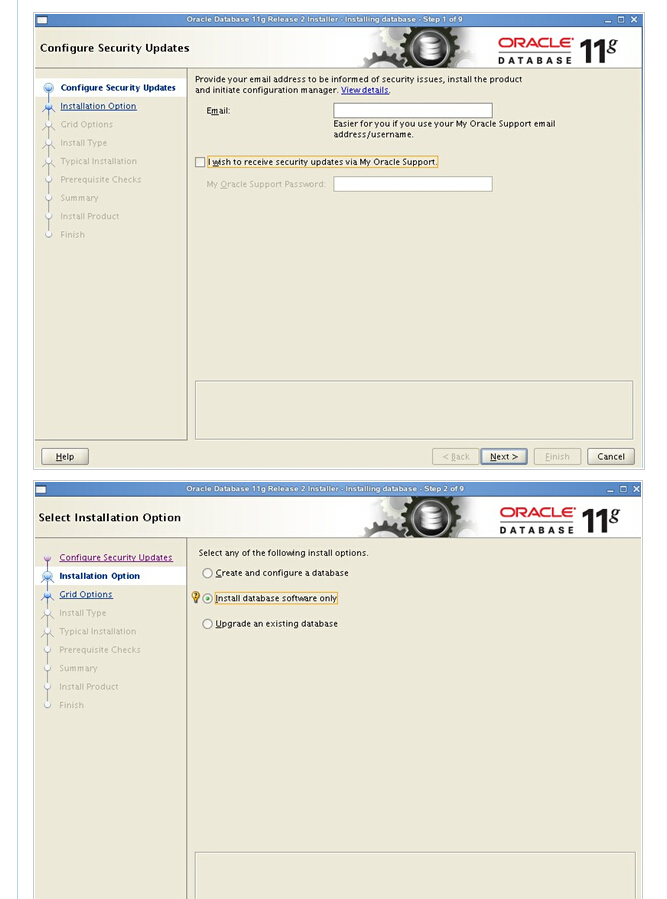
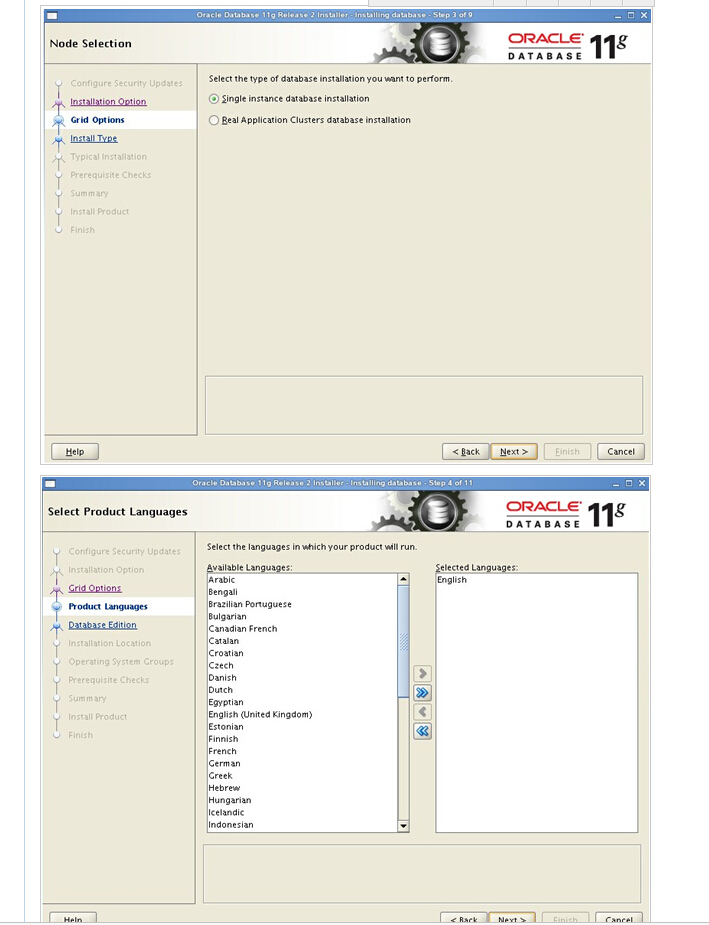
2)执行安装,输入命令:./runInstaller

安装完成后,系统会提示你需要用root权限执行2个shell脚本。按照其提示的路径,找到其所在的位置,如:我的就在/home/oracle/app/oracle/product/11.2.0/dbhome_1/root.sh
和 /home/oracle/oraInventory/orainstRoot.sh 新开启一个终端,输入命令:
su – rootcd /home/oracle/app/oracle/product/11.2.0/dbhome_1sh root.shcd /home/oracle/oraInventorysh orainstRoot.shLinux系统(X64)安装Oracle11g完整安装图文教程另附基本操作的更多相关文章
- Linux系统(X64)7 安装Oracle11g完整安装图文教程另附基本操作
在linux 7.6 安装 oracle 11g mount 挂载yum源 yum –y sys* gcc* lib* sys* ma* un* gli* elf* bin* com* ...
- Linux系统(X32)安装Oracle11g完整安装图文教程另附基本操作
一.修改操作系统核心参数 在Root用户下执行以下步骤: )修改用户的SHELL的限制,修改/etc/security/limits.conf文件 输入命令:vi /etc/security/limi ...
- Linux 安装Oracle11g完整安装图文教程另附基本操作 (分享)
一.修改操作系统核心参数 在Root用户下执行以下步骤: 1)修改用户的SHELL的限制,修改/etc/security/limits.conf文件 输入命令:vi /etc/security/lim ...
- Linux系统下MongoDB的简单安装与基本操作
这篇文章主要介绍了Linux系统下MongoDB的简单安装与基本操作,需要的朋友可以参考下 Mongo DB ,是目前在IT行业非常流行的一种非关系型数据库(NoSql),其灵活的数据存储方式,备 ...
- Linux系统CentOS6.2版本下安装JDK7详细过程
Linux系统CentOS6.2版本下安装JDK7详细过程 分类: Linux 2014-08-25 09:17 1933人阅读 评论(0) 收藏 举报 前言: java 是一种可以撰写 ...
- Linux系统初学-第一课 虚拟机安装CentOS6.5以及Root密码找回
Linux系统初学第一课 虚拟机安装CentOS6.5以及Root密码找回 虚拟机安装CentOS6.5 一.安装虚拟机 1-1.安装虚拟机VMware Station,新建虚拟机,选择典型配置. 1 ...
- Linux系统下Redis单机版的安装详细教程
Linux系统下Redis单机版的安装详细教程 1.下载软件安装包并上传到root目录 这里以旧版本的3.0进行安装,比较成熟稳定,具体软件可以通过qq群534073451文件下载
- 【转】Windows 7下硬盘安装Ubuntu 14.04图文教程--不错
原文网址:http://www.linuxidc.com/Linux/2014-04/100369p3.htm Ubuntu 官方已经发布了正式版的 Ubuntu 14.04 LTS,并宣称这是为云计 ...
- 分布式进阶(一)Windows 7下硬盘安装Ubuntu 14.04图文教程
Windows 7下硬盘安装Ubuntu 14.04图文教程 本人下载的是ubuntu-14.04.2-desktop-amd64.iso,经本人亲自测试的,折腾了一天的时间. 1)首先还是分区,在计 ...
随机推荐
- 最小生成树算法(Prim,Kruskal)
边赋以权值的图称为网或带权图,带权图的生成树也是带权的,生成树T各边的权值总和称为该树的权. 最小生成树(MST):权值最小的生成树. 生成树和最小生成树的应用:要连通n个城市需要n-1条边线路.可以 ...
- 一个SQLSERVER触发器的示例
CREATE TRIGGER WoStateChange on T_PD_WorkOrder AFTER UPDATE AS BEGIN declare @WorkOrderID varchar(20 ...
- H桥电路
电路特点:有三极管组成4个桥的腿,中间可以使电容或是电机. 应用:直流电机的正反转控制.DC-AC逆变电源(脉冲直流变为周期交流) 关键点:同一个时刻只能对角的一对三极管导通,同侧不能一块导通,共2对 ...
- Weblogic重启(转载)
1.用户名密码登录. 2.切换到weblogic的bin目录下: cd /user/local/weblogic/user_projects/domains/base_domain/bin/ 3.先停 ...
- C++学习47 文件的概念 文件流类与文件流对象 文件的打开与关闭
迄今为止,我们讨论的输入输出是以系统指定的标准设备(输入设备为键盘,输出设备为显示器)为对象的.在实际应用中,常以磁盘文件作为对象.即从磁盘文件读取数据,将数据输出到磁盘文件.磁盘是计算机的外部存储器 ...
- C++学习26 运算符重载的概念和语法
所谓重载,就是赋予新的含义.函数重载(Function Overloading)可以让一个函数名有多种功能,在不同情况下进行不同的操作.运算符重载(Operator Overloading)也是一个道 ...
- [Flex] IFrame系列 —— IFrame嵌入html点击其他组件后页面消失的问题
在flex建的web项目中,打开index.template.html,将param.wmode = "transparent";添加到以下位置 <script type=& ...
- 运行测试Caused by: java.lang.UnsatisfiedLinkError: no attach in java.library.path错误解决
解决办法:看到错误里面有个Caused by,说我的jdk运行到了32位的了,于是我查看环境变量,发现是昨天设置成32位的没有设置回来,于是设置回64位的jdk就ok了
- URAL 1416 Confidentia [次小生成树]
题意: 第一行n m代表n个点m条无向边. 接下来m行每行abc,代表ab之间有一条长度为c的无向边. 求: 最小生成树的边权和 次小生成树的边权和 #include<stdio.h> ...
- 安装和卸载windows程序
安装windows service通常有两种工具 1.Framework目录下的installutil.exe工具.2.visual studio命令行工具 在这里我要说的是当我们使用的系统是64位的 ...