Bitmap 之 getPixels() 的 stride
学习Graphics中遇到位图(Bitmap)中getPixels()方法,对该方法的用法大体理解,但对其中的stride参数却不明白具体的用法以及用意,现记述过程如下:
Android英文SDK中有关getPixels()方法的介绍如下:
public void getPixels (int[] pixels, int offset, int stride, int x, int y, int width, int height)
Returns in pixels[] a copy of the data in the bitmap. Each value is a packed int representing a Color. The stride parameter allows the caller to allow for gaps in the returned pixels array between rows. For normal packed results, just pass width for the stride value.
Parameters
| pixels | The array to receive the bitmap's colors |
|---|---|
| offset | The first index to write into pixels[] |
| stride | The number of entries in pixels[] to skip between rows (must be >= bitmap's width). Can be negative. |
| x | The x coordinate of the first pixel to read from the bitmap |
| y | The y coordinate of the first pixel to read from the bitmap |
| width | The number of pixels to read from each row |
| height | The number of rows to read |
Throws
| IllegalArgumentException | if x, y, width, height exceed the bounds of the bitmap, or if abs(stride) < width. |
|---|---|
| ArrayIndexOutOfBoundsException | if the pixels array is too small to receive the specified number of pixels. |
看完英文文档仍然不甚明白,于是去搜了下中文Android文档相应内容, getPixels()
public void getPixels (int[] pixels, int offset, int stride, int x, int y, int width, int height)
把位图的数据拷贝到pixels[]中。每一个都由一个表示颜色值的int值来表示。幅度参数(stride)表明调用者允许的像素数组行间距。对通常的填充结果,只要传递宽度值给幅度参数。
参数
pixels 接收位图颜色值的数组
offset 写入到pixels[]中的第一个像素索引值
stride pixels[]中的行间距个数值(必须大于等于位图宽度)。可以为负数
x 从位图中读取的第一个像素的x坐标值。
y 从位图中读取的第一个像素的y坐标值
width 从每一行中读取的像素宽度
height 读取的行数
异常
IllegalArgumentExcepiton 如果x,y,width,height越界或stride的绝对值小于位图宽度时将被抛出。
ArrayIndexOutOfBoundsException 如果像素数组太小而无法接收指定书目的像素值时将被抛出。
看完后仍然对Stride解释中的"行间距"不太明白,去查了下Stride在英语中的原义,Stride在柯林斯中的英英释义如下:
1 If you stride somewhere, you walk there with quick, long steps.
stride意为"大踏步快速前进"
2 A stride is a long step which you take when you are walking or running.
stride在此做名词,意为"大步"
3 Someone's stride is their way of walking with long steps.
指代某人具体迈大步的方式.
于是可以把stride理解为人行走过程中所迈大步的一段距离,而在此方法中可以理解为每行的像素数,至于用处是什么,还要继续寻找答案.
然后去StackOverFlow去搜了搜"getPixels() stride"关键字,查找到如下信息:
1 In most cases the stride is the same as the width. The stride is useful if you are trying to copy/draw a sub-region of a Bitmap. For instance, if you have a 100x100 bitmap and you want to draw the 50x50 top-right corner, you can use a width of 50px and a stride of 100px.(注:stride绝对值要大于等于位图的宽度)
2 Stride is number of bytes used for storing one image row.
Most of the images are 4 byte aligned.
So you will see stride as 154, width 50 and image alignment as 4 byte.
上面内容表示stride参数有两种用处
第一种:
可以截取图片中部分区域或者图片拼接.
截图:假设读取像素值的原图片宽为w,高为h,此时设置参数pixels[w*h], 参数stride为 w ,参数offset为0,参数x ,y为截图的起点位置,参数width和height为截图的宽度和高度,则此方法运行后,返回的pixels[]数组中从pixels[0]至pixels[width*height-1]里存储的是从图片( x , y )处起读取的截图大小为width * height的像素值.
示例:修改Android SDK自带的AipDemo程序中BitmapDecode示例,更换图像为自制四角四色图: 
图像大小为100*100,想截取图片右上1/4图像(图上黄色部分)修改程序部分代码为:
- int[] pixels = new int[w*h];
- mBitmap2.getPixels(pixels, 0, w, 50, 0, w/2, h/2);
- mBitmap3 = Bitmap.createBitmap(pixels, 0, w, w, h, Bitmap.Config.ARGB_8888);
- mBitmap4 = Bitmap.createBitmap(pixels, 0, w, w, h, Bitmap.Config.ARGB_4444);
- String txt = String.valueOf(pixels[10]);
- Log.i("myBitmapDecode", "w = " + w + "; h = " + h);
- Log.i("myBitmapDecode", "pixels[0] = " + pixels[0] + "; pixels[1] = " + pixels[1] + "; pixels[10] = " + pixels[10]);
- Log.i("myBitmapDecode", "pixels[w] = " + pixels[w] + "; pixels[h] = " + pixels[h] + "; pixels[w*h-1] = " + pixels[w*h-1]);
运行结果: 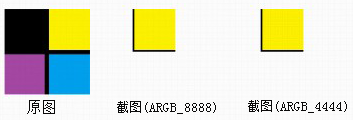
I/myBitmapDecode( 660): w = 100; h = 100
I/myBitmapDecode( 660): pixels[0]-16777216; pixels[1] = -16777216; pixels[10] = -4352
I/myBitmapDecode( 660): pixels[w]-16777216; pixels[h] = -16777216; pixels[w*h-1] = 0
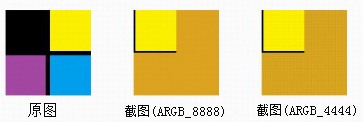
我们看到右边两副ARGB_8888,ARGB_4444图像隐约只在左上角显示原图右上的1/4黄色部分,其余部分为背景色白色,那么问题又来了,此时ARGB_8888,ARGB_4444图像大小为多少?还是原图的大小(100*100)吗,或者是(50*50)了,不然背景色为何是画布的背景色呢(白色)?那么把 pixels[100*100]数组设初始值看下情况(通过Log.i()我查到了pixels中存储的像素值为百万左右的负整数(-16777216),所以这里胡乱取个数-2578654做为初始值,颜色不太好,请见谅),修改后代码如下:
- int[] pixels = new int[w*h];
- for(int i=0; i<w*h; i++){
- pixels[i] = -2578654;
- }
- mBitmap2.getPixels(pixels, 0, w, 50, 0, w/2, h/2);
- mBitmap3 = Bitmap.createBitmap(pixels, 0, w, w, h, Bitmap.Config.ARGB_8888);
- mBitmap4 = Bitmap.createBitmap(pixels, 0, w, w, h, Bitmap.Config.ARGB_4444);
- String txt = String.valueOf(pixels[10]);
- Log.i("myBitmapDecode", "w = " + w + "; h = " + h);
- Log.i("myBitmapDecode", "pixels[0] = " + pixels[0] + "; pixels[1] = " + pixels[1] + "; pixels[10] = " + pixels[10]);
- Log.i("myBitmapDecode", "pixels[w] = " + pixels[w] + "; pixels[h] = " + pixels[h] + "; pixels[w*h-1] = " + pixels[w*h-1]);
运行结果:
I/myBitmapDecode( 727): pixels[0] = -16777216; pixels[1] = -16777216; pixels[10] = -4352
I/myBitmapDecode( 727): pixels[w] = -16777216; pixels[h] = -16777216; pixels[w*h-1] = -2578654
我们可以看到结果了,如果pixels[]中的数值为int默认值(0)的话,图片相应的部分就为背景色,如果设置为别的初始值而在运行中没有被修改的话,背景色就是修改值对应的RGB颜色.
原图位置(offset)
下面设置下getPixels[]方法中offset,使得黄色部分截图出现在它在原图中的位置,
offset = x + y*w ,本例代码如下:
- int[] pixels = new int[w*h];
- for(int i=0; i<w*h; i++){
- pixels[i] = -2578654;
- }
- mBitmap2.getPixels(pixels, 50, w, 50, 0, w/2, h/2;
- mBitmap3 = Bitmap.createBitmap(pixels, 0, w, w, h, Bitmap.Config.ARGB_8888);
- mBitmap4 = Bitmap.createBitmap(pixels, 0, w, w, h, Bitmap.Config.ARGB_4444);
- String txt = String.valueOf(pixels[10]);
- Log.i("myBitmapDecode", "w = " + w + "; h = " + h);
- Log.i("myBitmapDecode", "pixels[0] = " + pixels[0] + "; pixels[1] = " + pixels[1] + "; pixels[10] = " + pixels[10]);
- Log.i("myBitmapDecode", "pixels[w] = " + pixels[w] + "; pixels[h] = " + pixels[h] + "; pixels[w*h-1] = " + pixels[w*h-1]);
运行结果: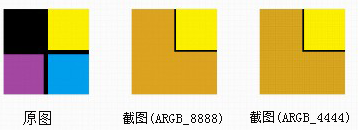
I/myBitmapDecode( 761): w = 100; h = 100
I/myBitmapDecode( 761): pixels[0] = -2578654; pixels[1] = -2578654; pixels[10] = -2578654
I/myBitmapDecode( 761): pixels[w] = -2578654; pixels[h] = -2578654; pixels[w*h-1] = -2578654
当然可以用这个方法进行更复杂的运算,诸如截取素材图片修改目标图片(已存储至pixels数组中)的指定区域!!
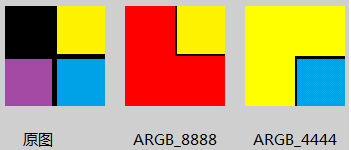
背景色设置(pixels[])
背景颜色与pixels[]初始值一致,如红色RED(-65536 0xffff0000),黄色YELLOW(-256 0xffffff00),具体详见下面附注
- int[] pixels = new int[w*h];
- for(int i=0; i<w*h; i++){
- pixels[i] = -65536; // Color.RED : -65536 (0xffff0000)
- }
- mBitmap2.getPixels(pixels, 50, w, 50, 0, w/2, h/2);
- mBitmap3 = Bitmap.createBitmap(pixels, 0, w, w, h, Bitmap.Config.ARGB_8888);
- Log.i("myBitmapDecode", "w = " + w + "; h = " + h);
- Log.i("myBitmapDecode", "pixels[0] = " + pixels[0] + "; pixels[1] = " + pixels[1] + "; pixels[10] = " + pixels[10] + "; pixels[50] = " + pixels[50]);
- Log.i("myBitmapDecode", "pixels[w] = " + pixels[w] + "; pixels[h] = " + pixels[h] + "; pixels[w*h-1] = " + pixels[w*h-1]);
- for(int i=0; i<w*h; i++){
- pixels[i] = -256; // Color.YELLOW : -256 (0xffffff00)
- }
- mBitmap2.getPixels(pixels, 50*100 + 50, w, 50, 50, w/2, h/2);
- mBitmap4 = Bitmap.createBitmap(pixels, 0, w, w, h, Bitmap.Config.ARGB_4444);
- Log.i("myBitmapDecode", "w = " + w + "; h = " + h);
- Log.i("myBitmapDecode", "pixels[0] = " + pixels[0] + "; pixels[1] = " + pixels[1] + "; pixels[10] = " + pixels[10] + "; pixels[50] = " + pixels[50]);
- Log.i("myBitmapDecode", "pixels[w] = " + pixels[w] + "; pixels[h] = " + pixels[h] + "; pixels[w*h-1] = " + pixels[w*h-1]);
运行结果:
I/myBitmapDecode( 1671): w = 100; h = 100
I/myBitmapDecode( 1671): pixels[0] = -65536; pixels[1] = -65536; pixels[10] = -65536; pixels[50] = -16777216
I/myBitmapDecode( 1671): pixels[w] = -65536; pixels[h] = -65536; pixels[w*h-1] = -65536
I/myBitmapDecode( 1671): w = 100; h = 100
I/myBitmapDecode( 1671): pixels[0] = -256; pixels[1] = -256; pixels[10] = -256; pixels[50] = -256
I/myBitmapDecode( 1671): pixels[w] = -256; pixels[h] = -256; pixels[w*h-1] = -16735513
图片拼接:
假设两张图片大小都为 w * h ,getPixels()方法中设置参数pixels[2*w*h],参数offset = 0,stride = 2*w读取第一张图片,再次运行getPixels()方法,设置参数offset = w,stride = 2*w,读取第二张图片,再将pixels[]绘制到画布上就可以看到两张图片已经拼接起来了.
示例如下:
- int w = mBitmap2.getWidth();
- int h = mBitmap2.getHeight();
- int[] pixels = new int[2*w*h];
- for(int i=0; i<2*w*h; i++){
- pixels[i] = -2578654;
- }
- mBitmap2.getPixels(pixels, 0, 2*w, 0, 0, w, h);
- mBitmap2.getPixels(pixels, w, 2*w, 0, 0, w, h);
- mBitmap3 = Bitmap.createBitmap(pixels, 0, 2*w, 2*w, h, Bitmap.Config.ARGB_8888);
- String txt = String.valueOf(pixels[10]);
- Log.i("myBitmapDecode", "w = " + w + "; h = " + h);
- Log.i("myBitmapDecode", "pixels[0] = " + pixels[0] + "; pixels[1] = " + pixels[1] + "; pixels[10] = " + pixels[10]);
- Log.i("myBitmapDecode", "pixels[w] = " + pixels[w] + "; pixels[h] = " + pixels[h] + "; pixels[w*h-1] = " + pixels[w*h-1]);
- Log.i("myBitmapDecode", "pixels[2*w-1] = " + pixels[2*w-1] + "; pixels[2*w] = " + pixels[2*w] + "; pixels[2*w*h-1] = " + pixels[2*w*h-1]);
运行结果: 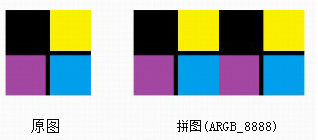
I/myBitmapDecode( 989): w = 100; h = 100
I/myBitmapDecode( 989): pixels[0] = -16777216; pixels[1] = -16777216; pixels[10] = -16777216
I/myBitmapDecode( 989): pixels[w] = -16777216; pixels[h] = -16777216; pixels[w*h-1] = -16777216
I/myBitmapDecode( 989): pixels[2*w-1] = -3328; pixels[2*w] = -16777216; pixels[2*w*h-1] = -16735513
第二种:
stride表示数组pixels[]中存储的图片每行的数据,在其中可以附加信息,即
stride = width + padding,如下图所示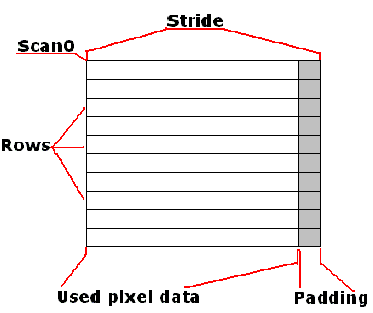
这样可以不仅仅存储图片的像素信息,也可以储存相应每行的其它附加信息.
最后,stride参数的意义及用处总结如下:
1 用来表示pixels[]数组中每行的像素个数,用于行与行之间区分,绝对值必须大于参数width,但不必大于所要读取图片的宽度w(在width < w 时成立).(stride负数有何作用不知,存疑).另,pixels.length >= stride * height,否则会抛出ArrayIndexOutOfBoundsException异常
2 stride > width时,可以在pixels[]数组中添加每行的附加信息,可做它用.
附注(Color颜色对应值):
Bitmap 之 getPixels() 的 stride的更多相关文章
- (转)C#进行图像处理的几种方法(Bitmap,BitmapData,IntPtr)
转自 http://blog.sina.com.cn/s/blog_628821950100wh9w.html C#进行图像处理的几种方法 本文讨论了C#图像处理中Bitmap类.BitmapData ...
- Android项目刮刮奖详解(四)
Android项目刮刮奖详解(三) 前言 上一期我们已经是完成了刮刮卡的基本功能,本期就是给我们的项目增加个功能以及美化一番 目标 增加功能 用户刮卡刮到一定程度的时候,清除遮盖层 在遮盖层放张图片, ...
- 使用C#进行图像处理的几种方法(转)
本文讨论了C#图像处理中Bitmap类.BitmapData类和unsafe代码的使用以及字节对齐问题. Bitmap类 命名空间:System.Drawing 封装 GDI+ 位图,此位图由图形图像 ...
- C#的图像处理方法--(作者:http://conner-wang.spaces.live.com转载)
使用C#进行图像处理的几种方法 本文讨论了C#图像处理中Bitmap类.BitmapData类和unsafe代码的使用以及字节对齐问题. Bitmap类 命名空间:System.Drawing 封装 ...
- C#GDI+图像处理
支持格式:BMP.GIF.JPEG.EXIF.PNG.TIFF.ICON.WMF.EMF等,几乎涵盖所有常用格式 图像类: Image类:Bitmap和Metafile的类提供功能的抽象基类. Met ...
- WPF学习(11)2D绘图
本篇我们来学习WPF的绘图,在2D绘图中主要有这么几个重要的类:Drawing.Visual和Shape,顺便讲下Brush和BitmapEffect. 1 2D绘图 1.1Drawing类 Draw ...
- wpf,vb,位图剪裁的方法
‘ 貌似WPF对GDI+不提供支持,要达到剪裁图像的方法,可以使用image.clip,’不过clip只是对图片的一个遮挡拦截效果,并不改变本身的图片资源.‘下面的代码提供了剪裁图片资源的方法. Di ...
- WPF:通过BitmapSource的CopyPixels和Create方法来切割图片
原文 WPF:通过BitmapSource的CopyPixels和Create方法来切割图片 BitmapSource是WPF图像的最基本类型,它同时提供两个像素相关的方法就是CopyPixels和C ...
- libass简明教程
[时间:2019-05] [状态:Open] [关键词:字幕,libass,字幕渲染,ffmpeg, subtitles, video filter] 0 引言 libass库则是一个轻量级的对ASS ...
随机推荐
- python黑帽子源码
https://www.nostarch.com/download/BHP-Code.zip https://yunpan.cn/cPvLPWMTdWJRu 访问密码 4243
- Ubuntu 14.10 下awk命令详解
简介 awk是一个强大的文本分析工具,相对于grep的查找,sed的编辑,awk在其对数据分析并生成报告时,显得尤为强大.简单来说awk就是把文件逐行的读入,以空格为默认分隔符将每行切片,切开的部分再 ...
- Ubuntu安装Osmocom-BB一只猿多频点WEB脚本
LAMP(Linux- Apache-MySQL-PHP)网站架构是目前国际流行的Web框架,该框架包括:Linux操作系统,Apache网络服务器,MySQL数据 库,Perl.PHP或者Pytho ...
- STL源码分析《3》----辅助空间不足时,如何进行归并排序
两个连在一起的序列 [first, middle) 和 [middle, last) 都已经排序, 归并排序最核心的算法就是 将 [first, middle) 和 [middle, last) 在 ...
- C# 如何执行bat文件 传参数
C# 如何执行bat文件 传参数 分类: C# basic 2011-04-25 18:55 3972人阅读 评论(0) 收藏 举报 c#stringpathoutput Process p = ne ...
- SQL 面试题及答案(一)
1. SQL 语法:update set from: http://wenku.baidu.com/link?url=aVr5EbEmx-pNK86rdnas8YDWG8txjg8GEry-HU_dF ...
- 《深入浅出Node.js》第3章 异步I/O
@by Ruth92(转载请注明出处) 第3章 异步I/O Node 的基调:异步 I/O.事件驱动.单线程. Node 不再是一个服务器,而是一个可以基于它构建各种高速.可伸缩网络应用的平台. No ...
- session过期时ajax请求刷新浏览器
ajax前置处理实现异步请求session过期时跳转登录页面 function checkLogin(json) { if (typeof(json) === 'string' && ...
- OpenMP的简单使用教程
转自:http://binglispace.com/2015/01/09/openmp-intro/ OpenMP的简单使用教程 今天有幸参加了一个XSEDE OpenMP的workshop讲座,真是 ...
- MySql配置方法,批处理进行MySql配置
@echo 注意右击管理员运行 @pause @echo .添加环境变量 @echo .my.ini中添加如下配置 @echo [mysqld] @echo basedir=C:\Program Fi ...