JavaWeb项目中集成Swagger API文档
1.增加依赖
<dependency>

            <groupId>io.springfox</groupId>

            <artifactId>springfox-swagger2</artifactId>

            <version>2.7.0</version>

        </dependency>

        <dependency>

            <groupId>io.springfox</groupId>

            <artifactId>springfox-swagger-ui</artifactId>

            <version>2.7.0</version>

        </dependency>
2.配置类SwaggerConfig.java
package com.example.config;

import org.springframework.context.annotation.Bean;

import org.springframework.context.annotation.ComponentScan;

import org.springframework.context.annotation.Configuration;

import springfox.documentation.builders.ApiInfoBuilder;

import springfox.documentation.builders.RequestHandlerSelectors;

import springfox.documentation.service.ApiInfo;

import springfox.documentation.spi.DocumentationType;

import springfox.documentation.spring.web.plugins.Docket;

import springfox.documentation.swagger2.annotations.EnableSwagger2;

@Configuration

@EnableSwagger2

@ComponentScan(basePackages = { "com.example.demo" })

public class SwaggerConfig {

    ApiInfo apiInfo() {

        return new ApiInfoBuilder()

                .title("demo Web service APIs")

                .description("")

                .license("")

                .licenseUrl("")

                .termsOfServiceUrl("")

                .version("1.0.0")

                .build();

    }

    @Bean

    public Docket createRestApi() {

        return new Docket(DocumentationType.SWAGGER_2)

                .select()

                .apis(RequestHandlerSelectors.basePackage("com.example.demo"))

                .build()

                .apiInfo(apiInfo());

    }

}
3.启动类加 @EnableSwagger2 注解
package com.example;

import com.example.config.SupplyConfig;

import org.springframework.boot.SpringApplication;

import org.springframework.boot.autoconfigure.SpringBootApplication;

import org.springframework.boot.context.properties.EnableConfigurationProperties;

import springfox.documentation.swagger2.annotations.EnableSwagger2;

@SpringBootApplication

@EnableConfigurationProperties(SupplyConfig.class)

@EnableSwagger2

public class DemoApplication {

    public static void main(String[] args) {

        SpringApplication.run(DemoApplication.class, args);

    }

}
4.接口类加@Api及接口方法加@ApiOperation注解
package com.example.demo.controller;

import io.swagger.annotations.Api;

import io.swagger.annotations.ApiOperation;

import org.springframework.beans.factory.annotation.Autowired;

import org.springframework.web.bind.annotation.RequestMapping;

import org.springframework.web.bind.annotation.RequestMethod;

import org.springframework.web.bind.annotation.RestController;

@RestController

@RequestMapping("/greet")

@Api(value = "demo api")

public class HelloWorldController{

    @ApiOperation(value = "问好")

    @RequestMapping(value = "helloworld",method = RequestMethod.GET)

    public String sayHello() {

        return "hello world cc";

    }

}
5.访问swagger-ui
http://localhost:8080/swagger-ui.html (端口是spring-boot项目启动的端口),打开页面如下:
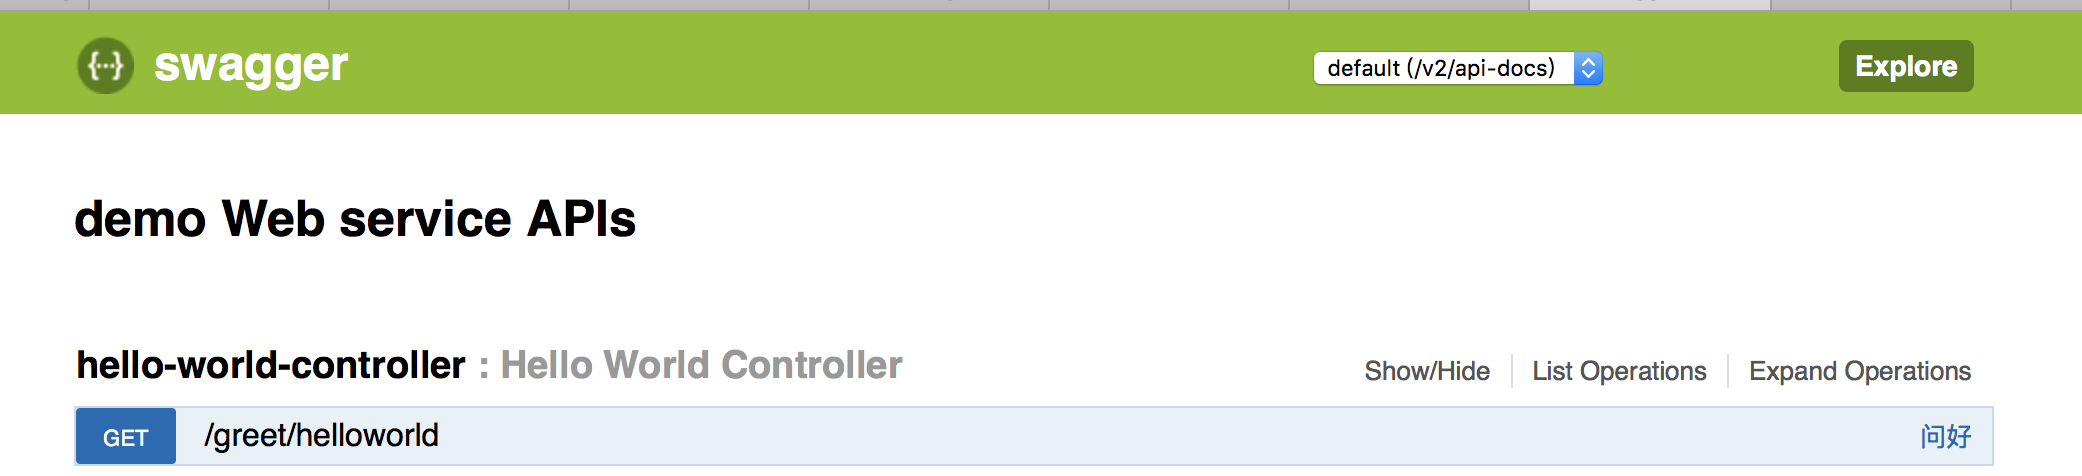
发送get请求:

JavaWeb项目中集成Swagger API文档的更多相关文章
- 使用Swagger2构建SpringMVC项目中的Restful API文档
使用Swagger自动生成API文档,不仅增加了项目的可维护性,还提高了API的透明度更利于快速测试等工作,便于更快地发现和解决问题. 本篇文章只记录整合过程,关于Security Configura ...
- 分享一个集成在项目中的REST APIs文档框架swagger
1 为什么是使用swagger? 1-1 当后台开发人员开发好接口,是不是还要重新书写一份接口文档提给前端人员,当然对于程序员最不喜欢的就是书写文档(当然文档是必须的,有利于项目的维护) 1-2 当后 ...
- Swagger API文档
Swagger API文档集中化注册管理 接口文档是前后端开发对接时很重要的一个组件.手动编写接口文档既费时,又存在文档不能随代码及时更新的问题,因此产生了像swagger这样的自动生成接口文档的 ...
- 添加swagger api文档到node服务
swagger,一款api测试工具,详细介绍参考官网:http://swagger.io/ ,这里主要记录下怎么将swagger api应用到我们的node服务中: 1.任意新建node api项目, ...
- 基于.NetCore3.1搭建项目系列 —— 使用Swagger导出文档 (番外篇)
前言 回顾之前的两篇Swagger做Api接口文档,我们大体上学会了如何在net core3.1的项目基础上,搭建一套自动生产API接口说明文档的框架. 本来在Swagger的基础上,前后端开发人员在 ...
- xadmin引入drf-yasg生成Swagger API文档
一.安装drf-yasg: 由于django-rest-swagger已经废弃了 所以引入了drf-yasg pip install drf-yasg 安装install drf-yasg库 http ...
- .Net Core3.0 WebApi 项目框架搭建 二:API 文档神器 Swagger
.Net Core3.0 WebApi 项目框架搭建:目录 为什么使用Swagger 随着互联网技术的发展,现在的网站架构基本都由原来的后端渲染,变成了:前端渲染.后端分离的形态,而且前端技术和后端技 ...
- Swagger API文档集中化注册管理
接口文档是前后端开发对接时很重要的一个组件.手动编写接口文档既费时,又存在文档不能随代码及时更新的问题,因此产生了像swagger这样的自动生成接口文档的框架.swagger文档一般是随项目代码生成与 ...
- swagger api 文档框架
<其他教程:https://www.cnblogs.com/FlyAway2013/p/7510279.html> 先看看swagger的生态使用图: 其中,红颜色的是swaggger官网 ...
随机推荐
- 关于js对象参数的讨论 用街道类比
var obj = { p: 1 }; function f(o) { o.p = 2; } f(obj); obj.p 上面代码中,传入函数f的是参数对象obj的地址.因此,在函数内部修改obj的属 ...
- 10M光纤与下载速度KB/s、MB/s的换算
我们经常听说谁开的宽带是4M或10M或20M等等.那这和我们所说的网速“多少MB/s”.“多少KB/s”等同吗? 其实这不是一个概念. 在宽带运营商那里开的宽带,比如4M,其实是说4M bit/s,即 ...
- 条件运算符?:接受三个操作数,是C#中唯一的三元运算符(转)
int i = 10; int j = i == 10 ? 1 : 2; //转换成if选择结果如下 if (i == 10) { j = 1; } else { j = 2; } 需要根据还可以嵌套 ...
- [题解](堆)luogu_P1631序列合并
思路来自题解 作者: Red_w1nE 更新时间: 2016-11-13 20:46 在Ta的博客查看 72 最近有点忙 没时间贴代码了== [分析] 首先,把A和B两个序列分别从小到大排序,变成两 ...
- bryce1010专题训练——Splay树
Prob Hint BZOJ 3323 文艺平衡树 区间翻转 BZOJ 1251 序列终结者 区间翻转,询问最值 BZOJ 1895 supermemo 区间加,翻转,剪切,询问最值.点插入,删除. ...
- Guard Duty (medium) Codeforces - 958E2 || (bzoj 2151||洛谷P1792) 种树 || 编译优化
https://codeforces.com/contest/958/problem/E2 首先求出N个时刻的N-1个间隔长度,问题就相当于在这些间隔中选K个数,相邻两个不能同时选,要求和最小 方法1 ...
- Hive_Hive的数据类型
Hive Basic Data Type: Basic Types: tinyint/samllint/int/bigint float/double boolean string Complex T ...
- 利用Common-Fileupload上传文件图片
一,介绍 common-fileupload是appache的开源组件,基于该组件可以轻松实现文件上传的功能,strust框架的文件上传功能也是基于该组件. 二,使用 1,导入两个jar包:commo ...
- go time笔记
package main import ( "time" "fmt" ) func main() { t := time.Now().UnixNano() fm ...
- (转)Unity中使用C#实现Zip包的压缩与解压
使用SharpZipLib库,下载地址为:http://icsharpcode.github.io/SharpZipLib/ /************************************ ...