SPA路由实现的基本原理
1. SPA路由实现的基本原理
前端单页应用实现路由的策略有两种,分别是 基于hash 和 基于 History API
基于hash
通过将一个 URL path 用
#Hash 符号拆分。— 浏览器视作其为虚拟的片段。
最早前端路由的实现就是 基于 location.hash 来实现的, 有这样几个特性:
- URL 中hash值的改变不会被触发页面的重载
- 页面发送请求时, hash 部分不会被发送
- hash 值的改变,会记录在浏览器的历史记录,可使用浏览器的“后退” “前进”触发页面跳转
- 可以利用 hashchange 事件来监听 hash 的变化
触发hash 变化的方式有两种:
- 通过a 标签的 href 属性,用户点击后,URL 就会发生改变,进而触发 hashchange 事件
- 直接对 location.hash 赋值,从而改变 URL, 触发hashchange 事件。
基于 History API
普通的 URL path (无哈希的 URL path) — 服务器需要拦截路径请求返回 入口 index.html 文件
基于 hash 的实现,存在一些问题,例如
- URL 上很多
#影响美观。
因此 H5 中,提供了 History API 来实现 URL 的变化。 采用这种策略实现的前端路由, 主要是利用了 popstate 事件来监听历史记录的变化。
补在文章后面:
除此之外, 基于 Hash 的路由不需要对服务器做改动,但是基于 History API 的路由则需要对服务器做一些 hanle 处理。
2. 相关API 与方法
在开始手动实现之前,有必要先了解一下将会涉及的 API 与 方法。
基于 Location.hash 相关
location
实例属性 hash
返回 URL 中 # 部分的内容, 例如 http://www.example.com/index.html#hello 中的 #hello 部分。
相关方法
window.hashchange 方法
该方法监听url 中, hash 部分改变时的回调。
注意️: 用户点击 浏览器的前进后退 按钮,如果url 的hash 发生改变,同样也会触发该方法。
History API
实例属性
History.length [只读属性]
返回 session 历史记录的长度,新打开的tab 页面该属性值为 1 。
History.scrollRestoration
控制页面刷新时是否记住用户页面的滚动位置。 该值是一个可设定值,有 auto 和 manual 两种:
auto: 保存页面滚动位置(默认)manual: 不保存页面滚动位置
新打开tab 页面时,滚动位置始终回到页面顶部。 这两个属性仅对 页面刷新有效。
History.state [只读属性]
浏览器页面历史记录是一个栈结构,该属性将返回栈顶页面的 状态, 在使用pushState() 或者 replaceState() 方法之前, 这个值为 null. state 是一个 js 对象,该对象将会被存储到用户的本地磁盘, 浏览器关闭重启之后,还能够访问历史值。 但是该对象有大小限制(具体大小根据浏览器的实现而定),一旦所设定内容超出该限制,浏览器将会抛出错误。
实例方法
History.go()
该方法控制页面回到历史中的某个相对位置,仅一个可选参数表示前进的步进值,它可以为正值,也可以为负值。
- 如果不传入参数,或者传入
0, 则等同于页面刷新。 - 该方法无返回值。
History.back()
该方法,不接受任何参数。 它等同于 history.go(-1), 也就是页面的 回退 按钮。
History.forward()
该方法同样不接受参数,等同于 history.go(1), 也就是页面的 前进 按钮
History.pushState() 和 History.replaceState()
语法:
pushState(state, unused)

pushState(state, unused, url)
state 是一个 js 对象,可以是任意被序列化的值。 第二个参数被废弃了,但是由于历史缘故,依然保留,在使用时,应该传入一个空字符串。
这两个方法用于手动操作History对象。
.

├── foo.html

└── index.html
<head>

	<title>History demo</title>

</head>

<body>

    <button onclick="handleClick()">test</button>

    <p>

        some text here...

    </p>

</body>
function handleClick() {

  window.history.pushState({ hello: 'world' }, '', 'foo.html');

}
chrome 浏览器中,可以将鼠标按住后退按钮,查看到 History 数组:
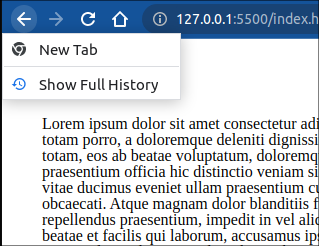
此时点击 test 按钮后:
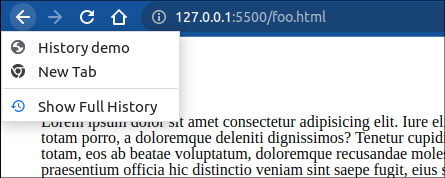
浏览器新打开tab 就会入栈一个 “New Tab”, 点击test 触发 pushState() 之后, 会将当且页面“History demo”入栈, 然后当前页面变为 foo.html, 页面的状态变作:{hello: 'world'}, 可以通过history.state 访问到。
值得注意的是, 页面虽然改变了,但是还没有更新渲染。 此时如果刷新页面,就会更新渲染了。
但是注意pushState 的目标url,必须是一个子域地址,且如果pushState 的目标页面不存在,页面刷新之后会报404错误。
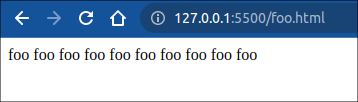
在 foo.html 中新增一个按钮,测试 replaceState 方法:
<!--foo.html-->

  <body>

    <button onclick="handleReplace()">replace</button>

    foo foo foo foo foo foo foo foo foo foo

    <script src="script.js"></script>

  </body>
// script.js

function handleReplace() {

  window.history.replaceState({ foo: 'bar' }, '', 'bar.html');

}
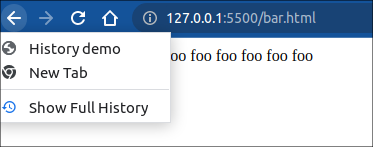
当前页面foo.html 将会被替换为 bar.html, 状态改变为 {foo: 'bar'}, 页面同样在刷新后会更新。
注意, 该方法并不会新增一个记录到历史记录。
关于History.pushState() 和 History.replaceState() 这两个API 的补充:
- 这两个API的,第三个参数可以可选的,如果缺省,那么操作默认以当前页面为目标。 第二个参数可以认为始终传入
""一个空串。 - 页面不仅仅
相关方法
window.popstate 方法
该方法当用户通过点击 前进后退 按钮,或者通过js, 调用 history.go(), history.back(), history.forward() 时,将会被触发
了解了所必须的 API,下面详细的试试如何手动实现路由。
3. 手写一个简单的路由
1.0 预准备
因为接下来的两种实现,我们都将用到同样的文件目录结构,所以在这里我们先创建好他们。
1.0.1 文件目录
.

├── index.html

├── js

│   └── router.js

└── templates

    ├── 404.html

    ├── about.html

    ├── contact.html

    └── index.html
1.0.2 创建服务器 serve 的主 html 文件
<!DOCTYPE html>

<html lang="en">

  <head>

    <meta charset="UTF-8" />

    <meta http-equiv="X-UA-Compatible" content="IE=edge" />

    <meta name="viewport" content="width=device-width, initial-scale=1.0" />

    <meta name="description" />

    <title></title>

  </head>

  <body>

    <nav>

      <a href="/">Home</a>

      <a href="#about">About</a>

      <a href="#contact">Contact</a>

    </nav>

    <div id="content"></div>

    <script src="js/router.js"></script>

  </body>

</html>
1.0.3 创建脚本文件
注意一个步骤中的代码,在body闭合标签的上方,我们引入了js脚本。
1.1 基于 History API
1.1.1 添加路由导航
将以下代码添加到 <nav></nav> 标签内,作为我们的路由导航。
<a href="/">Home</a>

<a href="/about">About</a>

<a href="/contact">Contact</a>
1.1.2 创建路由数组
// route.js

const routes = {

    404: {

        template: "/templates/404.html",

        title: "404",

        description: "Page not found",

    },

    "/": {

        template: "/templates/index.html",

        title: "Home",

        description: "This is the home page",

    },

    "/about": {

        template: "/templates/about.html",

        title: "About Us",

        description: "This is the about page",

    },

    "/contact": {

        template: "/templates/contact.html",

        title: "Contact Us",

        description: "This is the contact page",

    },

};
1.1.3 给导航添加点击事件监听器
//script.js

const route = (event) => {

    event = event || window.event; // get window.event if event argument not provided

    event.preventDefault();

    // window.history.pushState(state, unused, target link);

    window.history.pushState({}, "", event.target.href);

    locationHandler();

};

// create document click that watches the nav links only

document.addEventListener("click", (e) => {

    const { target } = e;

    if (!target.matches("nav a")) {

        return;

    }

    e.preventDefault();

    route();

});
1.1.4 创建处理 location URL 的函数
//script.js

const locationHandler = async () => {

    const location = window.location.pathname; // get the url path

    // if the path length is 0, set it to primary page route

    if (location.length == 0) {

        location = "/";

    }

    // get the route object from the urlRoutes object

    const route = routes[location] || routes["404"];

    // get the html from the template

    // 注意这里是怎么获取到html模板的,很具有技巧性

    const html = await fetch(route.template).then((response) => response.text());

    // set the content of the content div to the html

    document.getElementById("content").innerHTML = html;

    // set the title of the document to the title of the route

    document.title = route.title;

    // 如何选中 meta 标签

    // set the description of the document to the description of the route

    document

        .querySelector('meta[name="description"]')

        .setAttribute("content", route.description);

};
1.1.5 完成脚本
最后,我们需要在页面首次加载的时候调用一下 locationHandler 方法,否则,首页无法呈现。
此外,我们还需要添加 URL 变化的 watcher
//script.js

// add an event listener to the window that watches for url changes

window.onpopstate = locationHandler;

// call the urlLocationHandler function to handle the initial url

window.route = route;

// call the urlLocationHandler function to handle the initial url

locationHandler();
注意,点击导航,以及用户控制页面前进后退,都会触发页面的渲染。 所以需要调用 locationHandler 方法。
1.2 基于hash 的实现
1.2.1 添加路由导航
将以下内容添加在 <nav></nav> 标签内:
<a href="/">Home</a>

<a href="#about">About</a>

<a href="#contact">Contact</a>
1.2.2 创建路由数组
//script.js

const routes = {

    404: {

        template: "/templates/404.html",

        title: "404",

        description: "Page not found",

    },

    "/": {

        template: "/templates/index.html",

        title: "Home",

        description: "This is the home page",

    },

    about: {

        template: "/templates/about.html",

        title: "About Us",

        description: "This is the about page",

    },

    contact: {

        template: "/templates/contact.html",

        title: "Contact Us",

        description: "This is the contact page",

    },

};
1.2.3 创建处理 location URL 的函数
//script.js

const locationHandler = async () => {

    // get the url path, replace hash with empty string

    var location = window.location.hash.replace("#", "");

    // if the path length is 0, set it to primary page route

    if (location.length == 0) {

        location = "/";

    }

    // get the route object from the routes object

    const route = routes[location] || routes["404"];

    // get the html from the template

    const html = await fetch(route.template).then((response) => response.text());

    // set the content of the content div to the html

    document.getElementById("content").innerHTML = html;

    // set the title of the document to the title of the route

    document.title = route.title;

    // set the description of the document to the description of the route

    document

        .querySelector('meta[name="description"]')

        .setAttribute("content", route.description);

};
1.2.4 完成脚本
同样的,页面首次加载,以及 hashchange 的时候都需要调用 locationHandler 函数
//script.js

// create a function that watches the hash and calls the urlLocationHandler

window.addEventListener("hashchange", locationHandler);

// call the urlLocationHandler to load the page

locationHandler();
4. 总结
4.1 原理总结
总结的来说, 基于 History API 的实现,主要是利用了 h5 提供的 pushState, replaceState方法。去改变当前页面的 URL, 同时,利用点击事件 结合 window.popState 监听事件触发页面的更新渲染逻辑。
而 基于 location.hash 的实现,则更为简单,直接 利用 a 便签的 href 属性,触发 hashchange 事件,进而触发页面的更新逻辑。
对比起来, 基于 location.hash 的实现要更为简单。 但是基于 History API 实现的路由,URL 中不含有 # 而显得用户体验更加良好。
4.2 基于History API 的实现需要注意的事项
此外值得注意的一点是, 现在的框架中,大都提供了这两中实现方案。 在实际应用中。 如果应用了 基于 History API 的实现方式,服务器通常需要做一些配置。
因为由于单页应用路由的实现是前端实现的, 可以理解为是 “伪路由”, 路由的跳转逻辑都是前端代码完成的,这样就存在一个问题, 例如上面的实现中, http://127.0.0.1:5500/about 这个页面用户点击了页面刷新,就会找不到页面。 因为浏览器会向服务器 “http://127.0.0.1:5500/about” 这个地址发送 GET 请求, 希望请求到一个单独的 index.html 文件, 而实际上这个文件我们服务器上是不存在的。 我们需要将其处理为:
http://127.0.0.1:5500/ server 返回首页
http://127.0.0.1:5500/about server 返回首页, 然后前端路由跳转到 about 页
http://127.0.0.1:5500/contact server 返回首页, 然后前端路由跳转到 contact 页
为了做到这点,所以我们需要对服务器做一些转发处理,
// root 是我本地的页面地址

// try_files 将匹配子级路由全部尝试返回 index.html 文件

server {

    listen 7000;

    location / {

        root /home/jayce/Desktop/temp/demo/front-end-router-implement/HistoryApi;

        index index.html;

        try_files $uri $uri/ /index.html;

    }

}
4.3 两种实现模式的优势和挑战对比
4.3.1 基于 History API 的实现
优势
- URL 看起来和普通的url 一样, 更加美观简洁
- 在 SEO 方面, 普通 url 会有更多的优势
- 现代框架通常默认支持该模式
挑战
- 客户端刷新时,会把 SPA 的路由误当作 资源请求链接,所以需要配置 web 服务器以处理这些 “路由形式的URL” 以统一放回入口 index.html 文件。
- 通常为了让服务器区分这些 “路由形式的URL”, 所以通常需要用一些前缀以区分和普通 请求的区别,如
/api/* - 通过这种方式实现时,定义路由的时候需要特别注意, 因为不当的链接跳转可能会导致全页面重载。
4.3.2 基于 Location.hash 的实现
优势
- 浏览器不会将 URL.path 中
#hash 后面的部分视作一个分页,因此默认的就不会触发页面的重载 - 在前端定义带有 hash 的链接总是安全的,因为它不会触发页面的重载
- 服务端不需要额外配置。
- 实现起来更加简单
挑战
- SEO 并不友好
- 用户体验不好
参考
- https://developer.mozilla.org/en-US/docs/Web/API/History/pushState
- https://developer.mozilla.org/en-US/docs/Web/API/Window/hashchange_event
- https://developer.mozilla.org/en-US/docs/Web/API/Location/hash
- https://dev.to/thedevdrawer/single-page-application-routing-using-hash-or-url-9jh
- https://blog.bitsrc.io/using-hashed-vs-nonhashed-url-paths-in-single-page-apps-a66234cefc96
- https://www.jianshu.com/p/d2aa8fb951e4
- https://zhuanlan.zhihu.com/p/116023681#:~:text=前端路由实现原理就是,实现方式History 和hash。
推荐阅读
SPA路由实现的基本原理的更多相关文章
- JS高级学习笔记(9) 之 转:前端路由跳转基本原理
原文链接: 前端路由跳转基本原理 前述 前端三大框架Angular.React和Vue都推行单页面应用SPA开发模式,这是因为在路由切换时,替换DOM Tree中发生修改的DOM部分,来减少原来因为多 ...
- SPA 路由三部曲之核心原理
为了配合单页面 Web 应用快速发展的节奏,近几年,各类前端组件化技术栈层出不穷.通过不断的版本迭代 React.Vue 脱颖而出,成为当下最受欢迎的两大技术栈. 仅 7 个月的时间,两个技术栈的下载 ...
- SPA路由机制详解(看不懂不要钱~~)
前言 总所周知,随着前端应用的业务功能起来越复杂,用户对于使用体验的要求越来越高,单面(SPA)成为前端应用的主流形式.而大型单页应用最显著特点之一就是采用的前端路由跳转子页面系统,通过改变页面的UR ...
- 【Vue的路由,SPA概念】
前言 本章是为了以后实现前端页面的搭建而写的, 重点在于如何实现 单页Web应用 因为相对于以前的传统多页面web,有很大的缺陷. 那么就必须了解一下Vue的路由设置. SPA的概念 总的而言,我们知 ...
- WPF 自定义路由事件
如何:创建自定义路由事件 首先自定义事件支持事件路由,需要使用 RegisterRoutedEvent 方法注册 RoutedEvent C#语法 public static RoutedEvent ...
- SPA
为什么用SPA 1. 减少服务器压力 如果不用spa 那么每次切换页面的时候,就会向服务器发送一个请求 服务器返回一个html文件 如果使用了SPA 在切换时,不需要请求服务器,只要通过本地 ...
- WPF自定义路由事件(一)
首先自定义事件支持事件路由,需要使用 RegisterRoutedEvent 方法注册 RoutedEvent C#语法 public static RoutedEvent RegisterRoute ...
- 第五课 nodejs 路由实现并处理请求作出响应
1创建一个http Server 文件server.js var http = require('http');var url = require('url');function start(rout ...
- 利用vue-cli配合vue-router搭建一个完整的spa流程
好文章备忘录: 转自:https://segmentfault.com/a/1190000009160934?_ea=1849098 demo源码:https://github.com/1590123 ...
- Vue、SPA实现登陆
axios/qs/vue-axios安装及使用步骤 首先我们要下载三个依赖包,方便后面的开发使用需要: npm install axios -S axios是vue2提倡使用的轻量版的ajax.它 ...
随机推荐
- 多点DMALL × Apache Kyuubi:构建统一SQL Proxy探索实践
伴随着国家产业升级的推进和云原生技术成熟,多点 DMALL 大数据技术也经历了从存算一体到存算分离的架构调整变迁.本文将从引入 Kyuubi 实现统一 SQL Proxy 的角度讲述这一探索实践的历程 ...
- MySQL57 zip安装
引用:MySQL5.7的.zip文件的配置安装 由于MySQL5.7之后在javaEE中交互的端口发生了变化,而MySQL官网中5.6.5.7版本64位的只有.zip文件,而.zip文件不像直接下 ...
- Java网络编程:Socket 通信 2
client----发送数据(输出流)------------(输入)-[管道流处理数据]-(输出)------接收数据(输入流)------server 文件传输: 客户端: 创建Socket连接对 ...
- mysql数据库报错 sql 1452 Cannot add or update a child row:a foreign key constraint fails
其实这句话的意思就是你添加一个值是一个外键,但是这个外键不在关联的数据库中的主键中,这样就导致了添加失败了,解决办法就是添加对应关联数据库的主键的值,不过我要提醒一下!(也就是我采的坑!) 一定要看清 ...
- vue阻止向上和向下冒泡
阻止向下冒泡 <div class="content" @click.self="cancelFunc"></div> 阻止向上冒泡 & ...
- NavigationDuplicated Navigating to current location (“/XXX”) is not allowed
导航不允许导航到当前位置https://stackoverflow.com/questions/57837758/navigationduplicated-navigating-to-current- ...
- kernel 启动流程
一.概述 之前学习了uboot的启动流程,现在接着学习uboot的启动流程,关于 kernel 的启动流程分析的大佬也是很多的,这里还是通过流程的图的方式进行记录,为了像我一样的新手,直观的了解 ke ...
- 基于SqlSugar的开发框架循序渐进介绍(23)-- Winform端管理系统中平滑增加对Web API对接的需求
在前面随笔介绍的基于SqlSugar的WInform端管理系统中,数据提供者是直接访问数据库的方式,不过窗体界面调用数据接口获取数据的时候,我们传递的是标准的接口,因此可扩展性比较好.我曾经在随笔&l ...
- [OpenCV实战]39 在OpenCV中使用ArUco标记的增强现实
文章目录 1 什么是ArUco标记? 2 在OpenCV中生成ArUco标记 3 检测Aruco标记 4 增强现实应用 5 总结和代码 5.1 生成aruco标记 5.2 使用aruco增强现实 6 ...
- GIS数据下载合集:遥感、土壤、气象、行政区数据...
本文介绍GIS领域相关的各类综合数据免费获取网站,包括遥感数据.气象数据.土地数据.土壤数据.农业数据.行政区数据.社会数据.经济数据等等. 数据较多,大家可以直接通过下方目录加以总览:点击数 ...