Photon Server 实现注册与登录(三) --- 前端UI设计和发起请求
一、打开之前的测试项目。先将服务端代码编译一下,在 bin/Debug/目录下会发现有一个Common.dill。我们相应导入到前端使用。直接拖拽到相应地方
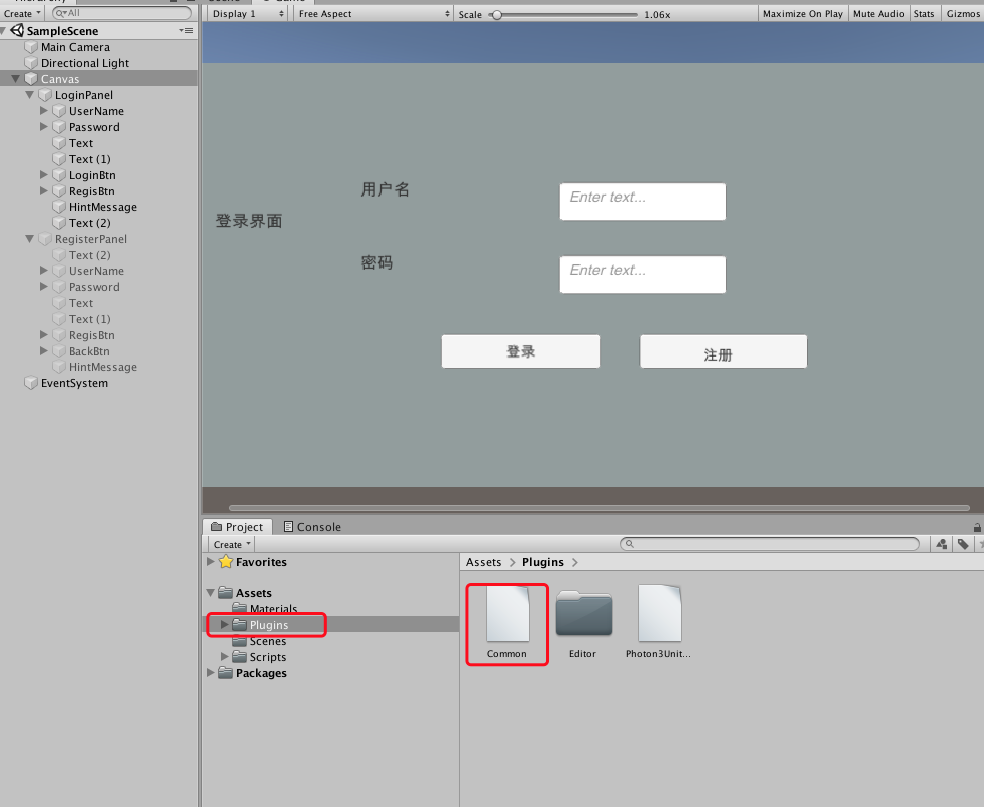
UI相应布局属于前端操作,这里就不做介绍了。详细查看视频:https://www.bilibili.com/video/av35109390/?p=70
二、代码处理:跟后端一样,前端发起请求的地方也会随着项目变大而变多,所以也得单独区分出每个请求独自管理。
Request.cs 请求基类

LoginRequest.cs  登录请求逻辑

RegiesterRequest.cs  注册请求连接

LoginPanel.cs  登录面挂载脚本

ReginsterPanel.cs 注册脚本挂载脚

三、调整PhotonManager.cs 管理类
(1)、添加字典,管理所以请求
private Dictionary<OperationCode,Request> ResquesDict = new Dictionary<OperationCode, Request>();
(2)、分配peer
    public static PhotonPeer Peer

    {

        get { return peer; }

    }
(3)、添加两个函数,管理请求
    public void AddRequest(Request rest)

    {

        ResquesDict.Add(rest.OpCode,rest);

    }

    public void RemoveRequest(Request rest)

    {

        ResquesDict.Remove(rest.OpCode);

    }
(4)、修改OnOperationResponse() 函数,实现接收服务端返回数据的分发
 /// <summary>

    /// 客户端请求后,服务端响应,返回数据

    /// </summary>

    /// <param name="operationResponse"></param>

    public void OnOperationResponse(OperationResponse operationResponse)

    {

        //服务端返回的code

        OperationCode opCode = (OperationCode)operationResponse.OperationCode;

        Request request = null;

        //根据code查找相应请求

        bool tmp = ResquesDict.TryGetValue(opCode, out request);

        if (tmp)

        {

            //如果存在,分发给相应OnOperationResponse去处理自己的接收数据逻辑

            request.OnOperationResponse(operationResponse);

        }

        else

        {

            Debug.Log("没找到响应处理对象");

        }

    }
(5)、完整代码
using System;

using System.Collections;

using System.Collections.Generic;

using System.Reflection.Emit;

using Common;

using UnityEngine;

using ExitGames.Client.Photon;

public class PhotonManager : MonoBehaviour,IPhotonPeerListener

{

    //单例模式,保证只有一个链接服务器

    public static PhotonManager Instance;

    private static PhotonPeer peer;

    private bool connected;

    private Dictionary<OperationCode,Request> ResquesDict = new Dictionary<OperationCode, Request>();

    public static PhotonPeer Peer

    {

        get { return peer; }

    }

    private void Awake()

    {

        if (Instance == null)

        {

            Instance = this;

            DontDestroyOnLoad(this.gameObject);

        }else if (Instance != this)

        {

            Destroy(this.gameObject);

            return;

        }

    }

    // Start is called before the first frame update

    void Start()

    {

        Debug.Log("111------开始连接----");

        peer = new PhotonPeer(this, ConnectionProtocol.Udp);

        peer.Connect("127.0.0.1:5055","MyGame1");

        connected = false;

    }

    // Update is called once per frame

    void Update()

    {

        Debug.Log("update------" + connected);

        peer.Service();

    }

    private void OnDestroy()

    {

        if (peer != null && peer.PeerState == PeerStateValue.Connected)

        {

            peer.Disconnect();

        }

    }

    public void DebugReturn(DebugLevel level, string message)

    {

    }

    /// <summary>

    /// 客户端请求后,服务端响应,返回数据

    /// </summary>

    /// <param name="operationResponse"></param>

    public void OnOperationResponse(OperationResponse operationResponse)

    {

        //服务端返回的code

        OperationCode opCode = (OperationCode)operationResponse.OperationCode;

        Request request = null;

        //根据code查找相应请求

        bool tmp = ResquesDict.TryGetValue(opCode, out request);

        if (tmp)

        {

            //如果存在,分发给相应OnOperationResponse去处理自己的接收数据逻辑

            request.OnOperationResponse(operationResponse);

        }

        else

        {

            Debug.Log("没找到响应处理对象");

        }

    }

    /// <summary>

    /// 连接状态发生改变时

    /// </summary>

    /// <param name="statusCode"></param>

    public void OnStatusChanged(StatusCode statusCode)

    {

        Debug.Log("serStatus-----" + statusCode.ToString());

        switch (statusCode)

        {

            case StatusCode.Connect:

                connected = true;

                break;

            default:

                connected = false;

                break;

        }

    }

    /// <summary>

    /// 服务端直接给客户端数据时,不需要向服务器请求

    /// </summary>

    /// <param name="eventData"></param>

    public void OnEvent(EventData eventData)

    {

        switch (eventData.Code)

        {

            case :

                break;

            case :

                break;

            default:

                break;

        }

    }

    public void AddRequest(Request rest)

    {

        ResquesDict.Add(rest.OpCode,rest);

    }

    public void RemoveRequest(Request rest)

    {

        ResquesDict.Remove(rest.OpCode);

    }

}
四、请求类
(1)、Request.cs 基类
using System;

using Common;

using ExitGames.Client.Photon;

using UnityEngine;

public abstract class Request: MonoBehaviour

{

    //定义请求code

    public OperationCode OpCode;

    public abstract void DefaultRequest(); //发送请求

    public abstract void OnOperationResponse(OperationResponse operationResponse); //接收返回的数据

    public virtual void Start()

    {

        //从管理类中添加该请求

        PhotonManager.Instance.AddRequest(this);

    }

    public void OnDestroy()

    {

        //从管理类中移除该请求

        PhotonManager.Instance.RemoveRequest(this);

    }

}
(2)、登陆类 LoginRequest.cs
using System.Collections.Generic;

using Common;

using ExitGames.Client.Photon;

using UnityEngine;

public class LoginRequest : Request

{

    //通过代码赋值,所有在UI界面上隐藏掉

    [HideInInspector]

    public string UserName;

    [HideInInspector]

    public string Password;

    //获取UI面板

    private LoginPanel loginPanel;

    public override void Start()

    {

        //调用基类Start,将登陆请求添加到管理类中

        base.Start();

        loginPanel = GetComponent<LoginPanel>();

    }

    public override void DefaultRequest()

    {

        //登录请求发起

        Dictionary<byte,object> data = new Dictionary<byte, object>();

        data.Add((byte) ParameterCode.UserName,UserName);

        data.Add((byte) ParameterCode.Password,Password);

        //通过Peer发送请求给服务端

        PhotonManager.Peer.OpCustom((byte)OpCode,data,true);

    }

    public override void OnOperationResponse(OperationResponse operationResponse)

    {

        //接收服务端的返回响应,将返回code给面板,由面板来处理接下来的逻辑(是提示错误还是跳转场景)

        ReturnCode returnCode = (ReturnCode) operationResponse.ReturnCode;

        loginPanel.OnLiginResponse(returnCode);

    }

}
(3)、登陆面板脚本 LoginPannel.cs
using System;
using System.Collections;
using System.Collections.Generic;
using Common;
using UnityEngine;
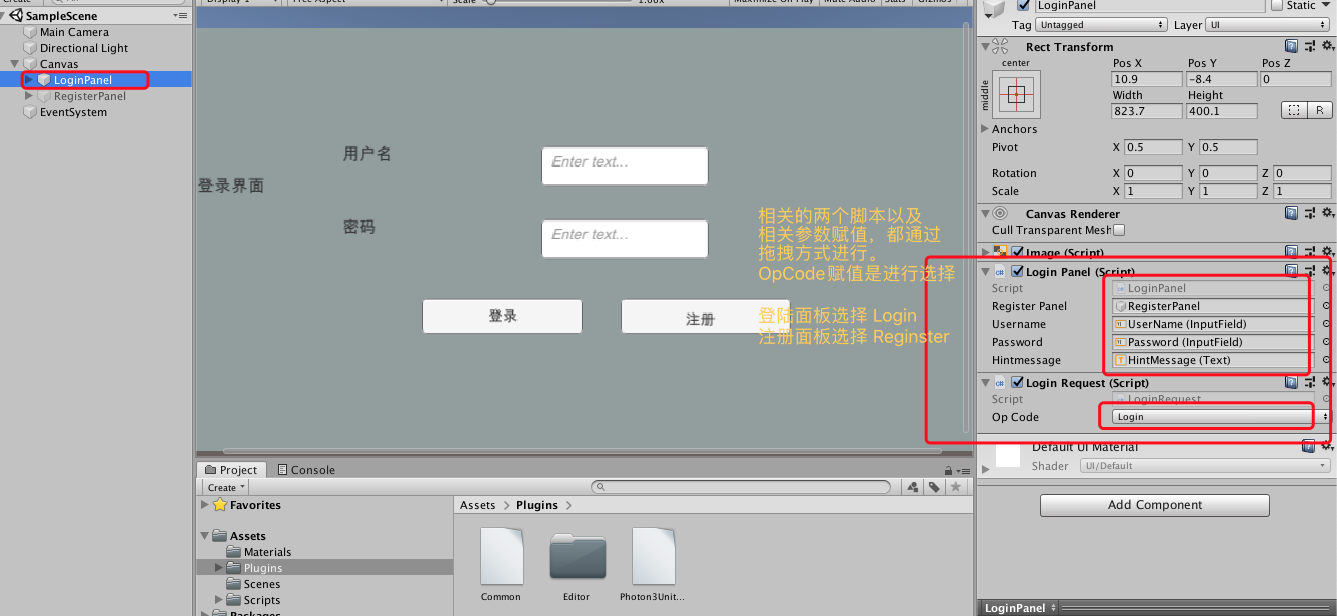
using UnityEngine.UI; public class LoginPanel : MonoBehaviour
{
//以下public参数通过UI拖拽进行赋值
#region Tags //注册面板,用于点击注册时显示该面板
public GameObject registerPanel;
//控件
public InputField username;
public InputField password;
public Text hintmessage; //登陆请求类
private LoginRequest loginRequest; #endregion private void Start()
{
//从面板中获取请求类(面板脚本和请求类都挂载到请求面板UI中)
loginRequest = GetComponent<LoginRequest>();
} public void OnLoginButton()
{
//点击登陆按钮时,发送请求
hintmessage.text = ""; loginRequest.UserName = username.text;
loginRequest.Password = password.text; //调用请求类中的发起请求
loginRequest.DefaultRequest();
} public void OnRegisterButton()
{
//点击注册时,隐藏登陆UI,显示注册UI
gameObject.SetActive(false);
registerPanel.SetActive(true);
} public void OnLiginResponse(ReturnCode returnCode)
{
//服务端响应返回数据时,请求类会将返回信息传递到该函数
Debug.Log("-----返回code" + returnCode); if (returnCode == ReturnCode.Success)
{
//登录成功,调整下一个场景
Debug.Log("--登陆成功----");
}
else
{
hintmessage.text = "用户名或密码错误";
}
}
}
注册类和注册面板跟登陆相同逻辑
(4)、注册类 ReginesterRequest.cs
using System.Collections;

using System.Collections.Generic;

using Common;

using ExitGames.Client.Photon;

using UnityEngine;

public class RegiesterRequet : Request

{

    [HideInInspector]

    public string username;

    [HideInInspector]

    public string password;

    private ReginsterPanel reginsterPanel;

    public override void Start()

    {

        base.Start();

        reginsterPanel = GetComponent<ReginsterPanel>();

    }

    public override void DefaultRequest()

    {

        //登录请求发起

        Dictionary<byte,object> data = new Dictionary<byte, object>();

        data.Add((byte) ParameterCode.UserName,username);

        data.Add((byte) ParameterCode.Password,password);

        PhotonManager.Peer.OpCustom((byte)OpCode,data,true);

    }

    public override void OnOperationResponse(OperationResponse operationResponse)

    {

        ReturnCode returnCode = (ReturnCode) operationResponse.ReturnCode;

        reginsterPanel.OnReigsterResponse(returnCode);

    }

}
(5)、注册面板 ReginsterPanel.cs
using System;

using System.Collections;

using System.Collections.Generic;

using Common;

using UnityEngine;

using UnityEngine.UI;

public class ReginsterPanel : MonoBehaviour

{

    public GameObject loginPanel;

    public InputField username;

    public InputField password;

    public Text hintmessage;

    private RegiesterRequet regiesterRequet;

    private void Start()

    {

        regiesterRequet = GetComponent<RegiesterRequet>();

    }

    public void OnRegisterButton()

    {

        hintmessage.text = "";

        regiesterRequet.username = username.text;

        regiesterRequet.password = password.text;

        regiesterRequet.DefaultRequest();

    }

    public void OnBackBtn()

    {

        loginPanel.SetActive(true);

        gameObject.SetActive(false);

    }

    public void OnReigsterResponse(ReturnCode returnCode)

    {

        if (returnCode == ReturnCode.Success)

        {

            hintmessage.text = "注册成功,请返回登录";

        }

        else

        {

            hintmessage.text = "用户名重复,请重新修改用户名";

        }

    }

}
前端UI和请求、响应逻辑基本完成。接下来进行服务端响应。
查看视频:https://www.bilibili.com/video/av35109390/?p=70
Photon Server 实现注册与登录(三) --- 前端UI设计和发起请求的更多相关文章
- Photon Server 实现注册与登录(一) --- Hibernate整合到项目中
本系列实现目的:基于Photon Server实现注册于登录 一.拷贝Nbibernate项目的文件到MyGamerServer项目中. 二.数据库新建表,结构如下 三.修改文件名和配置 (1).将拷 ...
- Photon Server 实现注册与登录(二) --- 服务端代码整理
一.有的代码前端和后端都会用到.比如一些请求的Code.使用需要新建项目存放公共代码. 新建项目Common存放公共代码: EventCode :存放服务端自动发送信息给客户端的code Operat ...
- Photon Server 实现注册与登录(四) --- 服务端响应登陆和注册
前面已经整理过了服务端代码,MyGameServer.cs 和 ClientPeer.cs 对请求和响应进行了拆分.接下来处理对前端的响应 一.响应登陆请求 之前整理中,响应前端请求主要在类Clien ...
- Photon Server 实现注册与登录(五) --- 服务端、客户端完整代码
客户端代码:https://github.com/fotocj007/PhotonDemo_Client 服务端代码:https://github.com/fotocj007/PhotonDemo_s ...
- Photon Server与Unity3D客户端的交互
Photon Server与Unity3D的交互分为3篇博文实现 (1)Photon Server的服务器端配置 (2)Photon Server的Unity3D客户端配置 (3)Photon Ser ...
- SpringBoot注册登录(三):注册--验证账号密码是否符合格式及后台完成注册功能
SpringBoot注册登录(一):User表的设计点击打开链接SpringBoot注册登录(二):注册---验证码kaptcha的实现点击打开链接 SpringBoot注册登录(三):注册 ...
- 实战django(一)--(你也能看懂的)注册与登录(带前端模板)
先是具体目录:(主要是注意templates和static的位置),其中person文件夹是上一期实战的,不用理会,login是本节实战app 项目urls.py from django.contri ...
- Halo 开源项目学习(三):注册与登录
基本介绍 首次启动 Halo 项目时需要安装博客并注册用户信息,当博客安装完成后用户就可以根据注册的信息登录到管理员界面,下面我们分析一下整个过程中代码是如何执行的. 博客安装 项目启动成功后,我们可 ...
- 基于 Socket 的群聊聊天室(带图形界面,包含注册、登录、数据入库功能)
代码下载 https://github.com/juno3550/GroupChatRoom 实现框架 Chat 包: server.py:服务器端执行代码(TCP 服务器,根据客户端消息调用 mod ...
随机推荐
- 数据结构实验之数组一:矩阵转置(SDUT 2130)
Problem Description 数组--矩阵的转置 给定一个m*n的矩阵(m,n<=100),求该矩阵的转置矩阵并输出. Input 输入包含多组测试数据,每组测试数据格式如下: 第一行 ...
- spring事务在web环境中失效的问题
今天温习一下spring事务的时候,出现了一种诡异的现象,在java环境中测试事务是可以的.然后到web下测试事务就没用了.spring.xml配置 spring-mvc.xml配置 后来百度发现是因 ...
- @Configuration,@ConfigurationProperties,@EnableConfigurationProperties
@Configuration API: https://www.javadoc.io/doc/org.springframework/spring-context/5.0.7.RELEASE @Con ...
- asyncio之异步上下文管理器
异步上下文管理器 前面文章我们提到了上下文管理器,但是这个上下文管理器只适用于同步代码,不能用于异步代码(async def形式),不过不用担心今天我们就来讨论在异步中如何使用上下文管理器. 特别提醒 ...
- cnpm与npm指定有什么区别?
CNPM跟NPM用法完全一致,只是在执行命令时将故宫改为CNPM. 因为故宫安装插件是从国外服务器下载,受网络影响大,可能出现异常,如果故宫的服务器在中国就好了,所以我们乐于分享的淘宝团队干了这事来自 ...
- 一篇文章搞懂Python装饰器所有用法
01. 装饰器语法糖 如果你接触 Python 有一段时间了的话,想必你对 @ 符号一定不陌生了,没错 @ 符号就是装饰器的语法糖. 它放在一个函数开始定义的地方,它就像一顶帽子一样戴在这个函数的头上 ...
- 阶段5 3.微服务项目【学成在线】_day04 页面静态化_24-页面预览-页面预览测试
通过nginx转发到预览的地址 重启nginx 添加页面预览按钮 调整下列表的列的宽度
- ios -转载-真机提示 iPhone has denied the launch request 问题
环境: 手机版本12.1,Xcode10.0问题: 真机时提示 iPhone has denied the launch request ,试过了的各种方法,最终解决方法如下:1. 2. 3.清理Xc ...
- PAT 甲级 1014 Waiting in Line (30 分)(queue的使用,模拟题,有个大坑)
1014 Waiting in Line (30 分) Suppose a bank has N windows open for service. There is a yellow line ...
- Linux 常用高效操作
空行处理 linux系统下删除空行,用vim底行模式'%s/^n$//g' 可以删除空行并真正修改文件,但文件数量太大时耗时不可预估,于是操作文件删除空行并重定向到一个新的文件是不错的选择. 常用特殊 ...