Flutter 移动端屏幕适配方案和制作
flutter_screenutil插件
flutter 屏幕适配方案,让你的UI在不同尺寸的屏幕上都能显示合理的布局!
注意:此插件仍处于开发阶段,某些API可能尚未推出。
安装依赖:
安装之前请查看最新版本
# 添加依赖

  flutter_screenutil: ^0.5.
在每个使用的地方导入包:
import 'package:flutter_screenutil/flutter_screenutil.dart';
属性
| 属性 | 类型 | 默认值 | 描述 |
|---|---|---|---|
| width | double | 1080px | 设计稿中设备的宽度,单位px |
| height | double | 1920px | 设计稿中设备的高度,单位px |
| allowFontScaling | bool | false | 设置字体大小是否根据系统的“字体大小”辅助选项来进行缩放 |
初始化并设置适配尺寸及字体大小是否根据系统的“字体大小”辅助选项来进行缩放
在使用之前请设置好设计稿的宽度和高度,传入设计稿的宽度和高度(单位px) 一定在MaterialApp的home中的页面设置(即入口文件,只需设置一次),以保证在每次使用之前设置好了适配尺寸:
//填入设计稿中设备的屏幕尺寸

//默认 width : 1080px , height:1920px , allowFontScaling:false

ScreenUtil.instance = ScreenUtil.getInstance()..init(context);

//假如设计稿是按iPhone6的尺寸设计的(iPhone6 750*1334)

ScreenUtil.instance = ScreenUtil(width: , height: )..init(context);

//设置字体大小根据系统的“字体大小”辅助选项来进行缩放,默认为false

ScreenUtil.instance = ScreenUtil(width: , height: , allowFontScaling: true)..init(context);
使用:
适配尺寸:
传入设计稿的px尺寸:
根据屏幕宽度适配 width: ScreenUtil.getInstance().setWidth(540),
根据屏幕高度适配 height: ScreenUtil.getInstance().setHeight(200),
也可以使用 ScreenUtil() 替代 ScreenUtil.getInstance(), 例如:ScreenUtil().setHeight(200)
注意
高度也根据setWidth来做适配可以保证不变形(当你想要一个正方形的时候)
setHeight方法主要是在高度上进行适配, 在你想控制UI上一屏的高度与实际中显示一样时使用.
 //初始化设计尺寸

ScreenUtil.instance = ScreenUtil(width: , height: )..init(context);

print('设备的像素密度:${ScreenUtil.pixelRatio}');

print('设备的高:${ScreenUtil.screenHeight}');

print('设备的宽:${ScreenUtil.screenWidth}');
适配字体:
传入设计稿的px尺寸:
//传入字体大小,默认不根据系统的“字体大小”辅助选项来进行缩放(可在初始化ScreenUtil时设置allowFontScaling)

ScreenUtil.getInstance().setSp()

//传入字体大小,根据系统的“字体大小”辅助选项来进行缩放(如果某个地方不遵循全局的allowFontScaling设置)

ScreenUtil(allowFontScaling: true).setSp()

//for example:

Column(

              crossAxisAlignment: CrossAxisAlignment.start,

              children: <Widget>[

                Text('我的文字大小在设计稿上是25px,不会随着系统的文字缩放比例变化',

                    style: TextStyle(

                        color: Colors.black, fontSize: ScreenUtil.getInstance().setSp())),

                Text('我的文字大小在设计稿上是25px,会随着系统的文字缩放比例变化',

                    style: TextStyle(

                        color: Colors.black, fontSize: ScreenUtil(allowFontScaling: true).setSp())),

              ],

  )
其他相关api:
ScreenUtil.pixelRatio       //设备的像素密度

ScreenUtil.screenWidth      //设备宽度

ScreenUtil.screenHeight     //设备高度

ScreenUtil.bottomBarHeight  //底部安全区距离,适用于全面屏下面有按键的

ScreenUtil.statusBarHeight  //状态栏高度 刘海屏会更高  单位px

ScreenUtil.textScaleFactory //系统字体缩放比例

ScreenUtil.getInstance().scaleWidth  // 实际宽度的dp与设计稿px的比例

ScreenUtil.getInstance().scaleHeight // 实际高度的dp与设计稿px的比例
完整demo示例代码:
import 'package:flutter/material.dart';
import 'package:flutter_screenutil/flutter_screenutil.dart'; void main() => runApp(new MyApp()); class MyApp extends StatelessWidget {
// This widget is the root of your application.
@override
Widget build(BuildContext context) {
return new MaterialApp(
debugShowCheckedModeBanner: false,
title: 'Flutter_ScreenUtil',
theme: new ThemeData(
primarySwatch: Colors.blue,
),
home: new MyHomePage(title: 'FlutterScreenUtil Demo'),
);
}
} class MyHomePage extends StatefulWidget {
MyHomePage({Key key, this.title}) : super(key: key); final String title; @override
_MyHomePageState createState() => new _MyHomePageState();
} class _MyHomePageState extends State<MyHomePage> {
@override
Widget build(BuildContext context) {
//设置适配尺寸 (填入设计稿中设备的屏幕尺寸) 假如设计稿是按iPhone6的尺寸设计的(iPhone6 750*1334)
ScreenUtil.instance = ScreenUtil(width: , height: )..init(context);
print('设备宽度:${ScreenUtil.screenWidth}'); //Device width
print('设备高度:${ScreenUtil.screenHeight}'); //Device height
print('设备的像素密度:${ScreenUtil.pixelRatio}'); //Device pixel density
print(
'底部安全区距离:${ScreenUtil.bottomBarHeight}dp'); //Bottom safe zone distance,suitable for buttons with full screen
print(
'状态栏高度:${ScreenUtil.statusBarHeight}dp'); //Status bar height , Notch will be higher Unit px print('实际宽度的dp与设计稿px的比例:${ScreenUtil.getInstance().scaleWidth}');
print('实际高度的dp与设计稿px的比例:${ScreenUtil.getInstance().scaleHeight}'); print(
'宽度和字体相对于设计稿放大的比例:${ScreenUtil.getInstance().scaleWidth * ScreenUtil.pixelRatio}');
print(
'高度相对于设计稿放大的比例:${ScreenUtil.getInstance().scaleHeight * ScreenUtil.pixelRatio}');
print('系统的字体缩放比例:${ScreenUtil.textScaleFactory}'); return Scaffold(
appBar: AppBar(
title: Text(widget.title),
),
floatingActionButton: FloatingActionButton(
onPressed: () {
print(
'ScreenUtil.getInstance().width:${ScreenUtil.getInstance().width}');
print('ScreenUtil().width:${ScreenUtil().width}');
},
child: Icon(Icons.accessible_forward),
),
body: new Center(
child: Column(
crossAxisAlignment: CrossAxisAlignment.center,
children: <Widget>[
Row(
children: <Widget>[
Container(
width: ScreenUtil.getInstance().setWidth(),
height: ScreenUtil.getInstance().setHeight(),
color: Colors.red,
child: Text(
'我的宽度:${ScreenUtil.getInstance().setWidth(375)}dp',
style: TextStyle(
color: Colors.white,
fontSize: ScreenUtil.getInstance().setSp(),
),
),
),
Container(
width: ScreenUtil.getInstance().setWidth(),
height: ScreenUtil.getInstance().setHeight(),
color: Colors.blue,
child:
Text('我的宽度:${ScreenUtil.getInstance().setWidth(375)}dp',
style: TextStyle(
color: Colors.white,
fontSize: ScreenUtil.getInstance().setSp(),
)),
),
],
),
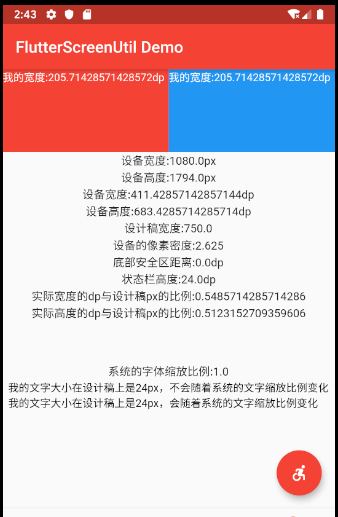
Text('设备宽度:${ScreenUtil.screenWidth}px'),
Text('设备高度:${ScreenUtil.screenHeight}px'),
Text('设备宽度:${ScreenUtil.screenWidthDp}dp'),
Text('设备高度:${ScreenUtil.screenHeightDp}dp'),
Text('设计稿宽度:${ScreenUtil.getInstance().width}'),
Text('设备的像素密度:${ScreenUtil.pixelRatio}'),
Text('底部安全区距离:${ScreenUtil.bottomBarHeight}dp'),
Text('状态栏高度:${ScreenUtil.statusBarHeight}dp'),
Text(
'实际宽度的dp与设计稿px的比例:${ScreenUtil.getInstance().scaleWidth}',
textAlign: TextAlign.center,
),
Text(
'实际高度的dp与设计稿px的比例:${ScreenUtil.getInstance().scaleHeight}',
textAlign: TextAlign.center,
),
SizedBox(
height: ScreenUtil.getInstance().setHeight(),
),
Text('系统的字体缩放比例:${ScreenUtil.textScaleFactory}'),
Column(
crossAxisAlignment: CrossAxisAlignment.start,
children: <Widget>[
Text('我的文字大小在设计稿上是24px,不会随着系统的文字缩放比例变化',
style: TextStyle(
color: Colors.black,
fontSize: ScreenUtil.getInstance().setSp())),
Text('我的文字大小在设计稿上是24px,会随着系统的文字缩放比例变化',
style: TextStyle(
color: Colors.black,
fontSize:
ScreenUtil(allowFontScaling: true).setSp())),
],
)
],
),
),
);
}
}
总结:这次学习了使用flutter_ScreenUtil来适配Flutter的APP应用,需要注意的是这个插件再不断升级中,所以使用的时候要使用最新版。
github地址:https://github.com/OpenFlutter/flutter_screenutil
Flutter 移动端屏幕适配方案和制作的更多相关文章
- Flutter移动电商实战 --(11)首页_屏幕适配方案和制作
1.flutter_ScreenUtil插件简介 flutter_ScreenUtil屏幕适配方案,让你的UI在不同尺寸的屏幕上都能显示合理的布局. 插件会让你先设置一个UI稿的尺寸,他会根据这个尺寸 ...
- Web 端屏幕适配方案
基础知识 像素相关 1.像素 :像素是屏幕显示最小的单位. 2.设备像素 :设备像素又称物理像素(physical pixel),设备能控制显示的最小单位,我们可以把这些像素看作成显示器上一个个的点. ...
- 11-Flutter移动电商实战-首页_屏幕适配方案和制作
1.flutter_ScreenUtil插件简介 flutter_ScreenUtil屏幕适配方案,让你的UI在不同尺寸的屏幕上都能显示合理的布局. 插件会让你先设置一个UI稿的尺寸,他会根据这个尺寸 ...
- 移动端font-size适配方案
概述 这是我研究移动端页面时的思考,记录下来供以后开发时参考,相信对其他人也有用.由于我写移动端页面写的还比较少,一些问题都还没遇到,所以我的这篇博文不免有些错误的地方,还请大佬多多指正. 这篇文章是 ...
- Flutter实战视频-移动电商-11.首页_屏幕适配方案讲解
11.首页_屏幕适配方案讲解 国人写的屏幕适配插件: https://github.com/OpenFlutter/flutter_screenutil 最新版本是0.5.1 在pubspec.yam ...
- 01-02 Flutter仿京东商城项目 功能分析、底部导航Tab切换以及路由配置、架构搭建:(Flutter仿京东商城项目 首页布局以及不同终端屏幕适配方案)
Flutter和Dart交流学习群:交流群:452892873 01Flutter仿京东商城项目 功能分析.底部导航Tab切换以及路由配置.架构搭建 02Flutter仿京东商城项目 首页布局以及不同 ...
- 移动端屏幕适配(rem+js)
什么是移动端适配 在制作webapp时,一个很关键的问题就是适配各种机型不同屏幕的大小,让每种机型上的布局看起来都尽量一样. 也就是说用同一套代码在不同分辨率的手机上跑时,页面元素间的间距.留白,以及 ...
- JavaScript强化教程 —— Cocos2d-JS的屏幕适配方案
1. 设置屏幕适配策略(Resolution Policy) 如果你还没有用过Resolution Policy,只需要在游戏载入过程完成之后(cc.game.onStart函数回调中),调用下面的代 ...
- Cocos2d-JS的屏幕适配方案
Cocos2d引擎为游戏开发者提供了屏幕适配策略(Resolution Policy)解决方案. 使用方式 1. 设置屏幕适配策略(Resolution Policy) 如果你还没有用过Resolut ...
随机推荐
- The 2018 ACM-ICPC Asia Qingdao Regional Contest, Online - H Traveling on the Axis-【思维模拟题目】
H Traveling on the Axis 作者: 浙江大学竞赛命题组 单位: ACMICPC 时间限制: 500 ms 内存限制: 64 MB 代码长度限制: 32 KB 传送门 BaoBao ...
- vscode开发
基于 Electron 开发.typescript编写.底层 Node.js 打造的一个编辑器 , 不是IDE,被称为“披着IDE外衣的编辑器”
- XSS攻击(跨站攻击)
漏洞描述 跨站脚本攻击(Cross-site scripting,简称XSS攻击),通常发生在客户端,可被用于进行隐私窃取.钓鱼欺骗.密码偷取.恶意代码传播等攻击行为.XSS攻击使用到的技术主要为HT ...
- npm设置成淘宝镜像
1.淘宝 npm 网址 https://npm.taobao.org/ 2.修改 2.1 通过命令配置 2.1.1. 命令 npm config set registry https://regist ...
- koa常用api文档整理
koa 支持的配置 1.应用配置是 app 实例属性,目前支持的配置项如下 配置项名称 简介 app.name 应用名称(可选项) app.env 默认为 NODE_ENV 或者 developmen ...
- javascript逻辑与(&&)
<!DOCTYPE html> <html lang="en"> <head> <meta charset="UTF-8&quo ...
- linux 批量创建用户
user 模块添加用户 python -c 'from passlib.hash import sha512_crypt; import getpass; print (sha512_crypt.en ...
- Foundation-常用结构体
复习 void test(){ struct Date{ int year; int month; int day; }; struct Date d={2015,5,14}; d.day=6; } ...
- javascript中稀疏数组和密集数组
密集数组 数组是一片连续的存储空间,有着固定的长度.加入数组其实位置是address,长度为n,那么占用的存储空间是address[0],address[1],address[2].......add ...
- go语言规范之方法集
Go语言规范里定义的方法集的规则 Values Methods Receivers ----------------------------------------------- T (t T) *T ...