Typora自动编号设置
找到C:\Users\用户名\AppData\Roaming\Typora\themes\路径下的base.user.css,用文本编辑器打开(若不存在,则自己创建一个),将一下内容复制进去,然后重启Typora即可。
以下是我的Typora自动编号配置:
/* 正文标题区: #write */

/* [TOC]目录树区: .md-toc-content */

/* 侧边栏的目录大纲区: .sidebar-content */

/** initialize css counter */

#write, .sidebar-content,.md-toc-content{

    counter-reset: h2

}

#write h1, .outline-h1, .md-toc-item.md-toc-h1 {

    counter-reset: h2

}

#write h2, .outline-h2, .md-toc-item.md-toc-h2 {

    counter-reset: h3

}

#write h3, .outline-h3, .md-toc-item.md-toc-h3 {

    counter-reset: h4

}

#write h4, .outline-h4, .md-toc-item.md-toc-h4 {

    counter-reset: h5

}

#write h5, .outline-h5, .md-toc-item.md-toc-h5 {

    counter-reset: h6

}

/** put counter result into headings */

/* 一级标题不展示 */

#write h1:before,

.outline-h1>.outline-item>.outline-label:before,

.md-toc-item.md-toc-h1>.md-toc-inner:before {

    /* counter-increment: h1;

    content: counter(h1) ". " */

}

/* 二级标题 */

#write h2:before,

.outline-h2>.outline-item>.outline-label:before,

.md-toc-item.md-toc-h2>.md-toc-inner:before {

    counter-increment: h2;

    content: counter(h2) ".   ";

    /* content: counter(h2) ". " */

}

/* 三级标题 */

#write h3:before,

h3.md-focus.md-heading:before, /** override the default style for focused headings */

.outline-h3>.outline-item>.outline-label:before,

.md-toc-item.md-toc-h3>.md-toc-inner:before {

    text-decoration: none;

    counter-increment: h3;

    /* content: counter(h1) "." counter(h2) "." counter(h3) ". " */

    /* content: counter(h2) "." counter(h3) ". " */

    content: counter(h2) "." counter(h3) "   "

}

/* 四级标题 */

#write h4:before,

h4.md-focus.md-heading:before,

.outline-h4>.outline-item>.outline-label:before,

.md-toc-item.md-toc-h4>.md-toc-inner:before {

    text-decoration: none;

    counter-increment: h4;

    /* content: counter(h1) "." counter(h2) "." counter(h3) "." counter(h4) ". " */

    /* content: counter(h2) "." counter(h3) "." counter(h4) ". " */

    content: counter(h2) "." counter(h3) "." counter(h4) "   "

}

/* 五级标题 */

#write h5:before,

h5.md-focus.md-heading:before,

.outline-h5>.outline-item>.outline-label:before,

.md-toc-item.md-toc-h5>.md-toc-inner:before {

    text-decoration: none;

    counter-increment: h5;

    /* content: counter(h1) "." counter(h2) "." counter(h3) "." counter(h4) "." counter(h5) ". " */

    /* content: counter(h2) "." counter(h3) "." counter(h4) "." counter(h5) ". " */

    content: counter(h2) "." counter(h3) "." counter(h4) "." counter(h5) "   "

}

/* 六级标题 */

#write h6:before,

h6.md-focus.md-heading:before,

.outline-h6>.outline-item>.outline-label:before,

.md-toc-item.md-toc-h6>.md-toc-inner:before {

    text-decoration: none;

    counter-increment: h6;

    /* content: counter(h1) "." counter(h2) "." counter(h3) "." counter(h4) "." counter(h5) "." counter(h6) ". " */

    /* content: counter(h2) "." counter(h3) "." counter(h4) "." counter(h5) "." counter(h6) ". " */

    content: counter(h2) "." counter(h3) "." counter(h4) "." counter(h5) "." counter(h6) "   "

}

/** override the default style for focused headings */

#write>h3.md-focus:before,

#write>h4.md-focus:before,

#write>h5.md-focus:before,

#write>h6.md-focus:before,

h3.md-focus:before,

h4.md-focus:before,

h5.md-focus:before,

h6.md-focus:before {

    color: inherit;

    border: inherit;

    border-radius: inherit;

    position: inherit;

    left:initial;

    float: none;

    top:initial;

    font-size: inherit;

    padding-left: inherit;

    padding-right: inherit;

    vertical-align: inherit;

    font-weight: inherit;

    line-height: inherit;

}

/* 设置行距 */

/* 设置一级标题行距 */

#write h1 {

    margin-bottom:50px;

    margin-top:50px;

}

#write h2 {

    margin-bottom:30px;

    margin-top:50px;

}

#write h3 {

    margin-bottom:30px;

    margin-top:30px;

}

#write h4 {

    margin-bottom:30px;

    margin-top:30px;

}

#write h5 {

    margin-bottom:30px;

    margin-top:30px;

}
效果如下,
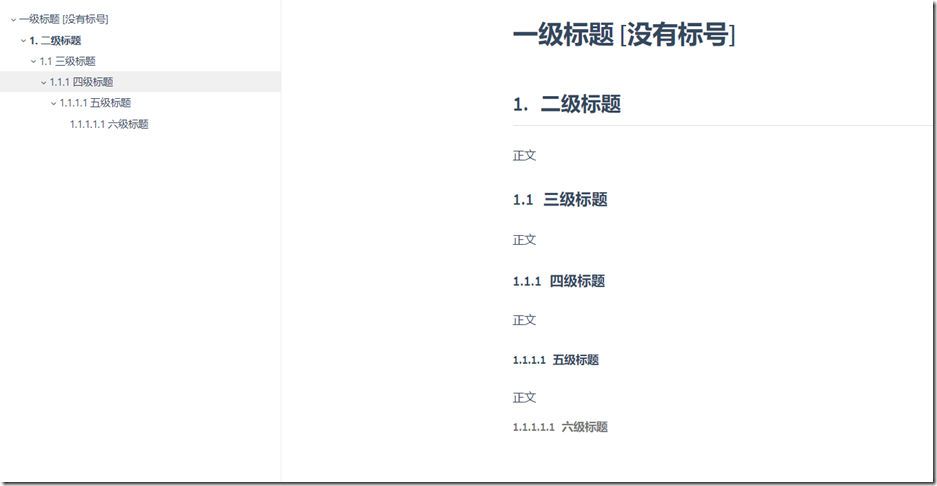
使用起来非常方便,再也不用自己手动来维护这个标号了。
Typora自动编号设置的更多相关文章
- Word 2010 制作文档结构之图标自动编号设置
注意: 使用图片自动编号时,如果文档标题使用的样式是通过“将所选内容保存为新快速样式”所生成的样式,则图片自动编号不会生效 因此设置标题样式时,不要 新建样式,直接使用word预设的“标题 1”样式和 ...
- word2010 标题自动编号设置
今天打算写篇文档,发现生成标题时无法自动生成编号,上网查了一下,现在把解决办法跟附图一块儿奉上. 新建word文档: 默认版式: 设置自动编号所在工具栏位置: 设置选择: 最终结果:
- Word2013对公式处理:样式、自动编号、交叉引用
因快写毕业论文,专门研究了一下Word2013对公式的处理,有一点小心得,记在这里. 文章中公式展示的预期效果是:公式居中,尾端有编号,同时在文章中可以实现引用.实现该效果有很多方法,这里就说一种,其 ...
- 轻松搞定word中让人抓狂的自动编号
在word中使用自动编号时,如果一级编号是2,想让其后面的二级编号自动编号为2.1.2.2--,三级编号自动编号为2.1.1.2.1.2--:且在该一级编号调整为3时,后面的二级编号和三级编号的第一位 ...
- Typora标题自动编号+设定快捷键技巧
Typora标题自动编号 提示:要了解将这些CSS片段放在哪里,请参阅添加自定义CSS. 打开Typora偏好设置,打开主题文件夹,在主题文件夹中创建base.user.css文件,放置以下内容,则T ...
- Access自动编号的初始值设置及重置编号
项目上需要在Access数据库,发现自动编号的列无法设置初始值和步长,但是可以使用SQL语句来设置它. 方法如下: ALTER TABLE tableName ALTER COLUMN ID COUN ...
- 关于设置oracle中系统编号SYSID自动编号的问题;
http://liye9801.blog.163.com/blog/static/601970320086210039591/ 如何在oracle里设置自动编号列 2008-07-21 12:00:3 ...
- SQL2005中设置自动编号字段【转】
如果希望重新定义在表中添加新记录时该列中自动生成并存储于列中的序列号,则可以更改该列的标识属性.在每个表中只能设置一个列的标识属性. 具有标识属性的列包含系统生成的连续值,该值唯一地标识表中的每一行( ...
- Access自动编号的初始值设置及重置编号 转
方法如下: ALTER TABLE tableName ALTER COLUMN Id COUNTER (100, 5) 其中:tableName为要修改的表名,Id为自动编号列,100为初始值,5为 ...
随机推荐
- tf.keras遇见的坑:Output tensors to a Model must be the output of a TensorFlow `Layer`
经过网上查找,找到了问题所在:在使用keras编程模式是,中间插入了tf.reshape()方法便遇到此问题. 解决办法:对于遇到相同问题的任何人,可以使用keras的Lambda层来包装张量流操作, ...
- ios--->NSNotificationCenter传值
object实现 //在发送通知时设置object参数 [[NSNotificationCenter defaultCenter] postNotificationName:@"ThisIs ...
- svg微信公众号推文实现点击显示答案
svg微信公众号推文实现点击显示答案 大家都知道微信公众号推文不能写js 所以不能加点击事件 其实是对的 确实不能写js 但是点击事件可以用svg写 svg代码可不会隐蔽 下面我直接贴代码 < ...
- centos7 手动设置时间
date -s "2020-02-03 23:13:00" hwclock -w clock -w
- 【论文笔记系列】AutoML:A Survey of State-of-the-art (上)
之前已经发过一篇文章来介绍我写的AutoML综述,最近把文章内容做了更新,所以这篇稍微细致地介绍一下.由于篇幅有限,下面介绍的方法中涉及到的细节感兴趣的可以移步到论文中查看. 论文地址:https:/ ...
- ubuntu以root身份登录
- [python]locals内置函数
locals() Update and return a dictionary representing the current local symbol table. Free variables ...
- ARTS Week 11
Jan 6, 2020 ~ Jan 12, 2020 Algorithm Problem 108 Convert Sorted Array to Binary Search Tree (将有序数组转化 ...
- Speech Super Resolution Generative Adversarial Network
博客作者:凌逆战 博客地址:https://www.cnblogs.com/LXP-Never/p/10874993.html 论文作者:Sefik Emre Eskimez , Kazuhito K ...
- python学习(8)实例:写一个简单商城购物车的代码
要求: 1.写一段商城程购物车序的代码2.用列表把商城的商品清单存储下来,存到列表 shopping_mail3.购物车的列表为shopping_cart4.用户首先输入工资金额,判断输入为数字5.用 ...