Typora自动编号设置
找到C:\Users\用户名\AppData\Roaming\Typora\themes\路径下的base.user.css,用文本编辑器打开(若不存在,则自己创建一个),将一下内容复制进去,然后重启Typora即可。
以下是我的Typora自动编号配置:
/* 正文标题区: #write */

/* [TOC]目录树区: .md-toc-content */

/* 侧边栏的目录大纲区: .sidebar-content */

/** initialize css counter */

#write, .sidebar-content,.md-toc-content{

    counter-reset: h2

}

#write h1, .outline-h1, .md-toc-item.md-toc-h1 {

    counter-reset: h2

}

#write h2, .outline-h2, .md-toc-item.md-toc-h2 {

    counter-reset: h3

}

#write h3, .outline-h3, .md-toc-item.md-toc-h3 {

    counter-reset: h4

}

#write h4, .outline-h4, .md-toc-item.md-toc-h4 {

    counter-reset: h5

}

#write h5, .outline-h5, .md-toc-item.md-toc-h5 {

    counter-reset: h6

}

/** put counter result into headings */

/* 一级标题不展示 */

#write h1:before,

.outline-h1>.outline-item>.outline-label:before,

.md-toc-item.md-toc-h1>.md-toc-inner:before {

    /* counter-increment: h1;

    content: counter(h1) ". " */

}

/* 二级标题 */

#write h2:before,

.outline-h2>.outline-item>.outline-label:before,

.md-toc-item.md-toc-h2>.md-toc-inner:before {

    counter-increment: h2;

    content: counter(h2) ".   ";

    /* content: counter(h2) ". " */

}

/* 三级标题 */

#write h3:before,

h3.md-focus.md-heading:before, /** override the default style for focused headings */

.outline-h3>.outline-item>.outline-label:before,

.md-toc-item.md-toc-h3>.md-toc-inner:before {

    text-decoration: none;

    counter-increment: h3;

    /* content: counter(h1) "." counter(h2) "." counter(h3) ". " */

    /* content: counter(h2) "." counter(h3) ". " */

    content: counter(h2) "." counter(h3) "   "

}

/* 四级标题 */

#write h4:before,

h4.md-focus.md-heading:before,

.outline-h4>.outline-item>.outline-label:before,

.md-toc-item.md-toc-h4>.md-toc-inner:before {

    text-decoration: none;

    counter-increment: h4;

    /* content: counter(h1) "." counter(h2) "." counter(h3) "." counter(h4) ". " */

    /* content: counter(h2) "." counter(h3) "." counter(h4) ". " */

    content: counter(h2) "." counter(h3) "." counter(h4) "   "

}

/* 五级标题 */

#write h5:before,

h5.md-focus.md-heading:before,

.outline-h5>.outline-item>.outline-label:before,

.md-toc-item.md-toc-h5>.md-toc-inner:before {

    text-decoration: none;

    counter-increment: h5;

    /* content: counter(h1) "." counter(h2) "." counter(h3) "." counter(h4) "." counter(h5) ". " */

    /* content: counter(h2) "." counter(h3) "." counter(h4) "." counter(h5) ". " */

    content: counter(h2) "." counter(h3) "." counter(h4) "." counter(h5) "   "

}

/* 六级标题 */

#write h6:before,

h6.md-focus.md-heading:before,

.outline-h6>.outline-item>.outline-label:before,

.md-toc-item.md-toc-h6>.md-toc-inner:before {

    text-decoration: none;

    counter-increment: h6;

    /* content: counter(h1) "." counter(h2) "." counter(h3) "." counter(h4) "." counter(h5) "." counter(h6) ". " */

    /* content: counter(h2) "." counter(h3) "." counter(h4) "." counter(h5) "." counter(h6) ". " */

    content: counter(h2) "." counter(h3) "." counter(h4) "." counter(h5) "." counter(h6) "   "

}

/** override the default style for focused headings */

#write>h3.md-focus:before,

#write>h4.md-focus:before,

#write>h5.md-focus:before,

#write>h6.md-focus:before,

h3.md-focus:before,

h4.md-focus:before,

h5.md-focus:before,

h6.md-focus:before {

    color: inherit;

    border: inherit;

    border-radius: inherit;

    position: inherit;

    left:initial;

    float: none;

    top:initial;

    font-size: inherit;

    padding-left: inherit;

    padding-right: inherit;

    vertical-align: inherit;

    font-weight: inherit;

    line-height: inherit;

}

/* 设置行距 */

/* 设置一级标题行距 */

#write h1 {

    margin-bottom:50px;

    margin-top:50px;

}

#write h2 {

    margin-bottom:30px;

    margin-top:50px;

}

#write h3 {

    margin-bottom:30px;

    margin-top:30px;

}

#write h4 {

    margin-bottom:30px;

    margin-top:30px;

}

#write h5 {

    margin-bottom:30px;

    margin-top:30px;

}
效果如下,
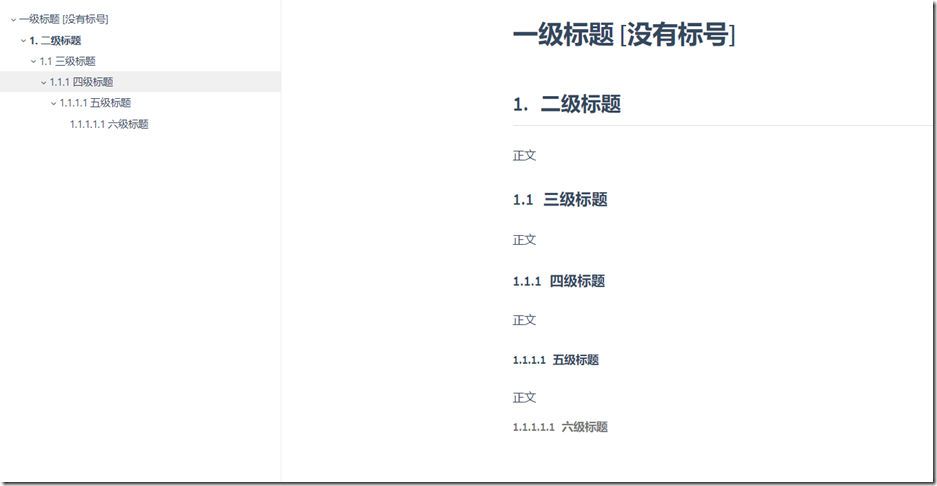
使用起来非常方便,再也不用自己手动来维护这个标号了。
Typora自动编号设置的更多相关文章
- Word 2010 制作文档结构之图标自动编号设置
注意: 使用图片自动编号时,如果文档标题使用的样式是通过“将所选内容保存为新快速样式”所生成的样式,则图片自动编号不会生效 因此设置标题样式时,不要 新建样式,直接使用word预设的“标题 1”样式和 ...
- word2010 标题自动编号设置
今天打算写篇文档,发现生成标题时无法自动生成编号,上网查了一下,现在把解决办法跟附图一块儿奉上. 新建word文档: 默认版式: 设置自动编号所在工具栏位置: 设置选择: 最终结果:
- Word2013对公式处理:样式、自动编号、交叉引用
因快写毕业论文,专门研究了一下Word2013对公式的处理,有一点小心得,记在这里. 文章中公式展示的预期效果是:公式居中,尾端有编号,同时在文章中可以实现引用.实现该效果有很多方法,这里就说一种,其 ...
- 轻松搞定word中让人抓狂的自动编号
在word中使用自动编号时,如果一级编号是2,想让其后面的二级编号自动编号为2.1.2.2--,三级编号自动编号为2.1.1.2.1.2--:且在该一级编号调整为3时,后面的二级编号和三级编号的第一位 ...
- Typora标题自动编号+设定快捷键技巧
Typora标题自动编号 提示:要了解将这些CSS片段放在哪里,请参阅添加自定义CSS. 打开Typora偏好设置,打开主题文件夹,在主题文件夹中创建base.user.css文件,放置以下内容,则T ...
- Access自动编号的初始值设置及重置编号
项目上需要在Access数据库,发现自动编号的列无法设置初始值和步长,但是可以使用SQL语句来设置它. 方法如下: ALTER TABLE tableName ALTER COLUMN ID COUN ...
- 关于设置oracle中系统编号SYSID自动编号的问题;
http://liye9801.blog.163.com/blog/static/601970320086210039591/ 如何在oracle里设置自动编号列 2008-07-21 12:00:3 ...
- SQL2005中设置自动编号字段【转】
如果希望重新定义在表中添加新记录时该列中自动生成并存储于列中的序列号,则可以更改该列的标识属性.在每个表中只能设置一个列的标识属性. 具有标识属性的列包含系统生成的连续值,该值唯一地标识表中的每一行( ...
- Access自动编号的初始值设置及重置编号 转
方法如下: ALTER TABLE tableName ALTER COLUMN Id COUNTER (100, 5) 其中:tableName为要修改的表名,Id为自动编号列,100为初始值,5为 ...
随机推荐
- React的环境搭建以及脚手架的安装
1.安装node.js 如果安装了,就请参照第二步:没有的话,去node.js官网下载:https://nodejs.org/zh-cn/download/ 2.检查 win键+r -----> ...
- linux--->配置lamp环境(centos7 最小版)
这篇博客写的很全,按照顺序敲代码即可 参考:https://www.cnblogs.com/me80/p/7218883.html
- 用 C# 写一个 Redis 数据同步小工具
用 C# 写一个 Redis 数据同步小工具 Intro 为了实现 redis 的数据迁移而写的一个小工具,将一个实例中的 redis 数据同步到另外一个实例中.(原本打算找一个已有的工具去做,找了一 ...
- SpringBoot分布式篇Ⅷ --- 整合SpringCloud
SpringCloud是一个分布式的整体解决方案.Spring Cloud为开发者提供了在分布式系统(配置管理,服务发现,熔断,路由,微代理,控制总线,一次性token,全局锁,leader选举.分布 ...
- 【WPF学习】第三十五章 资源字典
如果希望在多个项目之间共享资源,可创建资源字典.资源字典只是XAML文档,除了存储希望使用的资源外,不做其他任何事情. 一.创建资源字典 下面是一个资源字典示例,它包含一个资源: <Resour ...
- 低功耗设计技术--Multi VDD--Level shifter
本文转自:自己的微信公众号<集成电路设计及EDA教程> 前面的推文中我们分别介绍了低功耗设计中的Multi-VDD技术以及门控电源技术.在实际的低功耗设计中,门控电源技术中也常常结合Mul ...
- 在4K屏下以超过VMWare默认的最高分辨率运行Linux系统
前言 4K 屏,有其优点也有其弊端.优点就是分辨率高,字体和图标看起来如丝一般顺滑:缺点就是字体和图标小,费眼睛.解决这个缺点的方法也很简单粗暴,就是将系统的显示比例放大.在高分屏不很普及的时候,无论 ...
- Codeforces_734_E
http://codeforces.com/problemset/problem/734/E 每次操作可以把连通的同颜色的点全部换颜色,缩点,找直径,第一遍dfs找起点,第二遍dfs求直径. #inc ...
- HDU_1035_水
http://acm.xidian.edu.cn/problem.php?id=1035 本来想用goto优化一下的,不知道什么情况,加了goto就wa了. #include<iostream& ...
- GTMD并查集!
徐州的A我因为并查集写错T了整场.. int find(int x){ return fa[x]==x?x:fa[x]=find(fa[x]); } GTMD!