Cleaning up old NVIDIA driver files
原文地址:https://www.gameplayinside.com/optimize/cleaning-up-old-nvidia-driver-files-to-save-disk-space/
Did you know that each time you installed a Geforce driver update the old files get left behind on your system? This phenomenon has existed for years. However, with the introduction of the NVIDIA Geforce Experience it has gotten even worse. There are now three locations that get filled with unused files. GameplayInside shows you how to clean up old NVIDIA driver files to save disk space!
2017 update: This guide was originally released in 2014. Since then Nvidia introduced a major update of the Geforce Experience software. Unfortunately new Geforce Experiences still clutters your storage device, it just uses different file paths. Therefore this update was created.
Video tutorial
A video tutorial will be placed here later this week.
Location 1 – installer extraction directory
What is it?
When you run the NVIDIA Geforce Driver installer it will extract all files to a temporary directory. Each driver version has it’s own sub folder. Reinstalling the same version just overwrites the same directory.
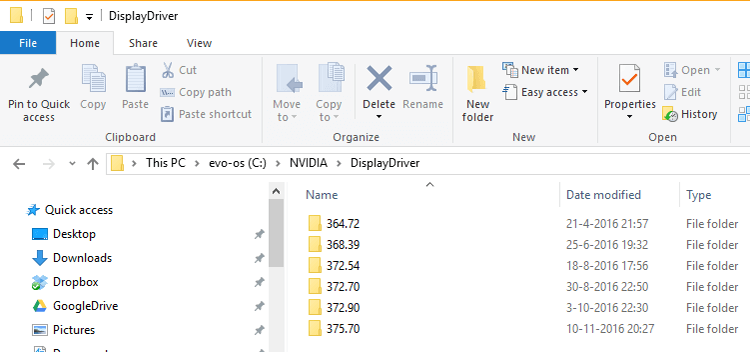 Screenshot of the nvidia temporary driver installation folder.
The impact: 5.2 GB
As you can see I currently have 5214 MB of installation files on my C drive. It is actually a Samsung 850 Evo 500 GB so every MB does count!
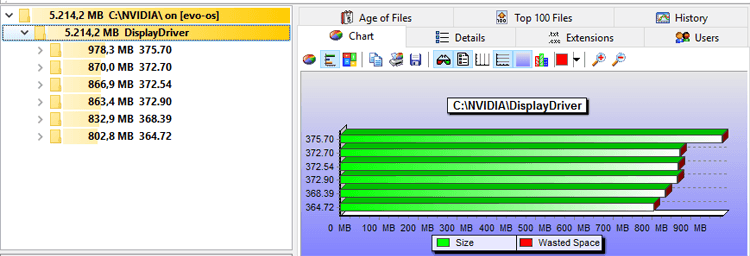 File size of the temporary Nvidia driver installation folder
Removal instructions
All of these files and folders files are 100% safe to remove. They are only used during installation of the Nvidia graphics driver. To remove them and save disk space simply navigate to:
C:\NVIDIA
Now delete all folders inside it and you’re done!
Location 2 – Geforce Experience Download folder
What is it?
Geforce Experience also keeps a copy of all drivers it has downloaded automatically. If you decide to install the driver it will still keep a copy forever. These copies are not cleaned and will stay on your system until you take action. Eventually you will end up with dozens of useless files because Nvidia releases updates monthly.
The impact: 3.7 GB

In this example there are 3721 MB of unnecessary files.
Removal instructions
This is one of the directories that was changed in GFE 3.x. To remove these files and save disk space navigate to:
C:\ProgramData\NVIDIA Corporation\Downloader
Most subfolders contain installer executables. Simply remove all folders with a random name, only leave config and latest. For example on my system the folder 0cfd1195e705a478237a4db99f7ce77c contains GeForce_Experience_Update_v3.4.0.70.exe.
Location 3 – Geforce Experience driver installation repository
What is it?
With the introduction of Geforce Experience NVIDIA has decided it is a good idea to build a library of files. In theory these files can be used in a roll-back and SHOULD be deleted when uninstalling or updating your driver. However in reality you usually update your driver without the “perform a clean install” checkbox.
So guess what? You get a ton of files inside the actual driver installation directory that are completely useless!
The impact: 4.4 GB
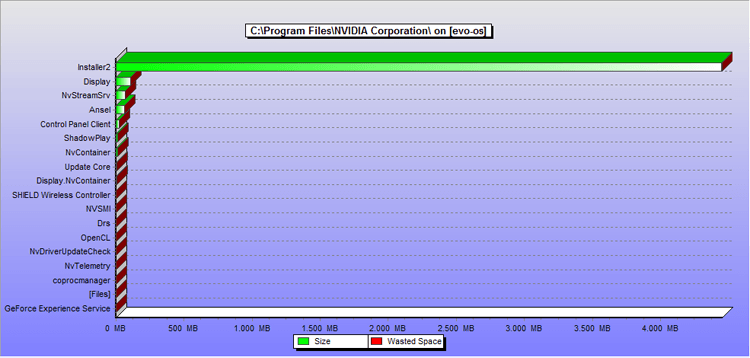 The Installer2 folder is by far the largest folder in the Geforce Experience installation directory.
In this example I have 4445 MB of useless files collecting dust in the Installer2 folder.
Removal instructions
To remove these files and save disk space simply navigate to:
C:\Program Files\NVIDIA Corporation\Installer2
Now delete all folders inside this folder. Do not delete the Installer2 folder itself.
Disclaimer: Removing these files means you can no longer uninstall the Geforce Experience regularly. However, do not worry. If you ever need to uninstall Geforce Experience simply download the latest geforce experience setup and re-install the latest version. Hereafter you can uninstall the Geforce Experience as if nothing happened.
Bonus: Windows driver repository (14.4 GB)
The final location is not something Nvidia can be blamed for. Ever since Windows vista Microsoft started to keep a copy of every driver that was ever installed by the system. This caused the annoying phenomenon that after a few years your 20 GB windows install was suddenly 60 GB. In those times most of us had no clue what was happening, we simply started to do a yearly reinstall of Windows. Microsoft kept using this system in Windows 7, 8 and 10. So today the same principle applies.
Impact: 14.4 GB
Do not delete these folders! Deleting them will mess up your OS. If you want to check your impact then you can find the driver store at
C:\Windows\System32\DriverStore\FileRepository
Again do not delete these folders!
Removal instructions
Soon
Summary
In 2014 I managed to reclaim 4 GB of storage using my own guide: 1726 MB from the Geforce Experience Installer2 directory, 1002 MB from the Netservice directory and 1287 MB from the temporary Nvidia folder.
A few years have passed and I have been using Windows 10 for about a year. Today I was able to reclaim a whopping 13.3 GB. Soon I will also clean the driver repository which will boost my personal savings to over 27 GB!
Conclusion: cleaning up after Nvidia drivers is now more important than even. Especially now that SSD storage is becoming more expensive due to NAND chip shortages.
Cleaning up old NVIDIA driver files的更多相关文章
- linux nVidia driver 304 319 . installation by hand
It's so painful to install nVidia driver by hand on linux. If you remove it or you want to upgrade b ...
- Install Nvidia driver 367.18 or later
Install Nvidia driver 367.18 or later from ppa:graphics-drivers/ppa as follows: sudo add-apt-reposit ...
- nvidia-smi failed because it couldn't communicate with the nvidia driver
Ubuntu装好CUDA之后过段时间提示NVIDIA-SMI has failed because it couldn't communicate with the NVIDIA driver. NV ...
- Ubuntu 18.04 nvidia driver 390.48 安装 TensorFlow 1.12.0 和 PyTorch 1.0.0 详细教程
最近要在个人台式机上搭建TensorFlow和PyTorch运行环境,期间遇到了一些问题.这里就把解决的过程记录下来,同时也可以作为安装上述环境的过程记录. 如果没有遇到类似的问题,想直接从零安装上述 ...
- 【linux基础err】NVIDIA-SMI has failed because it could't communicate with the NVIDIA driver.
问题 安装nvidia driver和cuda关机重启之后出现不能进入系统的问题,进入命令行模式使用nvidia-smi检查驱动的问题. nvidia-smi NVIDIA-SMI has faile ...
- Ubuntu 16.04 Install NVidia Driver (download from nvidia official site)
sudo apt-get update sudo apt-mark hold libreoffice sudo apt-get update && sudo apt-get upgra ...
- 查看显卡报错:NVIDIA-SMI has failed because it couldn't communicate with the NVIDIA driver. Make sure that the latest NVIDIA driver is installed and running.
当输入nvidia-smi时出现 NVIDIA-SMI has failed because it couldn't communicate with the NVIDIA driver. Make ...
- ubuntu 16.04 +anaconda3.6 +Nvidia DRIVER 390.77 +CUDA9.0 +cudnn7.0.4+tensorflow1.5.0+neural-style
这是我第一个人工智能实验.虽然原理不是很懂,但是觉得深度学习真的很有趣.教程如下. Table of Contents 配置 时间轴 前期准备工作 anaconda3 安装 bug 1:conda:未 ...
- centos7 intall nvidia driver
此教程是介绍于 CentOS 7 以上的 Linux 系统中安装 NVIDIA 显卡驱动和 CUDA Toolkit .此文中以 CentOS 7.4 64 bit 为例,显卡型号为 NVIDIA T ...
随机推荐
- 软Raid50制作
=====创建Raid50的步骤====== 1.创建分区[root@localhost ~]# fdisk /dev/sdb[root@localhost ~]# fdisk /dev/sdc[ro ...
- pandas 从入门到遗忘
读取大文件(内存有限): import pandas as pd reader = pd.read_csv("tap_fun_test.csv", sep=',', iterato ...
- php关于Session和cookie总结
什么是 Cookie? cookie 常用于识别用户.cookie 是服务器留在用户计算机中的小文件.每当相同的计算机通过浏览器请求页面时,它同时会发送 cookie.通过 PHP,能够创建并取回 c ...
- Linux中配置Aria2 RPC Server
启动Aria2 RPC Server 直接在终端中执行aria2c --enable-rpc --rpc-allow-origin-all可直接开启RPC服务. 这种方法并不能进行个性化的参数设置,需 ...
- bzoj3698 XWW的难题
题意:给你个n * n的实数矩阵,你需要把它中的每个数上/下取整,并满足如下条件: 每行最后一个数等于前面的和. 每列最后一个数等于前面的和. n行n列的那个元素始终为0,不予考虑. 求满足条件下矩阵 ...
- qbxt的题:找一个三元环
有向图中找一个三元环 题意: 考虑 N 个人玩一个游戏, 任意两个人之间进行一场游戏 (共 N*(N-1)/2 场),且每场一定能分出胜负.现在,你需要在其中找到三个人构成的这样的局面:A战胜B,B战 ...
- ffmpeg基本用法
FFmpeg FFmpeg 基本用法 本课要解决的问题 1.FFmpeg的转码流程是什么? 2.常见的视频格式包含哪些内容吗? 3.如何把这些内容从视频文件中抽取出来? 4.如何从一种格式转换为另一种 ...
- teleport使用说明
teleport使用说明 浏览器下载网页:只能浏览主页和少数网页,其它不能浏览,容量几百kb teleport下载项目一能完全离线看网页,7328多文件 9个JPG文件,大小134M te ...
- 配置GitLab Push 自动触发Jenkins构建
配置GitLab Push 自动触发Jenkins构建 作者:尹正杰 版权声明:原创作品,谢绝转载!否则将追究法律责任. 本篇博客是对之前的笔记:https://www.cnblogs.com/yin ...
- 整理备忘一波liunx命令(持续更新)
# 分区挂载 查看当前目录下的文件大小 du --max-depth= -h # 文件操作 # 编辑操作 #liunx 字体设置 苹果方字体下载安装 # 网洛端口 netstat命令各个参数说明如下: ...